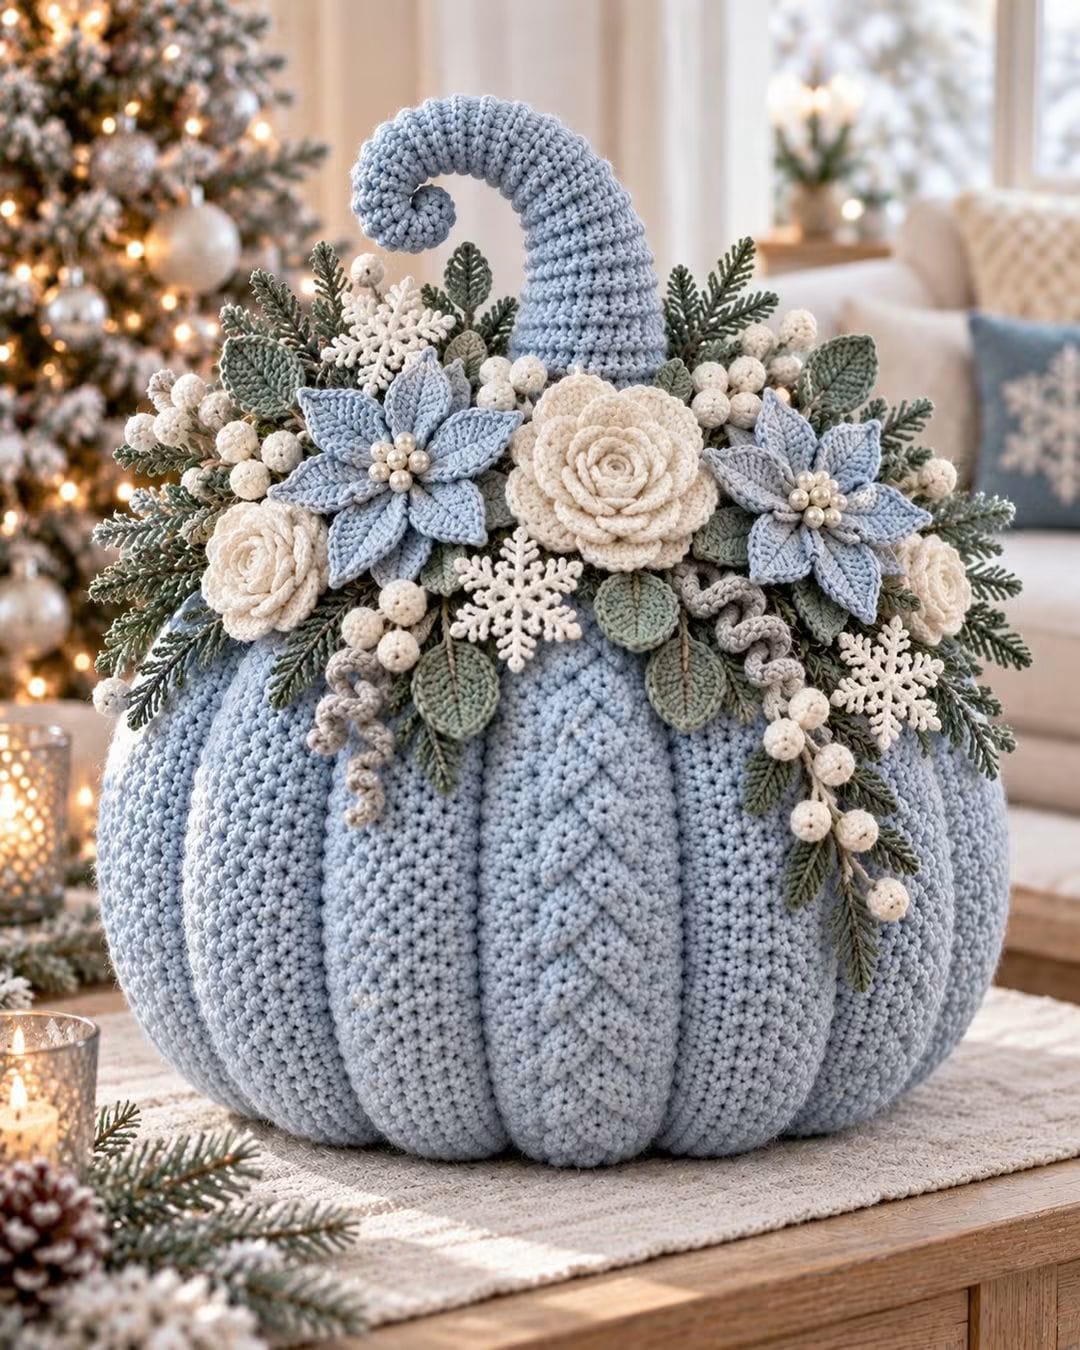
A pumpkin does not normally carry poinsettia-shaped blooms, snowflakes, winter berries, and an icy blue curled stem. That combination defines this winter crochet pumpkin centerpiece. The design uses a stuffed ribbed pumpkin as its structural base, then builds a removable-looking floral crown from crochet roses, blue flowers, leaves, berries, evergreen sprigs, snowflakes, and curling vines. It is an intermediate seasonal decor project designed for a table, mantel, or Christmas display.
The Design: What Makes This Winter Pumpkin Different
The pumpkin body provides the mass needed to support an unusually dense arrangement of crochet decorations. Deep vertical ribs divide the pale-blue body into broad segments, while a raised cable-style panel adds extra definition to the front.
The second structural decision is the oversized curved stem. Instead of a short brown pumpkin stalk, the photograph uses an elongated blue stem that bends forward into a tight curl. A firm internal support is useful for reproducing that shape.
The floral crown creates the winter identity. Cream roses provide large focal points, blue pointed-petal flowers fill the middle layer, and green foliage extends beyond them. White berries, snowflakes, evergreen branches, and gray spiral vines fill the remaining spaces. The arrangement should be assembled only after the stuffed pumpkin has reached its final shape.
Project Info at a Glance
| Skill Level | Intermediate |
|---|---|
| Construction | Stuffed pumpkin with separately crocheted decorations |
| Suggested Yarn | Worsted / Aran weight |
| Suggested Hook | 4–5 mm for body; smaller hook for motifs if required |
| Reference Pumpkin Size | Approximately 15 cm wide × 11.5 cm tall before decorations |
| Best For | Christmas centerpiece, winter table decor, mantel display |
The photograph shows a substantially larger decorative pumpkin than many standard crochet pumpkin patterns. Scale the body according to the intended display area. A published worsted-weight pumpkin reference measures approximately 15 cm wide × 11.5 cm tall using a 5 mm hook and about 76–80 g of yarn.
Materials and Tools
Yarn
- Ice blue — worsted/Aran yarn for the pumpkin and curved stem
- Cream — worsted or DK yarn for roses
- Pale blue — DK or worsted yarn for pointed flowers
- Sage green — DK or worsted yarn for broad leaves
- Dark evergreen — DK yarn for fir-style foliage
- White — cotton or smooth yarn for snowflakes and berries
- Light gray — yarn for spiral vines
- Small amounts of matching colors — for joining and finishing
Additional Materials
- 4–5 mm crochet hook for the pumpkin
- 2.5–3.5 mm crochet hook for smaller decorative motifs
- Polyester fiberfill
- Long tapestry needle
- Stitch markers
- Scissors
- Blocking pins
- Pearl beads for flower centers, optional
- Flexible craft wire or pipe cleaner for the curved stem, optional
Abbreviations
- MR — magic ring
- ch — chain
- sl st — slip stitch
- sc — single crochet
- hdc — half double crochet
- dc — double crochet
- tr — treble crochet
- inc — increase
- dec — decrease
- BLO — back loop only
- FLO — front loop only
- FPdc — front-post double crochet
- st(s) — stitch(es)
- rnd — round
- rep — repeat
Use an invisible decrease when shaping the stuffed body by inserting the hook through the front loops of the next two stitches and completing them together as one single crochet.
Winter Crochet Pumpkin Pattern
The instructions below are an original construction plan based on the visible components of the photographed centerpiece. They are not presented as a transcription of an unidentified commercial pattern.
Pumpkin Body
Yarn: ice blue.
The pumpkin should be worked tightly enough that the stuffing does not show between stitches. A standard worsted-weight decorative pumpkin can use approximately 75–100 g, while a substantially larger centerpiece will require more yarn.
R1: 6 sc in MR (6)
R2: inc × 6 (12)
R3: (sc, inc) × 6 (18)
R4: (2 sc, inc) × 6 (24)
R5: (3 sc, inc) × 6 (30)
R6: (4 sc, inc) × 6 (36)
R7: (5 sc, inc) × 6 (42)
The 42-stitch plateau creates a large amigurumi-style base. For an oversized centerpiece, continue increasing in the same six-stitch progression until the required diameter is reached.
R8–R20: sc around (42)
Begin stuffing before the decreases become too narrow. Add filling gradually and distribute it toward the outer wall.
R21: (5 sc, dec) × 6 (36)
R22: (4 sc, dec) × 6 (30)
R23: (3 sc, dec) × 6 (24)
R24: (2 sc, dec) × 6 (18)
Add the remaining stuffing. The body should be firm enough to hold the weight of the floral crown without collapsing.
R25: (sc, dec) × 6 (12)
R26: dec × 6 (6)
Fasten off, leaving a 40–50 cm tail. Thread through the remaining stitches and close the opening.
Creating the Deep Pumpkin Ribs
The photograph shows pronounced vertical channels rather than a completely smooth sphere. These can be created after stuffing.
Thread a long strand of ice-blue yarn onto a strong tapestry needle. Insert through the bottom center and bring the needle out through the top center.
Wrap the yarn down the outside of the pumpkin and return through the bottom center. Pull until a clear groove forms.
Repeat at evenly spaced positions around the pumpkin.
For eight ribs, divide the circumference into eight equal sections before tightening any strand permanently.
Do not pull one sculpting strand substantially tighter than the others. Unequal tension can tilt the pumpkin or produce lobes of different widths.
Raised Front Cable Panel
The photographed pumpkin includes a prominent chevron or cable-like texture on its front center.
A separate textured strip provides a practical way to reproduce this detail without changing the entire pumpkin construction.
With ice-blue yarn, chain enough stitches for a strip approximately 5–7 cm wide.
Work the strip in rows using front-post stitches, crossed stitches, or alternating diagonal raised stitches.
Continue until the strip runs from close to the bottom center to the upper floral area.
Fasten off with a long sewing tail.
Pin the strip centrally over one pumpkin segment. Sew around its perimeter using small matching stitches.
The lower end should disappear visually into the bottom shaping while the upper edge can be concealed beneath the floral arrangement.
Large Curved Crochet Stem
Yarn: ice blue.
The stem is intentionally exaggerated. Its curved silhouette is one of the strongest identifying details of the centerpiece.
R1: 6 sc in MR (6)
R2: inc × 6 (12)
R3: (sc, inc) × 6 (18)
R4–R18: sc around (18)
Begin stuffing lightly as the tube grows.
For a gradual taper:
R19: (sc, dec) × 6 (12)
R20–R28: sc around (12)
R29: dec × 6 (6)
Fasten off and close.
For the pronounced curl shown in the photograph, insert a flexible pipe cleaner or suitable covered craft wire before closing. Bend the upper third gradually rather than creating one sharp angle.
The final tip should curve inward toward the pumpkin.
If the centerpiece may be handled by children, omit exposed or sharp internal wire and use a firmly sewn soft stem instead.
Large Cream Crochet Rose
Make 1 large focal rose and additional smaller roses as required.
Chain a long foundation approximately 45–55 stitches.
Beginning near the hook, work increasing groups of hdc and dc stitches across the chain to produce a naturally curling strip.
Use smaller stitches at one end and progressively fuller shell groups toward the other end.
Fasten off with a long tail.
Roll the strip tightly from the smaller end to form the center of the rose.
Allow the outer rounds to loosen gradually.
Sew through all layers across the underside several times.
The largest rose should sit slightly off-center beneath the curved stem rather than directly covering the pumpkin’s top opening.
Small Cream Roses
Make two or more smaller roses using the same construction with a shorter foundation chain.
Reduce both the number of stitches and the size of the outer shell groups.
Roll each flower and secure through the base.
Position the smaller roses toward the outer left and right edges of the arrangement.
Blue Pointed-Petal Flowers
Make 2–3.
The photograph shows blue flowers with approximately six pointed petals and pearl-like centers.
Center R1: 6 sc in MR (6)
Center R2: inc × 6 (12)
For each petal, work outward from the center using progressively taller stitches:
Petal: sc, hdc, dc, tr toward the point, then reverse with dc, hdc, sc toward the base.
Repeat until six petals surround the center.
For additional structure, work a second layer of slightly smaller petals behind the first.
Fasten off and block the petals into pointed shapes.
Sew several pearl beads into the center, or replace beads with small cream crochet bobbles.
Cream Crochet Snowflakes
Make 3–5.
Use a smaller hook and smooth cream or white yarn so the branches remain defined.
R1: 6 sc in MR (6)
For each of the six branches, work a chain extending outward from the center.
Add short side chains or picots along each branch.
Slip stitch back toward the center before beginning the next branch.
Repeat six times.
Fasten off and weave in the ends.
Wet-block each snowflake with all six branches pinned symmetrically. Allow it to dry completely before attaching it to the arrangement.
White Crochet Berries
Make 15–25 depending on centerpiece size.
R1: 6 sc in MR (6)
R2: sc around (6)
R3: sc around (6)
Add a tiny amount of fiberfill.
Fasten off with a long tail. Thread the tail through the final six stitches, pull closed, and secure.
Published winter-motif patterns also use a six-single-crochet center followed by straight rounds for compact crochet berries, making this construction suitable for small decorative clusters.
Berry Clusters
Arrange the individual white berries into groups of three to seven.
Sew each berry onto a green foundation chain or directly to a crocheted twig.
Vary the branch lengths. The photograph includes both compact berry clusters near the flowers and longer trailing branches at the outer edges.
Keep the berries small enough that they function as filler rather than competing with the roses.
Sage Crochet Leaves
Make 8–12.
Ch 9.
Beginning in the second chain from the hook, work:
sc, hdc, dc, dc, dc, hdc, sc.
Work several stitches into the final chain to turn around the tip.
Continue down the opposite side of the foundation chain using the reverse stitch sequence.
Join near the base.
For a raised central vein, surface slip stitch from the base toward the point.
Fasten off with a sewing tail.
Evergreen Crochet Sprigs
Make enough to frame the entire arrangement.
With dark sage or evergreen yarn, chain 18–30 stitches depending on the required branch length.
Working back toward the beginning, create short needle-like branches from each side of the foundation.
Alternate their lengths so the sprig tapers naturally toward its point.
Make several short branches for the front and longer branches for the back perimeter.
The longest greenery should extend beyond the flowers by several centimeters to break up the circular outline of the pumpkin.
Gray Spiral Vines
Make 2–4.
Chain 20–30.
Work 2–3 sc into each chain across.
The excess stitches force the chain into a corkscrew shape.
Fasten off with a long attachment tail.
Allow the spiral to hang freely rather than sewing its full length against the pumpkin.
Optional Small Winter Flower
For additional filler, make a compact six-petal flower.
R1: 6 sc in MR (6)
For each petal, work a short combination of sc, hdc, dc, hdc, sc into an available loop or chain space.
Repeat six times.
Use cream, pale blue, or gray according to the surrounding motifs.
Building the Floral Crown
Do not sew decorations permanently as soon as they are completed. The arrangement should be tested as a complete composition first.
Begin by positioning the curved stem at the center rear.
Place the largest cream rose slightly forward and to one side of the stem.
Add the two large blue flowers to the left and right, creating a triangular focal group.
Place smaller cream roses toward the outer edges.
Insert broad sage leaves behind and between the flowers.
Add evergreen branches around the rear perimeter and allow several branches to project sideways.
Position snowflakes where their full six-point outlines remain visible.
Fill small gaps with berry clusters.
Add gray spirals last so they can hang naturally over the pumpkin ribs.
Assembly and Finishing
- Stuff and close the ice-blue pumpkin body, keeping the top and bottom centers aligned.
- Sculpt evenly spaced vertical ribs using long strands of matching yarn.
- Attach the raised cable-style front panel centrally over one pumpkin segment.
- Sew the curved blue stem firmly into the top center and test its stability.
- Pin the large cream rose and blue flowers around the base of the stem.
- Add the smaller cream roses and broad sage leaves around the main flower group.
- Insert evergreen sprigs behind the flowers to create the widest layer of the arrangement.
- Attach the white snowflakes and berry branches in open spaces where their shapes remain visible.
- Sew the gray spiral vines near the front and sides, leaving most of each spiral free.
- Remove all temporary pins, weave the remaining tails into concealed areas, and check that the centerpiece sits level without tipping.
The completed centerpiece should have a stable ribbed pumpkin base, a strongly curved central stem, three-dimensional floral layers, visible snowflakes, trailing berry clusters, and greenery extending beyond the main flower group.
7 Technical Tips for This Winter Crochet Pumpkin
- Mark every pumpkin rib before tightening. Dividing the circumference into eight equal sections prevents one lobe from becoming noticeably narrower than the others.
- Stuff the upper third more firmly than a standard decorative pumpkin. A soft top can collapse under the combined weight of the stem, roses, berries, and foliage.
- Keep sculpting tension consistent. One rib pulled 1–2 cm deeper than its neighbors can shift the apparent center of the pumpkin.
- Pin the entire floral arrangement before sewing. Attaching the first large rose too early can leave insufficient room for the blue flowers and snowflakes.
- Block every snowflake separately. An unblocked six-point motif can curl inward and disappear visually against the surrounding foliage.
- Do not overstuff the small berries. A berry approximately 1.5–2 cm across needs only enough fiberfill to maintain a spherical shape without opening gaps between stitches.
- Test the stem before adding decorations. If the curled stem falls forward under its own weight, reinforce or resew it before the floral crown hides the attachment point.
How to Make a Larger Centerpiece
The photographed winter crochet pumpkin centerpiece is much larger than a typical amigurumi pumpkin. Increasing yarn thickness is the simplest scaling method because it enlarges the body without requiring a complete redesign.
For a large table centerpiece, use bulky yarn and an appropriate hook. Continue the standard six-stitch increase sequence beyond 42 stitches: 48, 54, 60, and so forth. Stop increasing when the flat circle approaches the required base diameter.
Add additional straight rounds to increase height. When decreasing, reverse the increase sequence by removing six stitches per shaping round.
Scale the flowers at the same time. An oversized pumpkin combined with tiny DK-weight roses will leave too much exposed space around the stem.
How to Keep the Pumpkin From Tipping
The decorative crown creates a high center of gravity, particularly when the stem contains internal support.
Keep the pumpkin wider than it is tall. Concentrate dense fiberfill near the lower perimeter and maintain a relatively flat bottom.
For a display-only centerpiece, a small concealed weighted pouch can be placed at the bottom before the final stuffing is added. It must remain fully enclosed inside the crochet body.
Position the largest rose toward the front only after checking the weight of the curved stem. Decorations can then be distributed around the opposite side to balance the composition.
Color Variations
The photographed palette combines ice blue, cream, sage, white, and gray. That restrained scheme allows numerous small motifs to coexist without making the centerpiece visually fragmented.
Alternative palettes include:
- Ivory pumpkin + burgundy flowers + forest green foliage + gold accents
- Sage pumpkin + cream roses + white snowflakes + eucalyptus leaves
- Deep blue pumpkin + silver-gray foliage + white flowers
- White pumpkin + dusty blue flowers + sage foliage + pearl centers
- Soft gray pumpkin + cream flowers + dark green foliage + pale blue accents
Keep the snowflakes light in color so their branching structure remains readable against the foliage.
Making the Decorations Removable
A removable floral crown allows the pumpkin base to be reused outside the Christmas season.
Instead of sewing every motif directly to the body, assemble the flowers, leaves, berries, and evergreen branches onto a separate crocheted circular foundation.
Cut no holes in the pumpkin. Position the finished decorative collar around the stem and secure it with concealed ties or several removable attachment points.
The winter crown can then be replaced with autumn leaves, neutral flowers, or another seasonal arrangement while the same stuffed pumpkin remains intact.
Care and Storage
Three-dimensional flowers and blocked snowflakes can lose their shape if the centerpiece is compressed during storage.
Store the pumpkin upright in a container with enough clearance around the curved stem. Do not place heavy decorations on top of the floral crown.
For dust removal, use a gentle low-suction method rather than pulling individual branches. Check pearl centers and sewn motifs before and after seasonal storage.
If the snowflakes flatten, reshape and block them separately before reinstalling the centerpiece.
Conclusion
A winter crochet pumpkin centerpiece works best when the pumpkin is treated as structural support rather than simply another decorative motif. Complete the stuffed body and sculpt every rib first, then test the curved stem before arranging the flowers. Build the crown from largest to smallest: roses and blue flowers first, leaves and evergreen branches second, followed by snowflakes, berries, and spiral vines. Before sewing anything permanently, photograph the pinned arrangement from the front and both sides to check its balance. Save the finished version to Pinterest and share the display on Instagram with #WinterCrochetPumpkin. For this specific centerpiece, would you keep the oversized curled blue stem or replace it with a shorter traditional pumpkin stem?









