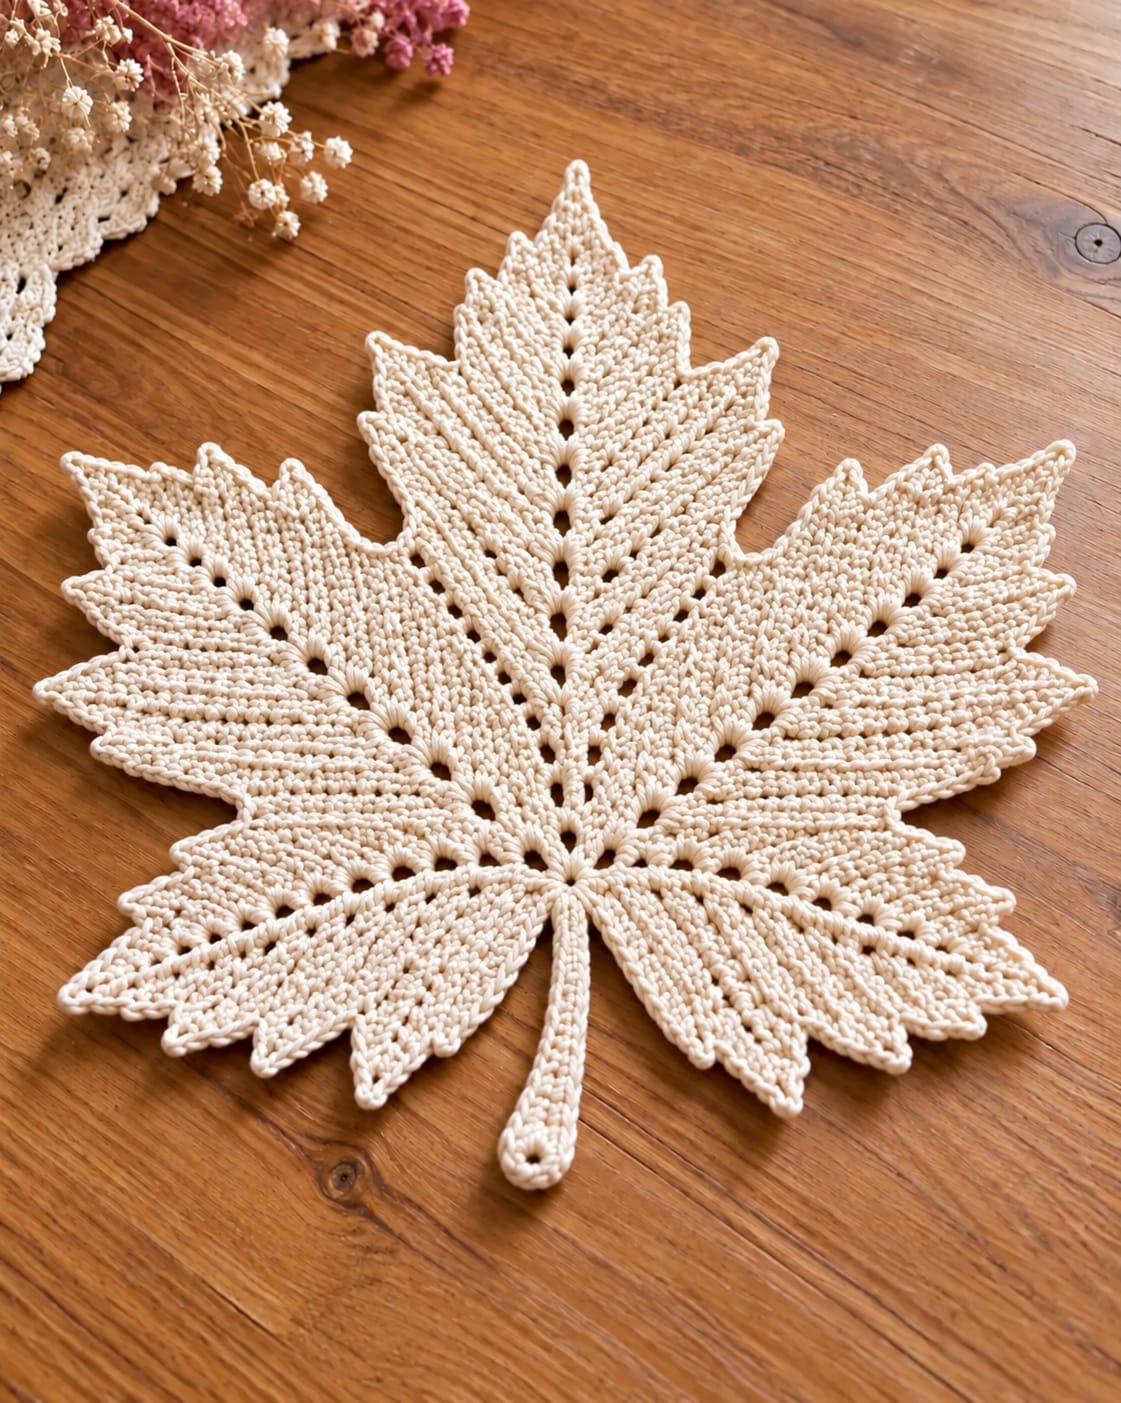
Seven sharply stepped points and a line of open eyelets keep this cream leaf from reading like a generic crochet motif. This crochet maple leaf doily pattern uses cotton yarn, dense textured stitches, openwork vein lines, and a narrow stem to create flat table decor. Published maple-leaf patterns range from small thread motifs to placemats larger than 35 cm, so the construction can be scaled for a centerpiece, placemat, or decorative mat.
The Design: What Makes This Maple Leaf Different
The photograph uses a broad maple silhouette with one tall central lobe, two large side lobes, and lower pointed sections that step inward toward the stem. Each lobe contains a line of regularly spaced openings. Those eyelets function as visual veins while also separating the dense crochet sections.
The second structural feature is directional texture. Rows appear to travel diagonally from the center toward the perimeter, giving each lobe its own grain. This prevents a large cream motif from looking visually flat.
Finally, the perimeter is restrained. There is no heavy lace border. Small pointed tips define the maple outline, while a narrow stem extends directly from the center. The main technical risk is adding too many stitches around the outer points, which causes a crochet maple leaf placemat to ripple instead of lying flat.
Project Info at a Glance
| Skill Level | Intermediate |
|---|---|
| Construction | Flat shaped leaf with openwork vein sections |
| Recommended Yarn | Cotton thread, DK cotton, or worsted cotton |
| Suggested Hook | 3.5–5 mm for a placemat-size version |
| Reference Size | Approximately 25–38 cm depending on yarn and hook |
| Best For | Placemat, centerpiece, fall table decor, decorative doily |
Published maple-leaf crochet patterns vary considerably in scale. A recent worsted-cotton design measures approximately 25.5 × 23 cm with a 3.5 mm hook, while a published Aran-weight placemat measures approximately 36.8 × 38.1 cm with a 5 mm hook. Choose the yarn and hook according to the finished size required.
Materials and Tools
Yarn
- Cream or natural cotton — DK or worsted weight for a placemat-size leaf
- Optional size 10 or size 20 crochet cotton — for a finer doily version
A smooth cotton yarn is preferable when reproducing the photographed texture because it keeps the eyelets, raised lines, and pointed edges clearly defined.
For a medium placemat, prepare approximately 85–140 m of yarn depending on yarn weight, gauge, and finished dimensions. One published worsted-weight maple leaf uses approximately 85–91 m, while another Aran-weight placemat lists about 139 m.
Tools
- 3.5–5 mm crochet hook for DK or worsted cotton
- Tapestry needle
- Locking stitch markers
- Sharp scissors
- Measuring tape
- Blocking mat
- Rust-resistant blocking pins
Abbreviations
- ch — chain
- sl st — slip stitch
- sc — single crochet
- hdc — half double crochet
- dc — double crochet
- tr — treble crochet
- inc — increase
- dec — decrease
- BLO — back loop only
- ch-sp — chain space
- st(s) — stitch(es)
- rep — repeat
- RS — right side
- WS — wrong side
For a crisp decrease in a solid section, work through the appropriate loops of two adjacent stitches before completing them together. Consistent decreases are important at the pointed tips.
Crochet Maple Leaf Doily Pattern
The following instructions provide an original construction method based on the visible structure of the photographed leaf. They are not a transcription of an unidentified commercial pattern.
The design is built around a central axis. Individual sections branch outward to form the upper lobe, two major side lobes, and the lower pointed sections. Open chain spaces create the characteristic vein lines.
Gauge and Finished Size
Gauge is less important than maintaining a flat fabric, but it becomes important when making several matching placemats.
Make a 10 cm square using the main stitch pattern. Wash or dampen the sample and allow it to dry flat before measuring.
For a finished leaf around 30–35 cm, DK or light worsted cotton with a 3.5–4.5 mm hook provides a practical starting point.
Use a smaller hook if the fabric feels loose around the eyelets. Move up one hook size if the solid sections become stiff enough to curl.
Central Foundation
With cream cotton, make a foundation chain long enough to establish the central axis of the leaf body.
For a medium placemat, begin with a foundation approximately 18–22 cm long before shaping.
Do not include the final stem length in this measurement.
Place stitch markers at the approximate locations where the upper side lobes and lower lobes will branch from the center.
The foundation must remain straight because every major section will be positioned relative to this line.
Central Openwork Vein
The photographed leaf has a distinct sequence of openings running from the lower center toward the upper point.
Work the first side of the central foundation using dense stitches.
At regular intervals, replace one solid stitch with a chain space.
A practical sequence is:
Work 3–5 solid stitches, ch 1, skip 1 stitch, continue in pattern.
Repeat the eyelet spacing consistently toward the upper section.
On the following row, work around the chain spaces rather than closing them completely. The openings should remain visible after blocking.
Central Upper Lobe
The upper lobe is the tallest section and establishes the vertical proportion of the maple leaf.
Begin increasing gradually on both sides of the central vein.
Use a combination of sc, hdc, dc, and tr where additional height is needed. Taller stitches toward the center of a shaping group help create the upward angle.
Continue increasing until the lobe reaches its required width.
Work several rows with minimal increases through the middle section.
Begin decreasing symmetrically toward the upper tip.
For the final point, reduce the width rapidly over the last rows until only a narrow tip remains.
Fasten off or continue directly into the perimeter if the construction method permits.
Upper Left Lobe
Join yarn at the marked upper-left branch position.
Work outward while increasing along the outer edge.
Maintain a line of chain spaces running diagonally from the central junction toward the lobe point.
The eyelets should appear as a continuation of the leaf’s vein system rather than isolated decorative holes.
After reaching the broadest portion, begin decreasing.
Use progressively shorter rows or decreases to create the stepped outer point visible in the photograph.
Finish with a narrow pointed tip.
Upper Right Lobe
Join yarn at the corresponding position on the right side.
Repeat the same shaping sequence used for the upper-left lobe.
Count both rows and eyelets. Matching only the overall length is not enough because an extra open space on one side can make the two lobes look structurally different.
Lay the work flat before fastening off.
Measure from the central vein to each outer point. Keep the difference below approximately 1 cm for a symmetrical table piece.
Middle Left Lobe
The middle side lobe creates much of the overall width.
Join below the upper-left section.
Increase more quickly than for the narrow central point so the fabric projects outward.
Establish another diagonal eyelet line from the central junction toward the outer point.
Work dense textured stitches on both sides of the openings.
Begin the decrease section only after the lobe has reached its planned width.
Shape the outer edge into several small steps leading toward one prominent point.
Middle Right Lobe
Repeat the middle-lobe construction on the right side.
Match the number of shaping rows to the left lobe.
Check that the openwork vein begins at the corresponding height.
Do not compensate for a narrower lobe by adding random stitches along the outer edge. Correct the shaping row instead, because uncontrolled increases will cause the perimeter to ripple.
Lower Left Section
The lower section angles downward from the central junction and contains several smaller points.
Join the yarn near the base of the middle-left lobe.
Work outward using short shaped rows.
Maintain one openwork line that travels from the center toward the outer section.
Create two or three progressively smaller points as the edge approaches the stem.
Keep the innermost point shorter than the middle lobe so the maple silhouette remains recognizable.
Lower Right Section
Repeat the lower shaping on the opposite side.
Count every shaping row.
The two lower sections frame the stem, so differences here are especially visible when the leaf is centered beneath a plate or vase.
Finish the last point close to the stem junction.
Creating the Directional Texture
The photographed leaf contains strong lines running from the central veins toward the outer points.
One method is to work selected rows through the back loop only.
Another option is to alternate ordinary single crochet with raised or elongated stitches along the vein-facing edge.
Whichever method is chosen, keep it consistent across corresponding lobes.
The texture should follow the direction of growth: upward in the central lobe, diagonally outward in the side lobes, and downward toward the lower points.
A horizontal texture across every section will reduce the botanical structure visible in the reference.
Openwork Vein Technique
The line of eyelets is one of the most important details in this crochet maple leaf doily.
Create each opening with a controlled chain space rather than stretching an ordinary stitch.
A basic vein opening can be worked as:
Ch 1, skip 1 stitch, continue in pattern.
For a larger opening:
Ch 2, skip 1–2 stitches, continue in pattern.
Use the same opening size throughout a single vein.
The spaces can become slightly smaller as they approach the outer point. This creates a natural taper and prevents the tip from becoming too open.
Shaping the Pointed Edges
The outer silhouette depends on alternating points and valleys.
Build a point by increasing stitch height toward its center:
sc, hdc, dc, tr, dc, hdc, sc.
For a sharper tip, place a short chain or picot at the highest point.
Work shorter stitches as the edge descends into the valley between two points.
Do not place large stitch groups inside the valleys. Extra fabric in those positions produces waves and reduces the definition of the individual lobes.
Outer Edging
The photographed design uses a narrow, firm perimeter rather than a wide decorative border.
Join cream yarn near the base.
Work sc evenly around the leaf.
At each major point, work:
sc, ch 2, sl st into the second ch from hook, sc.
This creates a small controlled tip.
Inside each valley, skip a stitch if necessary to keep the edge flat.
Continue around all lobes until reaching the stem junction.
Do not fasten off if the stem will be worked directly from the border.
Crochet Stem
The stem in the photograph is narrow, straight, and approximately one-third of the lower-lobe length.
From the center base, chain approximately 14–20 stitches depending on the finished leaf size.
Beginning in the second chain from the hook, work sc toward the leaf.
Work around the stem base and continue down the opposite side of the foundation chain.
At the bottom end, work several stitches into one chain to create the rounded tip.
Slip stitch to join.
Fasten off and weave the tail into the reverse side.
Alternative Stem With an Open Tip
The photographed stem appears to contain a small opening near its rounded end.
To reproduce this detail, begin with a small chain loop instead of closing the stem tip completely.
Work sc around the loop, then continue up one side of the stem foundation.
Join the stem to the leaf body, work across the base, and return down the opposite side.
Join at the lower loop.
The opening should remain small enough that it functions as a decorative detail rather than becoming the visual focus.
Blocking the Maple Leaf
Blocking is a structural step for this pattern, not an optional finishing treatment.
Dampen the completed leaf according to the care instructions for the selected cotton yarn.
Place it on a blocking mat.
Pin the top central point first.
Pin the bottom of the stem second so the central axis remains straight.
Next, pin the matching upper-left and upper-right points.
Continue with the middle lobes and then the lower points.
Pin the valleys only after all major points have been positioned.
Measure the left and right sides before allowing the leaf to dry.
Leave it pinned until completely dry.
Assembly and Finishing
- Complete the central foundation and mark every planned lobe junction before extensive shaping begins.
- Work the tall central lobe and maintain a straight sequence of open vein spaces.
- Add the matching upper-left and upper-right sections and compare their lengths.
- Work the broader middle lobes while maintaining symmetrical diagonal eyelet lines.
- Add the lower pointed sections and check that both sides terminate at equal distances from the stem.
- Work the narrow outer edging without adding excess stitches inside the valleys.
- Add the stem directly from the center base and round its lower tip.
- Weave all yarn tails through dense sections on the reverse side.
- Wet-block or damp-block the leaf with every major point pinned individually.
- Allow the piece to dry completely before removing the pins and measuring the final dimensions.
The finished piece should have a straight central axis, balanced left and right lobes, clearly visible openwork veins, multiple sharp perimeter points, and a narrow centered stem.
7 Technical Tips for a Flat Crochet Maple Leaf
- Mark every lobe junction before shaping. Moving one branch by only two or three stitches can make the finished leaf visibly asymmetric.
- Count the eyelets on corresponding lobes. A left section with seven openings and a right section with six will remain visibly different even after aggressive blocking.
- Reduce stitches inside the valleys. Too many stitches between two points create rippling exactly where the outline should turn inward.
- Do not tighten the chain spaces. Uneven eyelets interrupt the vein line and can pull one side of a lobe inward.
- Measure opposite points before adding the edging. Keep the left-to-right difference below approximately 1 cm for a placemat intended to look symmetrical.
- Pin the central point and stem first during blocking. Establishing this axis before the side lobes prevents the entire leaf from drying at an angle.
- Weave each cotton tail at least 5–7 cm through dense stitches. Change direction once before trimming so the ends remain secure after washing and blocking.
How to Make a Placemat-Size Maple Leaf
For a practical dining placemat, target approximately 35–40 cm at the widest point.
Published crochet maple-leaf placemats demonstrate that this size works well with medium-weight cotton. One Aran-weight reference measures 14.5 × 15 inches, approximately 36.8 × 38.1 cm, and uses a 5 mm hook.
Begin with a large gauge sample before changing the stitch structure. If the first leaf is too small, moving from DK to worsted cotton may provide sufficient additional size without altering the proportions.
If additional shaping rows are required, add the same number to corresponding left and right lobes.
How to Make a Smaller Maple Leaf Doily
For a smaller decorative mat, use crochet cotton thread and a steel hook.
A published thread maple-leaf doily uses size 20 cotton, a 1.75 mm hook, and finishes at approximately 30 × 30 cm. Finer thread can reduce the finished scale further.
Do not eliminate the open vein spaces when reducing size. They are a major part of the visual structure.
Instead, shorten the solid sections between openings and reduce the number of shaping rows at the outer points.
Choosing the Best Yarn
Mercerized or tightly spun cotton produces the strongest stitch definition for a cream crochet maple leaf doily pattern.
Acrylic can be used for decorative versions, but it behaves differently during blocking and may produce a softer edge.
For table use, cotton provides enough structure for the points to remain distinct while still allowing the finished leaf to lie flat.
Avoid highly fuzzy yarn. The design depends on small eyelets and directional stitch lines, both of which become less visible when surrounded by a heavy halo.
Color Variations
The cream version works as neutral table decor, but the same construction can be used for an autumn set.
- Natural cream — neutral farmhouse table setting
- Burnt orange — traditional autumn leaf
- Deep rust — Thanksgiving table decor
- Mustard — warm fall centerpiece
- Burgundy — darker seasonal table setting
- Olive green — late-summer or early-autumn version
For a six-place table setting, alternating cream, rust, and mustard leaves provides color variation without requiring changes to the stitch pattern.
How to Keep the Points Sharp
Sharp points depend on both stitch shaping and blocking.
Use taller stitches only near the center of each point. Reduce immediately afterward rather than carrying treble crochet too far along the edge.
A ch-2 or small picot can add a defined tip without increasing the width.
During blocking, insert the pin through the tip itself and pull only enough to straighten the surrounding stitches.
Excessive stretching can make one point longer than its matching point on the opposite side.
Using the Leaf as a Table Centerpiece
A cream leaf can sit directly beneath a vase, candle arrangement, or small autumn centerpiece while leaving the outer points visible.
For dining use, position a plate over the broad center while keeping the upper central point and outer side lobes exposed.
Several leaves can also be arranged down the center of a long dining table. Rotate alternating motifs slightly rather than aligning every stem in exactly the same direction.
When making a coordinated set, record the hook, yarn, finished width, central-lobe length, and number of eyelets after completing the first leaf. Use those measurements as the control specifications for every subsequent piece.
Care Instructions
Follow the washing instructions printed on the yarn label.
After washing, reshape the leaf while damp. Align the stem and upper point first, then arrange corresponding side points in pairs.
Do not hang the wet leaf from its stem because the weight of the water can stretch the narrow section.
Dry the piece flat.
If the points soften after repeated washing, pin them briefly during drying to restore the original outline.
Conclusion
A crochet maple leaf doily pattern depends on symmetry, controlled eyelets, and precise point shaping rather than a decorative border. Establish the central axis first, keep corresponding left and right lobes matched, and treat every chain space as part of the leaf’s vein structure. Before making a full table set, complete and block one leaf, then record its finished width, height, eyelet count, and stem length. That sample becomes the measurement reference for the remaining pieces. Save the finished cream leaf to Pinterest and share the blocked version on Instagram with #CrochetMapleLeafDoily. For this specific design, would you keep the natural cream cotton or make the same openwork leaf in burnt orange?









