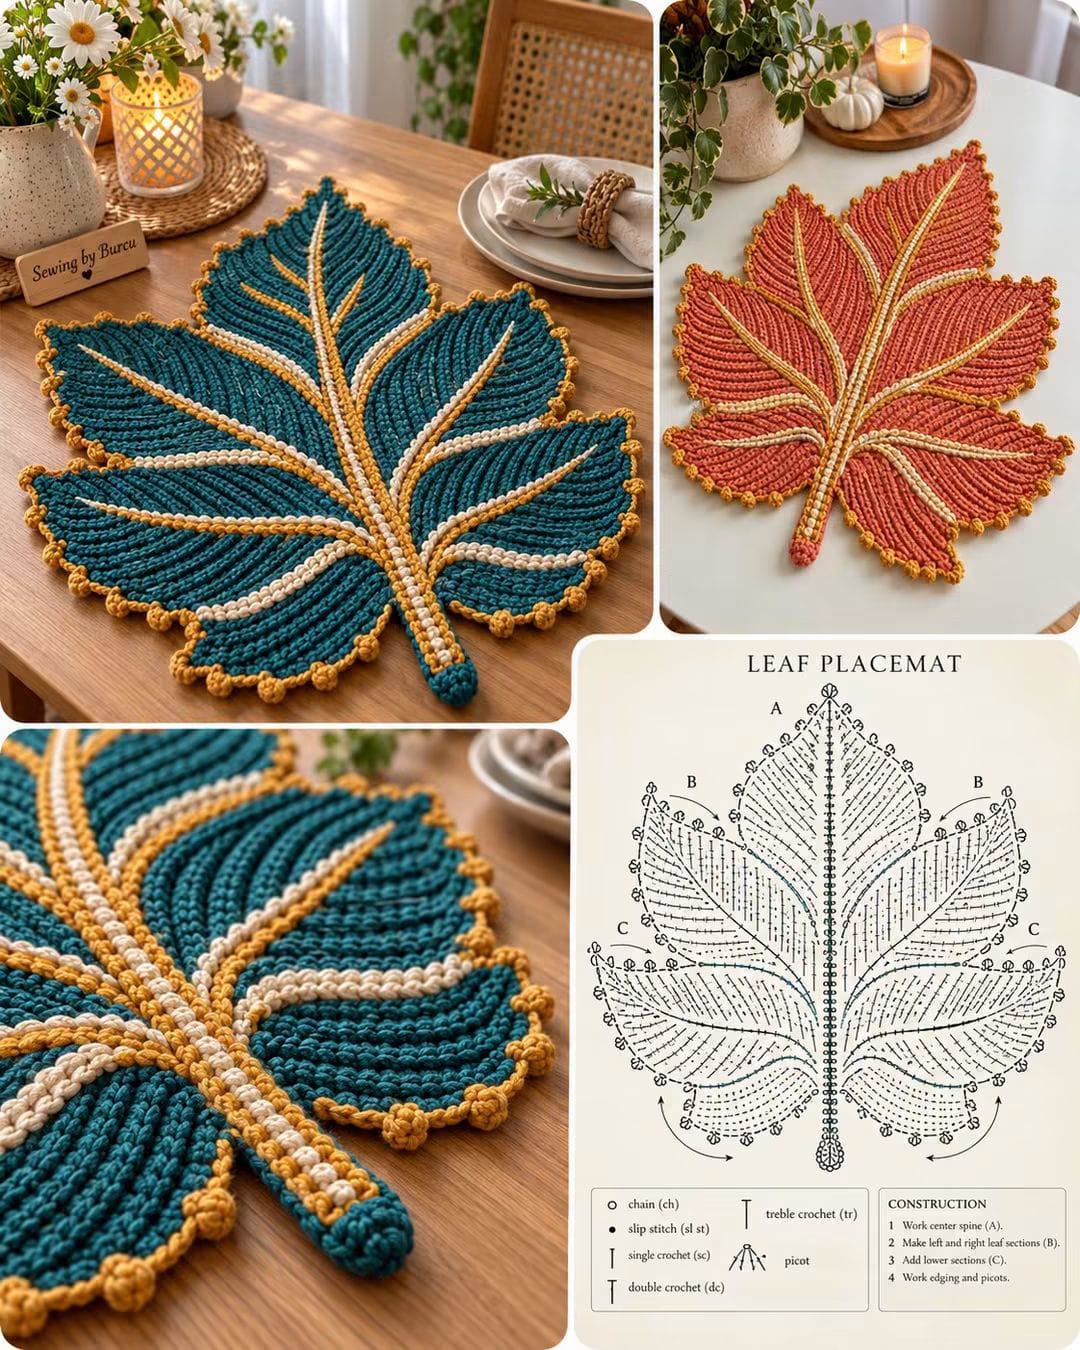
A maple leaf needs five distinct lobes and branching veins before the silhouette reads correctly. This maple leaf crochet placemat uses a firm ribbed fabric, a long central stem, raised contrast-color veins, and a small picot-style border. Worked in cotton or firm worsted-weight yarn, the finished piece can be used as a dining placemat, fall table mat, or decorative centerpiece.
The Design: What Makes This Maple Leaf Different
The structure begins with the central vein rather than a conventional circular center. That decision matters because the spine controls the length, symmetry, and angle of every leaf section.
Five primary lobes form the recognizable maple-leaf silhouette: one tall central lobe, two upper side lobes, and two broad lower lobes. Smaller shaping sections near the base connect those lobes to the stem.
The second defining feature is texture. Rows or ridges travel outward from the veins toward the perimeter, giving each section a directional structure instead of a flat doily appearance.
Finally, contrasting cream and mustard stitches emphasize the central spine and branching veins. The small mustard picots around the perimeter repeat that accent color without covering the main teal or rust leaf fabric.
Project Info at a Glance
| Skill Level | Intermediate |
|---|---|
| Construction | Worked flat in shaped sections |
| Recommended Yarn | Medium / worsted-weight cotton |
| Reference Hook | 5 mm |
| Reference Size | Approximately 37 × 38 cm |
| Best For | Dining placemat, autumn table decor, centerpiece |
The finished dimensions depend on yarn, hook size, tension, and the number of shaping rows. Make a gauge sample before working a matching placemat set.
Materials and Tools
Yarn
- Main color — medium/worsted-weight cotton — teal, rust, burnt orange, or another leaf color
- Vein color — cream or natural cotton
- Accent color — mustard/gold for secondary veins and edging
Cotton is particularly suitable for a placemat because it produces clear stitch definition and a comparatively stable finished fabric. Choose yarns of the same weight for the body, veins, and border so the raised details remain proportional.
Tools
- 5 mm crochet hook
- Tapestry needle
- Locking stitch markers
- Scissors
- Measuring tape
- Blocking pins
Abbreviations
- ch — chain
- sl st — slip stitch
- sc — single crochet
- hdc — half double crochet
- dc — double crochet
- tr — treble crochet
- BLO — back loop only
- inc — increase
- dec — decrease
- st(s) — stitch(es)
- sp — space
- rep — repeat
- RS — right side
- WS — wrong side
A picot can be formed by chaining three stitches and slip stitching into the first chain. Keep every picot approximately the same height so the perimeter remains balanced.
Maple Leaf Crochet Placemat Pattern
This construction is based on the visible characteristics of the photographed leaf rather than a transcription of an unidentified commercial pattern. The leaf is divided into a central spine, five principal lobes, lower connecting sections, raised veins, stem, and decorative edging.
Before You Start
Make one complete placemat before preparing yarn for a matching set. Leaf patterns contain considerably more shaping than rectangular placemats, and small differences in tension can alter both width and lobe length.
The main leaf should lie flat before the raised veins and decorative edging are added. If the body already curls substantially, adding surface crochet will increase the distortion.
Central Spine
Foundation
With the main leaf color, make a foundation chain corresponding to the desired length from the base of the leaf body to the upper point.
For a medium placemat, aim for a finished leaf body around 35–40 cm long including the lower shaping but excluding excessive stem length.
Mark the midpoint and the positions where the upper and lower side lobes will branch from the spine.
The central line must remain straight. A curved foundation will make the two sides appear different even when their stitch counts match.
Central Lobe
The central lobe is the tallest section of the leaf.
Begin at the upper portion of the spine and work outward in shaped rows. Increase gradually as the lobe widens.
Once the required width is reached, work a short section without increases.
Begin decreasing symmetrically toward the point.
Finish with a narrow pointed tip.
Do not make the central lobe excessively wide. Its height should dominate the silhouette, while the upper side lobes supply most of the horizontal width.
Upper Left Lobe
Join the main color at the marked upper-left branching point.
Work outward from the central spine.
Increase through the first section to establish width. Continue with evenly worked rows through the broadest part.
Decrease toward the outer point.
The upper side lobe should angle upward rather than extend directly sideways.
Fasten off after completing the pointed end, leaving sufficient yarn for secure weaving.
Upper Right Lobe
Join yarn at the corresponding position on the opposite side of the spine.
Repeat the same general shaping used for the upper-left lobe.
Count the shaping rows rather than relying only on visual estimation. Matching row counts keep the two sides balanced.
Before fastening off, place the leaf flat and compare both upper points.
A difference greater than approximately 1 cm will be visible once the contrast veins are added.
Lower Left Lobe
Join the main yarn below the upper-left branch.
The lower lobe should be broader and slightly rounder than the upper side lobe.
Increase gradually from the central section, establish the widest portion, and then decrease toward the outer point.
Keep the lower edge gently curved as it returns toward the stem.
Abrupt decreases at the base can produce an unwanted triangular gap between the lobe and stem.
Lower Right Lobe
Repeat the lower-lobe construction on the opposite side.
Use the left section as the measurement reference.
Check the distance from the central spine to the outermost point on both sides.
The lower lobes establish much of the placemat’s usable width, so large differences between them can make plates sit visibly off-center.
Lower Connecting Sections
The photographed leaf includes smaller curved areas between the lower lobes and the base of the central stem.
Work these sections with shorter shaped rows.
Increase toward the outer curve and decrease again as the fabric approaches the stem.
These areas should remain subordinate to the five principal lobes. Making them too large changes the recognizable maple-leaf silhouette.
Creating the Ribbed Leaf Texture
The strong linear texture is one of the defining features of this design.
Work selected rows through the back loop only, or use another raised-ridge method consistently throughout each lobe.
Orient the ridges so they visually travel from each vein toward the outer edge.
The direction matters more than the number of ridges. Randomly changing their angle makes the sections look disconnected.
Keep the ridges firm but not tight. Excessive tension contracts the individual lobes and can make the finished leaf curl upward.
Central Raised Vein
Switch to cream or the selected contrast color.
Beginning near the stem base, surface crochet along the center of the leaf toward the upper tip.
Slip stitches work well for a narrow vein. Single crochet worked around a prepared line can produce a thicker raised effect.
Keep the vein centered throughout its length.
Do not pull the surface stitches tightly. The vein should sit on the fabric without shortening the leaf underneath it.
Secondary Veins
Each main lobe needs a branch connecting it visually to the central spine.
Start near the center and work toward the lobe point.
For the photographed two-color effect, place cream and mustard/gold lines beside one another or alternate the colors between branches.
The upper veins should angle sharply toward the two upper lobes. Lower veins extend more horizontally before curving toward their points.
Keep corresponding left and right branches similar in thickness.
Stem
The stem extends directly from the central vein.
With the main color, attach yarn at the bottom center.
Work a narrow strip approximately 2–3 cm wide. Continue until the stem reaches the desired length.
Taper the final section slightly.
Round the end rather than finishing with a square edge.
Surface crochet cream and mustard stitches along the stem to continue the vein treatment from the leaf body.
Fasten off securely.
Picot-Style Decorative Border
Join mustard or gold yarn near the stem.
Work evenly around the entire leaf perimeter using single crochet as the foundation edging.
At regular intervals, make a small picot:
Ch 3, sl st into the first ch, continue along the edge.
Repeat the picots at consistent intervals.
Place a picot close to each major lobe point so the edging reinforces rather than obscures the leaf silhouette.
When working into concave spaces between lobes, reduce the number of stitches if necessary. Too many stitches in these valleys create ripples.
At sharp outer points, add enough stitches to turn the corner without pulling the fabric.
Alternative Rust Maple Leaf
The same construction can be worked in rust, terracotta, burnt orange, burgundy, mustard, or brown.
For a rust-colored version, use cream for the main raised veins and mustard for the secondary vein or border details.
Do not change hook size when changing only the color. If the replacement yarn has a different thickness, make another gauge sample before beginning the second placemat.
Assembly and Finishing
- Complete the central spine and main upper section first.
- Work the upper-left and upper-right lobes from corresponding branch positions.
- Add the two broad lower lobes and check their width against each other.
- Complete the smaller lower connecting sections around the stem base.
- Work the stem directly from the bottom of the central spine.
- Add the cream central vein from the stem toward the upper point.
- Add matching raised veins from the center toward each principal lobe.
- Work mustard or gold accent stitches beside the selected veins.
- Crochet the perimeter edging and distribute the picots evenly around every lobe.
- Weave all yarn tails, block the five points into position, and allow the placemat to dry completely while flat.
The finished piece should have five clearly defined primary lobes, a straight central spine, balanced branching veins, a narrow stem, and an evenly spaced decorative perimeter.
7 Technical Tips for a Flat Maple Leaf
- Mark every vein junction. A branch beginning even two or three stitches above its matching opposite branch can make the entire leaf appear tilted.
- Measure corresponding lobes before adding the border. Keep the left-to-right difference under approximately 1 cm when making a symmetrical table placemat.
- Do not tighten surface crochet. A short central vein can pull the fabric lengthwise and cause both sides of the leaf to curl upward.
- Reduce edging stitches inside deep valleys. Excess stitches between two lobes cause the inner curve to ripple instead of remaining sharply defined.
- Place a marker at every major leaf point. These markers provide fixed reference positions when distributing picots around an irregular perimeter.
- Block the placemat to its measured dimensions. Pin the central point first, followed by corresponding left and right lobe points, so blocking does not introduce asymmetry.
- Weave each tail at least 5–7 cm through the reverse side. Change direction once before trimming so surface-crochet veins do not loosen during washing or repeated table use.
How to Adjust the Placemat Size
The easiest way to resize this maple leaf crochet placemat is to change the yarn and hook together rather than altering individual lobe proportions.
For a smaller decorative leaf, use sport or DK cotton with an appropriately smaller hook. Keep the same overall proportions between the central lobe, upper lobes, lower lobes, and stem.
For a larger table mat, move to a thicker worsted or bulky cotton and increase the hook size according to the yarn label and your gauge.
Another method is to add shaping rows to each section. If using this approach, add corresponding rows to both left and right lobes. Increasing only one section will change the symmetry.
Choosing Yarn for a Crochet Placemat
A smooth cotton yarn gives the veins and ribbed sections stronger definition than a fuzzy fiber. It also makes the small picot border easier to control.
Medium-weight cotton is a practical starting point for a dining-size leaf. Published maple-leaf placemat designs demonstrate considerable variation: examples use everything from fine crochet thread to worsted and jumbo yarn, so finished dimensions can differ substantially.
For a matching set, purchase all main-color yarn from the same dye lot. The broad leaf surface makes even a modest shade difference easier to see than it would be in a small motif.
Color Combinations
The teal, cream, and mustard version creates strong separation between the leaf body and its raised veins. Rust with cream and gold produces a more traditional autumn palette.
Other combinations can follow the same three-color structure:
- Forest green + cream + copper
- Burgundy + beige + mustard
- Burnt orange + ivory + brown
- Olive green + natural + ochre
- Deep brown + cream + rust
Keep the central vein lighter or darker than the main fabric. Low contrast can hide one of the most important structural details of the leaf.
Blocking the Leaf Shape
Blocking has a direct effect on this project because the outer edge contains multiple points and concave spaces.
Lay the damp placemat on a blocking surface. Pin the central upper point first, then the bottom of the stem.
Next, pin the two upper side lobes at equal distances from the central spine. Repeat with the lower lobes.
Shape the smaller valleys only after all five major points are positioned.
Measure the overall width before the piece dries. Adjust the pins until the left and right sides are balanced.
Allow the placemat to dry completely before removing the pins.
Using the Maple Leaf as a Table Setting
A dining plate should sit over the broad central and lower portions while leaving the upper leaf points visible. This positioning keeps the silhouette recognizable when the placemat is in use.
For a coordinated table, alternate teal and rust leaves while keeping cream and mustard veins consistent across the set.
The same construction can also be made at a smaller scale for coasters or at a larger scale for a table centerpiece. Maintain the five-lobe proportions so the design continues to read as a maple leaf.
Conclusion
A maple leaf crochet placemat relies on controlled shaping more than repetitive stitch counts. Establish the central spine first, match corresponding left and right lobes, and add the raised veins only after the body lies flat. The final picot border should emphasize each point without adding excess stitches inside the valleys. Make one complete sample before crocheting a full dining set, then record its yarn amount, finished dimensions, and lobe measurements for consistent duplicates. Save the finished leaf to Pinterest and share your table setting on Instagram with #MapleLeafCrochetPlacemat. For this design, would you make the first set in teal and mustard or rust and gold?









