Introduction
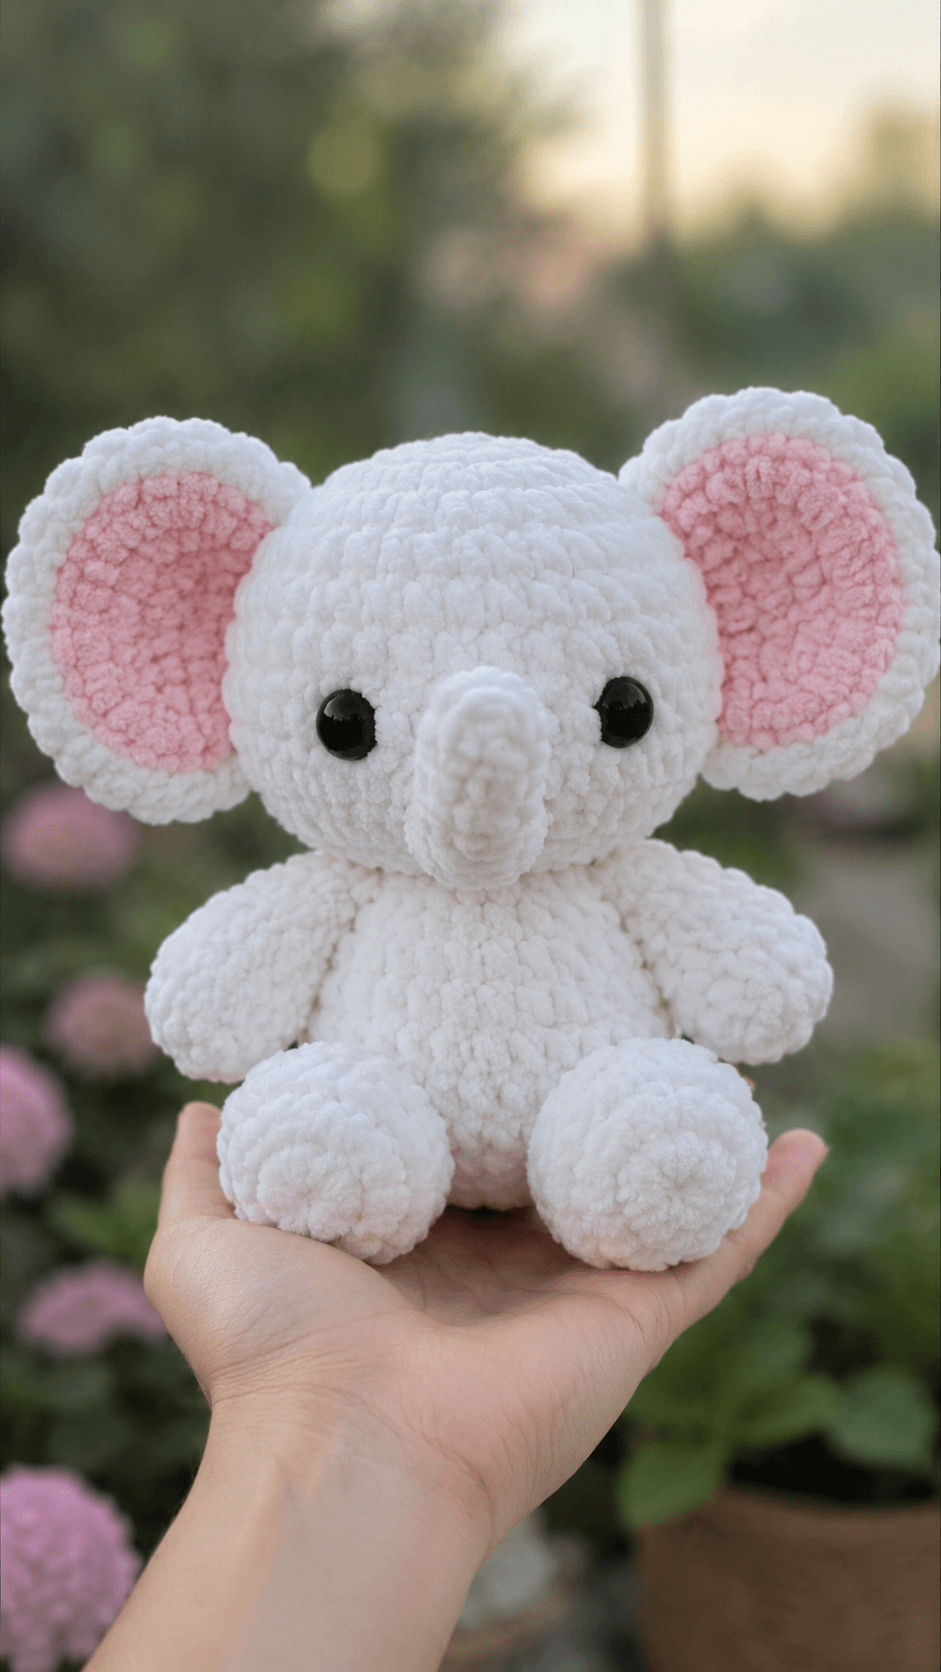
An elephant’s trunk must project from the face without pulling the head forward. This white elephant amigurumi crochet pattern uses super-bulky chenille yarn, a 4.0 mm hook, and 12 mm safety eyes to make a seated toy measuring about 24–27 cm. The pattern suits an advanced beginner familiar with spiral rounds and sewing. Its broad feet and lightly stuffed trunk produce a stable display piece that remains upright.
The Design: What Makes This Elephant Different
The head expands to 42 stitches, while the body stops at 36. That six-stitch difference gives the baby elephant crochet pattern a broad forehead without creating an oversized torso. Each ear consists of a white outer disc and a smaller pink panel, producing a visible border that frames the face. The trunk widens near its attachment point but stays narrow at the tip, reducing weight in front of the safety eyes. Large rounded feet extend beyond the body base so the sitting elephant amigurumi does not roll sideways. One frequent error is placing the ears directly behind the head’s widest point. That position hides the pink sections from the front. This chenille elephant amigurumi attaches each ear slightly forward, with the upper edge beginning near the crown and the lower edge aligned close to the eye line.
Project Info at a Glance
| Skill Level | Time | Finished Size | Hook | Best For |
|---|---|---|---|---|
| Advanced beginner | 6–8 hours | 24–27 cm seated | 4.0 mm | Nursery display, safari collection, handmade plush |
Materials and Tools
Yarn
- White — super-bulky category 6 chenille yarn — approximately 180 g — Hobbii Honey Bunny, Himalaya Dolphin Baby, Premier Parfait Chunky, or a similar plush yarn.
- Soft pink — super-bulky category 6 chenille yarn — approximately 20–25 g — use the same yarn line as the main shade to maintain equal thickness.
- White sewing yarn — smooth worsted-weight cotton or acrylic — approximately 3 g — used where chenille sewing tails may shed.
Tools
- 4.0 mm crochet hook
- Two 12 mm black safety eyes
- Polyester stuffing, approximately 120–150 g
- Large-eye yarn needle
- Locking stitch marker
- Sewing pins, at least 12
- Scissors
- Flexible measuring tape
Abbreviations
- MR — magic ring
- sc — single crochet
- inc — two single crochets in one stitch
- dec — decrease over two stitches
- sl st — slip stitch
- ch — chain
- BLO — back loop only
For an invisible decrease, insert the hook through the front loops of the next two stitches, yarn over, pull through both front loops, then complete one single crochet.
Pattern — Step by Step
Work in a continuous spiral unless a section states otherwise. Mark the first stitch of each round and move the marker only after the round count has been checked.
Head
Yarn: white — standard six-stitch amigurumi shaping.
R1: 6 sc in MR (6)
R2: inc ×6 (12)
R3: (sc, inc) ×6 (18)
R4: (2 sc, inc) ×6 (24)
R5: (3 sc, inc) ×6 (30)
R6: (4 sc, inc) ×6 (36)
R7: (5 sc, inc) ×6 (42)
R8–R15: sc around (42)
R16: (5 sc, dec) ×6 (36)
R17: sc around (36)
R18: (4 sc, dec) ×6 (30)
R19: (3 sc, dec) ×6 (24)
R20: (2 sc, dec) ×6 (18)
R21: (sc, dec) ×6 (12)
R22: dec ×6 (6)
Place the eyes between R12 and R13. Leave eight visible stitches between their inner edges. Fit both washers before finishing R17, then begin stuffing after R18.
Fasten off. Leave a 30 cm tail for closing and attachment.
Body
Yarn: white — standard six-stitch amigurumi shaping.
R1: 6 sc in MR (6)
R2: inc ×6 (12)
R3: (sc, inc) ×6 (18)
R4: (2 sc, inc) ×6 (24)
R5: (3 sc, inc) ×6 (30)
R6: (4 sc, inc) ×6 (36)
R7–R12: sc around (36)
R13: (4 sc, dec) ×6 (30)
R14–R16: sc around (30)
R17: (3 sc, dec) ×6 (24)
R18–R19: sc around (24)
R20: (2 sc, dec) ×6 (18)
R21: sc around (18)
R22: (sc, dec) ×6 (12)
R23: dec ×6 (6)
Pack the lower half firmly, especially around R6–R10. Use less stuffing in the final four rounds so the neck can compress beneath the head.
Fasten off. Leave a 35 cm tail for sewing.
Arms or Front Legs — Make 2
Yarn: white — standard six-stitch shaping.
R1: 6 sc in MR (6)
R2: inc ×6 (12)
R3: (sc, inc) ×6 (18)
R4–R6: sc around (18)
R7: (sc, dec) ×6 (12)
R8–R11: sc around (12)
R12: (2 sc, dec) ×3 (9)
R13–R14: sc around (9)
Stuff R1–R7 firmly. Leave R10–R14 nearly empty so each arm hangs beside the body rather than projecting outward.
Flatten the opening and crochet 4 sc through both layers. Fasten off, leaving a 25 cm tail.
Back Legs and Feet — Make 2
Yarn: white — elongated oval construction.
R1: ch 5. Starting in the second chain from the hook, 3 sc, 3 sc in the last chain, 2 sc along the opposite side, inc in the final chain (10)
R2: inc, 2 sc, inc ×3, 2 sc, inc ×2 (16)
R3: (sc, inc), 2 sc, (sc, inc) ×3, 2 sc, (sc, inc) ×2 (22)
R4: 2 sc, inc, 3 sc, (2 sc, inc) ×3, 3 sc, (2 sc, inc) ×2 (28)
R5–R7: sc around (28)
R8: 8 sc, dec ×6, 8 sc (22)
R9: 6 sc, dec ×5, 6 sc (17)
R10: 5 sc, dec ×3, 6 sc (14)
R11–R12: sc around (14)
R13: (5 sc, dec) ×2 (12)
Stuff the toe firmly and keep the rear third softer. Shape the front into a rounded dome measuring approximately 8 cm across.
Flatten the opening and crochet 6 sc through both layers. Fasten off, leaving a 30 cm sewing tail.
Outer Ears — Make 2
Yarn: white — worked in joined rounds to keep each disc flat.
R1: 6 sc in MR; join with sl st (6)
R2: ch 1, inc ×6; join with sl st (12)
R3: ch 1, (sc, inc) ×6; join with sl st (18)
R4: ch 1, (2 sc, inc) ×6; join with sl st (24)
R5: ch 1, (3 sc, inc) ×6; join with sl st (30)
R6: ch 1, (4 sc, inc) ×6; join with sl st (36)
R7: ch 1, (5 sc, inc) ×6; join with sl st (42)
Do not stuff. Block each ear by hand into a circle approximately 11–12 cm across. A small amount of waviness at the edge will settle during attachment.
Fasten off. Leave a 40 cm tail for sewing.
Pink Inner Ears — Make 2
Yarn: soft pink — worked in joined rounds.
R1: 6 sc in MR; join with sl st (6)
R2: ch 1, inc ×6; join with sl st (12)
R3: ch 1, (sc, inc) ×6; join with sl st (18)
R4: ch 1, (2 sc, inc) ×6; join with sl st (24)
R5: ch 1, (3 sc, inc) ×6; join with sl st (30)
R6: ch 1, (4 sc, inc) ×6; join with sl st (36)
Do not stuff. Center each pink panel on an outer ear, leaving an even white border of approximately 10–12 mm.
Fasten off. Leave a 30 cm tail for sewing the panel to the white ear.
Trunk
Yarn: white — tapered tube based on published elephant-trunk construction.
R1: 6 sc in MR (6)
R2–R4: sc around (6)
R5: 2 sc, inc, 2 sc, inc (8)
R6–R7: sc around (8)
R8: (3 sc, inc) ×2 (10)
R9–R10: sc around (10)
R11: (4 sc, inc) ×2 (12)
R12: sc around (12)
R13: (sc, inc) ×6 (18)
R14: sc around (18)
Place a very small amount of stuffing in R7–R14 only. Leave the tip empty, then bend it slightly downward before pinning the base between the eyes.
Fasten off. Leave a 30 cm tail for attachment.
Tail
Yarn: white — chain-and-tassel construction.
Row 1: ch 9 (9)
Row 2: starting in the second chain from the hook, sl st in each chain (8)
Cut three white strands measuring 7 cm. Fold them through the last stitch, knot firmly, and trim the tuft to 2 cm.
Fasten off, leaving a 20 cm sewing tail.
Optional Cheek Patches — Make 2
Yarn: white — flat-circle construction used to build a shallow facial plane beneath the eyes.
R1: 6 sc in MR (6)
R2: inc ×6 (12)
Do not stuff. These white patches remain subtle against the head and may be omitted when the trunk base already covers the lower face.
Join with a sl st. Fasten off, leaving a 15 cm tail.
Assembly
- Close the final six head stitches by threading the tail through the front loops and pulling the opening shut.
- Position the head over the body with the eye line centered above the body’s front midpoint, then sew through two full rounds at the neck.
- Pin the optional cheek patches beneath the eyes, keeping their inner edges behind the future trunk base, and sew around their outer loops.
- Place the trunk between the eyes with its upper edge approximately one round below them. Sew around the 18-stitch base twice.
- Pin the arms between body R15 and R18, leaving about 7 cm between their upper attachment points. Angle both arms toward the front.
- Attach the back legs across body R6–R10. Keep 2.5–3 cm between the inner edges and test the sitting balance before tightening the stitches.
- Sew each pink inner panel to a white outer ear using small stitches placed one row inside the pink edge.
- Pin the completed ears to the sides of the head from approximately R4 to R14. Keep the pink panels facing forward and the lower ear edges level with the eyes.
- Sew the tail to the center back across body R7–R9, keeping the tuft above the sitting surface.
- Weave each tail through three separate stitch paths, trim the ends, and redistribute the stuffing around the neck, feet, and trunk base.
The completed elephant should sit on both feet without the trunk or ears rotating the head forward.
7 Technical Tips
- Round-marker displacement: Losing the first stitch can rotate the head decreases and move the eye line off center. Count all 42 stitches at the end of every plateau round before moving the marker.
- Soft ear edges: Loose outer rounds allow the 11–12 cm ears to fold behind the head. Tighten the final 42-stitch round or add a second surface-crochet line around the rear edge.
- Visible decrease holes: Ordinary two-stitch decreases may expose white stuffing through chenille fibers. Work through the front loops only and reduce the hook to 3.5 mm if any opening exceeds 2 mm.
- Incorrect eye timing: The safety-eye washers cannot pass through the neck after the head reaches 18 stitches. Install both 12 mm eyes before completing R18 and confirm eight visible stitches between their inner edges.
- Overstuffed trunk: Dense filling in the first six rounds makes the tip rigid and pushes it away from the face. Leave the lower 3 cm empty and use less than a thumb-sized piece of stuffing in the complete trunk.
- Asymmetrical ear placement: A vertical difference of 5 mm becomes obvious because each ear is nearly as wide as the head. Measure both upper attachment points from the center MR before sewing either ear permanently.
- Loose sewing tails: Chenille can strip from its core when pulled repeatedly through dense fabric. Use a smooth white sewing yarn for load-bearing seams and weave it horizontally, vertically, and diagonally before trimming.
Conclusion
Check the elephant from the front, side, and rear before cutting the final sewing strands. Both pink ear panels should remain visible from the front, the trunk should end above the body, and the feet should share the toy’s weight evenly. Record the finished height, ear diameter, eye spacing, yarn brand, and hook size before making another version. Save this white elephant amigurumi crochet pattern to Pinterest, then post the completed plush on Instagram with #PinkEarElephant. For the next elephant, would you keep the ears circular as shown, or reduce the lower edge by six stitches to produce a more tapered ear shape?









