Introduction
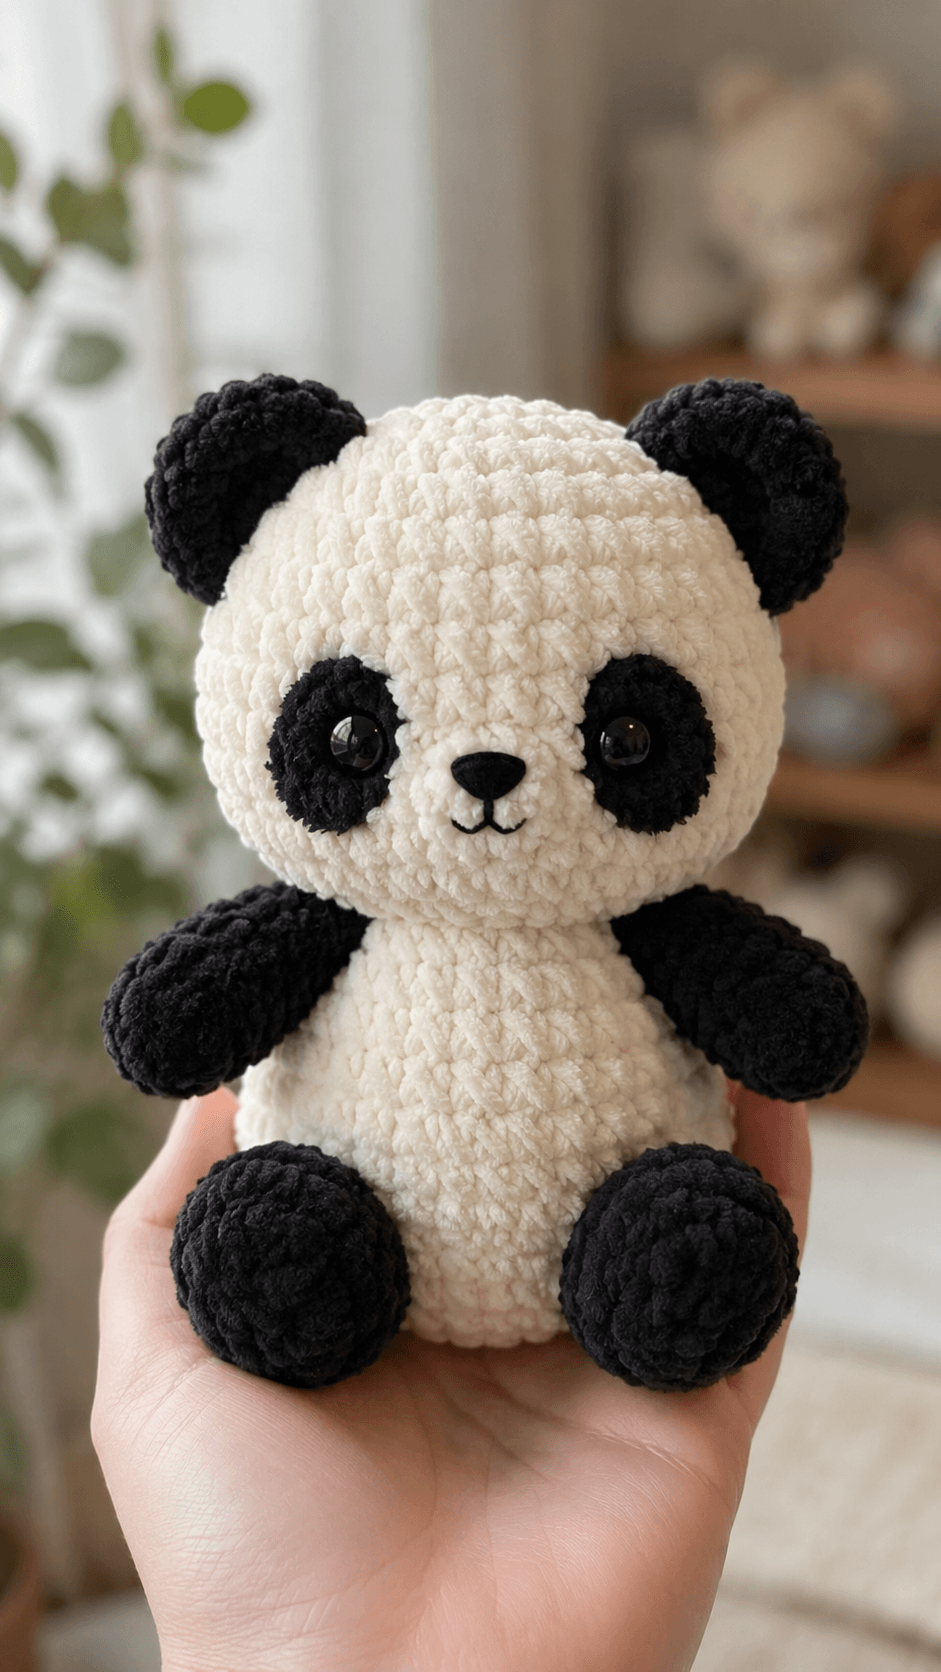
A panda’s black eye patches can make a crochet face look crossed, sleepy or uneven when their angles differ by only one stitch. This panda amigurumi crochet pattern uses bulky chenille, a 4 mm hook and 15 mm safety eyes to make a sitting cub about 20 cm tall. The project requires basic spiral crochet and careful assembly. Its wide feet create a stable base for shelf display and front-facing project photographs.
The Design: What Makes This Panda Different
The head reaches a 36-stitch plateau and remains at that count for eight rounds, producing the broad forehead and rounded cheeks visible in the photograph. Separate oval eye patches are sewn diagonally before the safety eyes are locked, which gives you more control than changing colors inside the head rounds. The white muzzle projects slightly from the face so the black nose does not disappear against the eye markings. Below the head, a short pear-shaped body keeps the black arms and feet visually separate. One frequent error in a plush panda crochet pattern is positioning the patches as vertical circles. Real panda markings angle downward toward the nose, and the photographed toy follows that visual structure. This chenille panda amigurumi also uses oversized back feet to support the larger head without plastic pellets or an internal frame.
Project Info at a Glance
| Skill Level | Time | Finished Size | Hook | Best For |
|---|---|---|---|---|
| Intermediate beginner | 5–7 hours | Approximately 20 cm sitting | 4 mm | Display, gifting and plush photography |
The finished measurement assumes bulky weight #5 chenille and firm amigurumi tension. A different yarn, hook or stuffing density will alter the final height and width.
Materials and Tools
Yarn
- Ivory white — bulky weight #5 polyester chenille or velvet — approximately 90–110 g — Bernat Velvet, Big Twist Baby Bear, Hobbii Honey Bunny or a comparable plush yarn.
- Black — bulky weight #5 polyester chenille or velvet — approximately 80–100 g — use the same product line as the ivory yarn to keep the stitch gauge consistent.
- Black embroidery yarn — DK cotton or six-strand embroidery floss — less than 5 g — used for the nose and mouth.
Tools
- 4 mm crochet hook
- Two 15 mm black safety eyes
- Polyester stuffing, approximately 70–90 g
- Large-eye yarn needle
- Embroidery needle
- Locking stitch marker
- Straight pins
- Sharp scissors
Replace plastic safety eyes with embroidered eyes when making the panda for a child under three years old. Plastic components can become a choking hazard if the backing or surrounding fabric fails.
Abbreviations
- MR — magic ring
- sc — single crochet
- inc — two single crochets in one stitch
- dec — invisible decrease over two stitches
- sl st — slip stitch
- ch — chain
- BLO — back loop only
To make an invisible decrease, insert the hook through the front loops of the next two stitches, yarn over, pull through both loops, then complete one single crochet.
Pattern — Step by Step
Work in a continuous spiral unless the instructions state otherwise. Put a locking marker in the first stitch of every round and move it after completing the round.
Head
Yarn: ivory white. Stitch source: standard six-stitch amigurumi shaping adapted to the photographed proportions.
R1: 6 sc in MR (6)
R2: inc ×6 (12)
R3: (sc, inc) ×6 (18)
R4: (2 sc, inc) ×6 (24)
R5: (3 sc, inc) ×6 (30)
R6: (4 sc, inc) ×6 (36)
R7–R14: sc around (36)
R15: (4 sc, dec) ×6 (30)
R16: (3 sc, dec) ×6 (24)
Do not attach the safety eyes yet. The posts will pass through the separate black eye patches and the head fabric during facial assembly.
R17: (2 sc, dec) ×6 (18)
Stuff the forehead and side walls firmly. Add smaller pieces around the lower face so the front remains rounded rather than pointed.
R18: (sc, dec) ×6 (12)
R19: dec ×6 (6)
Fasten off. Thread the tail through the front loops of the final six stitches and pull the opening closed. Weave the tail through the stuffed head.
Body
Yarn: ivory white.
R1: 6 sc in MR (6)
R2: inc ×6 (12)
R3: (sc, inc) ×6 (18)
R4: (2 sc, inc) ×6 (24)
R5: (3 sc, inc) ×6 (30)
R6: (4 sc, inc) ×6 (36)
R7–R9: sc around (36)
R10: (4 sc, dec) ×6 (30)
R11–R12: sc around (30)
R13: (3 sc, dec) ×6 (24)
R14–R15: sc around (24)
R16: (2 sc, dec) ×6 (18)
R17: sc around (18)
R18: (sc, dec) ×6 (12)
Stuff the lower body firmly enough to resist compression beneath the head. Keep the final two rounds slightly softer so the neck seam can sit flat.
Fasten off. Leave a 40 cm tail for sewing the body to the head.
Front Arms — Make Two
Yarn: black.
R1: 6 sc in MR (6)
R2: inc ×6 (12)
R3: (sc, inc) ×6 (18)
R4–R5: sc around (18)
R6: (sc, dec) ×6 (12)
R7–R10: sc around (12)
Stuff the paw end firmly and the upper half lightly. Flatten the final opening so the arm lies against the curved body.
R11: Crochet 6 sc through both layers of the flattened opening (6).
Fasten off. Leave a 30 cm sewing tail.
Back Legs — Make Two
Yarn: black.
R1: 6 sc in MR (6)
R2: inc ×6 (12)
R3: (sc, inc) ×6 (18)
R4: (2 sc, inc) ×6 (24)
R5–R7: sc around (24)
R8: (2 sc, dec) ×6 (18)
R9: sc around (18)
R10: (sc, dec) ×6 (12)
Fill each foot firmly, adding slightly more stuffing toward the front. The back surface should remain flatter where it meets the body.
R11: dec ×6 (6).
Fasten off. Close the remaining six stitches and leave a 35 cm tail for attachment.
Ears — Make Two
Yarn: black.
R1: 6 sc in MR (6)
R2: inc ×6 (12)
R3: (sc, inc) ×6 (18)
R4–R5: sc around (18)
Add a small amount of stuffing. Each ear should remain compressible and approximately 5 cm wide after flattening.
Fold the opening flat and crochet 9 sc through both layers (9).
Fasten off. Leave a 30 cm sewing tail.
Eye Patches — Make Two
Yarn: black. Work in joined rounds so the oval can be blocked before attachment.
Ch 5.
R1: Starting in the second ch from the hook, 3 sc, 3 sc in the final ch; continue along the opposite side of the foundation chain, 2 sc, inc in the final ch (10)
R2: inc, 2 sc, inc ×3, 2 sc, inc ×2 (16)
R3: (sc, inc), 2 sc, (sc, inc) ×3, 2 sc, (sc, inc) ×2 (22)
R4: sc around (22)
Join with a sl st. Fasten off and leave a 25 cm sewing tail.
Rotate each patch so its long axis slopes downward toward the center of the face. The left and right pieces must mirror each other rather than tilt in the same direction.
Muzzle
Yarn: ivory white.
R1: 6 sc in MR (6)
R2: inc ×6 (12)
R3: (sc, inc) ×6 (18)
Join with a sl st. Fasten off and leave a 30 cm sewing tail.
Do not stuff the muzzle heavily. A thin layer behind the center is enough to raise the nose area without producing a separate spherical snout.
Tail
Yarn: black.
R1: 6 sc in MR (6)
R2: inc ×6 (12)
R3–R4: sc around (12)
R5: (sc, dec) ×4 (8)
Add a small pinch of stuffing.
Fasten off. Leave a 20 cm tail.
Nose and Mouth
Use black DK yarn or embroidery floss.
Embroider a triangular nose approximately 18 mm wide across the upper center of the muzzle. Pass the thread vertically down through one stitch below the triangle. Add one curved stitch toward the left and a matching curved stitch toward the right, keeping the finished mouth no wider than 22 mm.
Assembly
- Pin the body beneath the head, centering the neck across the lower head rounds.
- Sew the body to the head with close mattress stitches, adding a final amount of stuffing before closing the seam.
- Position the black eye patches across R9–R13 of the head with their lower inner edges angled toward the muzzle.
- Insert each 15 mm eye through the center of its patch and through the head, leaving approximately eight visible white stitches between the inner edges of the patches.
- Lock the eye washers, then sew around each patch without stretching the oval out of shape.
- Place the muzzle between the lower inner corners of the patches and sew around its edge, adding a thin layer of stuffing before closing.
- Embroider the nose and divided mouth, centering the vertical line directly beneath the midpoint between the eyes.
- Attach the arms to the upper sides of the body and sew the back legs low enough for both feet to touch the sitting surface.
- Sew the ears between R3 and R7 of the head, then attach the tail to the lower rear body.
- Bury every yarn tail through at least 4 cm of stuffed fabric, trim it and massage the surface until the cut end retracts.
The finished panda should remain seated with the head upright, both feet level and the eye patches forming mirrored diagonal ovals.
7 Technical Tips
- Spiral-round drift: A misplaced marker shifts the face center and can leave the muzzle one or two stitches off-axis. Count all increase and decrease rounds before beginning the next plain round.
- Flattened head: Stuffing the forehead below about 80% firmness allows the ears and body seam to compress the shape. Add small pieces around the outer wall rather than forcing one large clump into the center.
- Open decrease holes: A standard two-stitch decrease can expose white stuffing through black chenille. Work through the two front loops and keep the working loop close to the 4 mm hook shaft.
- Crossed-looking eyes: Eye patches placed vertically direct both eyes toward the nose. Tilt each oval about 20–30 degrees downward at the inner edge before inserting the eye posts.
- Stripped chenille fibers: Repeatedly pulling out stitches can remove the pile and expose the internal cord. Test the first three rounds for gauge before completing a full component.
- Uneven sitting base: A back leg attached 10 mm higher than the other causes the panda to lean. Pin both legs, place the panda on a level table and compare the foot contact points before sewing.
- Loose sewn parts: A single pass around the ears or limbs can stretch under handling. Sew each edge in both directions and bury the tail through at least three internal stitch paths.
Conclusion
Check the facial layout before fitting the eye washers, because the oval patch angle cannot be corrected after the plastic backs are locked. Photograph the pinned face from directly in front and compare the white space beside the muzzle on both sides. Next, test the seated body on a level surface before securing the legs and tail. Save the yarn label, hook size and finished measurement with this panda amigurumi crochet pattern so later versions can be matched accurately. Share a vertical photograph on Pinterest and post front and side views on Instagram with #BambooPatchPanda. Should this panda’s eye patches remain narrow and diagonal, or be widened by one additional round?









