Introduction
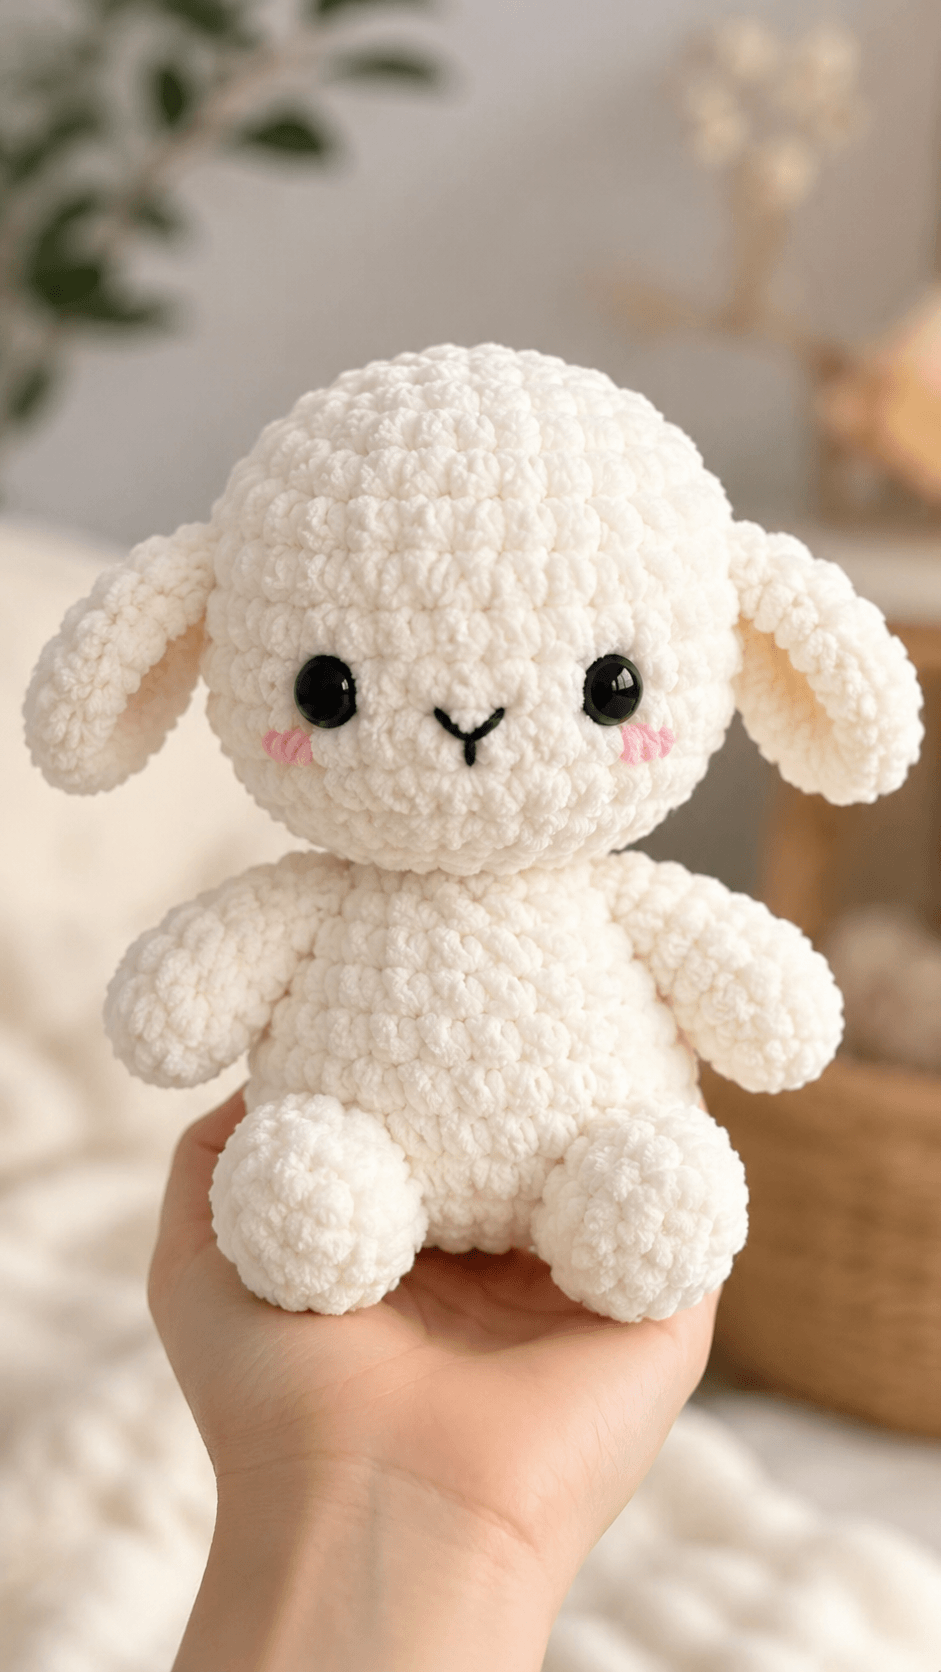
A lamb’s ears leave the skull sideways before gravity pulls their tips down. This lamb amigurumi crochet pattern reproduces that structure with folded, unstuffed ear pieces, chunky chenille yarn and a compact 36-stitch head. Use a 4 mm hook to make an intermediate-level lamb measuring approximately 18–20 cm tall. The broad feet and weighted lower body create a stable seated toy for nursery shelves or spring displays.
The Design: What Makes This Lamb Different
The head is wider than the body and carries most of the visual weight, matching the juvenile proportions visible in the photograph. Its muzzle is not a separate oval patch. Instead, a shallow circular piece adds only enough projection for the embroidered nose, preventing the face from resembling a bear or puppy. The floppy ears begin near the widest head round and angle slightly downward before curving toward the cheeks.
The body narrows above the belly so the arms can hang beside the torso without spreading outward. Rounded back feet sit forward of the hips and act as two support points. This structure gives the chenille lamb crochet pattern a reliable seated position. A common mistake in a plush sheep amigurumi is attaching the ears too high. High ear placement creates a rabbit-like silhouette, while low horizontal placement preserves the lamb profile.
Project Info at a Glance
| Skill Level | Time | Finished Size | Hook | Best For |
|---|---|---|---|---|
| Intermediate | 5–7 hours | Approximately 18–20 cm seated | 4 mm | Spring displays, nursery decoration and handmade gifts |
Materials and Tools
Yarn
- Cream white — bulky chenille or velvet yarn — 100–120 g — Himalaya Dolphin Baby, YarnArt Dolce or Premier Parfait Chunky.
- Pale pink — smooth DK cotton or acrylic — less than 5 g — use for the cheek marks.
- Black — smooth DK cotton or acrylic — less than 5 g — use for the nose and mouth.
- Optional sewing yarn — strong cream acrylic — use for structural seams when the chenille core breaks during sewing.
Tools
- 4 mm crochet hook
- 12 mm safety eyes
- Polyester fiberfill
- Yarn needle
- Embroidery needle
- Locking stitch markers
- Long straight pins
- Scissors
Replace plastic safety eyes with tightly embroidered eyes when the finished lamb will be handled by a child under three years old.
Abbreviations
- MR — magic ring
- sc — single crochet
- inc — two single crochets in one stitch
- dec — invisible decrease over two stitches
- sl st — slip stitch
- ch — chain
- BLO — back loop only
- st/sts — stitch/stitches
Work an invisible decrease through the front loops of the next two stitches to limit gaps in the stuffed fabric.
Pattern — Step by Step
Work in continuous spirals unless a section states otherwise. Mark the first stitch of every round. The head uses a 36-stitch plateau, which matches the required medium component size.
Head
Yarn: cream white — standard six-stitch amigurumi shaping.
R1: 6 sc in MR (6)
R2: inc ×6 (12)
R3: (sc, inc) ×6 (18)
R4: (2 sc, inc) ×6 (24)
R5: (3 sc, inc) ×6 (30)
R6: (4 sc, inc) ×6 (36)
R7–R13: sc around (36)
Place the 12 mm safety eyes between R10 and R11. Leave seven visible stitches between the posts. Pin the muzzle before fixing the eye backs.
R14: (4 sc, dec) ×6 (30)
R15: (3 sc, dec) ×6 (24)
Begin stuffing. Fill the crown first, then press smaller pieces around the eye posts.
R16: (2 sc, dec) ×6 (18)
R17: (sc, dec) ×6 (12)
Add enough filling to maintain a round profile without stretching the chenille stitches.
R18: dec ×6 (6)
R19: sc around (6)
R20: dec ×3 (3)
Fasten off. Leave a 15 cm tail, pass it through the remaining front loops and close the opening.
Body
Yarn: cream white — standard six-stitch amigurumi shaping.
R1: 6 sc in MR (6)
R2: inc ×6 (12)
R3: (sc, inc) ×6 (18)
R4: (2 sc, inc) ×6 (24)
R5: (3 sc, inc) ×6 (30)
R6–R10: sc around (30)
R11: (3 sc, dec) ×6 (24)
R12–R13: sc around (24)
R14: (2 sc, dec) ×6 (18)
R15–R16: sc around (18)
Stuff the lower body firmly. Press the starting ring against a flat surface to form a stable base.
R17: (sc, dec) ×6 (12)
R18: dec ×6 (6)
Fasten off. Leave a 30 cm tail for joining the body to the head.
Arms and Front Legs — Make 2
Yarn: cream white — standard six-stitch amigurumi shaping.
R1: 6 sc in MR (6)
R2: inc ×6 (12)
R3: (sc, inc) ×6 (18)
R4–R6: sc around (18)
R7: (sc, dec) ×6 (12)
Place a small amount of stuffing in the rounded end only.
R8–R12: sc around (12)
R13: (sc, dec) ×4 (8)
R14: sc around (8)
Flatten the opening and work 4 sc through both layers (4).
Fasten off. Leave a 25 cm sewing tail.
Back Legs and Feet — Make 2
Yarn: cream white — standard six-stitch amigurumi shaping.
R1: 6 sc in MR (6)
R2: inc ×6 (12)
R3: (sc, inc) ×6 (18)
R4: (2 sc, inc) ×6 (24)
R5–R7: sc around (24)
R8: (2 sc, dec) ×6 (18)
R9: (sc, dec) ×6 (12)
Stuff the front of the foot firmly. Use less filling near the attachment opening.
R10–R12: sc around (12)
R13: dec ×6 (6)
Fasten off. Leave a 30 cm sewing tail.
Floppy Ears — Make 2
Yarn: cream white — elongated oval construction.
R1: 6 sc in MR (6)
R2: inc ×6 (12)
R3: (sc, inc) ×6 (18)
R4–R7: sc around (18)
R8: (sc, dec) ×6 (12)
R9–R10: sc around (12)
R11: (sc, dec) ×4 (8)
Do not stuff. Flatten each ear, then fold the lower corners toward each other to create a shallow central crease.
Fasten off. Leave a 25 cm tail for sewing.
Muzzle
Yarn: cream white — shallow circular construction.
R1: 6 sc in MR (6)
R2: inc ×6 (12)
R3: (sc, inc) ×6 (18)
R4: sc around (18)
Fasten off. Leave a 25 cm tail. Add only a thin layer of stuffing during attachment.
Nose and Mouth
Yarn: black DK yarn — embroidered facial feature.
Make two diagonal stitches measuring approximately 7 mm each so they meet at the center and form a shallow V. Add one vertical stitch measuring 8 mm from the center point downward. Split its lower end into two short diagonal stitches, each approximately 4 mm long.
Cheek Marks — Make 2 Sets
Yarn: pale pink DK yarn — embroidered detail.
Each cheek consists of three short horizontal stitches. Make every stitch approximately 6 mm long and place the lines 2 mm apart. Position each group one round below its eye and at least two visible stitches away from the muzzle edge.
Optional Tail
Yarn: cream white — standard six-stitch amigurumi shaping.
R1: 6 sc in MR (6)
R2: inc ×6 (12)
R3–R4: sc around (12)
R5: dec ×6 (6)
Add a small pinch of stuffing.
Fasten off. Leave a 20 cm tail for sewing.
Assembly
- Center the head over the body opening and pin it in four places. Sew through one complete stitch from each component, tightening the seam after every four stitches.
- Position the muzzle between and slightly below the eyes. Its upper edge should sit approximately one round beneath the eye posts.
- Add a thin layer of stuffing behind the muzzle before closing the final third of the seam. The projection should remain below 1 cm.
- Embroider the nose, central mouth line and two lower mouth branches. Check the face from directly above before burying the black yarn tail.
- Add the three pink cheek stitches on each side. Match the distance from the muzzle rather than following the spiral’s natural slant.
- Pin the ears across head rounds 6–9, close to the widest section. Angle the folded bases slightly downward so the ear tips hang beside the cheeks.
- Attach the arms between body rounds 12 and 15. Rotate the rounded ends inward by approximately 15 degrees.
- Pin the back legs between body rounds 4 and 9. Move both feet forward until the lamb balances on the feet and lower body.
- Sew the optional tail to the rear center between body rounds 6 and 9. Keep it above the surface on which the lamb sits.
- Remove every pin and pass each structural yarn tail through at least 4 cm of stuffed fabric before trimming it.
The finished lamb should sit without rear support, with both ear tips positioned below the eye line.
7 Technical Tips
- Lost round position: White chenille obscures the first stitch and can shift shaping by one stitch. Place a locking marker through both loops of every first stitch and recount each shaped round.
- Flat head failure: Large pieces of stuffing can create corners beneath the plush fabric. Insert pieces no larger than 3 cm and distribute them around the wall before filling the center.
- Visible decrease gaps: A standard two-stitch decrease can expose fiberfill between the front loops. Use an invisible decrease and tighten the working loop before making the following stitch.
- Fixed eyes in the wrong position: Safety-eye backs cannot be removed without damaging the fabric. Pin the complete muzzle between the eyes and confirm a seven-stitch gap before attaching the washers.
- Chenille core damage: Excess hook friction strips the pile and exposes the internal thread. Keep the working loop approximately 1–2 mm wider than the 4 mm hook shaft.
- Rabbit-like ears: Ears sewn above the head’s widest round point upward instead of outward. Pin each folded base across rounds 6–9 and check that both tips fall below the eyes.
- Unstable sitting position: Back legs attached too high leave the lower body unsupported. Set the lower edge of each leg near body round 4 and test the balance before completing either seam.
Conclusion
Photograph the pinned assembly from the front before sewing the ears and legs, then use the image to compare both sides against the muzzle center. The next practical step is to record the chosen yarn brand, eye spacing and finished height on the pattern page because chenille thickness can alter all three measurements. Share the completed lamb on Pinterest and Instagram with #FloppyEarLamb, including the hook size in the caption. This lamb amigurumi crochet pattern can also be tested in pale gray or natural beige without changing the stitch counts. Should the next lamb keep the three-line cheeks shown in the photograph, or use one compact oval on each side?
Technical Sources
- Spin a Yarn Crochet: Lamb Amigurumi Size and Yarn Information
- Ravelry: Ana Yogui Lamb Size, Hook and Yarn Data
- Ravelry: Lamb Pattern with 12 mm Eye Specification
- Etsy: Fluffy the Lamb Yarn Quantities
- Jess Huff: Sheep Construction and Eye Placement Reference









