Introduction
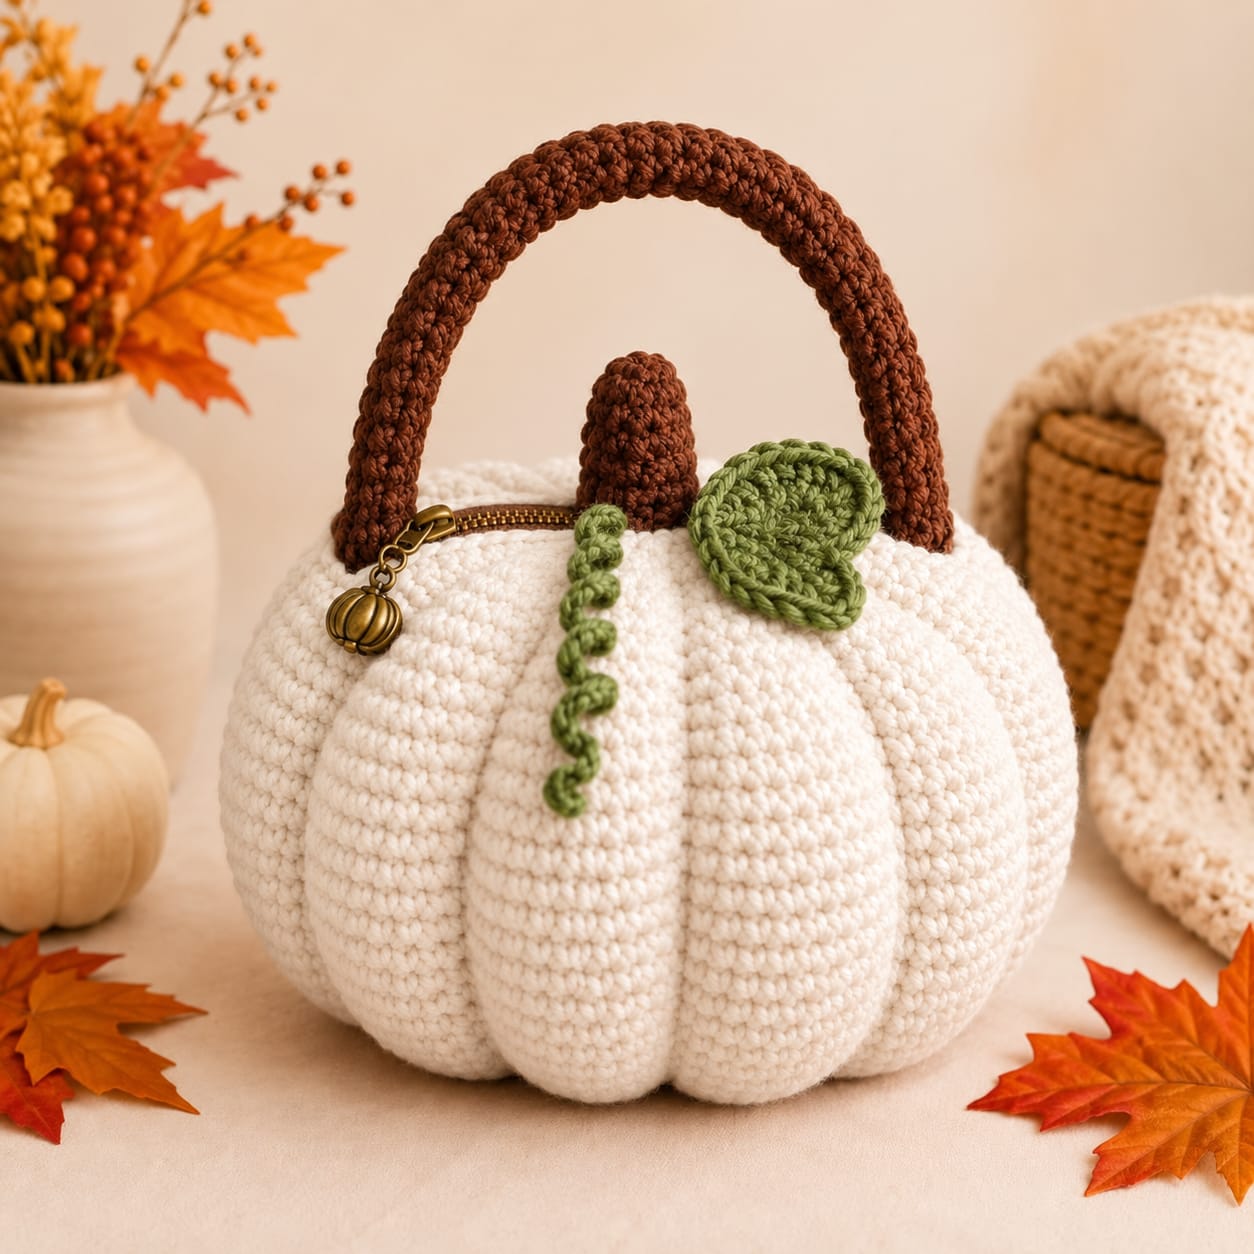
A pumpkin purse has to keep eight rounded ribs while supporting a zipper and a handle that both pull against its upper edge. This crochet pumpkin purse pattern uses cream worsted yarn, a 4.5 mm hook, post-construction sculpting, a brown stem and handle, plus a green leaf and curling vine. The finished bag measures approximately 22 cm wide. Its zippered opening makes the pumpkin shape functional for fall accessories and small personal items.
The Design: What Makes This Pumpkin Purse Different
The photographed bag combines amigurumi-style shaping with handbag construction. A dense cream shell creates the rounded pumpkin body, but the center remains hollow rather than stuffed. Eight external channels divide that shell into substantial lobes. The upper opening is reinforced before the zipper is sewn in because zipper tape can distort an unsupported crochet edge.
The second structural feature is the tall brown handle. Its attachment points sit on opposite sides of the opening and need a wider sewing area than the narrow decorative stem. A green leaf and crochet pumpkin vine then cover part of the crown without interfering with the zipper path. A common mistake with a pumpkin crochet bag is pulling the sculpting strands as tightly as those on a stuffed pumpkin. An empty purse needs shallower channels or the interior capacity collapses.
Project Info at a Glance
| Skill Level | Estimated Time | Finished Size | Hook | Best For |
|---|---|---|---|---|
| Intermediate | 7–10 hours | Approx. 22 cm wide × 17 cm high | 4.5 mm body / 4 mm details | Fall handbag, Halloween accessory, seasonal gift bag |
The finished measurements are a target based on the photographed proportions. Gauge, yarn composition, rib depth, and zipper installation can change the final dimensions.
Materials and Tools
Yarn
- Warm cream / ivory — worsted or Aran #4 — approximately 220–260 g for the body and reinforcement
- Chestnut brown — worsted or Aran #4 — approximately 70–90 g for the handle and stem
- Olive or sage green — worsted or Aran #4 — approximately 20–30 g for the leaf and vine
- Matching cream sewing yarn — approximately 8–10 m for reinforcing the pumpkin channels if required
Hardware and Tools
- 4.5 mm crochet hook
- 4 mm crochet hook for the leaf, vine, stem, and handle
- 20 cm zipper in antique brass, brown, or cream
- Optional pumpkin zipper charm
- Fabric lining — approximately 35 × 55 cm
- Strong sewing thread
- Hand-sewing needle
- Large tapestry needle
- Eight locking stitch markers
- Dressmaking pins or sewing clips
- Scissors
- Tape measure
Abbreviations
- MR — magic ring
- ch — chain
- sc — single crochet
- hdc — half double crochet
- dc — double crochet
- inc — two single crochets in one stitch
- dec — invisible decrease
- sl st — slip stitch
- BLO — back loop only
- FLO — front loop only
- st/sts — stitch/stitches
An invisible decrease catches the front loops of the next two stitches before completing one single crochet, reducing the bump produced by a standard decrease.
Gauge and Construction
Target approximately 16–17 sc × 18–19 rounds = 10 cm in firm single crochet.
The fabric must be dense enough that the lining does not show clearly through the stitches. At the same time, it needs enough flexibility for shallow pumpkin sculpting.
The purse begins with a circular base and expands to a broad body. The upper rounds reduce toward a controlled opening rather than closing completely. A separate reinforcement band supports the zipper.
Pattern — Step by Step
White Pumpkin Purse Body
Yarn: warm cream.
R1: 6 sc in MR (6)
R2: inc ×6 (12)
R3: (1 sc, inc) ×6 (18)
R4: (2 sc, inc) ×6 (24)
R5: (3 sc, inc) ×6 (30)
R6: (4 sc, inc) ×6 (36)
R7: (5 sc, inc) ×6 (42)
R8: (6 sc, inc) ×6 (48)
R9: (7 sc, inc) ×6 (54)
R10: (8 sc, inc) ×6 (60)
The 60-stitch circumference creates enough internal space for a functional purse while allowing the outer wall to be divided into broad pumpkin sections.
Lower Body
R11: BLO sc around (60)
R12: sc around (60)
R13: sc around (60)
R14: sc around (60)
R15: sc around (60)
R16: sc around (60)
Widest Section
R17: (9 sc, inc) ×6 (66)
R18: sc around (66)
R19: sc around (66)
R20: sc around (66)
R21: sc around (66)
R22: sc around (66)
R23: sc around (66)
R24: sc around (66)
This short 66-stitch plateau provides the broad middle visible in the reference.
Upper Body
R25: (9 sc, dec) ×6 (60)
R26: sc around (60)
R27: sc around (60)
R28: (8 sc, dec) ×6 (54)
R29: sc around (54)
R30: sc around (54)
R31: (7 sc, dec) ×6 (48)
R32: sc around (48)
R33: sc around (48)
Do not decrease further. The remaining circumference forms the purse opening.
Opening Reinforcement
R34: BLO sc around (48)
R35: sc around (48)
R36: sc around (48)
Fasten off, leaving approximately 30 cm.
Fold R35–R36 slightly toward the inside along the BLO hinge. Tack the folded band to the interior at regular intervals. This doubles the upper edge and creates a stronger foundation for the zipper and handle.
Creating the Pumpkin Ribs
The photographed purse has approximately eight large rounded lobes. They can be created with shallow external shaping rather than the deep compression used on a stuffed pumpkin.
Mark eight equally spaced vertical positions around the body.
Cut a cream strand approximately 160 cm long.
Thread a long tapestry needle.
Beginning close to the base, run the yarn vertically through selected surface stitches toward the upper edge.
Return through the interior along the same general line.
Pull only until the wall moves inward approximately 5–8 mm.
Secure the strand inside the bag.
Repeat around the remaining marked positions.
The channels should remain shallow enough that a hand can still move freely inside the purse.
Alternative Surface-Crochet Ribs
For a bag that must retain maximum interior capacity, replace the shaping strands with raised surface crochet.
Join cream yarn near the bottom turning round.
Surface slip stitch vertically toward the top.
Repeat at eight evenly spaced positions.
Work a second parallel surface line if a broader ridge is required.
This method adds visual pumpkin segmentation without compressing the body.
Brown Pumpkin Stem
Yarn: chestnut brown.
R1: 6 sc in MR (6)
R2: inc ×6 (12)
R3: BLO sc around (12)
R4: sc around (12)
R5: sc around (12)
R6: sc around (12)
R7: sc around (12)
R8: sc around (12)
R9: (2 sc, dec) ×3 (9)
R10: sc around (9)
R11: sc around (9)
Fasten off, leaving a 35 cm sewing tail.
Add only enough stuffing or folded yarn scraps to prevent the stem from collapsing. The stem is decorative and should not be used as a carrying point.
Brown Crochet Handle
Yarn: chestnut brown.
The reference uses one thick arched handle approximately 40–45 cm long.
Ch 71.
Row 1: Sc in second chain from hook and across (70)
Row 2: Ch 1, turn, sc across (70)
Row 3: Ch 1, turn, sc across (70)
Row 4: Ch 1, turn, sc across (70)
Fasten off, leaving a 50 cm tail.
Fold the strip lengthwise.
Whipstitch the long edges together to create a rounded handle.
For a firmer handle, insert cotton cord before closing the seam.
Handle End Reinforcement — Make 2
Yarn: brown.
R1: 6 sc in MR (6)
R2: inc ×6 (12)
R3: (1 sc, inc) ×6 (18)
Fasten off, leaving a 30 cm tail.
These flat discs sit inside the bag behind the handle ends. They spread carrying force across a wider area of crochet fabric.
Green Pumpkin Leaf
Yarn: olive or sage green.
Ch 12.
Starting in the second chain from the hook:
Row 1: sl st, sc, hdc, dc, dc, tr, dc, dc, hdc, sc, 3 sc in final chain.
Continue along the opposite side:
sc, hdc, dc, dc, tr, dc, dc, hdc, sc, sl st.
Fasten off, leaving approximately 30 cm.
Leaf Edging
Join green yarn at the base.
Work sc evenly around the leaf.
At the point, work 3 sc into one stitch.
Continue down the opposite side.
Join and fasten off.
Raised Leaf Vein
Join green yarn at the base of the leaf.
Work surface slip stitches along the central foundation chain toward the point.
Fasten off.
The completed leaf should measure approximately 8–10 cm.
Green Curly Vine
Yarn: olive green.
Ch 25.
Beginning in the second chain from the hook, work 2 sc in each chain.
For the final six chains, work 3 sc in each chain if a tighter curl is wanted at the free end.
Fasten off, leaving a 25 cm attachment tail.
Zipper Installation
Use a zipper approximately 20 cm long. The zipper should sit slightly below the reinforced cream rim rather than directly on its outermost edge.
Open the zipper.
Center one side of the zipper tape against the inside of the opening.
Pin or clip it in place.
Check that the zipper teeth remain visible and that the slider can travel without catching yarn.
Hand-sew the tape to the doubled crochet rim with small backstitches.
Repeat on the opposite side.
Close the zipper and inspect the top from above.
If one side puckers, remove that section of stitching and reposition the tape. Do not attempt to flatten zipper puckering by pulling the crochet rim tighter.
Optional Pumpkin Zipper Charm
The reference includes a small antique-brass pumpkin charm attached to the zipper pull.
Use a lightweight charm rather than a heavy metal pendant.
Attach it with a small split ring or jump ring.
Check that the charm clears the crochet body when the zipper is opened and closed.
This is decorative hardware rather than part of the structural closure.
Fabric Lining
A lining protects the crochet fabric from keys, cosmetics, pens, and other objects that can catch between stitches.
Measure the purse interior after the pumpkin channels are complete.
Cut two fabric pieces approximately 1.5 cm larger than the measured interior outline on all sides.
Place the fabric pieces with right sides together.
Sew around the sides and bottom using a 1 cm seam allowance.
Leave the upper edge open.
Turn the top edge toward the wrong side by approximately 1 cm and press.
Insert the lining into the purse.
Hand-sew the folded lining edge immediately below the zipper tape.
Keep the lining stitches independent from the zipper teeth.
Attaching the Handle
The handle carries the bag’s weight, so its ends need more reinforcement than the decorative stem and leaf.
Position one handle end approximately 2–3 cm from the zipper end.
Place one reinforcement disc against the corresponding point inside the purse.
Sew through the handle end, doubled cream rim, and internal brown disc repeatedly.
Cover an attachment area approximately 3 cm wide.
Repeat at the opposite side.
Test the empty bag by lifting it several centimeters above a padded surface.
The rim should remain approximately circular without folding sharply around either attachment point.
Attaching the Stem, Leaf and Vine
Position the brown stem near the center of the upper edge, behind the zipper line.
Sew around its 12-stitch lower circumference.
Do not attach the handle to the stem.
Place the green leaf beside the stem and slightly over the cream body.
Sew the lower 2–3 cm of the leaf while leaving its point free.
Attach the vine beneath the leaf.
Sew only the first 2 cm of the vine.
The remaining spiral should hang freely down the front of the purse.
Assembly
- Complete the cream purse body through the reinforced 48-stitch opening and weave in the main working tail.
- Mark eight vertical pumpkin sections and add shallow 5–8 mm channels without collapsing the empty interior.
- Install the fabric lining after the final body dimensions have been established but before permanently covering the zipper area with decorative pieces.
- Center the 20 cm zipper inside the reinforced opening and hand-sew both zipper tapes securely to the doubled cream rim.
- Attach the brown stem near the upper center while keeping all stitches clear of the zipper slider.
- Position the brown handle ends on opposite sides of the opening and place one reinforcement disc behind each attachment point.
- Sew each handle end through approximately 3 cm of rim fabric and its internal reinforcement disc.
- Attach the green leaf beside the stem, sewing only its lower section so the outer half remains dimensional.
- Sew the green curly vine beneath the leaf and leave most of the spiral free against the front pumpkin lobe.
- Test the zipper, lift the empty purse from the handle, inspect every attachment point, and weave remaining yarn tails through matching interior stitches.
The completed bag should retain a rounded eight-section pumpkin profile while the zipper opens freely and the handle load is distributed across the reinforced rim.
7 Technical Tips
- The empty purse collapses after rib shaping: Limit each channel to approximately 5–8 mm of indentation. The deep compression used on stuffed pumpkins removes too much usable volume from an unstuffed handbag.
- The zipper forms waves: Baste each 20 cm tape in place before making permanent backstitches. Stretching either the zipper or the crochet rim during sewing produces puckering that remains visible when closed.
- The handle pulls the rim upward: Spread each attachment across approximately 3 cm and use an 18-stitch reinforcement disc inside. Sewing the handle to only two or three crochet stitches concentrates the entire load at one point.
- The bag body stretches downward: Install a fabric lining cut to the finished interior dimensions. An unsupported crochet shell can lengthen when keys or other dense objects are carried.
- The pumpkin channels become uneven: Mark all eight vertical positions before tightening the first shaping strand. Working around the circumference without markers commonly leaves the final lobe narrower than the others.
- The leaf interferes with the zipper: Keep its sewn base at least 8–10 mm from the zipper teeth. A loose leaf edge positioned over the slider path can become trapped during closing.
- The handle continues stretching: Insert low-stretch cotton cord inside the four-row brown tube before closing it. The internal cord should finish 2–3 cm shorter than the crochet cover so it does not protrude at the ends.
Why the Purse Body Is Not Stuffed
A decorative pumpkin depends on stuffing to resist shaping pressure. A purse needs that same visual profile while preserving an empty interior.
The body therefore receives only shallow channels.
Its circular base, expanded center, and reduced upper rounds create most of the pumpkin silhouette before any sculpting begins.
The channels supply the final segmentation.
This order matters. Trying to turn a straight cylindrical bag into a pumpkin entirely with shaping yarn creates excessive folds inside the purse.
The 60-to-66-to-48 stitch progression builds the silhouette into the crochet itself and reduces the amount of compression required later.
Keeping the Pumpkin Shape Without Stuffing
Dense gauge is the first requirement.
If the body fabric is too loose, the lower lobes will sag when the bag is empty.
Cotton and cotton-acrylic blends are useful because they produce firm single crochet with less elastic stretch than many soft acrylics.
The lining provides the second layer of support.
Cut it to the finished bag rather than to the unshaped crochet body. A lining that is too large does nothing to control stretch.
The reinforced upper band provides the third structural element. It carries the zipper and prevents the opening from becoming an oval under the handle load.
Choosing the Cream Yarn
The photographed body is warm ivory rather than bright optical white.
Look for colors labeled natural, cream, ecru, vanilla, parchment, or warm ivory.
A smooth yarn gives the cleanest horizontal single-crochet rows and makes the vertical pumpkin channels easier to read.
Pure cotton creates the firmest bag but increases weight.
A cotton-acrylic blend can reduce that weight while maintaining useful structure.
If using 100% acrylic, select a tightly spun variety and consider dropping from a 4.5 mm hook to 4 mm if the fabric feels loose.
Choosing the Brown Handle Yarn
The handle and stem use a medium chestnut brown with enough contrast to separate them from the ivory body.
A handle benefits from low-stretch yarn.
Cotton or a cotton-rich blend is therefore preferable even if the pumpkin body uses acrylic.
Do not substitute chenille for the handle. Its soft core can stretch and abrade at the attachment points.
The handle cover should be dense enough to conceal any internal reinforcement cord.
How Long Should the Handle Be?
The reference uses a short handbag-style arch rather than a shoulder strap.
Target approximately 40–45 cm after the strip is folded and seamed.
Measure from one attachment point, over the intended arch, to the opposite attachment point before permanently sewing either end.
For a smaller hand loop, reduce the foundation chain.
For shoulder carrying, do not simply extend the same narrow handle indefinitely. A longer strap requires additional reinforcement and preferably wider attachment tabs to manage the increased leverage against the rim.
How to Make a Smaller Pumpkin Purse
For a compact bag, stop the lower expansion at 48 stitches.
Use the following body progression:
R1: 6 sc in MR (6)
R2: inc ×6 (12)
R3: (1 sc, inc) ×6 (18)
R4: (2 sc, inc) ×6 (24)
R5: (3 sc, inc) ×6 (30)
R6: (4 sc, inc) ×6 (36)
R7: (5 sc, inc) ×6 (42)
R8: (6 sc, inc) ×6 (48)
Work five straight rounds.
Increase once to 54 stitches.
Work five rounds at 54.
Decrease to 48 and then to 42 stitches for the opening.
Use a zipper approximately 15–18 cm long after measuring the actual opening.
How to Make a Larger Pumpkin Bag
For a larger handbag, continue the circular expansion beyond 60 stitches.
Next increase: (9 sc, inc) ×6 (66)
Following increase: (10 sc, inc) ×6 (72)
Build the lower wall from the selected circumference.
Increase the widest portion by another six stitches, then reduce gradually toward the opening.
A larger body needs a wider zipper and stronger handle reinforcement.
Do not scale the bag to 72 or more stitches while retaining tiny three-stitch handle attachment points.
Installing the Zipper Before or After the Lining
The zipper can be installed first, followed by the lining, which is the easier order for hand sewing.
Sew the zipper to the reinforced crochet rim.
Check its operation.
Then insert the lining and sew its folded upper edge to the zipper tape below the first line of stitches.
This hides most of the zipper tape inside the bag.
It also allows the lining to cover interior yarn tails from the pumpkin channels.
Keep lining stitches away from the zipper teeth so fabric cannot catch in the slider.
Making the Handle More Durable
A decorative crochet tube alone may be sufficient for a lightweight purse.
For repeated use, add an internal low-stretch core.
Cotton cord is suitable because it bends without behaving like wire.
Cut the cord slightly shorter than the finished handle.
Insert it before whipstitching the long edge closed.
At each end, sew through the crochet cover and around the cord several times before attaching the handle to the purse.
This transfers part of the load to the internal core instead of relying entirely on stretched crochet stitches.
Making the Green Vine Curl
A plain chain remains nearly straight.
The spiral forms because multiple stitches are forced into each chain.
Two single crochets per chain produce a moderate curl.
Three create a tighter corkscrew.
The reference shows a compact spiral near the lower end, so use two sc per chain through most of the vine and three sc per chain across the final six chains.
After fastening off, twist the spiral gently in its natural direction rather than pulling it straight.
Keeping the Leaf Dimensional
Do not sew around the complete leaf perimeter.
Attach its base and part of the central vein.
Leave the outer 4–5 cm free.
The raised vein provides enough stiffness for the leaf to sit away from the cream body.
If the yarn is particularly soft, use a 3.5 mm hook instead of 4 mm for the leaf.
The tighter gauge will produce a firmer appliqué without requiring wire.
Where to Place the Decorative Stem
The stem should sit near the center of the crown without blocking the zipper.
Close the zipper and mark its midpoint.
Position the stem behind that point rather than directly over the teeth.
Open the zipper fully and confirm that the slider clears the stem base.
Sew the stem only after this test.
The green leaf can overlap the stem base and hide part of the attachment seam.
Adding a Pumpkin Zipper Charm
A small pumpkin-shaped charm reinforces the seasonal theme without changing the crochet construction.
Choose a lightweight metal charm approximately 15–25 mm across.
Attach it to the existing zipper pull rather than piercing the zipper tape.
Test the added weight.
If the zipper slider drops open under the charm’s weight, replace it with a lighter charm.
Do not attach heavy beads to a small zipper designed for lightweight bags.
What the Finished Purse Can Hold
The target 22 cm body is suitable for lightweight personal items such as a small wallet, keys, packaged tissues, lip balm, compact accessories, or crochet notions.
The exact capacity depends on the depth of the eight pumpkin channels.
A lined version handles small objects more reliably because they cannot work through the crochet stitches.
A handmade yarn purse should not be loaded as though it were a rigid commercial tote.
Dense or heavy objects increase stress at the handle attachments and can stretch the lower body.
Care and Storage
Remove detachable metal charms before washing.
Follow the care instructions for the selected yarn and lining fabric.
Hand washing is preferable once a zipper, reinforced handle, and lining have been installed.
Press excess water out with a towel rather than twisting the bag.
Reshape all eight pumpkin sections while damp.
Dry the purse with clean fabric or towels loosely filling the interior so the body retains its rounded profile.
For seasonal storage, leave the zipper partly open and support the interior with acid-free tissue or clean fabric. Do not fold the handle sharply across the crown.
Conclusion
The zipper opening and handle attachments determine whether this pumpkin remains a usable purse rather than only a shaped crochet decoration. Build the ivory body first, keep all eight channels shallow, and reinforce the 48-stitch opening before installing hardware. Add a fitted lining before loading the bag, then spread each brown handle attachment across a reinforced section of the rim. The stem, green leaf, and curling vine can be positioned after the zipper operates cleanly. Save this crochet pumpkin purse pattern to Pinterest or share the finished bag on Instagram with #CrochetPumpkinPurse. For this specific pumpkin, would you keep the antique-brass zipper or use a concealed cream zipper?









