Introduction
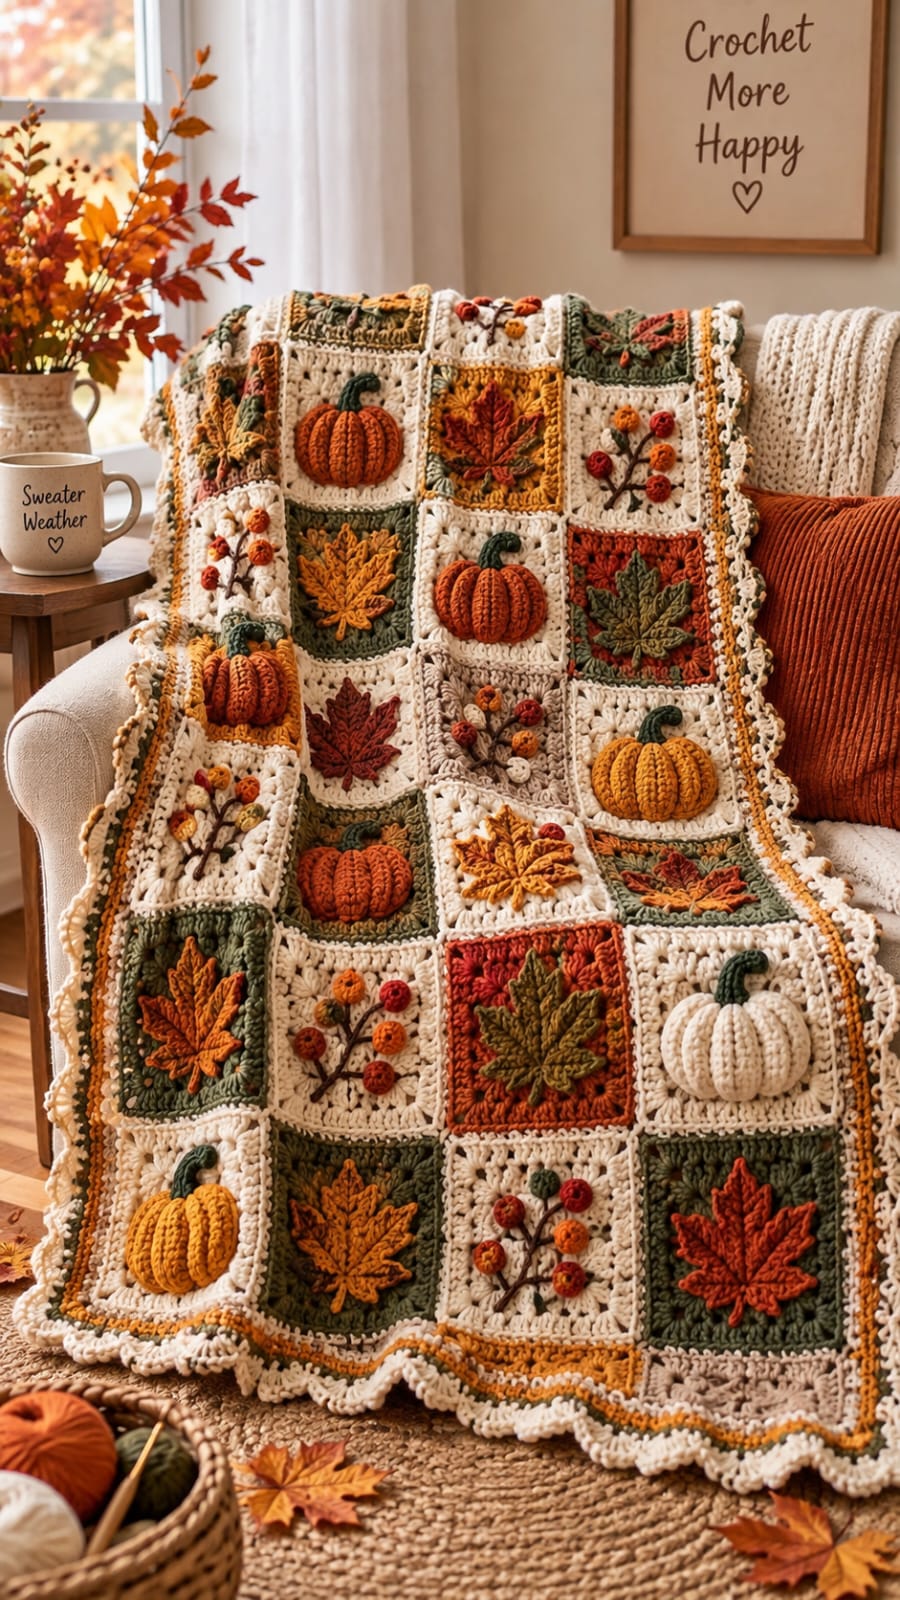
Pumpkins, five-point maple leaves, and branching berry stems all have to fit inside the same square without distorting its corners. This fall granny square crochet blanket pattern combines cream, moss green, burnt orange, mustard, rust, and brown worsted yarn with dimensional appliqués. The finished throw targets approximately 110 × 145 cm at an intermediate skill level. Separate motifs make damaged or uneven squares easier to replace before final assembly.
The Design: What Makes This Fall Blanket Different
The blanket is built from individual squares rather than one continuous fabric. That decision matters because the raised pumpkins, maple leaves, and berry branches use different amounts of surface area. A consistent square foundation gives every motif the same final footprint before joining.
Three-dimensional pumpkins project farther than the crochet maple leaf squares, so their bodies are made separately and attached only after blocking. Berry branches use narrow stems with small circular berries, keeping those squares comparatively light. Alternating cream, moss, mustard, and rust backgrounds prevents identical motifs from forming rigid columns. The border then repeats the palette before finishing with a cream scalloped edge. One frequent construction error is sewing dimensional appliqués onto unblocked squares. The motif can pull the center inward, leaving corners that no longer align when the autumn granny square blanket is assembled.
Project Info at a Glance
| Skill Level | Estimated Time | Finished Size | Hook | Best For |
|---|---|---|---|---|
| Intermediate | 30–40 hours | Approx. 110 × 145 cm | 4.5 mm | Fall sofa throw, seasonal bed layer, decorative afghan |
The photographed blanket appears to use a four-square-wide layout with repeated autumn motifs. Finished measurements are therefore treated as a project target rather than a measurement taken directly from the image.
Materials and Tools
Yarn
- Warm cream — worsted/Aran #4 — approximately 750–900 g for squares, joins, and border
- Moss or forest green — worsted/Aran #4 — approximately 300–350 g
- Burnt orange — worsted/Aran #4 — approximately 250–300 g
- Mustard gold — worsted/Aran #4 — approximately 200–250 g
- Deep rust / burgundy — worsted/Aran #4 — approximately 180–220 g
- Chestnut brown — worsted/Aran #4 — approximately 80–100 g for branches and details
Tools
- 4.5 mm crochet hook for squares
- 4 mm crochet hook for appliqués
- Large tapestry needle
- Blocking mats and rust-resistant pins
- Stitch markers
- Scissors
- Tape measure
Abbreviations
- MR — magic ring
- ch — chain
- sc — single crochet
- hdc — half double crochet
- dc — double crochet
- tr — treble crochet
- inc — increase
- dec — decrease
- sl st — slip stitch
- BLO — back loop only
- FLO — front loop only
- st/sts — stitch/stitches
An invisible decrease is worked through the front loops of two consecutive stitches before completing one single crochet, reducing the ridge created by a standard decrease.
Gauge and Finished Square Size
Target each blocked square at approximately 22 × 22 cm.
Exact stitch gauge is less important than producing identical finished dimensions. Crochet one complete square, block it, and measure only after the yarn has dried.
If the square is smaller than 22 cm, add another border round or increase the hook by 0.5 mm. If it exceeds the target, reduce the hook size rather than forcing the square smaller during blocking.
Blanket Layout
For a throw similar to the reference, make 24 squares and arrange them in a 4 × 6 grid.
| Square Type | Quantity | Main Motif |
|---|---|---|
| Pumpkin Squares | 8 | Raised ribbed pumpkin |
| Maple Leaf Squares | 8 | Five-point autumn leaf |
| Berry Branch Squares | 8 | Brown branch with dimensional berries |
Rotate background colors so two identical combinations do not touch wherever possible.
Pattern — Step by Step
Basic Granny Square Foundation — Make 24
Use cream, moss green, mustard, or rust according to the planned layout.
R1: MR, ch 3, 2 dc, ch 2, (3 dc, ch 2) ×3, join with sl st to top of beginning ch 3. (12 dc, 4 corner spaces)
R2: Sl st to corner space, ch 3, 2 dc, ch 2, 3 dc in same corner; ch 1, *(3 dc, ch 2, 3 dc) in next corner, ch 1* ×3; join. (24 dc)
R3: Sl st to corner, ch 3, 2 dc, ch 2, 3 dc in same corner, ch 1, 3 dc in next ch-1 space, ch 1; repeat around, working (3 dc, ch 2, 3 dc) in every corner. Join.
R4: Continue established granny-square construction, placing one 3-dc group in each side space and (3 dc, ch 2, 3 dc) in every corner.
R5: Repeat R4 with one additional side group on each side.
R6: Repeat established pattern.
R7: Repeat established pattern.
Measure the square.
If additional size is required, continue the same construction until the piece is approximately 20–21 cm before the final edging.
Square Edging
Join cream or the selected contrasting color in any corner.
Edging R1: Ch 1, sc evenly across each side, working (sc, ch 2, sc) in every corner.
Edging R2: Ch 2, hdc in each stitch, working (2 hdc, ch 2, 2 hdc) in every corner space.
Fasten off.
Block every foundation square to 22 × 22 cm before adding the raised motifs.
Dimensional Pumpkin Appliqué — Make 8
The pumpkins in the reference project beyond the square rather than sitting as flat circles. A ribbed oval produces that volume without filling the motif heavily.
Pumpkin Body
Use burnt orange, mustard, rust, or cream.
Ch 17.
Row 1: Hdc in second chain from hook and across. (16)
Row 2: Ch 1, turn, BLO hdc across. (16)
Rows 3–14: Repeat Row 2. (16)
Fasten off, leaving a 45 cm tail.
Bring Row 1 and Row 14 together.
Whipstitch through both short edges to form a ribbed tube.
Thread the remaining tail through the stitches along one long edge and pull firmly to close that end.
Flatten the tube so the seam sits at the back.
Do not stuff the appliqué fully. Insert only a thin layer of yarn scraps or polyester filling if additional projection is required.
Gather the second edge until the pumpkin measures approximately 10–12 cm wide.
Secure the tail.
Pumpkin Stem
Use moss green.
Ch 9.
Row 1: Sc in second chain and across. (8)
Row 2: Ch 1, turn, BLO sc across. (8)
Row 3: Repeat Row 2. (8)
Fasten off, leaving 20 cm.
Fold the strip slightly and sew its lower 2 cm behind the pumpkin.
Attaching the Pumpkin
Center the pumpkin on its blocked square.
Leave approximately 4–5 cm between the motif and each square edge.
Pin the pumpkin at its top, bottom, and both sides.
Sew around the rear perimeter rather than through the raised front ribs.
Add two or three hidden anchoring stitches through the center back if the motif lifts excessively.
Maple Leaf Appliqué — Make 8
Use mustard, rust, burgundy, burnt orange, or moss green.
R1: 6 sc in MR (6)
R2: inc ×6 (12)
R3: (1 sc, inc) ×6 (18)
Do not fasten off.
Leaf Point 1
Ch 7.
Starting in second chain: sl st, sc, hdc, dc, tr, tr.
Sl st into the next two stitches of R3.
Leaf Point 2
Ch 9.
Starting in second chain: sl st, sc, hdc, dc, tr, tr, dc, hdc.
Sl st into next two stitches of R3.
Center Leaf Point
Ch 11.
Starting in second chain: sl st, sc, hdc, dc, tr, tr, tr, dc, hdc, sc.
Sl st into next two stitches of R3.
Leaf Point 4
Repeat Leaf Point 2.
Leaf Point 5
Repeat Leaf Point 1.
Lower Leaf Lobes
Work (sc, hdc, dc, hdc, sc) across the next available stitches on one lower side.
Repeat symmetrically on the opposite lower side.
Leaf Stem
Ch 9.
Sl st back through each chain.
Join to the leaf base.
Fasten off, leaving a 40 cm sewing tail.
Leaf Veins
Join a contrasting or matching strand at the base.
Surface slip stitch toward the center point.
Add one shorter surface line toward each major side lobe.
Fasten off.
Block the leaf lightly before sewing it to the square. Do not flatten the raised surface veins.
Berry Branch Square — Make 8
Main Brown Branch
Use chestnut brown.
Ch 23.
Sl st into second chain from hook and every chain across. (22)
Fasten off with a 30 cm tail.
Branch Arm A
Ch 11.
Sl st in second chain and across. (10)
Fasten off.
Branch Arm B
Ch 9.
Sl st in second chain and across. (8)
Fasten off.
Branch Arm C
Ch 7.
Sl st in second chain and across. (6)
Fasten off.
Arrange the main branch diagonally across the square.
Position the three smaller branches at different angles.
Sew through the center of each crochet cord with matching brown yarn.
Small Crochet Berries — Make 40–48
Use a mixture of rust, mustard, burnt orange, burgundy, cream, and moss.
R1: 6 sc in MR (6)
R2: inc ×6 (12)
R3: sc around (12)
R4: dec ×6 (6)
Add a tiny amount of stuffing before completing the final decreases.
Fasten off, leaving a 20 cm sewing tail.
Each berry should measure approximately 2–2.5 cm.
Sew five or six berries around each branch structure.
Optional Flat Berry Version
For a lighter blanket, omit stuffing.
R1: 6 sc in MR (6)
R2: inc ×6 (12)
Sl st to first stitch.
Fasten off.
Sew the 12-stitch circle directly to the square.
This version is useful on squares that will sit behind the user’s back because it reduces hard dimensional points.
Optional Small Autumn Leaf
The reference also includes smaller leaves around several branch motifs.
Ch 8.
Starting in second chain: sl st, sc, hdc, dc, hdc, sc, 3 sc in final chain.
Continue along the opposite side: sc, hdc, dc, hdc, sc, sl st.
Fasten off with a 20 cm tail.
Make these in cream, moss, mustard, and rust and place one or two beside selected berry branches.
Blocking the Completed Motif Squares
Do not pin through the dimensional pumpkins or berries.
Place each completed square on a blocking mat.
Pin only the outer foundation edges to 22 × 22 cm.
Steam or wet-block according to the yarn fiber.
Arrange maple leaf points by hand.
Keep the pumpkin ribs raised.
Allow every square to dry fully before joining.
Suggested 4 × 6 Layout
| Maple Leaf | Pumpkin | Berry Branch | Maple Leaf |
| Berry Branch | Maple Leaf | Pumpkin | Berry Branch |
| Pumpkin | Berry Branch | Maple Leaf | Pumpkin |
| Maple Leaf | Pumpkin | Berry Branch | Maple Leaf |
| Pumpkin | Maple Leaf | Berry Branch | Pumpkin |
| Berry Branch | Maple Leaf | Berry Branch | Pumpkin |
Change the background colors independently from the motif arrangement. The objective is to distribute cream, green, mustard, and rust rather than forming uninterrupted vertical bands.
Joining the Granny Squares
Use warm cream yarn for visible seams similar to the reference.
Lay two squares with wrong sides together.
Join yarn in the first corner.
Working through corresponding edge stitches, sc the two squares together.
Keep the seam relaxed.
Fasten off at the opposite corner.
Join the squares into six horizontal rows first.
Next, crochet the six rows together along their long seams.
At each four-square intersection, work through the corner spaces carefully so no hole develops at the crossing.
Alternative Flat Join
For less raised seaming, place the squares right sides together.
Whipstitch through the outer loops using cream yarn.
Open the joined squares and flatten the seam with your fingers.
This method keeps more attention on the dimensional appliqués.
Use the same joining method throughout the blanket. Mixing raised single-crochet seams with flat sewn seams changes the spacing between squares.
Autumn Blanket Border
The photographed blanket uses several narrow color rounds followed by a prominent cream scalloped edge.
Border Round 1 — Cream
Join cream yarn at any corner.
Ch 1.
Sc evenly around the complete blanket.
Work 3 sc in each corner.
At square joins, work stitches evenly rather than adding extra stitches automatically.
Join with sl st.
Border Round 2 — Moss Green
Join moss green.
Ch 2.
Hdc in every stitch around.
Work 3 hdc in each corner.
Join.
Border Round 3 — Mustard
Join mustard.
Ch 1.
Sc in every stitch around.
Work 3 sc in each corner.
Join.
Border Round 4 — Cream
Join cream.
Ch 1.
Sc around, working 3 sc in each corner.
Join.
Scalloped Outer Border
Skip 2 stitches.
Work 7 dc into the next stitch.
Skip 2 stitches.
Sl st into the next stitch.
Repeat around.
At each corner, adjust the skipped stitches slightly so one complete seven-double-crochet shell is centered over the corner.
Do not force the normal repeat if it places a slip stitch directly at the corner point.
Join and fasten off.
Optional Picot Detail
For the pointed cream edging visible in parts of the reference, add a picot to the center of each shell.
Work 3 dc into the shell stitch.
Ch 3.
Sl st into the first chain to form a picot.
Work 4 more dc into the same base stitch.
Continue to the next shell.
Assembly
- Crochet all 24 foundation squares and block each one to approximately 22 × 22 cm before attaching dimensional motifs.
- Make eight ribbed pumpkins and attach their green stems before sewing the pumpkin bodies to their assigned squares.
- Crochet eight five-point maple leaves, add surface veins, block the points, and sew each leaf through its center and major lobes.
- Construct eight brown branch arrangements and attach them diagonally across the selected foundation squares.
- Make 40–48 dimensional berries and distribute five or six around each branch, adding optional small leaves where extra coverage is required.
- Block the completed motif squares again by pinning only their outer edges and keeping raised elements uncompressed.
- Arrange all 24 squares in the final 4 × 6 layout and photograph the arrangement before moving any pieces.
- Join individual squares into six horizontal rows, then join those rows together while matching every corner intersection.
- Work the cream, moss, mustard, and cream foundation border rounds, checking the blanket after each round for waves or contraction.
- Complete the cream scalloped edging, weave every tail through matching stitches, and lay the blanket flat for a final measurement.
The completed throw should have aligned square intersections, raised autumn motifs, evenly distributed seasonal colors, and a continuous cream scalloped perimeter.
7 Technical Tips
- The joined blanket develops crooked seams: Block every foundation square to the same 22 cm measurement before joining. A difference of only 1 cm per square can accumulate into a visibly uneven six-square column.
- The pumpkin squares buckle inward: Sew around the rear perimeter of each pumpkin instead of pulling stitches across its raised front ribs. Excessive attachment tension shortens the square center and lifts the corners.
- The maple leaf points curl: Pin each major point independently during blocking and keep it in position until completely dry. Sewing an unblocked leaf to the square locks the curl into the finished blanket.
- The berry branches sag: Anchor the brown stem approximately every 1.5–2 cm rather than sewing only its ends. The dimensional berries add enough weight to pull an unsupported branch away from the background.
- The square intersections form holes: Match all four corner spaces before joining the crossing seams. A displaced corner by even one stitch leaves an opening that becomes more visible after the border is added.
- The outer border waves: Reduce stitches along the blanket sides before continuing to the next border round. Adding decorative shells over an already ruffled foundation multiplies the excess circumference.
- The raised motifs flatten during finishing: Block the square edges rather than pressing directly over pumpkins, berries, or leaf veins. Dimensional appliqués should remain above the background fabric after the final blocking.
Making the Raised Pumpkin Motifs
The pumpkin squares provide the greatest depth in the blanket.
BLO half double crochet creates parallel ribs across a flat rectangle. Joining the short edges converts those ribs into vertical pumpkin segments.
Gathering the upper and lower edges changes the tube into a flattened oval.
Only minimal stuffing is required.
A heavily stuffed pumpkin becomes too thick for a throw and can create an uncomfortable hard point when the blanket is used on a sofa.
For a purely decorative wall-hanging version, additional stuffing can be added before closing the second edge.
Making the Maple Leaves More Defined
The leaf shape depends on differences in chain length.
The central point is longest.
Two medium side points establish the upper width, while the shortest outer points form the remaining maple silhouette.
Surface slip stitches create the vein structure after the basic leaf is complete.
Use a slightly smaller hook for the appliqué than for the square. Dense stitches hold the pointed outline better than loose fabric.
If a leaf still looks rounded, block it while damp and pull each point away from the center independently.
Berry Color Distribution
Do not make every berry on one branch the same color.
The reference mixes burnt orange, deep rust, mustard, and occasional cream or green berries.
Start with the darkest berry near a branch junction.
Add two medium orange berries farther outward.
Use mustard or cream as the smallest visual accent.
Keep neighboring berries approximately 2–4 cm apart so their circular forms remain readable.
A branch covered with touching berries becomes a single dense cluster rather than a branching autumn motif.
Background Color Planning
Warm cream should remain the dominant neutral because it separates the stronger seasonal colors.
Use moss green as the primary dark background.
Mustard creates a medium-value transition, while rust works best as an occasional high-contrast square.
Lay all foundation squares on the floor before attaching appliqués.
Check the arrangement from several meters away.
If one side looks substantially darker, move two or three green or rust squares toward the opposite side before sewing motifs permanently.
Making a Smaller Fall Blanket
A lap-size version can use 12 squares in a 3 × 4 arrangement.
At a blocked size of 22 cm per square, the unbordered field measures approximately 66 × 88 cm.
Use four pumpkin squares, four maple leaf squares, and four berry branch squares.
Add a wider border if a finished width near 75 cm is preferred.
The same appliqué patterns can be used without modification.
Maintain the three-motif rotation so no single motif dominates the smaller field.
Making a Larger Afghan
Use 35 squares for a 5 × 7 arrangement.
At 22 cm per square, the central field measures approximately 110 × 154 cm before joining contraction and border additions are considered.
Make approximately 11–12 examples of each motif.
Increase the yarn quantities by roughly 45–50% compared with the 24-square throw.
Arrange the larger blanket before joining because repeating backgrounds become more obvious across five columns.
Using Flat Motifs for a Lighter Blanket
The photographed design is highly dimensional, but the same layout can be adapted for regular use.
Replace stuffed berries with 12-stitch flat circles.
Do not add filling to the pumpkins.
Sew each pumpkin more completely around its rear perimeter.
Keep the maple leaves unchanged because they already add relatively little thickness.
This modification reduces weight and makes the blanket easier to fold without removing the pumpkin-leaf-berry theme.
Joining Without Hiding the Square Borders
The individual squares remain visually important in the reference.
For that reason, use cream for the joins even between dark-colored backgrounds.
The light seam acts as a narrow frame around each motif.
Keep single-crochet joins loose.
A tight seam shortens the square edges and can create raised ridges between motifs.
After joining the first complete row, measure its length and compare it with the combined blocked width of the individual squares.
A large reduction indicates that the joining tension is too tight.
Border Color Order
The border repeats colors already present inside the blanket rather than introducing a new shade.
Begin with cream to merge the square joins into the perimeter.
Add moss green for a narrow dark line.
Mustard supplies the warm accent.
Return to cream before the scalloped edging.
This sequence keeps the decorative outer shells visually separate from the multicolored square field.
If rust is preferred, substitute it for mustard but retain cream as the final foundation round beneath the scallops.
Keeping the Scalloped Border Flat
Decorative shells add considerably more fabric than a plain single-crochet round.
Work the final cream foundation round first and place the blanket flat.
Correct any waves before beginning the shells.
Use seven double crochets per scallop for a pronounced edge.
If the border becomes too full, reduce the shell to five double crochets.
If it contracts, reduce the number of skipped foundation stitches between shells.
Adjust corners independently rather than forcing the side repeat around them.
Yarn Tail Management
A 24-square appliqué blanket produces many yarn tails.
Weave them in as each component is completed rather than leaving all finishing until assembly.
For foundation squares, weave tails at least 7–8 cm through matching stitches.
For pumpkins and berries, use the attachment tail as part of the sewing whenever possible.
Do not trim tails immediately beside dimensional appliqués.
Repeated movement can loosen short ends and allow them to emerge on the front surface.
Care and Storage
Follow the washing instructions for the selected yarn fiber.
A blanket with dimensional appliqués benefits from gentle washing inside a large mesh laundry bag or from hand washing if practical.
Support the blanket fully when wet.
Do not lift it by one corner because the added weight of water stresses the joined square seams.
Lay it flat and reshape the outer perimeter.
Arrange pumpkin ribs, maple leaf points, and berry branches by hand while damp.
Allow the throw to dry completely before folding. Store it without heavy objects pressing directly on the raised pumpkins.
Conclusion
The square dimensions control this project more than any individual appliqué stitch. Make one 22 cm foundation square first, establish its gauge, and use that measurement for every pumpkin, maple leaf, and berry-branch panel that follows. Attach dimensional pieces only after blocking, then arrange all 24 squares before joining the first seam. Reserve enough cream yarn for both the joins and the scalloped perimeter. Your next practical step is to crochet one cream test square and one raised pumpkin. Save this fall granny square crochet blanket pattern to Pinterest or share the completed throw on Instagram with #FallGrannySquareBlanket. Which square would you repeat most: the ribbed pumpkin, maple leaf, or berry branch?









