Introduction
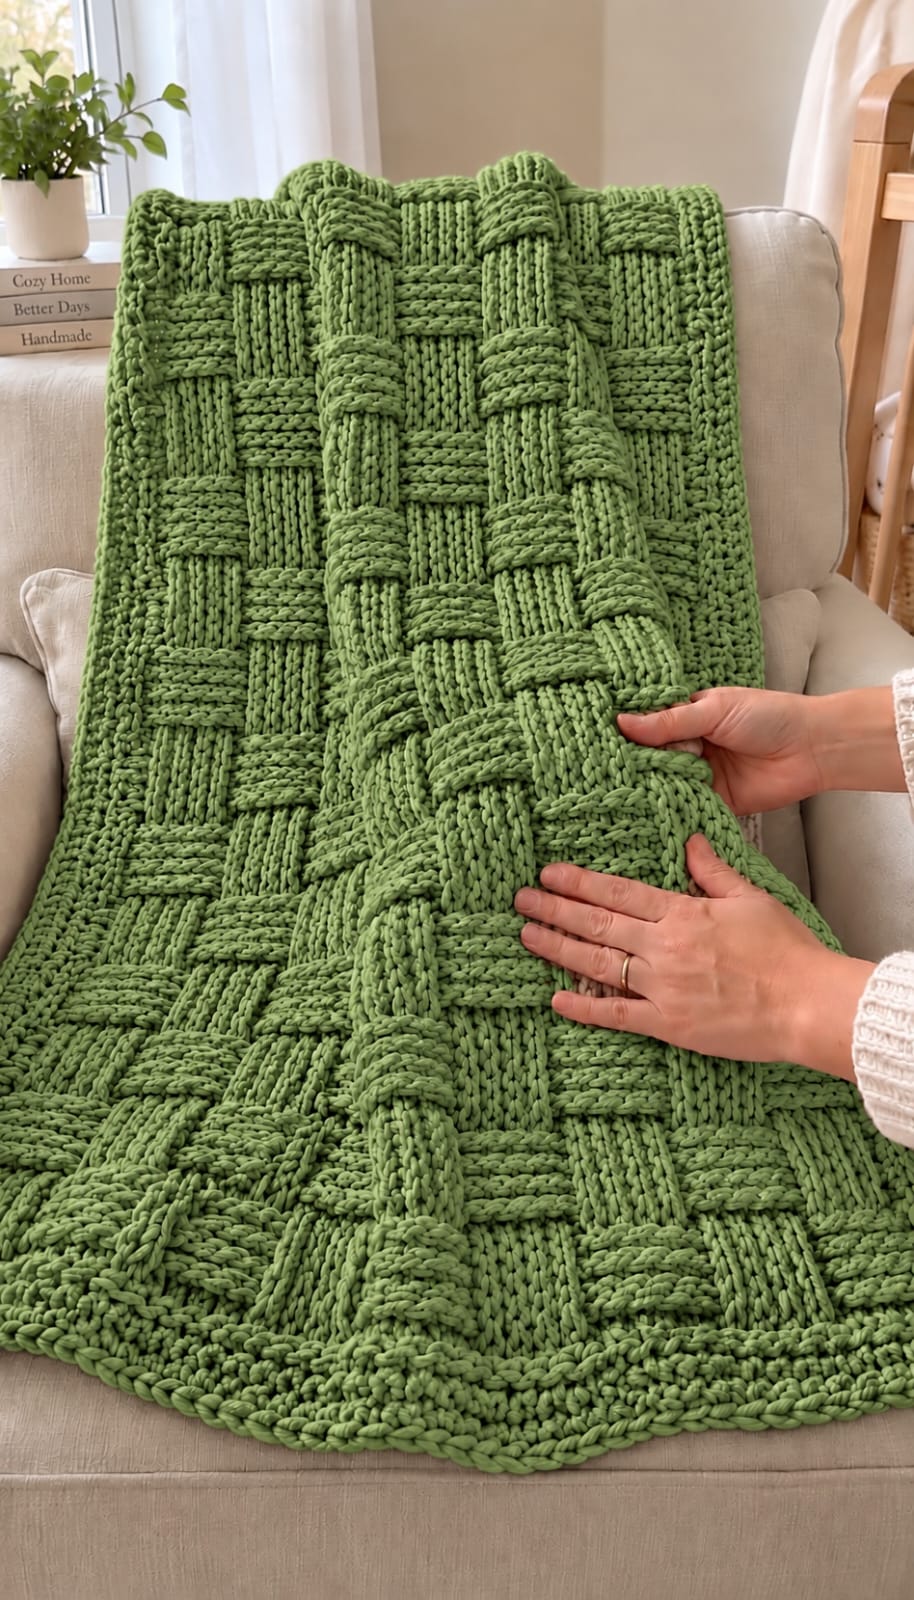
Six-stitch olive blocks must alternate direction at exactly the same height or this blanket loses its woven-grid illusion. This green basket weave crochet blanket pattern uses super-bulky yarn, a 9 mm hook, and alternating front-post and back-post double crochet. The finished throw measures approximately 127 × 145 cm. Its one-color construction keeps attention on the oversized texture while eliminating color-change joins throughout the main field.
The Design: What Makes This Green Basket Weave Blanket Different
The reference uses broad relief blocks rather than the smaller four-stitch repeats found in many basketweave patterns. Six post stitches form each half of a 12-stitch repeat, creating substantial vertical ribs beside equally broad horizontal-looking sections. After five textured rows, the post directions reverse. That single change creates the apparent over-under structure.
A muted moss or olive green also affects readability. Highlights collect along the projecting stitches while recessed areas appear darker, so the chunky basket weave crochet blanket needs no additional colors to define its geometry. Published super-bulky basketweave blankets commonly use 8–11.5 mm hooks, with a 9 mm example measuring approximately 127 × 144.5 cm. One recurring mistake is maintaining the correct stitch count while accidentally shifting a six-stitch group. The blanket stays rectangular, but the woven columns stop aligning.
Project Info at a Glance
| Skill Level | Estimated Time | Finished Size | Hook | Best For |
|---|---|---|---|---|
| Intermediate | 12–18 hours | Approx. 127 × 145 cm | 9 mm | Sofa throws, lap blankets, textured bed layers |
The size target follows established super-bulky basketweave throw proportions. Exact measurements depend on the thickness of the selected category 6 yarn and the height of the post stitches.
Materials and Tools
Yarn
- Moss green / olive green — category 6 super bulky — approximately 1,570–1,610 m (1,720–1,760 yd)
- Border reserve — keep approximately 150–200 m of the total yarn aside until the central field is finished
For plush polyester blanket yarn sold in approximately 300 g balls with around 200–220 yd per ball, expect roughly eight to nine balls. Yarn construction varies enough that yardage should be checked before relying only on weight.
Tools
- 9 mm crochet hook
- 10 mm crochet hook — optional for the starting chain
- Large tapestry needle
- Scissors
- Locking stitch markers
- Tape measure
Abbreviations
- ch — chain
- sc — single crochet
- hdc — half double crochet
- dc — double crochet
- FPdc — front post double crochet
- BPdc — back post double crochet
- sl st — slip stitch
- st/sts — stitch/stitches
An invisible decrease is unnecessary because this blanket is worked as a constant-width rectangle rather than a shaped amigurumi form.
Gauge
Target approximately 8 stitches × 5 textured rows = 10 × 10 cm after the basketweave fabric has relaxed.
More important than the raw gauge is the relationship between block width and block height. Six post stitches should measure approximately the same width as one complete five-row textured section measures vertically.
Make a swatch containing at least two 12-stitch repeats. A narrow swatch cannot show whether neighboring blocks maintain the correct proportions.
Pattern — Step by Step
Use US crochet terminology. Work the blanket flat in rows. Turning chains do not count as stitches unless specifically stated.
Foundation
The main field contains 98 stitches.
The count is calculated as:
1 edge stitch + (12 stitches × 8 repeats) + 1 edge stitch = 98 stitches.
Ch 101.
Row 1: Dc in the fourth chain from the hook and in every remaining chain across. The three skipped chains do not count as a stitch. (98 dc)
Count the row before continuing.
For a cleaner lower edge, substitute 98 foundation double crochets for the starting chain and Row 1.
Basket Weave Section A
Row 2
Ch 2, turn.
Dc in first stitch.
*FPdc around each of the next 6 stitches, BPdc around each of the next 6 stitches.*
Repeat from * to * eight times.
Dc in final stitch. (98 sts)
Row 3
Ch 2, turn.
Dc in first stitch.
*FPdc around next 6 stitches, BPdc around next 6 stitches.*
Repeat across.
Dc in final stitch. (98 sts)
Row 4
Repeat Row 3. (98 sts)
Row 5
Repeat Row 3. (98 sts)
Row 6
Repeat Row 3. (98 sts)
Stop and measure one six-stitch block. If its width differs from the five-row height by more than approximately 1 cm, adjust the number of rows in each section before proceeding.
Basket Weave Section B
Row 7
Ch 2, turn.
Dc in first stitch.
*BPdc around each of the next 6 stitches, FPdc around each of the next 6 stitches.*
Repeat eight times.
Dc in final stitch. (98 sts)
Row 8
Repeat Row 7. (98 sts)
Row 9
Repeat Row 7. (98 sts)
Row 10
Repeat Row 7. (98 sts)
Row 11
Repeat Row 7. (98 sts)
At this point the first complete woven cycle is visible. Section A projects one set of blocks while Section B reverses those positions.
Continue the Blanket Body
Rows 12–16: Repeat Section A.
Rows 17–21: Repeat Section B.
Rows 22–26: Repeat Section A.
Rows 27–31: Repeat Section B.
Continue alternating five-row sections until the central field measures approximately 137–140 cm.
Always stop after a complete five-row section.
Do not finish halfway through a basket block merely to hit an exact length. The border can absorb a small measurement difference, while an incomplete section remains permanently visible.
Final Body Row
Ch 1, turn.
Hdc in every stitch across. (98 hdc)
This plain row stabilizes the final post stitches before the perimeter is added.
Do not fasten off.
Why the Pattern Looks Woven
Nothing is physically passed over or under another crochet strip.
The illusion comes from relief.
Front-post double crochet wraps around a stitch from the front and pushes the resulting column toward the viewer. Back-post double crochet approaches from behind and pushes the column away.
Six stitches worked in the same direction create a broad raised panel.
The next six stitches use the opposite technique.
After five rows, every group changes direction.
The resulting light, shadow, and rib orientation make one green block appear to cross its neighbor.
Front Post Double Crochet
Yarn over.
Insert the hook from front to back beside the next stitch post, then bring it back to the front on the opposite side of that post.
The vertical post should lie in front of the hook.
Yarn over and draw up a loop.
Yarn over and pull through two loops.
Yarn over again and pull through the final two loops.
Do not insert the hook through the top loops as for an ordinary double crochet. Doing so removes the raised rib needed for the woven effect.
Back Post Double Crochet
Yarn over.
Insert the hook from the back of the fabric toward the front beside the stitch post.
Pass around the post and return the hook toward the back.
Draw up a loop.
Complete the double crochet normally.
The stitch recedes relative to a front-post stitch.
Maintain similar loop height for FPdc and BPdc. Tightening one technique more than the other distorts the supposedly square blocks.
Measuring the Basket Blocks
The six-stitch width and section height should remain close to equal.
Suppose one block measures 9 cm wide.
If five rows measure only 7 cm high, the pattern will produce short horizontal rectangles. Work six rows per section and measure again.
If five rows measure 11 cm high, reduce the section to four rows.
Repeat the same adjusted number of rows throughout the blanket.
Never alternate five-row and six-row sections to compensate locally. That disrupts the grid farther up the throw.
Green Blanket Border
The reference uses a broad monochromatic frame with a firm corded outer edge.
Border Round 1
Ch 1.
Sc across the top edge.
Work 3 sc in the first corner.
Work down the first long side, distributing stitches evenly across the row ends.
Start with approximately 2 sc for every 3 row ends, then adjust according to the actual fabric.
Work 3 sc in the next corner.
Sc across the foundation edge.
Work 3 sc in the next corner.
Continue evenly up the remaining side.
Work 3 sc in the final corner and join with sl st.
Border Round 2
Ch 2.
Hdc in every stitch around.
Work 3 hdc in the center stitch of each corner.
Join.
Border Round 3
Ch 1.
Sc in every stitch around.
Work 3 sc in each corner.
Join.
Border Round 4
Ch 2.
Hdc in every stitch around.
Work 3 hdc in each corner.
Join.
Final Corded Edge
Ch 1.
Work reverse single crochet around the complete blanket.
Keep the loops slightly relaxed.
Join, fasten off, and leave a 20 cm tail for weaving.
Assembly
- Complete the 98-stitch foundation row and recount it before beginning the first post-stitch section.
- Place a marker after each 12-stitch repeat during Row 2 so the eight pattern repeats remain separated.
- Work the first five-row Section A and measure both the width and height of one six-stitch block.
- Complete Section B by reversing every FPdc and BPdc group at the same row throughout the blanket.
- Continue complete alternating sections until the central field reaches approximately 137–140 cm.
- Work the final 98-stitch hdc row and lay the blanket flat before beginning the perimeter.
- Add Border Round 1 slowly, correcting the number of stitches along the long edges if the fabric waves or contracts.
- Complete the remaining green border rounds only after Round 1 lies flat on all four sides.
- Finish the perimeter with relaxed reverse single crochet and inspect all four corners for curling.
- Weave each yarn tail through at least 8–10 cm of dense matching stitches before trimming the excess.
The finished blanket should display a continuous field of oversized moss-green woven blocks surrounded by a stable textured frame.
7 Technical Tips
- The six-stitch blocks shift out of alignment: Mark every 12-stitch repeat during the first textured row. One missed post stitch can move every remaining block even when the total width initially looks correct.
- The lower edge contracts: Make the foundation chain with a hook approximately 1 mm larger than the working hook. Super-bulky chains worked too tightly can make the bottom several centimeters narrower than the upper field.
- The woven sections look rectangular: Compare the six-stitch width with the height of five textured rows. Change the section to four or six rows if the measurements differ by more than approximately 1 cm.
- The blanket narrows gradually: Confirm all 98 stitches after every direction change. Missing the ordinary dc at either edge is more common than losing a stitch inside the marked repeats.
- The relief becomes shallow: Pass the hook completely around each vertical post. Catching only the top loops converts the stitch into ordinary double crochet and removes the raised structure.
- The border ruffles: Remove several stitches from the first round along each long edge. Excess sc worked into thick row ends produces perimeter waves that become larger with every additional round.
- A skein change creates a hard knot: Join new yarn near an outside edge and leave 15–20 cm tails. Knots buried inside a raised basket block can remain visible as bumps on the finished surface.
Choosing the Right Green Yarn
The reference is closest to a muted medium olive or moss green. It contains enough yellow to read warmer than emerald but remains less brown than traditional army green.
Look for shade names such as moss, olive, fern, avocado, sage leaf, or meadow green.
A solid color is preferable when matching the photographed blanket. Variegated yarn introduces color transitions across the raised blocks and can reduce the visual clarity of the woven grid.
Choose a smooth super-bulky strand rather than an extremely fuzzy yarn. The reference shows individual stitch columns clearly, particularly in the vertical sections.
Why One Color Works
Basketweave texture creates its own contrast.
Raised front-post sections catch more light. Back-post areas create recessed shadows.
Changing stitch orientation also changes the direction of the visible yarn lines.
The result is enough visual separation to define every block in a single shade.
This makes the design especially effective in medium-value colors such as moss green. Very dark yarn can hide some post-stitch detail, while extremely pale yarn reduces the shadow difference between raised and recessed areas.
Medium olive provides enough tonal variation from light alone.
Yarn Quantity
Basketweave crochet is yarn-intensive.
For a throw around 127 × 145 cm, plan approximately 1,720–1,760 yd of category 6 yarn as a starting quantity.
Post stitches require extra yarn because each stitch wraps around the previous stitch’s vertical post.
The broad border adds further consumption.
Do not crochet the central field until the final skein is nearly empty and then expect enough yarn to remain for edging.
Reserve at least 150–200 m before deciding whether to add another complete basketweave cycle.
How to Make the Blanket Wider
Width changes are simple because the central pattern repeat contains 12 stitches.
The standard version contains eight repeats:
1 + (8 × 12) + 1 = 98 stitches.
For nine repeats:
1 + (9 × 12) + 1 = 110 stitches.
For ten repeats:
1 + (10 × 12) + 1 = 122 stitches.
For seven repeats:
1 + (7 × 12) + 1 = 86 stitches.
When using a standard chain foundation with three skipped chains that do not count as a stitch, add three chains to the desired Row 1 stitch count.
Lap Blanket Version
Use six pattern repeats for a narrower throw.
The body contains:
1 + (6 × 12) + 1 = 74 stitches.
Ch 77.
Dc in the fourth chain from the hook and across to produce 74 dc.
Work the same alternating sections.
Continue until the central field measures approximately 100–110 cm long.
Add the same border or reduce it to three rounds if a lighter finished edge is preferred.
Large Sofa Throw Version
Use ten repeats for a broader blanket.
The central field contains 122 stitches.
If using a chain foundation, ch 125 and work dc in the fourth chain from the hook and across.
Measure after several textured rows rather than relying only on the foundation measurement.
Post-stitch fabric contracts differently from ordinary double crochet.
Continue complete A-and-B cycles until the blanket reaches the required length.
Expect the larger version to require substantially more than 1,760 yd.
Adjusting for a Different Super-Bulky Yarn
Category 6 is a range rather than one exact diameter.
One super-bulky yarn may produce eight stitches per 10 cm with a 9 mm hook, while another needs a 10 or 11.5 mm hook for comparable fabric.
Start with the yarn-label recommendation.
Make a two-repeat basketweave swatch.
If the fabric is rigid and difficult to fold, move up one hook size.
If the posts spread apart and the relief looks weak, move down one hook size.
Repeat the gauge measurement after changing hooks because both finished width and yarn requirements will change.
Keeping the Basket-Weave Grid Square
The most useful measurement is not the overall blanket length. It is one individual block.
Place a ruler across six post stitches.
Record the width.
Measure vertically from the start to the end of one direction section.
Those dimensions should be close.
Check again after several cycles. Heavy blanket fabric can alter working tension as the project grows.
If later blocks become shorter, support more of the blanket on a table or lap so its weight does not pull on the active row.
Managing a Heavy Crochet Blanket
A finished super-bulky throw can exceed 2 kg.
Do not allow the entire blanket to hang below the working hook as the rows become longer.
Place the completed fabric on a table, sofa, or your lap.
Turn the project without lifting its complete weight whenever possible.
Measure the blanket flat rather than vertically.
Heavy post-stitch fabric stretches under its own weight, which can make a hanging measurement several centimeters longer than the actual resting length.
Changing Skeins Cleanly
Plan yarn changes near the first or final ordinary edge stitch.
On the final yarn-over of the old strand, complete the stitch with the new yarn.
Leave both tails approximately 15–20 cm.
Continue crocheting normally.
After several additional rows, weave each tail separately through dense matching stitches.
Avoid joining in the center of a six-stitch raised block whenever possible. Super-bulky yarn tails can create enough thickness to disturb the block surface.
Keeping the Side Edges Straight
Every textured row begins and ends with one ordinary double crochet.
These stitches form stable border columns.
Mark both edge stitches if they become difficult to identify beside the large post stitches.
The turning chain does not count as a stitch in this version.
Work the first actual dc into the first stitch and the final dc into the last stitch.
Changing that convention midway through the blanket can create accidental increases.
Fixing a Wrong-Direction Block
A block that projects when it should recede usually contains the wrong post stitch.
Check the first row of the current five-row section.
If the section should begin with BPdc but a six-stitch group was worked as FPdc, every following row will reinforce the mistake.
Correct it as soon as it appears.
Post stitches wrap around lower rows, making local repairs difficult once several sections have been completed.
Unraveling to the incorrect section is usually cleaner than attempting to disguise a reversed block later.
Border Tension and Corners
Place the blanket flat after the first border round.
The long edges should remain straight.
If they ripple, too many sc have been placed into the row ends.
If the blanket cups inward, the side stitch count is too low or the tension is too tight.
Correct Round 1 before adding Round 2.
Use three stitches in each corner to create enough turning space.
The final reverse-single-crochet round should define the perimeter without pulling it shorter.
Care and Finishing
Follow the care instructions printed on the selected yarn label.
Check washing-machine capacity before washing a large super-bulky blanket because saturated yarn becomes substantially heavier.
Support the complete fabric when wet.
Lay the blanket flat and arrange the four corners into a rectangle.
Do not press the basketweave surface flat. The raised post stitches are the primary design feature.
Allow the throw to dry completely before folding.
Store it without heavy objects on top so the relief blocks are not compressed for long periods.
Conclusion
The green surface depends on consistent relief rather than color changes, making block alignment the measurement to monitor throughout the project. Begin with 98 double crochets, mark every 12-stitch repeat, and compare the first six-stitch block’s width with the height of one complete section. Correct that proportion before extending the throw. Reserve the border yarn early and work all section reversals on the same row. Your next step is a two-repeat swatch in the chosen moss yarn. Save this green basket weave crochet blanket pattern to Pinterest or share the completed throw on Instagram with #GreenBasketWeaveBlanket. Would you use this olive green or shift the same texture toward darker forest green?









