Introduction
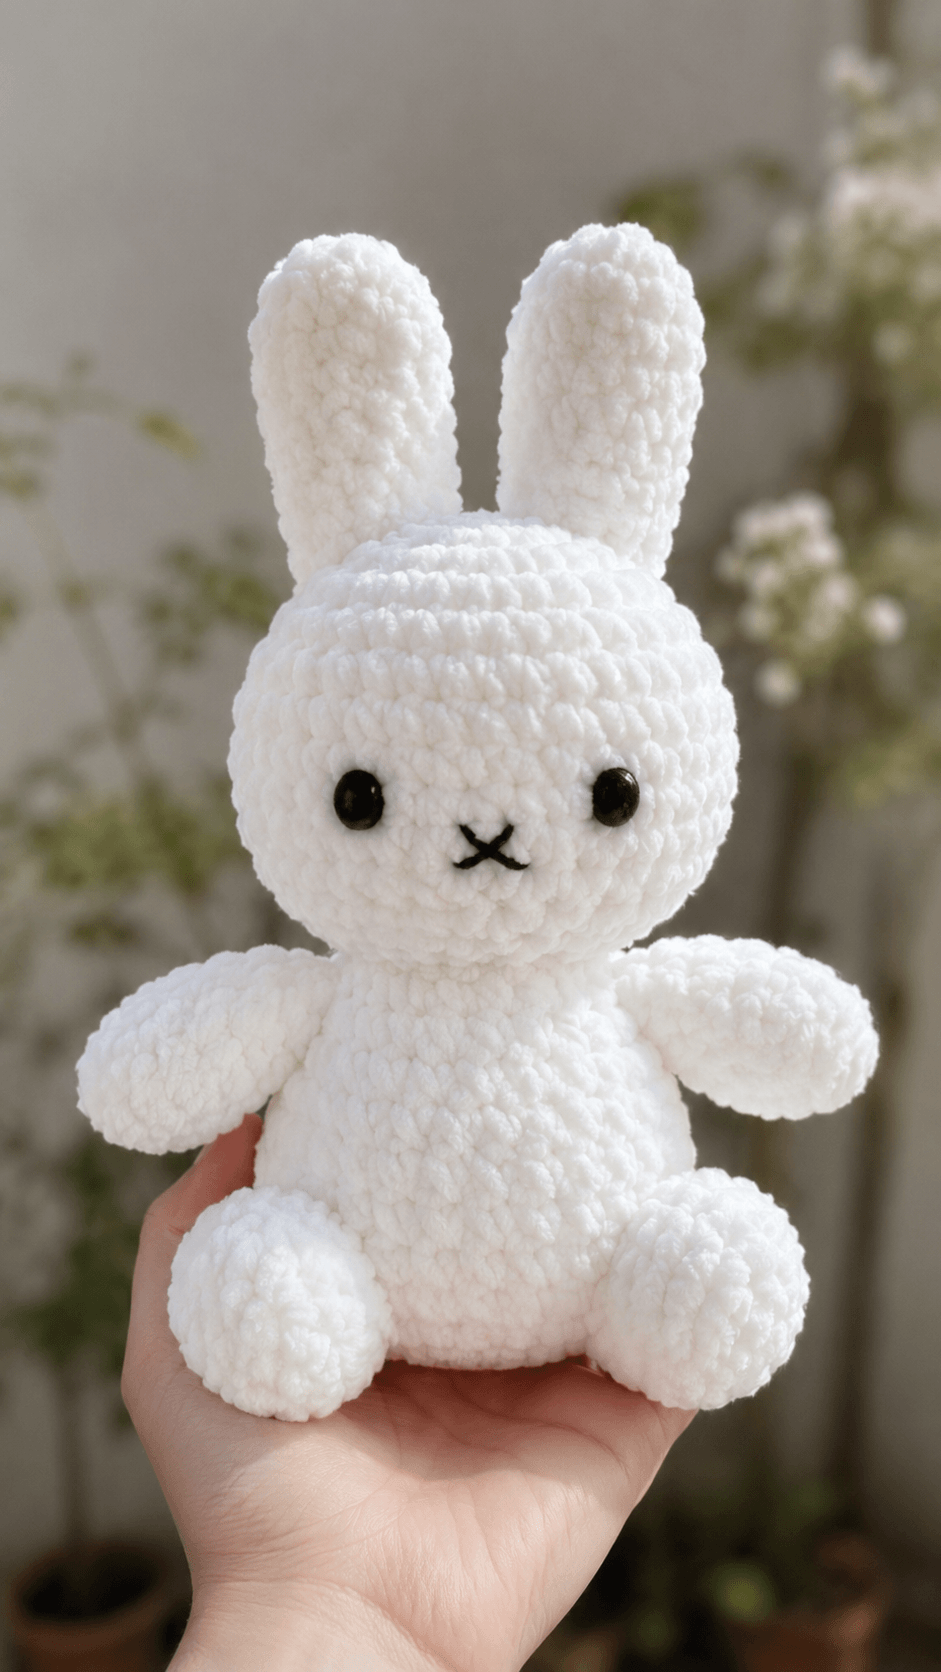
A rabbit’s ears can add almost half its visible height, so their base placement controls the entire silhouette. This white bunny amigurumi crochet pattern uses super-bulky velvet yarn, a 4.0 mm hook, and 10 mm safety eyes to produce a seated rabbit measuring about 25–28 cm. The project suits an advanced beginner who can work continuous rounds, shape with decreases, and sew symmetrical parts. Its wide feet create a stable display base.
The Design: What Makes This Bunny Different
The head reaches a 42-stitch plateau, while the body stops at 36 stitches. That difference creates the broad face and narrower torso visible in the reference image without requiring a separate muzzle. Each ear begins as a closed oval and continues through a long straight section, giving the long-eared crochet rabbit enough height to read clearly above the head. The back feet use an extended oval rather than a simple sphere because the seated pose needs forward weight and a flat contact area. A common error in a plush bunny crochet pattern is attaching the ears too far apart. The head then appears flattened across the crown. This velvet bunny amigurumi places the inner ear edges about 2.5 cm apart, keeping both ears upright while preserving the rounded head shape.
Project Info at a Glance
| Skill Level | Time | Finished Size | Hook | Best For |
|---|---|---|---|---|
| Advanced beginner | 5–7 hours | 25–28 cm including ears | 4.0 mm | Nursery shelf, seasonal display, handmade toy |
Materials and Tools
Yarn
- White — super-bulky velvet or chenille yarn — approximately 120 g — Himalaya Dolphin Baby, YarnArt Dolce, or an equivalent plush yarn.
- Black — smooth DK or worsted yarn — approximately 2 g — cotton or acrylic embroidery yarn.
Tools
- 4.0 mm crochet hook
- Two 10 mm black safety eyes
- Polyester stuffing, approximately 90–110 g
- Yarn needle with a large eye
- Locking stitch marker
- Sewing pins
- Scissors
- Black embroidery needle
Abbreviations
- MR — magic ring
- sc — single crochet
- inc — two single crochets in one stitch
- dec — decrease over two stitches
- sl st — slip stitch
- ch — chain
- BLO — back loop only
For an invisible decrease, insert the hook through the front loops of the next two stitches, yarn over, pull through both front loops, then complete one single crochet.
Pattern — Step by Step
Work all stuffed sections in a continuous spiral unless a different method is stated. Move the stitch marker after every completed round.
Head
Yarn: white — shaping based on standard six-stitch amigurumi math.
R1: 6 sc in MR (6)
R2: inc ×6 (12)
R3: (sc, inc) ×6 (18)
R4: (2 sc, inc) ×6 (24)
R5: (3 sc, inc) ×6 (30)
R6: (4 sc, inc) ×6 (36)
R7: (5 sc, inc) ×6 (42)
R8–R14: sc around (42)
R15: (5 sc, dec) ×6 (36)
R16: (4 sc, dec) ×6 (30)
R17: (3 sc, dec) ×6 (24)
R18: (2 sc, dec) ×6 (18)
R19: (sc, dec) ×6 (12)
R20: dec ×6 (6)
Install the eyes between R11 and R12 with nine visible stitches between their inner edges. Begin stuffing after R16. Add small pieces around the eye washers before filling the center.
Fasten off. Leave a 25 cm tail for closing and sewing.
Body
Yarn: white — shaping based on standard six-stitch amigurumi math.
R1: 6 sc in MR (6)
R2: inc ×6 (12)
R3: (sc, inc) ×6 (18)
R4: (2 sc, inc) ×6 (24)
R5: (3 sc, inc) ×6 (30)
R6: (4 sc, inc) ×6 (36)
R7–R11: sc around (36)
R12: (4 sc, dec) ×6 (30)
R13–R15: sc around (30)
R16: (3 sc, dec) ×6 (24)
R17–R18: sc around (24)
R19: (2 sc, dec) ×6 (18)
R20: sc around (18)
R21: (sc, dec) ×6 (12)
R22: dec ×6 (6)
Stuff the lower body firmly enough to hold the seated shape. Keep the upper 2 cm slightly softer so the head can settle against the neck opening.
Fasten off. Leave a 30 cm tail for closing and attachment.
Arms or Front Legs — Make 2
Yarn: white — standard amigurumi math.
R1: 6 sc in MR (6)
R2: inc ×6 (12)
R3: (sc, inc) ×6 (18)
R4–R6: sc around (18)
R7: (sc, dec) ×6 (12)
R8–R11: sc around (12)
R12: (2 sc, dec) ×3 (9)
R13: sc around (9)
Stuff the rounded paw and the lower half of the arm. Leave the top half nearly flat so it sits cleanly against the body.
Flatten the opening and crochet 4 sc through both layers. Fasten off, leaving a 25 cm sewing tail.
Back Legs and Feet — Make 2
Yarn: white — original oval construction.
R1: ch 5. Starting in the second chain from the hook, 3 sc, 3 sc in the last chain, work along the opposite side with 2 sc, inc in the final chain (10)
R2: inc, 2 sc, inc ×3, 2 sc, inc ×2 (16)
R3: (sc, inc), 2 sc, (sc, inc) ×3, 2 sc, (sc, inc) ×2 (22)
R4–R6: sc around (22)
R7: 6 sc, dec ×5, 6 sc (17)
R8: 5 sc, dec ×3, 6 sc (14)
R9–R10: sc around (14)
R11: (5 sc, dec) ×2 (12)
Fill the toe firmly. Add less stuffing at the heel so the foot can angle upward when sewn to the seated body.
Flatten the opening and crochet 6 sc through both layers. Fasten off, leaving a 30 cm tail.
Upright Ears — Make 2
Yarn: white — original shaping based on the photographed ears.
R1: 6 sc in MR (6)
R2: inc ×6 (12)
R3: (sc, inc) ×6 (18)
R4: (2 sc, inc) ×6 (24)
R5–R14: sc around (24)
R15: (2 sc, dec) ×6 (18)
R16–R19: sc around (18)
R20: (sc, dec) ×6 (12)
Do not stuff the upper two-thirds. Place a thin strip of stuffing in the lower 4 cm only; this supports the base without rounding the full ear.
Flatten the opening and crochet 6 sc through both layers. Fasten off, leaving a 35 cm sewing tail.
Tail
Yarn: white — based on a standard spherical bunny-tail sequence.
R1: 6 sc in MR (6)
R2: inc ×6 (12)
R3: (sc, inc) ×6 (18)
R4–R5: sc around (18)
R6: (sc, dec) ×6 (12)
R7: dec ×6 (6)
Stuff lightly. A rigid tail can push the body forward and weaken the sitting balance.
Fasten off, leaving a 25 cm tail.
Cheek Patches — Make 2
Yarn: white — flat-circle construction. These patches create a slight muzzle plane without adding another color.
R1: 6 sc in MR (6)
R2: inc ×6 (12)
Join with a sl st. Fasten off, leaving a 15 cm tail. Do not stuff.
Embroidered Nose and Mouth
Yarn: black DK or worsted yarn.
Place the center nose point between R13 and R14. Make two diagonal stitches, each approximately 8 mm long, to form a small “X.” Add one 5 mm vertical stitch from the lower point, then make two curved mouth stitches extending about 7 mm to each side.
Fasten the yarn inside the head with two hidden knots before final assembly.
Assembly
- Close the final six stitches of the head with the yarn tail, but keep the long sewing strand attached.
- Close the body opening and position the head directly over the final body rounds.
- Sew the head to the body with two full passes through R18–R20 of the head and R19–R21 of the body.
- Pin the cheek patches below the eyes with a gap of about 5 mm between their inner edges, then sew around each outer loop.
- Complete the nose and mouth embroidery at the midpoint between the two eyes.
- Pin the arms between body R14 and R17. Angle them downward by roughly 20 degrees and sew along the flattened edges.
- Attach the back feet across body R5–R9. Keep approximately 3 cm between their inner edges.
- Pin the ears across head R3–R6, leaving about 2.5 cm between the inner edges. Check the front view before sewing.
- Sew the tail to the center back across body R6–R9, keeping its lower edge slightly above the sitting surface.
- Weave every tail through at least three different stitch directions, trim the yarn, and redistribute the stuffing by hand.
The completed bunny should remain seated without the ears pulling the head backward.
7 Technical Tips
- Stitch-marker drift: A lost round boundary can rotate the decreases and twist the face. Place the marker in the first stitch, not in the working loop, and count each completed round before moving it.
- Understuffed head: Hollow areas above the eyes produce dents when the washers press inward. Pack small pieces into the crown first, then fill the center until the head measures about 12–13 cm across.
- Visible decrease gaps: Standard decreases can expose stuffing through velvet yarn. Work every shaping decrease through the front loops only and keep the new loop close to the hook shaft.
- Late eye placement: Safety-eye washers cannot be installed after the head opening becomes too narrow. Fit both eyes after R14 and before completing R16, then confirm that nine visible stitches separate their inner edges.
- Loose velvet tension: A hook that slides through the fabric without resistance can leave gaps around the 42-stitch head plateau. Change from 4.0 mm to 3.5 mm when stuffing remains visible between adjacent stitches.
- Uneven pinning: One ear sewn 5 mm farther forward will appear taller from the front. Measure both ear bases from the eye line and use at least three pins per ear before making the first stitch.
- Escaping yarn tails: A tail woven in only one direction can pull free from plush fibers. Pass each tail horizontally, vertically, and diagonally through separate dense sections before trimming it level with the surface.
Conclusion
Check the final measurements before treating the rabbit as finished: the ears should be parallel, the eyes should sit on one horizontal line, and both feet should contact the display surface. The next practical step is to record your yarn brand, hook size, and completed height so a second bunny can be reproduced at the same scale. Save the white bunny amigurumi crochet pattern to Pinterest and share the completed rabbit on Instagram with #UprightEarBunny. When comparing the front and side views, does your rabbit need firmer stuffing at the ear bases, or would moving each ear inward by one stitch create the cleaner silhouette?









