Introduction
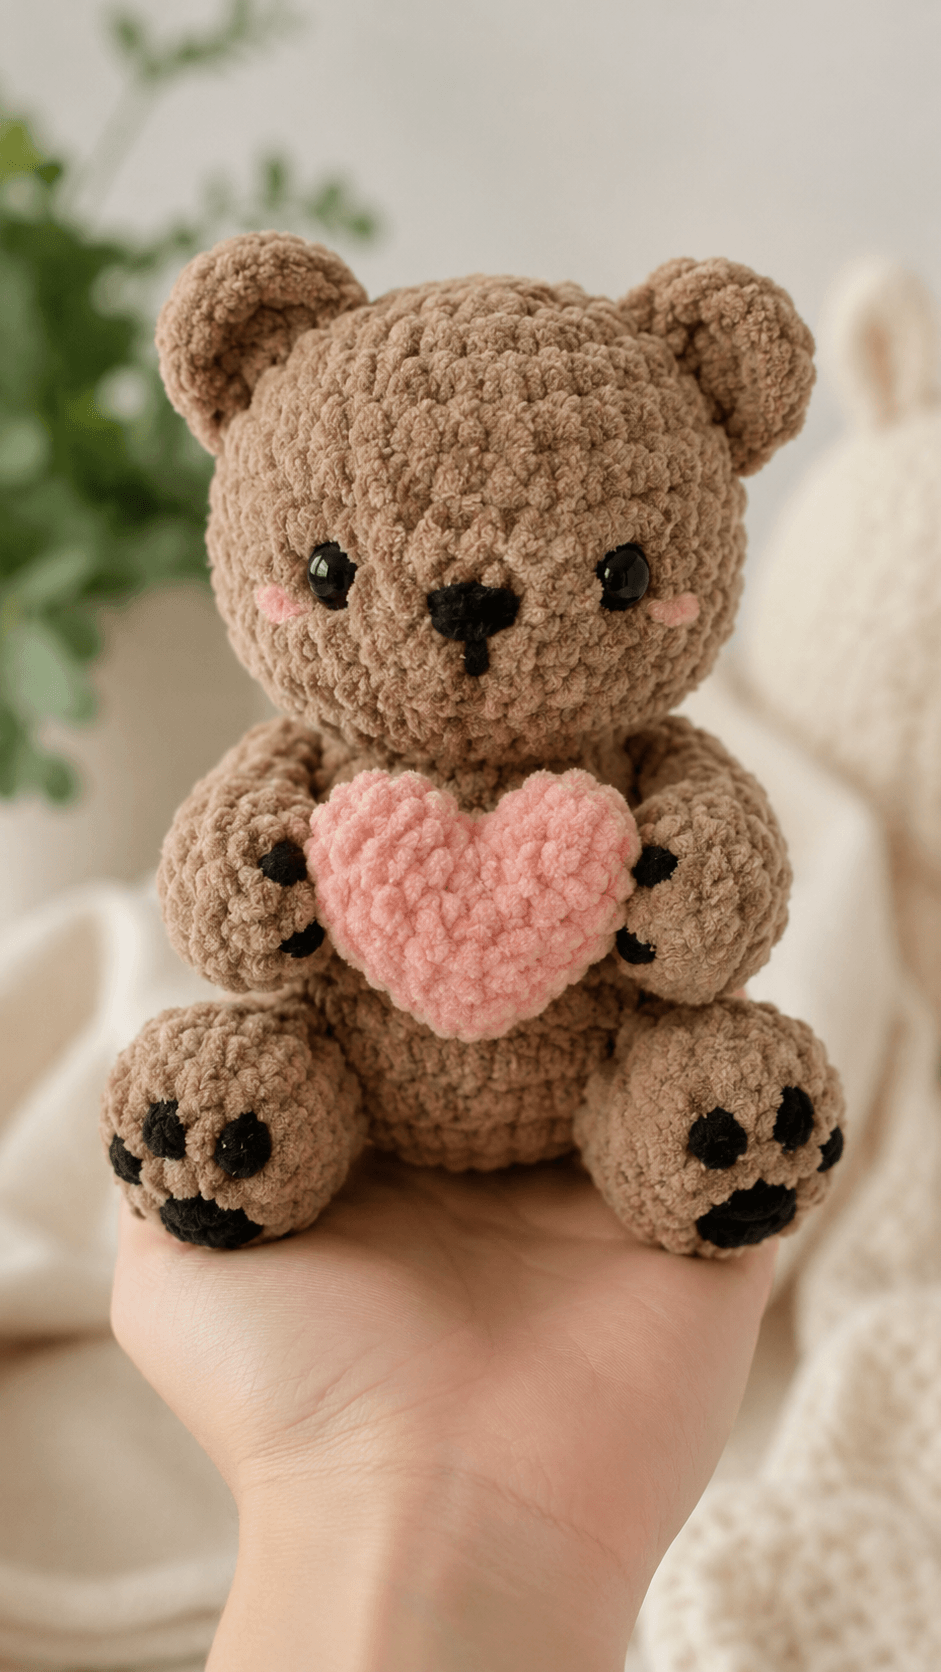
A teddy bear’s muzzle must project without turning the head into a dog-shaped profile. This teddy bear amigurumi crochet pattern uses bulky chenille yarn, a 5 mm hook and measured facial placement to produce a sitting bear approximately 17 cm tall. The project is rated intermediate because the heart, paw pads and symmetrical assembly require controlled placement. Its flat sitting base also makes the finished bear practical for shelf displays and gift photographs.
The Design: What Makes This Teddy Bear Different
The head reaches a 36-stitch plateau, giving the bear a broad forehead while keeping the finished toy close to palm size. A separate shallow muzzle adds projection around the nose without increasing the lower half of the head. The back legs use wide oval paws and attach low on the body, creating a stable three-point sitting position with the lower torso. This construction distinguishes the chenille teddy bear pattern from narrow standing-bear designs.
The arms curve around a stuffed heart rather than hanging at the sides. Their angle must be tested with the accessory in place before sewing. A frequent mistake in a crochet bear holding a heart is attaching the hands first and discovering that the heart either covers the face or drops below the feet. Pin the complete arrangement as one unit before making permanent seams.
Project Info at a Glance
| Skill Level | Time | Finished Size | Hook | Best For |
|---|---|---|---|---|
| Intermediate | 5–7 hours | Approximately 17 cm sitting height | 5 mm | Gift displays, Valentine projects and nursery decoration |
The finished size and primary tool selection follow a published 17 cm chenille-bear tutorial using Himalaya Dolphin Baby yarn and a 5 mm hook.
Materials and Tools
Yarn
- Warm taupe brown — bulky chenille or velvet yarn — purchase 100 g — Himalaya Dolphin Baby, YarnArt Dolce or a similar 100 g plush-yarn ball.
- Blush pink — bulky chenille yarn — purchase 25 g or use a partial ball — match the thickness of the main yarn.
- Black — DK cotton or smooth acrylic — approximately 5 g — use for the nose, mouth and paw-pad embroidery.
- Optional sewing yarn — strong smooth yarn in brown and pink — use when chenille strands shed or snap during assembly.
Tools
- 5 mm crochet hook
- 10 mm safety eyes
- Polyester fiberfill
- Yarn needle and embroidery needle
- Locking stitch markers
- Long straight pins
- Scissors
Safety eyes are not suitable for children under three years old. Replace them with tightly embroidered eyes when the bear will be handled by an infant or toddler.
Abbreviations
- MR — magic ring
- sc — single crochet
- inc — two single crochets in one stitch
- dec — invisible decrease over two stitches
- sl st — slip stitch
- ch — chain
- BLO — back loop only
- st/sts — stitch/stitches
An invisible decrease is worked through the front loops of the next two stitches and reduces the visible gap on a stuffed surface.
Pattern — Step by Step
Work all pieces in continuous spirals unless a section states otherwise. Place a marker in the first stitch of every round. The head uses the 36-stitch plateau required for a medium-scale amigurumi component.
Head
Yarn: warm taupe brown — standard six-stitch amigurumi shaping.
R1: 6 sc in MR (6)
R2: inc ×6 (12)
R3: (sc, inc) ×6 (18)
R4: (2 sc, inc) ×6 (24)
R5: (3 sc, inc) ×6 (30)
R6: (4 sc, inc) ×6 (36)
R7–R13: sc around (36)
Insert the 10 mm safety eyes between R10 and R11. Leave 8 visible stitches between the eye posts. Do not attach the backs until the muzzle has been pinned below them.
R14: (4 sc, dec) ×6 (30)
R15: (3 sc, dec) ×6 (24)
Stuff the crown and side walls first. Keep the area directly behind the muzzle firm but not domed.
R16: (2 sc, dec) ×6 (18)
R17: (sc, dec) ×6 (12)
Add small pieces of stuffing until the head measures approximately 9 cm across. Do not stretch the final opening.
R18: dec ×6 (6)
R19: sc around (6)
R20: dec ×3 (3)
Fasten off. Leave a 15 cm tail, pass it through the remaining front loops and close the opening.
Body
Yarn: warm taupe brown — standard six-stitch amigurumi shaping.
R1: 6 sc in MR (6)
R2: inc ×6 (12)
R3: (sc, inc) ×6 (18)
R4: (2 sc, inc) ×6 (24)
R5: (3 sc, inc) ×6 (30)
R6–R10: sc around (30)
R11: (3 sc, dec) ×6 (24)
R12–R13: sc around (24)
R14: (2 sc, dec) ×6 (18)
R15–R16: sc around (18)
Stuff the lower half firmly. The base should stay flat when pressed against a table.
R17: (sc, dec) ×6 (12)
R18: dec ×6 (6)
Fasten off. Leave a 30 cm tail for sewing the body to the head.
Arms and Front Paws — Make 2
Yarn: warm taupe brown — standard amigurumi math.
R1: 6 sc in MR (6)
R2: inc ×6 (12)
R3: (sc, inc) ×6 (18)
R4–R6: sc around (18)
R7: (sc, dec) ×6 (12)
Place a small amount of stuffing in the paw only. Leave the upper arm flexible so it can curve around the heart.
R8–R12: sc around (12)
R13: (sc, dec) ×4 (8)
R14: sc around (8)
Flatten the opening and crochet 4 sc through both layers (4).
Fasten off. Leave a 25 cm tail for sewing.
Back Legs and Feet — Make 2
Yarn: warm taupe brown — standard amigurumi math.
R1: 6 sc in MR (6)
R2: inc ×6 (12)
R3: (sc, inc) ×6 (18)
R4: (2 sc, inc) ×6 (24)
R5–R7: sc around (24)
R8: (2 sc, dec) ×6 (18)
R9: (sc, dec) ×6 (12)
Stuff the foot firmly, concentrating the filling under the front half of the paw.
R10–R12: sc around (12)
R13: dec ×6 (6)
Fasten off. Leave a 30 cm sewing tail. Do not close the opening until the leg angle has been tested against the body.
Ears — Make 2
Yarn: warm taupe brown — standard amigurumi math.
R1: 6 sc in MR (6)
R2: inc ×6 (12)
R3: (sc, inc) ×6 (18)
R4–R5: sc around (18)
R6: (sc, dec) ×6 (12)
Do not stuff. Flatten each ear into a shallow cup rather than pressing it completely flat.
Fasten off. Leave a 20 cm tail for sewing.
Muzzle
Yarn: warm taupe brown — standard amigurumi math.
R1: 6 sc in MR (6)
R2: inc ×6 (12)
R3: (sc, inc) ×6 (18)
R4: sc around (18)
Fasten off. Leave a 25 cm tail. Add a thin layer of stuffing during attachment so the muzzle projects approximately 1 cm.
Nose and Mouth
Yarn: black DK yarn — embroidered feature.
Embroider a horizontal nose approximately 12 mm wide at the center of the muzzle. Build the shape with six to eight parallel passes, then add one vertical stitch measuring approximately 8 mm. Split the lower end into two short diagonal mouth stitches. Keep the mouth centered on the line between the eyes.
Cheek Patches — Make 2
Yarn: blush pink — flat-circle construction.
R1: 6 sc in MR (6)
Sl st into the first sc.
Fasten off. Leave a 12 cm tail. Flatten each circle before sewing it two stitches outside the muzzle and one round below the eye line.
Large Paw Pads — Make 2
Yarn: black DK yarn — flat-circle construction.
R1: 6 sc in MR (6)
R2: inc ×6 (12)
Sl st into the first stitch.
Fasten off. Leave a 15 cm tail. Sew one pad to the lower front of each back foot.
Toe Pads — Make 6
Yarn: black DK yarn — embroidered or crocheted detail.
R1: 6 sc in MR (6)
Sl st into the first sc.
Fasten off. Leave a 10 cm tail. Sew three toe pads in a shallow arc above each large paw pad. For a less bulky finish, replace these circles with six satin-stitch ovals measuring 6–7 mm.
Front-Paw Claws
Yarn: black DK yarn — embroidered feature.
Place three short vertical stitches across the rounded end of each arm. Each line should measure approximately 6 mm, with 3 mm between adjacent lines. Keep the stitches loose enough that they do not compress the chenille surface.
Heart Lobes — Make 2
Yarn: blush pink — original accessory shaping.
R1: 6 sc in MR (6)
R2: inc ×6 (12)
R3: (sc, inc) ×6 (18)
R4–R5: sc around (18)
Fasten off the first lobe. Do not cut the yarn after completing the second lobe.
Heart Body
Yarn: blush pink — join both lobes before continuing.
R6: sc through all 18 stitches of the second lobe, then through all 18 stitches of the first lobe (36)
R7: sc around (36)
R8: (4 sc, dec) ×6 (30)
R9: (3 sc, dec) ×6 (24)
Close the small gap between the lobes with the first lobe’s yarn tail. Begin stuffing in thin layers.
R10: (2 sc, dec) ×6 (18)
R11: (sc, dec) ×6 (12)
Add the final stuffing. Keep the front surface flat enough to sit against the bear’s arms.
R12: dec ×6 (6)
Fasten off. Leave a 20 cm tail and close the remaining opening.
Assembly
- Position the head on the body opening. Sew through one complete stitch from each component, checking the front alignment after every four stitches.
- Place the muzzle between the eyes, with its upper edge approximately one round below the eye posts. Add a thin layer of stuffing before closing the final third of the seam.
- Complete the embroidered nose and mouth. Check that the vertical mouth stitch follows the center of the muzzle rather than the spiral’s natural slant.
- Sew the cheek patches level with the lower half of the muzzle. Place their inner edges approximately two stitches from the muzzle seam.
- Pin the back legs beside the lower body between body rounds 4 and 9. Angle the feet forward until the body sits without rolling backward.
- Attach the ears across head rounds 3–7. Position each inner edge approximately seven stitches from the crown center.
- Place the stuffed heart against the center of the torso. Its upper lobes should remain below the mouth and its point should stop above the lower body edge.
- Curve one arm around each side of the heart. Sew the upper arms to the body first, then add two hidden holding stitches between each paw and the heart.
- Attach the large paw pads, toe pads and front-paw claw embroidery. Match the left and right pad heights before weaving in the tails.
- Inspect every seam, remove the pins and bury each yarn tail through at least 4 cm of stuffed fabric before trimming it.
The completed bear should sit on both back paws and the lower edge of its body while holding the heart below the muzzle.
7 Technical Tips
- Marker drift: Chenille hides the first stitch and can shift the round by one position. Use a locking marker in every first stitch and recount at each increase or decrease round.
- Soft neck failure: A loosely filled upper body allows the head to lean after assembly. Pack the final 2 cm of the body firmly enough that finger pressure produces only a shallow indentation.
- Visible decrease gaps: Standard sc2tog exposes both stitch tops and may reveal white fiberfill. Work every decrease through the front loops only, then tighten the completed stitch before continuing.
- Incorrect eye timing: Eye backs cannot be repositioned after the head is closed. Pin the muzzle first and confirm an eight-stitch eye gap before pressing the washers into place.
- Uneven velvet tension: Pulling chenille tightly can strip the pile from its core. Keep each loop large enough to slide along the 5 mm hook without scraping.
- Asymmetrical limbs: Sewing unpinned legs often produces different foot heights. Pin both legs at the same time and measure from the body’s starting ring to each ankle seam.
- Escaping yarn tails: A short chenille tail may work back through the fabric because the pile compresses. Weave every assembly tail through at least 4 cm of stuffing and reverse direction once before trimming.
Conclusion
Check the bear from the front, side and base before trimming the final assembly tails. The next concrete step is to photograph the pinned layout and compare the eye, ear, foot and heart positions against the center line; that reference makes later duplicates more consistent. Share the finished teddy bear amigurumi crochet pattern result on Pinterest and Instagram with #HeartHoldingTeddy, including the yarn brand and hook size in the caption. For the next version, test one controlled variation rather than changing several measurements at once. Would you keep the three separate toe pads shown in the photograph, or replace them with compact embroidered ovals?
Technical Sources
- CrochetGrams: Little Teddy Bear Crochet Tutorial, 17 cm
- Yarnandy: Chenille Teddy Bear Yarn Quantity
- Amigurumi Today: Chenille Yarn, Hook and Eye Specifications
- Iuliia Craft: Velvet Teddy Materials and Construction









