Introduction
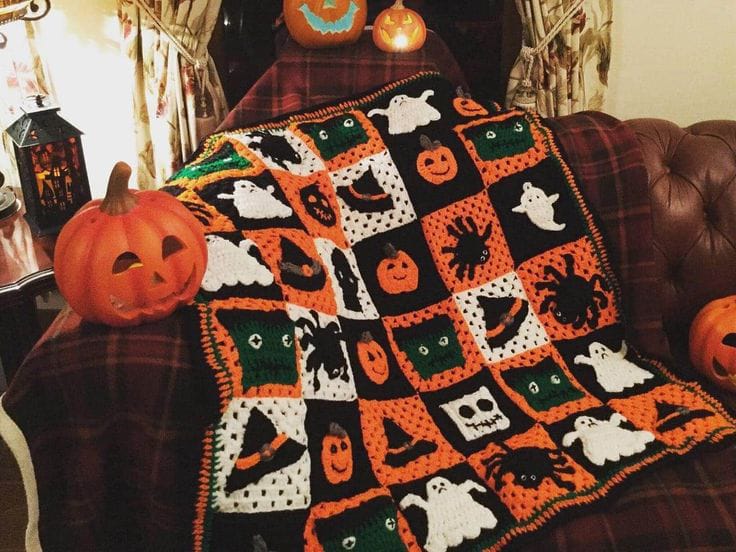
A six-square row containing a ghost, spider, pumpkin and monster still has to finish as one perfectly straight strip. This vintage Halloween granny square blanket pattern uses worsted or Aran yarn with 5 mm and 4 mm hooks to make an approximately 104 × 110 cm throw. Thirty-six framed blocks combine black, orange, cream and green into an intermediate mixed-motif Halloween project.
The Design: What Makes This Halloween Blanket Different
The blanket relies on motif variety rather than one repeated character. Ghosts, pumpkins, skulls, spiders, witch hats, crescents and green monster faces alternate across approximately thirty-six squares. Every design is surrounded by the same cream frame, so a dense black block can sit beside an orange or green one without breaking the grid. Most decorative pieces are flat or only slightly raised, keeping the finished Halloween motif crochet blanket flexible enough to fold over a chair. Color distribution is equally important. Orange, black and green centers repeat throughout the surface instead of forming isolated rows. A common error with a ghost granny square crochet project is enlarging the character until it touches the frame. Sewing then shortens the square center, which can pull the cream border inward and make the assembled grid uneven.
Project Info at a Glance
| Skill Level | Time | Finished Size | Hooks | Best For |
|---|---|---|---|---|
| Intermediate | 38–50 hours | Approx. 104 × 110 cm | 5.0 mm squares / 4.0 mm motifs | Halloween sofa throws, chair blankets and seasonal displays |
Materials and Tools
Yarn
- Black — worsted / Aran #4 — approximately 320–380 g — dark square centers, spiders, silhouettes, hats and facial details.
- Pumpkin orange — worsted / Aran #4 — approximately 270–330 g — orange backgrounds, pumpkins and border accents.
- Antique cream — worsted / Aran #4 — approximately 300–360 g — ghosts, skulls, square frames, joining and border.
- Monster green — worsted / Aran #4 — approximately 150–190 g — monster blocks and selected background squares.
- Muted gold / brown — worsted / Aran #4 — approximately 40–60 g combined — buckles, moon details and small accents.
Choose yarns with comparable loft. A stiff black yarn beside a soft cream yarn can produce visibly different square dimensions before framing.
Tools
- 5.0 mm crochet hook for square bases and joins
- 4.0 mm crochet hook for appliqués
- Yarn needle
- Stitch markers
- Blocking mats
- Rust-resistant pins
- Scissors
- Measuring tape
Abbreviations
- MR — magic ring
- ch — chain
- sc — single crochet
- hdc — half double crochet
- dc — double crochet
- tr — treble crochet
- sl st — slip stitch
- inc — increase
- dec — decrease
- BLO — back loop only
An invisible decrease is worked through the front loops of two adjacent stitches before completing one single crochet through both loops.
Pattern — Step by Step
Make one completed base square first. Block it to 16 cm, test at least two contrasting appliqués on the center and use that square as the dimensional reference for the remaining thirty-five blocks.
Basic Halloween Granny Square — Make 36
Yarn: black, orange, cream or green center with antique-cream frame — original reconstruction using standard granny-square geometry.
R1: With center color, make MR. Ch 3, 2 dc, ch 2; repeat (3 dc, ch 2) three more times. Join.
R2: Sl st to a corner. Work (3 dc, ch 2, 3 dc) in each corner with ch 1 between corner groups. Join.
R3: Work (3 dc, ch 2, 3 dc) in every corner. Work 3 dc in each side space with ch 1 between groups. Join.
R4: Repeat the established granny-square sequence, adding one 3-dc group to every new side space.
R5: Repeat R4 once more.
Change to antique cream.
R6: Ch 1. Sc in every dc and side chain space. Work (2 sc, ch 1, 2 sc) in each corner.
Fasten off.
Block to approximately 16 × 16 cm.
Background Color Distribution
Make twelve center squares in black.
Work ten in pumpkin orange.
Make eight in monster green.
Finish six in antique cream.
Every square receives the same cream outer frame.
Avoid creating a complete six-square row in only one background color.
White Ghost Appliqué — Make 8
Yarn: antique cream.
R1: 6 sc in MR. (6)
R2: inc ×6. (12)
R3: (sc, inc) ×6. (18)
R4: (2 sc, inc) ×6. (24)
Continue across twelve stitches only.
Row 1: 12 sc. (12)
Row 2: ch 1, turn, 12 sc. (12)
Row 3: ch 1, turn, 12 sc. (12)
Row 4: ch 1, turn, 12 sc. (12)
Row 5: ch 1, turn, sc, hdc, 2 dc, sl st, 2 dc, sl st, 2 dc, hdc, sc.
Fasten off with a 25 cm sewing tail.
Ghost Arms
Join cream at one side.
Ch 5.
Starting in the second chain work sl st, sc, hdc, sl st into the body.
Repeat on the opposite side.
Ghost Face
With black yarn, embroider two oval eyes approximately 7–9 mm high.
Keep the centers roughly 15 mm apart.
For an open mouth, add one short vertical black stitch 8–10 mm below the eye line.
Jack-o’-Lantern Appliqué — Make 8
Yarn: pumpkin orange.
Ch 10.
Row 1: starting in the second chain, 9 hdc. (9)
Rows 2–14: ch 1, turn, hdc BLO across. (9)
Fasten off with a 30 cm tail.
Gather each short edge slightly and draw the upper and lower centers inward.
Keep the pumpkin essentially flat.
Pumpkin Stem
With green, ch 5.
Sl st back through four chains.
Fasten off and sew behind the upper center.
Jack-o’-Lantern Face
Use black yarn.
Make two triangular eyes using three short satin stitches each.
Add a small triangular nose.
Embroider a curved mouth approximately 35–40 mm wide and interrupt it with two short orange gaps for teeth.
Skull Appliqué — Make 3
Yarn: antique cream.
R1: 6 sc in MR. (6)
R2: inc ×6. (12)
R3: (sc, inc) ×6. (18)
R4: (2 sc, inc) ×6. (24)
Work across the lower eight stitches.
Jaw Row 1: 8 sc. (8)
Jaw Row 2: dec, 4 sc, dec. (6)
Jaw Row 3: dec, 2 sc, dec. (4)
Fasten off.
Skull Features
Embroider two black eye sockets approximately 10 mm across.
Add two short nose stitches.
Work three vertical black marks along the jaw edge for teeth.
Green Monster Square Motif — Make 6
Yarn: monster green.
Ch 12.
Row 1: starting in second chain, 11 sc. (11)
Rows 2–9: ch 1, turn, 11 sc. (11)
Row 10: ch 1, turn, dec, 7 sc, dec. (9)
Fasten off.
Monster Hair
Join black at one upper corner.
Repeat across the top:
ch 3, sl st in next stitch.
Vary two loops to ch 4 for an uneven hairline.
Monster Eyes
With cream yarn, embroider two small circles approximately 8 mm wide.
Add a 3–4 mm black pupil inside each.
Place the eyes roughly 25–30 mm apart.
Monster Mouth
Use black yarn to embroider one horizontal line approximately 25 mm long.
Add two short vertical stitches crossing the line to imitate stitched lips.
Spider Appliqué — Make 3
Yarn: black.
R1: 6 sc in MR. (6)
R2: inc ×6. (12)
R3: (sc, inc) ×6. (18)
Fasten off.
Spider Legs
Attach black yarn to one side of the body.
Ch 7.
Sl st back through six chains.
Sl st into the next body stitch.
Repeat four times.
Make four matching legs on the opposite side.
Spider Eyes
Use two small cream embroidered dots.
Add black centers if stronger definition is wanted.
Witch Hat Appliqué — Make 3
Yarn: black with orange band.
Ch 3.
Row 1: 2 sc. (2)
Row 2: inc, sc. (3)
Row 3: sc across. (3)
Row 4: sc, inc, sc. (4)
Row 5: sc across. (4)
Row 6: inc, 2 sc, inc. (6)
Row 7: sc across. (6)
Row 8: inc, 4 sc, inc. (8)
Rows 9–10: sc across. (8)
Row 11: inc, 6 sc, inc. (10)
Fasten off.
Witch Hat Brim
Ch 19.
Starting in the second chain, 18 hdc.
Fasten off.
Sew the crown base over the center eight stitches of the brim.
Hat Band
With orange yarn, ch 11.
Sl st back through ten chains.
Sew across the lower crown directly above the brim.
Crescent Moon — Make 3
Yarn: orange or muted gold.
R1: 6 sc in MR. (6)
R2: inc ×6. (12)
R3: (sc, inc) ×6. (18)
R4: (2 sc, inc) ×6. (24)
R5: (3 sc, inc) ×6. (30)
Fasten off.
Fold approximately one-third of the circle behind the main piece.
Tack that hidden section to the rear so the visible front becomes a crescent.
Black Cat Silhouette — Make 3
Yarn: black.
Head R1: 6 sc in MR. (6)
Head R2: inc ×6. (12)
Head R3: (sc, inc) ×6. (18)
Fasten off.
Cat Ear — Make 2 Per Cat
Ch 5.
Starting in second chain work sc, hdc, dc, tr.
Fasten off.
Sew the broad edge behind the head.
Cat Body
Ch 11.
Row 1: 10 sc. (10)
Rows 2–7: ch 1, turn, 10 sc. (10)
Row 8: dec, 6 sc, dec. (8)
Row 9: dec, 4 sc, dec. (6)
Fasten off.
Sew the head over the upper 10–12 mm of the body.
Cat Tail
Ch 17.
Sl st back through sixteen chains.
Fasten off.
Sew one end to the body and curve the remaining cord upward.
Bat Silhouette — Make 2
Yarn: black.
Ch 15.
Starting in the second chain work:
sl st, sc, hdc, dc, tr, hdc, sc, sc, hdc, tr, dc, hdc, sc, sl st.
Fasten off.
Take one black stitch through the exact center and pull it inward to divide the wings.
Check Every Motif Against a Test Square
Place each completed motif in the center of a blocked 16 cm square.
Keep at least 20–25 mm between the appliqué and cream frame.
Turn spiders so their legs fit diagonally if necessary.
Keep witch hats lower than the upper frame rather than forcing the point directly against it.
Suggested Six-by-Six Layout
Row 1: Spider / Monster / Ghost / Pumpkin / Monster / Crescent.
Row 2: Ghost / Pumpkin / Witch Hat / Pumpkin / Cat / Ghost.
Row 3: Pumpkin / Spider / Ghost / Monster / Pumpkin / Cat.
Row 4: Monster / Skull / Crescent / Pumpkin / Spider / Ghost.
Row 5: Witch Hat / Pumpkin / Bat / Monster / Skull / Ghost.
Row 6: Ghost / Cat / Pumpkin / Skull / Witch Hat / Crescent.
The exact motif order can change, but distribute cream figures across black and orange backgrounds and keep black silhouettes off the darkest centers.
Attach the Appliqués
Block the thirty-six squares before sewing.
Pin every motif at its upper, lower, left and right extremes.
Sew with matching yarn approximately every 8–10 mm along the main outline.
Leave selected ghost arms, spider legs, hat tips and cat tails partly free.
Join the Squares into Six Horizontal Rows
Yarn: antique cream.
Lay six squares side by side.
Insert the 5 mm hook through corresponding outer loops.
Slip stitch across with relaxed tension.
Make six separate six-square strips.
Measure all strips before joining vertically.
Join the Six Rows
Place Row 1 above Row 2.
Pin each of the five square intersections.
Slip stitch the complete horizontal seam in cream.
Add Rows 3–6 in the same manner.
Keep all four-square intersections flat.
Border Round 1 — Black
Join black in one corner.
Sc evenly around the complete perimeter.
Work (2 sc, ch 2, 2 sc) at every corner.
Join.
Border Round 2 — Pumpkin Orange
Join orange.
Hdc in every stitch.
Work (2 hdc, ch 2, 2 hdc) at each corner.
Border Round 3 — Antique Cream
Join cream.
Repeat sc, ch 1, skip 1 stitch around each straight side.
At each corner work (sc, ch 2, sc).
Final Black and Orange Edge
Join black.
Sc in every sc and ch-1 space.
Change to orange for the final round.
Repeat:
sl st in next stitch, ch 2, sc in same stitch, skip 1 stitch.
Continue around.
Fasten off.
Assembly
- Crochet thirty-six five-round granny-square centers using black, orange, green and cream, then add the same antique-cream framing round to every block.
- Block every square to approximately 16 cm and remake any block that differs from the target by more than about 5 mm.
- Make the ghost, Jack-o’-lantern, skull, monster, spider, witch-hat, crescent, cat and bat motifs required for the planned layout.
- Test every appliqué on a blocked square and keep at least 20–25 mm between the motif edge and cream frame.
- Arrange the thirty-six completed blocks in six rows of six, distributing background colors and light/dark motifs across the full grid.
- Sew the appliqués to their assigned squares while leaving selected legs, tails, ghost arms and pointed hat sections partly free.
- Join six blocks into each horizontal row with relaxed antique-cream slip stitches.
- Connect all six horizontal strips, pinning the five vertical intersections before completing each long seam.
- Work the black, orange and cream border sequence followed by the narrow black-and-orange finishing rounds.
- Block the grid and perimeter, then reshape the ghost arms, spider legs, pumpkin ribs, hat points and cat tails after drying.
The finished blanket should form an even six-by-six Halloween grid in which each cream-framed block remains readable as an individual vintage-style motif.
7 Technical Tips
- Finished row curves after joining: Individual squares differ in blocked width. Keep all thirty-six blocks within approximately 5 mm of 16 cm before making the first six-square strip.
- Ghost crowds the cream frame: The body is too wide for the center field. Maintain at least 20–25 mm of visible background around the main ghost outline before sewing.
- Black spider disappears visually: It has been assigned to a black square. Place black silhouettes on orange, green or cream backgrounds and reserve cream motifs for the darkest blocks.
- Pumpkin square cups inward: The appliqué seam is too tight. Keep perimeter attachment points approximately 8–10 mm apart and loosen them if a square corner rises more than about 4 mm.
- Monster faces become uneven: Eye placement is being judged from the rectangle edges rather than the center line. Keep the two eye centers roughly 25–30 mm apart and on the same horizontal axis.
- Cream joining grid forms ridges: Slip stitches are contracting the square edges. Join with the six-block row lying flat and reopen any 16 cm seam that shortens by more than roughly 3 mm.
- Outer border begins waving: Extra stitches have accumulated where six square edges meet the perimeter. Audit the edge in 20 cm sections before adding the final orange textured round.
Why Mixed Motifs Fit the Vintage Style
The photograph does not treat Halloween as one repeated icon. Its visual rhythm comes from switching between white ghosts, orange pumpkins, green monsters and black silhouettes.
That variation resembles older seasonal patchwork textiles, where every block can carry a different illustration while the surrounding frame maintains order.
The same principle works in crochet. Keep the square dimensions, cream frame and restricted palette consistent, then let the central image change from block to block.
Why Cream Joining Is Important
A black join between black and espresso blocks would disappear. Orange joining would dominate cream ghosts.
Antique cream creates a visible line around every square regardless of its center color.
The grid also separates neighboring images. A black spider next to a pumpkin remains readable because the cream seam gives each motif its own boundary.
Controlling the Retro Halloween Palette
The reference uses an older orange-black-green-white palette rather than modern pastel Halloween colors.
Keep pumpkin orange moderately dark.
Use a deep leaf or monster green rather than neon lime.
Antique cream works better than bright optical white for the joining frame if a vintage result is the target.
A tiny amount of muted gold can appear in buckles or moon accents without becoming a fifth dominant color.
Changing the Motif Mix
The reconstruction provides nine motif families, but the six-by-six grid does not require an equal number of each.
For a ghost-heavy version, make twelve ghosts and reduce the monster and cat blocks.
A more graphic blanket can increase witch hats, moons and spiders.
Keep at least three motif families in light yarn and three in dark yarn so contrast remains distributed across the whole surface.
Changing the Blanket Size
A four-by-four arrangement uses sixteen squares and produces a compact accent throw.
Five by five needs twenty-five blocks.
The reconstructed image uses approximately six by six for thirty-six.
Six by eight requires forty-eight squares and makes a longer sofa blanket.
Keep the individual 16 cm block unchanged if only the overall dimensions need adjustment.
Making the Squares Larger
Published Halloween granny blankets range widely in size, and current examples often use worsted yarn with hooks around 4–6 mm. To enlarge this reconstruction, add one extra granny round before the cream frame.
That change provides more negative space around the appliqué without rebuilding every character.
Do not automatically enlarge the ghosts or pumpkins. A slightly smaller motif inside a larger frame often reads more clearly.
Keeping the Motifs Flat
The chair throw in the reference contains graphic surface decoration rather than stuffed amigurumi.
Keep pumpkins under about 8 mm thick.
Ghosts, skulls, monster faces and moons should remain flat.
Dimension can come from unattached extremities: the last centimeters of a spider leg, the point of a witch hat or the curve of a black cat tail.
Planning the Color Grid
Lay all thirty-six base squares on the floor before attaching motifs.
Start with the background colors.
Move black squares until none forms a large uninterrupted cluster.
Add orange and green next.
Place the cream backgrounds last.
Only after the color distribution works should ghost, pumpkin and silhouette locations be assigned.
Final Blocking
Pin all four corners first.
Next pin every square-to-square intersection around the outside edge.
Measure the top, middle and bottom widths.
Keep those measurements within approximately 10 mm.
Do not flatten free spider legs, cat tails or ghost arms under heavy blocking material.
After drying, reshape each loose detail by hand and inspect the blanket vertically to find any square that appears rotated.
Conclusion
Standardize the sixteen-centimeter block before producing the character batch because one irregular square can shift an entire six-block row. Your next step is to make one black, orange and green square, block all three, then test a ghost and pumpkin against the cream-framed centers. Keep pictorial motifs flat and reserve black silhouettes for lighter backgrounds. Share the finished vintage Halloween granny square blanket pattern project on Pinterest with the whole six-by-six grid visible, then post a favorite block on Instagram using #RetroHalloweenGrannyBlanket. For this blanket specifically, would you repeat the white ghosts most often or give the green monster faces more squares?









