Introduction
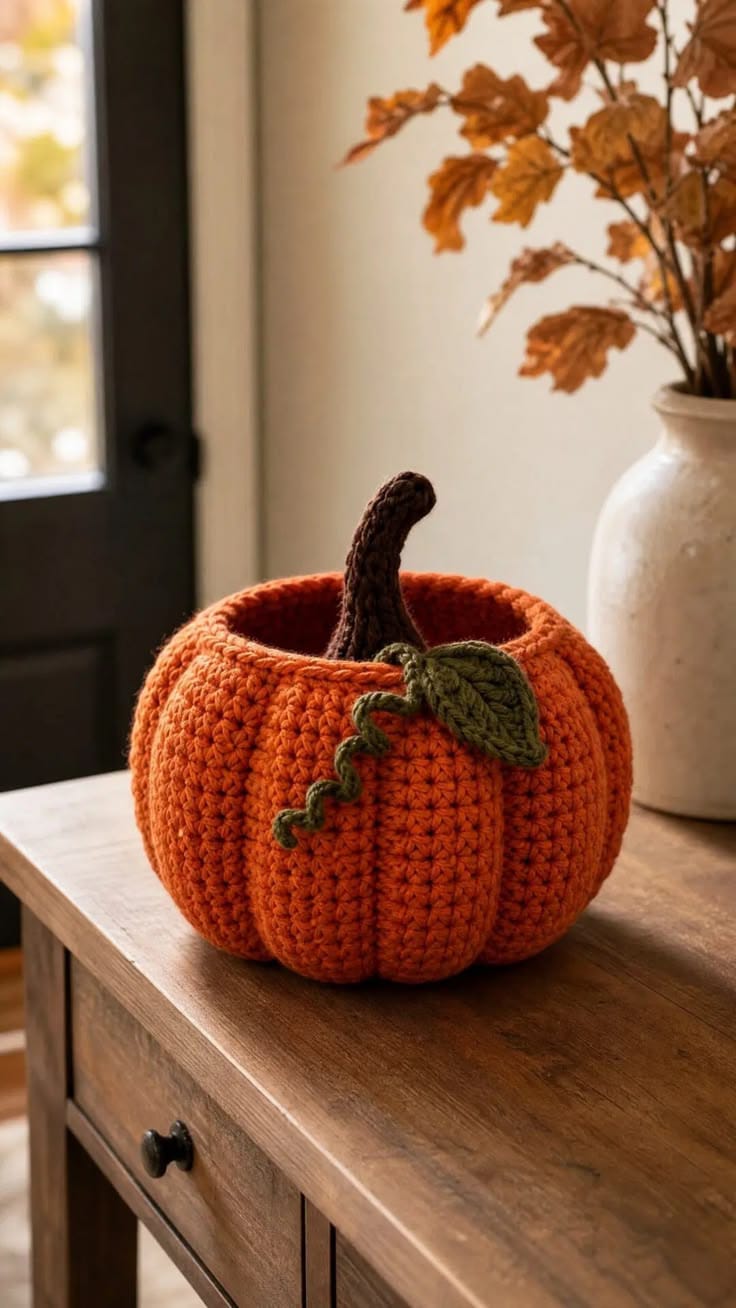
Eight pumpkin grooves must stop at a rim that still needs to behave like a circle. This crochet pumpkin basket pattern uses worsted or Aran yarn with 5 mm and 4 mm hooks to make an approximately 27 cm wide open container. A 72-stitch base, sculpted orange walls, curved brown stem, olive leaf and spiral vine create an intermediate functional fall project.
The Design: What Makes This Pumpkin Basket Different
The basket is shaped as a usable container first and as a pumpkin second. A broad circular base expands to 72 stitches, giving enough circumference for eight sections of approximately nine stitches each. The wall then rises without major reductions, keeping the opening wide while exterior shaping creates the lobes. A reinforced final rim prevents the eight grooves from turning the opening into a scalloped octagon. The tall stem sits near the rear interior edge rather than closing the center like a lid, so the pumpkin storage basket crochet design remains functional. One olive leaf and a curled vine cover the stem seam. A common maker mistake is tightening the shaping strands all the way to the rim. That pulls the upper edge into points and makes the basket opening uneven.
Project Info at a Glance
| Skill Level | Time | Finished Size | Hooks | Best For |
|---|---|---|---|---|
| Intermediate | 6–8 hours | Approx. 27 cm wide × 19 cm high | 5.0 mm basket / 4.0 mm details | Fall storage, yarn bowls, wrapped treats and seasonal displays |
Materials and Tools
Yarn
- Burnt pumpkin orange — worsted / Aran #4 — approximately 240–290 g — basket base, side walls, rim and sculpting.
- Dark chocolate brown — worsted / Aran #4 — approximately 25–35 g — tall curved stem.
- Olive green — worsted / Aran #4 — approximately 30–40 g — leaf and spiral tendril.
Use a relatively firm yarn rather than a highly draping fiber. The basket walls need enough body to support a 19 cm height without a lining.
Tools
- 5.0 mm crochet hook for basket base, walls and rim
- 4.0 mm crochet hook for stem, leaf and tendril
- Long tapestry needle
- Standard yarn needle
- Stitch markers
- Dressmaking pins
- Scissors
- Measuring tape
- Optional plastic canvas circle approximately 20–21 cm diameter for a firmer base
Abbreviations
- MR — magic ring
- sc — single crochet
- hdc — half double crochet
- inc — increase
- dec — decrease
- sl st — slip stitch
- ch — chain
- BLO — back loop only
- FLO — front loop only
An invisible decrease is worked through the front loops of the next two stitches before one single crochet is completed through both loops.
Pattern — Step by Step
Work the base in a continuous spiral. Move the stitch marker after every round and verify the count before continuing.
Basket Base
Yarn: burnt pumpkin orange — Source: original reconstruction using standard six-stitch circular expansion.
R1: 6 sc in MR. (6)
R2: inc ×6. (12)
R3: (sc, inc) ×6. (18)
R4: (2 sc, inc) ×6. (24)
R5: (3 sc, inc) ×6. (30)
R6: (4 sc, inc) ×6. (36)
R7: (5 sc, inc) ×6. (42)
R8: (6 sc, inc) ×6. (48)
R9: (7 sc, inc) ×6. (54)
R10: (8 sc, inc) ×6. (60)
R11: (9 sc, inc) ×6. (66)
R12: (10 sc, inc) ×6. (72)
Target base diameter: approximately 20–22 cm before the walls turn upward.
Base Turning Round
R13: BLO sc around. (72)
This round creates a defined fold between the floor and the side wall.
Optional Base Insert
Trace the completed base onto plastic canvas.
Cut the insert approximately 5 mm smaller than the crocheted circle.
Place it inside after R15.
A rigid insert is useful when the basket will hold yarn balls or wrapped treats, but the photographed structure can also be made without one.
Lower Basket Wall
R14: sc around. (72)
R15: sc around. (72)
R16: sc around. (72)
R17: sc around. (72)
R18: sc around. (72)
Mark every ninth stitch.
You should have eight evenly distributed markers.
Pumpkin Rib Round
R19: *8 sc, work 1 elongated front-loop slip stitch down around the stitch column from R17; repeat from * eight times. Maintain 72 working stitches.
The elongated stitches act as visual guides for later sculpting.
Middle Basket Wall
R20: sc around. (72)
R21: sc around. (72)
R22: sc around. (72)
R23: sc around. (72)
R24: sc around. (72)
R25: sc around. (72)
Second Rib Guide Round
R26: Repeat the rib-guide placement from R19, keeping each guide directly above the previous one. (72)
Upper Basket Wall
R27: sc around. (72)
R28: sc around. (72)
R29: sc around. (72)
R30: sc around. (72)
R31: sc around. (72)
R32: sc around. (72)
R33: sc around. (72)
R34: sc around. (72)
Target wall height from the base fold: approximately 17–18 cm.
Shape the Upper Wall Slightly Inward
The reference basket narrows subtly near the opening without becoming closed.
R35: (10 sc, dec) ×6. (66)
R36: sc around. (66)
This small reduction gives the pumpkin a rounded shoulder while retaining a broad opening.
Reinforced Rim
R37: FLO hdc around. (66)
R38: Working through both loops, hdc around. (66)
R39: reverse sc or firm sl st around. (66)
Fasten off.
Target opening diameter: approximately 21–23 cm.
Mark the Eight Pumpkin Sections
Place the basket on a table.
Use the eight rib-guide columns as reference lines.
The grooves should be spaced evenly around the exterior.
Do not pull the upper rim inward yet.
External Sculpting Strand 1
Yarn: burnt pumpkin orange.
Cut approximately 110 cm.
Insert the needle from the inside near the base center.
Exit at the outer lower edge beside the first guide line.
Carry the yarn vertically up the outside wall.
Enter the fabric approximately 25–30 mm below the upper rim.
Return through the interior to the base.
Pull until a visible groove forms.
Sculpting Strands 2–8
Repeat at each remaining guide.
Work opposite grooves in pairs.
Target an indentation of approximately 10–15 mm around the widest wall area.
Stop every shaping strand 25–30 mm below the top so the rim remains circular.
Check the Basket Opening
Measure across the opening in two perpendicular directions.
The measurements should differ by no more than about 10 mm.
If one axis is shorter, loosen the corresponding two sculpting strands before securing them.
Check the Base
Set the basket on a rigid table.
The base should make continuous contact without rocking.
If one pumpkin groove pulls the floor upward, loosen that shaping strand at the bottom rather than stretching the basket.
Curved Brown Stem
Yarn: dark chocolate brown — Source: original reconstruction using standard amigurumi tube math.
R1: 6 sc in MR. (6)
R2: inc ×6. (12)
R3: BLO sc around. (12)
R4: sc around. (12)
R5: sc around. (12)
R6: sc around. (12)
R7: sc around. (12)
R8: sc around. (12)
R9: sc around. (12)
R10: sc around. (12)
R11: sc around. (12)
R12: sc around. (12)
R13: sc around. (12)
R14: sc around. (12)
R15: sc around. (12)
R16: sc around. (12)
R17: sc around. (12)
R18: sc around. (12)
R19: sc around. (12)
R20: sc around. (12)
Fasten off with a 45 cm sewing tail.
Lightly stuff the lower twelve rounds only.
Curve the Stem
Thread a separate brown strand through the inner side of the stem.
Take one long hidden stitch covering approximately 6–7 cm.
Pull until the upper section bends roughly 25–35 degrees.
Secure near the lower end.
Stem Mounting Tab
Ch 9 with brown.
Row 1: starting in the second chain, 8 sc. (8)
Rows 2–5: ch 1, turn, 8 sc. (8)
Fasten off with a long tail.
Sew one end of the tab around the lower stem.
The other end will be attached inside the basket wall.
Attach the Stem Inside the Basket
Position the stem approximately 25–30 mm inside the rear rim.
The stem should rise above the basket without obstructing most of the opening.
Sew the mounting tab across approximately 5 cm of the inner wall.
Add two deeper anchor stitches through the lower stem and basket wall.
Large Olive Leaf
Yarn: olive green — Source: original pointed-leaf construction.
Ch 19.
Starting in the second chain work:
sl st, sc, hdc, 3 dc, 5 tr, 3 dc, hdc, sc, sl st.
Work 3 sc into the final chain.
Return along the opposite side in mirrored stitch order.
Fasten off with a 30 cm tail.
Target length: approximately 13–15 cm.
Leaf Vein
Join a slightly darker olive strand at the leaf base.
Surface slip stitch along the center.
Stop approximately 10 mm before the point.
Add two short diagonal veins on each side.
Curly Pumpkin Tendril
Yarn: olive green.
Ch 38.
Starting in the second chain, work 3 sc in each of the first 22 chains.
Work 2 sc in each remaining chain.
The cord will curl naturally.
Fasten off with a 20 cm tail.
Attach the Leaf
Position the leaf at the outer base of the stem.
Sew the lower third to the basket rim and stem mounting area.
Leave the pointed upper section free.
Keep the leaf outside the opening rather than allowing it to fold into the storage space.
Attach the Tendril
Sew the tendril base beside the leaf.
Add one additional tack approximately 30–40 mm along the cord.
Leave the remaining curls free.
Strengthen the Rim Around the Stem
Use orange yarn to add several hidden stitches through R37–R39 near the stem mount.
Spread those reinforcement stitches across approximately 6 cm.
Concentrating them in one small point can pull the rim downward.
Assembly
- Crochet the orange base from 6 stitches through the 72-stitch expansion, then work the BLO turning round to define the floor.
- Build the 72-stitch wall and mark eight rib positions approximately nine stitches apart.
- Continue the walls through the upper section, reduce to 66 stitches and work the three-round reinforced rim.
- Add eight exterior sculpting strands in opposite pairs, stopping each strand approximately 25–30 mm below the rim.
- Check the opening in two directions and loosen any groove that changes the diameter by more than approximately 10 mm.
- Crochet the twenty-round brown stem, lightly fill its lower section and add an internal shaping strand to form the curve.
- Make the brown mounting tab and attach the stem approximately 25–30 mm inside the rear basket rim.
- Crochet the olive leaf, add its surface vein and sew only its lower third beside the stem.
- Make the spiral tendril, tack its base beside the leaf and leave the outer curls free.
- Reinforce the rim around the stem attachment, check the base on a hard surface and weave all remaining tails through matching stitches.
The completed basket should stand independently with eight visible pumpkin sections, a level open rim, a curved rear stem and one leaf-and-vine cluster positioned outside the usable center.
7 Technical Tips
- Opening becomes octagonal: The sculpting strands reach too close to the top. Stop every groove approximately 25–30 mm below the rim and keep the final three rim rounds free of shaping tension.
- Basket walls collapse inward: The yarn or hook combination creates too much drape. A finished side wall should stand about 17–18 cm high without folding when the empty basket is placed on a table.
- One pumpkin lobe looks narrower: Its shaping strand is tighter than the opposite one. Keep exterior groove depth near 10–15 mm and adjust opposite channels as pairs.
- Base rocks after sculpting: A groove has pulled the floor upward. Loosen that strand at the lower attachment until the circular base again contacts the table continuously.
- Rim drops beside the stem: The mounting tab is concentrated in too small an area. Spread its sewing across approximately 5–6 cm of inner wall and reinforce R37–R39 with separate orange stitches.
- Stem remains rigidly straight: Too much filling is packed into the upper rounds. Fill approximately R1–R12 and keep the remaining section soft enough to accept a 25–35-degree bend.
- Tendril hangs instead of curling: The chain does not contain enough increases. Work 3 sc per chain through roughly the first 22 chains, then 2 sc per chain for the looser outer spiral.
Why 72 Stitches Work for the Basket
The base needs enough circumference for a storage bowl, but it also needs a stitch count that divides cleanly into the visible pumpkin sections. Seventy-two stitches provide eight sections of nine stitches each.
That spacing gives every sculpting groove a predictable reference position.
The same count also produces a broad base in worsted yarn without forcing the walls outward immediately. Once the BLO turn is made, the circle begins functioning as a floor rather than continuing to expand.
Why the Basket Is Not Stuffed
A decorative pumpkin normally relies on fiberfill to push its lobes outward. A container cannot use that method because its center must remain empty.
Here the crocheted wall supplies the volume.
Exterior shaping strands create the valleys, while the firm fabric between them becomes the pumpkin lobe. The interior therefore remains available for yarn, wrapped candy, faux foliage or other lightweight seasonal items.
Keeping the Rim Circular
The rim controls the function of the entire project.
If the shaping strands reach the edge, eight pumpkin grooves create eight inward notches. That may look decorative but makes the storage opening smaller and uneven.
Stopping the grooves below the top leaves a smooth band of fabric above them. Two hdc rounds and a firm finishing round then act as a structural ring around the basket.
Changing the Basket Size
For a smaller version, stop the base at 60 stitches and mark six sections of ten stitches.
For a larger basket, continue the six-stitch expansion to 84 stitches. Seven or eight sculpting channels can then be positioned by measurement rather than exact stitch division.
Increase wall height proportionally. A much wider basket with the original 17 cm walls can appear too shallow.
Changing the Yarn Weight
Super-bulky yarn can create a comparable basket with fewer rounds and a larger hook, as current published patterns demonstrate. Cotton cord produces even firmer walls.
Worsted yarn gives finer stitch definition and makes the leaf and vine less heavy against the rim.
When substituting yarn, judge the finished base diameter rather than copying a stitch count from a materially different pattern.
Making a Firmer Basket
Three changes increase structure without altering the visible design.
Use cotton or a cotton-rich blend. Drop the hook by 0.5 mm if the stitches remain easy to work. Add a plastic-canvas disk beneath the first several wall rounds.
The insert should stay smaller than the crocheted base so its edge does not create a visible ridge.
Changing the Stem Placement
The photographed stem rises from the rear interior rather than the geometric center.
That placement keeps the opening visually connected to a pumpkin while leaving most of the bowl accessible.
For maximum storage capacity, move the stem against the rear wall. For a stronger decorative silhouette, place it about 25–30 mm inward as written.
Why One Leaf Is Enough
A large cluster of leaves would cover the rim and reduce usable opening space.
One broad olive leaf balances the brown stem while leaving the orange body visible.
The spiral tendril supplies a second green element without adding substantial area. Attach only the leaf base and inner portion so the outer point remains dimensional.
Using the Basket for Fall Storage
The reconstruction is sized as a tabletop container rather than a trick-or-treat tote. The broad floor can hold several small yarn balls, wrapped sweets, fabric napkins or lightweight seasonal decorations.
A rigid insert is useful when the contents have concentrated weight.
A separate fabric liner can also be added if small objects might pass between crochet stitches, but the liner is not required for the photographed appearance.
Final Shaping
Set the empty basket on a level surface.
Compare all eight pumpkin lobes from the front and above.
Run your fingers along the grooves and correct any strand that produces a noticeably narrower section.
Check the upper opening in two directions.
Lift the leaf away from the rim and arrange the spiral vine outward.
Finally, check the stem from the front and side so its curved tip remains above the basket rather than pulling the rear wall downward.
Conclusion
Shape the orange walls before mounting the stem because the eight grooves determine where the rear attachment can sit without distorting the opening. Your next step is to crochet the 72-stitch base, build the straight wall and mark eight nine-stitch sections before adding the sculpting strands. Keep every groove below the reinforced rim and leave the upper stem lightly filled. Share the finished crochet pumpkin basket pattern project on Pinterest with the open top visible, then post the leaf-and-vine detail on Instagram using #OpenPumpkinBasket. For this basket specifically, would you keep the single olive leaf or add a second smaller leaf behind the stem?









