Introduction
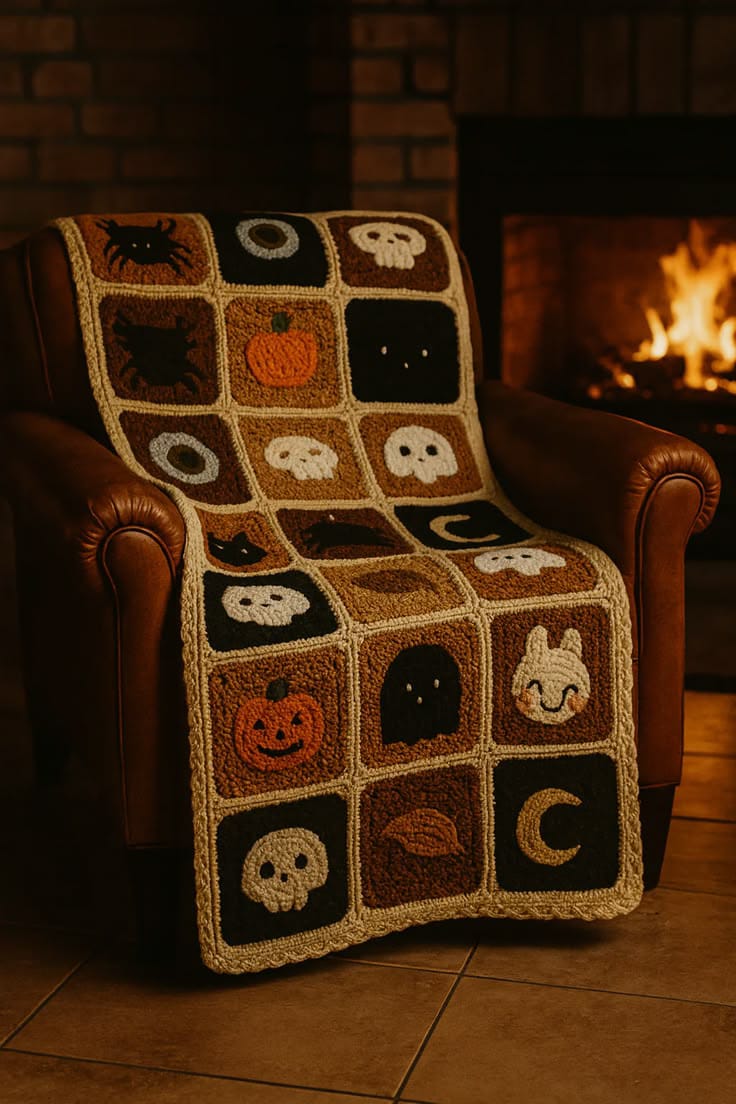
A three-column Halloween blanket gives every skull, pumpkin and crescent moon only one narrow frame in which to stay readable. This Halloween granny square blanket pattern uses worsted or Aran yarn with 5 mm and 4 mm hooks to make an approximately 60 × 132 cm throw. Twenty-one framed squares, muted harvest colors and flat spooky appliqués create an intermediate patchwork project.
The Design: What Makes This Halloween Blanket Different
The narrow three-by-seven grid is the first structural decision. Instead of spreading dozens of small motifs across a wide afghan, it creates a long chair throw with only three blocks per row. Second, every square uses an antique-cream frame, allowing rust, brown and black backgrounds to alternate without losing the grid. Third, the motifs stay mostly flat. Skulls, crescent moons, pumpkins, ghosts and dark silhouettes project only a few millimeters, so the blanket remains practical to fold. The vintage Halloween crochet blanket also avoids high-saturation purple and lime colors in favor of oatmeal, espresso, rust and muted olive. One common mistake with a spooky granny square blanket is scaling every appliqué to the maximum available space. A motif that reaches the cream frame can distort the block during sewing and make neighboring squares appear smaller.
Project Info at a Glance
| Skill Level | Time | Finished Size | Hooks | Best For |
|---|---|---|---|---|
| Intermediate | 28–36 hours | Approx. 60 × 132 cm | 5.0 mm squares / 4.0 mm appliqués | Halloween chair throws, narrow sofa blankets and seasonal displays |
Materials and Tools
Yarn
- Antique cream — worsted / Aran #4 — approximately 430–500 g — square frames, joining and perimeter.
- Rust brown — worsted / Aran #4 — approximately 130–150 g — selected square centers and autumn motifs.
- Espresso brown — worsted / Aran #4 — approximately 120–150 g — square centers and dark details.
- Black — worsted / Aran #4 — approximately 120–150 g — square centers, silhouettes and facial details.
- Pumpkin orange — worsted / Aran #4 — approximately 80–100 g — pumpkins and accent motifs.
- Oatmeal / bone — worsted / Aran #4 — approximately 70–90 g — skulls, ghosts and moons.
- Muted olive — worsted / Aran #4 — approximately 15–25 g — pumpkin stems.
Keep all background shades within one yarn weight. Dense black yarn can produce a smaller block than softer rust yarn when both are worked with the same hook and stitch count.
Tools
- 5.0 mm crochet hook for granny squares and joining
- 4.0 mm crochet hook for appliqués
- Yarn needle
- Stitch markers
- Blocking mats
- Rust-resistant pins
- Scissors
- Measuring tape
Abbreviations
- MR — magic ring
- ch — chain
- sc — single crochet
- hdc — half double crochet
- dc — double crochet
- tr — treble crochet
- inc — increase
- dec — decrease
- sl st — slip stitch
- BLO — back loop only
An invisible decrease is worked through the front loops of two neighboring stitches before completing one single crochet through both loops.
Pattern — Step by Step
Make and block one complete square before starting the batch. The working target is 17–18 cm after the cream framing round.
Solid Halloween Square — Make 21
Yarn: black, rust or espresso for the center; antique cream for the frame — original reconstruction using standard square geometry.
R1: With background color, make MR. Ch 3, 2 dc, ch 2; work (3 dc, ch 2) three more times. Join.
R2: Sl st to the first corner. Work (3 dc, ch 2, 3 dc) in each corner with ch 1 between corner groups. Join.
R3: Work (3 dc, ch 2, 3 dc) in every corner. Work one 3-dc group in each side space, with ch 1 between groups. Join.
R4: Repeat the established square pattern, adding one new 3-dc group in every side space. Join.
R5: Repeat once more.
Change to antique cream.
R6: Work one sc in every dc and side space. At each corner work (sc, ch 1, sc).
R7: Hdc around, working (2 hdc, ch 2, 2 hdc) in each corner.
Fasten off.
Block every finished square to 17–18 cm.
Background Color Distribution
Make seven squares with rust centers.
Work seven with espresso-brown centers.
Finish seven with black centers.
Do not arrange identical center colors in one complete horizontal row.
The cream framing rounds stay unchanged across all twenty-one blocks.
Skull Appliqué — Make 6
Yarn: oatmeal / bone.
R1: 6 sc in MR. (6)
R2: inc ×6. (12)
R3: (sc, inc) ×6. (18)
R4: (2 sc, inc) ×6. (24)
Do not fasten off.
Skull Jaw
Ch 1.
Sc in the next 8 stitches.
Turn.
Row 1: dec, 4 sc, dec. (6)
Row 2: dec, 2 sc, dec. (4)
Row 3: sc across. (4)
Fasten off with a 25 cm sewing tail.
Skull Eye Sockets
Using black yarn, make two compact circular embroidered areas approximately 10–12 mm across.
Place the centers roughly 20–24 mm apart.
Add two short black stitches for the nose beneath the eyes.
Use three short vertical stitches across the jaw for tooth divisions.
Pumpkin Appliqué — Make 3
Yarn: pumpkin orange.
Ch 10.
Row 1: starting in second chain, 9 hdc. (9)
Rows 2–14: ch 1, turn, hdc BLO across. (9)
Fasten off with a 30 cm tail.
Draw both short ends slightly inward with the sewing tail.
Do not stuff.
The finished flat pumpkin should measure approximately 7–8 cm wide.
Pumpkin Rib Lines
Run two matching orange strands vertically through the rib valleys.
Pull only enough to create three broad sections.
Keep the appliqué less than approximately 8 mm thick.
Pumpkin Stem
Yarn: muted olive.
Ch 5.
Sl st back through four chains.
Fasten off and sew behind the upper pumpkin center.
Ghost Appliqué — Make 2
Yarn: oatmeal / bone.
R1: 6 sc in MR. (6)
R2: inc ×6. (12)
R3: (sc, inc) ×6. (18)
R4: (2 sc, inc) ×6. (24)
Continue from the lower half of the circle.
Row 1: sc across 10 stitches. (10)
Row 2: ch 1, turn, 10 sc. (10)
Row 3: ch 1, turn, 10 sc. (10)
Row 4: ch 1, turn, sc, hdc, 2 dc, sl st, 2 dc, hdc, sc, sl st.
Fasten off.
Ghost Arms
Join at one side.
Ch 5.
Starting in second chain, sl st, sc, hdc, sl st back into the body.
Repeat on the opposite side.
Ghost Face
Use black yarn to embroider two vertical eyes about 6–8 mm high.
Keep eye centers approximately 14–16 mm apart.
No plastic eye hardware is required.
Crescent Moon — Make 3
Yarn: oatmeal or muted gold.
R1: 6 sc in MR. (6)
R2: inc ×6. (12)
R3: (sc, inc) ×6. (18)
R4: (2 sc, inc) ×6. (24)
R5: (3 sc, inc) ×6. (30)
Fasten off.
Fold approximately one-third of the circle behind itself.
Use matching yarn to tack that section to the rear.
The exposed front forms a crescent approximately 7–8 cm tall.
Spider Appliqué — Make 2
Yarn: black.
R1: 6 sc in MR. (6)
R2: inc ×6. (12)
R3: sc around. (12)
Fasten off.
Spider Legs
Attach black yarn to the body edge.
Ch 6, sl st back through 5 chains and sl st into the next body stitch.
Repeat four times on one side.
Work four matching legs on the opposite side.
Curve the chains during sewing so the legs point outward rather than hanging straight down.
Black Cat Silhouette — Make 2
Yarn: black.
Head R1: 6 sc in MR. (6)
Head R2: inc ×6. (12)
Head R3: (sc, inc) ×6. (18)
Fasten off.
Cat Ears — Make 2 Per Cat
Ch 5.
Starting in the second chain work sc, hdc, dc, tr.
Fasten off.
Sew the broad tr edge behind the head.
Cat Body
Ch 13.
Row 1: starting in second chain, 12 sc. (12)
Rows 2–8: ch 1, turn, 12 sc. (12)
Row 9: dec, 8 sc, dec. (10)
Row 10: dec, 6 sc, dec. (8)
Fasten off.
Overlap the head on the upper body by approximately 10 mm.
Cat Tail
Ch 18.
Sl st back through all chains.
Sew the lower end to one body side and curve the remaining cord upward.
Dark Bat Silhouette — Make 3
Yarn: black.
Ch 13.
Starting in second chain work:
sl st, sc, hdc, dc, tr, sc, sc, tr, dc, hdc, sc, sl st.
Fasten off.
Use black yarn to draw the center inward with one vertical stitch, producing two wings.
Add two small ch-2 loops at the center if a defined head is wanted.
Check Motif Scale
Place every appliqué on an 18 cm test square.
Leave at least 25–30 mm between the motif edge and the cream frame.
Trim or remake any piece that reaches the framing round.
Skulls and ghosts may sit slightly higher than moons because their lower jaw or body adds vertical length.
Suggested 3 × 7 Layout
Row 1: Spider / Crescent Moon / Skull.
Row 2: Black Cat / Pumpkin / Bat.
Row 3: Crescent Moon / Skull / Skull.
Row 4: Bat / Black Cat / Crescent Moon.
Row 5: Skull / Dark Bat / Skull.
Row 6: Pumpkin / Ghost / Ghost.
Row 7: Skull / Pumpkin / Crescent Moon.
Swap motifs between rows if your individual pieces match the reference differently, but retain the three-column grid.
Attach the Motifs
Block all twenty-one squares first.
Center each appliqué by measuring from the cream frame rather than the dark background alone.
Pin at four points.
Sew through the motif perimeter with matching yarn at intervals of approximately 8–10 mm.
Leave spider legs, cat tails and selected ghost-arm tips partly free.
Join Squares Into Seven Rows
Yarn: antique cream.
Place three squares beside one another.
Join corresponding outer loops with relaxed slip stitches.
Complete seven separate three-square strips.
Each strip should measure approximately 52–54 cm before the outer border.
Join the Seven Horizontal Strips
Place Row 1 above Row 2.
Pin both internal square intersections before joining.
Slip stitch across in antique cream.
Repeat until all seven rows form one long rectangle.
Keep every cream grid intersection flat.
Border Round 1 — Antique Cream
Join cream in one corner.
Sc evenly around the entire blanket.
Work (2 sc, ch 2, 2 sc) in each corner.
Join.
Border Round 2 — Antique Cream
Hdc in every stitch.
Work (2 hdc, ch 2, 2 hdc) in each corner.
Join.
Border Round 3 — Narrow Vintage Edge
Repeat around:
sl st in next stitch, ch 2, sc in same stitch, skip 1 stitch.
At corners work the repeat twice into the corner space.
Fasten off.
Assembly
- Crochet twenty-one background squares, dividing them among black, rust and espresso centers and framing every block with the same antique-cream rounds.
- Block every square to approximately 17–18 cm and rework any block that differs from the target by more than about 5 mm.
- Make six skulls, three pumpkins, two ghosts, three or four crescent moons and the remaining dark spider, cat and bat silhouettes.
- Place every finished appliqué on a test square and keep at least 25–30 mm of background visible between the motif and cream frame.
- Arrange all twenty-one squares in a three-column by seven-row layout, distributing black, rust and brown backgrounds throughout the blanket.
- Sew each appliqué around its main perimeter while leaving selected spider legs, ghost arms and cat-tail sections partly free.
- Join three blocks into each of seven horizontal strips using relaxed antique-cream slip stitches.
- Connect the seven strips vertically, pinning both internal intersections before completing each horizontal seam.
- Work two antique-cream perimeter rounds followed by the narrow textured finishing edge.
- Block the cream grid and border, then reshape the skull jaws, pumpkin ribs, moon curves and loose silhouette details after drying.
The finished blanket should contain twenty-one clearly framed Halloween scenes arranged in a long three-column grid with muted backgrounds and consistent antique-cream joining.
7 Technical Tips
- Joined rows become different lengths: Background squares were not blocked to one measurement. Keep every block within approximately 5 mm of the 17–18 cm target before sewing the first strip.
- Skull looks crowded inside its frame: The appliqué exceeds the available center area. Maintain at least 25 mm of visible background between the skull edge and the cream framing round.
- Dark bat disappears on a black square: Motif and background values are too similar. Put black silhouettes on rust or medium-brown blocks and reserve oatmeal motifs for the black centers.
- Pumpkin square cups inward: The appliqué attachment is tighter than the background. Keep sewing points roughly 8–10 mm apart and loosen the seam if any corner lifts more than approximately 4 mm.
- Spider legs twist under the body: Every chain has been sewn flat. Tack only the first and final 10–15 mm of selected legs so their outer bends remain visible.
- Cream joining grid develops ridges: Slip stitches are shorter than the square edges. Join with the blanket pieces lying flat and reopen any 18 cm seam that contracts by more than about 3 mm.
- Outer edge waves after Round 2: Too many stitches were added along row-end sections. Compare repeated 20 cm border sections and remove excess stitches before working the final textured round.
Why the Three-Column Layout Works
The supplied blanket is much narrower than a conventional sofa afghan. That proportion gives it a distinctive chair-runner shape and keeps all twenty-one motifs large enough to read individually.
At roughly 18 cm per square, three columns create an inner width near 54 cm. A modest border increases that figure to about 60 cm. Seven rows produce enough length to extend from the chair back to the lower front edge without requiring dozens of additional blocks.
Why the Cream Frame Matters
Black beside dark brown can disappear visually. Rust beside orange can do the same.
The antique-cream frame creates a fixed light boundary around each Halloween scene. It also lets the blanket use different background colors without turning the full surface into one dark mass.
Keep the frame width identical on every block. Even if an appliqué varies in size, the grid still reads as orderly because all twenty-one borders match.
Controlling the Vintage Palette
Bright Halloween blankets often rely on purple, lime green and saturated orange. The reference takes another route.
Use black as the darkest value, espresso as a softer dark background and rust as the warm middle tone. Antique cream provides the strongest contrast. Pumpkin orange should appear mainly in the pumpkin motifs, while muted olive works only as a small botanical accent.
This restricted palette gives the Halloween granny square blanket pattern its aged patchwork appearance.
Changing the Motif Mix
The 21-square structure does not require six identical skulls. You can replace one skull with another pumpkin, add an extra ghost or use a second spider design.
Keep the overall contrast balanced. If several oatmeal motifs are placed in one row, use at least one dark silhouette nearby. Avoid putting three black silhouettes across three black-background blocks because the row will lose definition.
Changing the Blanket Size
A three-by-five layout needs fifteen squares and makes a shorter chair throw.
Three by six uses eighteen blocks.
The reconstruction uses three by seven for twenty-one.
A four-by-seven arrangement requires twenty-eight blocks and moves closer to a conventional lap blanket.
Keep square size constant when changing only the grid. That lets all appliqué patterns remain unchanged.
Using Larger Granny Squares
Christine Longe’s published Halloween throw demonstrates that Halloween squares can reach about 21.6 cm. Blocks of that scale would make this three-column blanket substantially wider.
If you increase the reconstruction from 18 cm to about 21–22 cm, expand the cream framing rounds rather than scaling every appliqué immediately. Extra negative space around the skulls and pumpkins can improve readability.
Keeping Flat Motifs Practical
This blanket is intended to drape over furniture, so the motifs should not behave like stuffed toys.
Pumpkins may project a few millimeters because of the ribbed BLO construction. Skulls, moons and ghosts should remain essentially flat.
Loose silhouette details can add surface depth without bulk. Cat tails, spider legs and ghost arms need only partial attachment to create visible relief.
Blocking the Finished Grid
Pin the four outer corners first.
Next pin every cream grid line where it reaches the perimeter.
Measure the blanket width at the top, center and bottom.
Keep those dimensions within approximately 10 mm.
Do not press directly over loose spider legs or cat tails. After drying, arrange the appliqué edges by hand and check that every motif remains centered inside its cream frame.
Conclusion
Standardize the cream-framed square before making the full motif batch because the grid controls every later placement decision. Your next step is to crochet one 17–18 cm block, test a skull and pumpkin against its center, then confirm that at least 25 mm of background remains around each motif. Keep dark silhouettes on medium-value squares and the oatmeal pieces on the darkest blocks. Share the finished Halloween granny square blanket pattern project on Pinterest with the full three-by-seven grid visible, then post a motif close-up on Instagram using #VintageSpookySquareBlanket. For this blanket specifically, would you repeat the skulls most often or replace two of them with extra crescent moons?









