Introduction
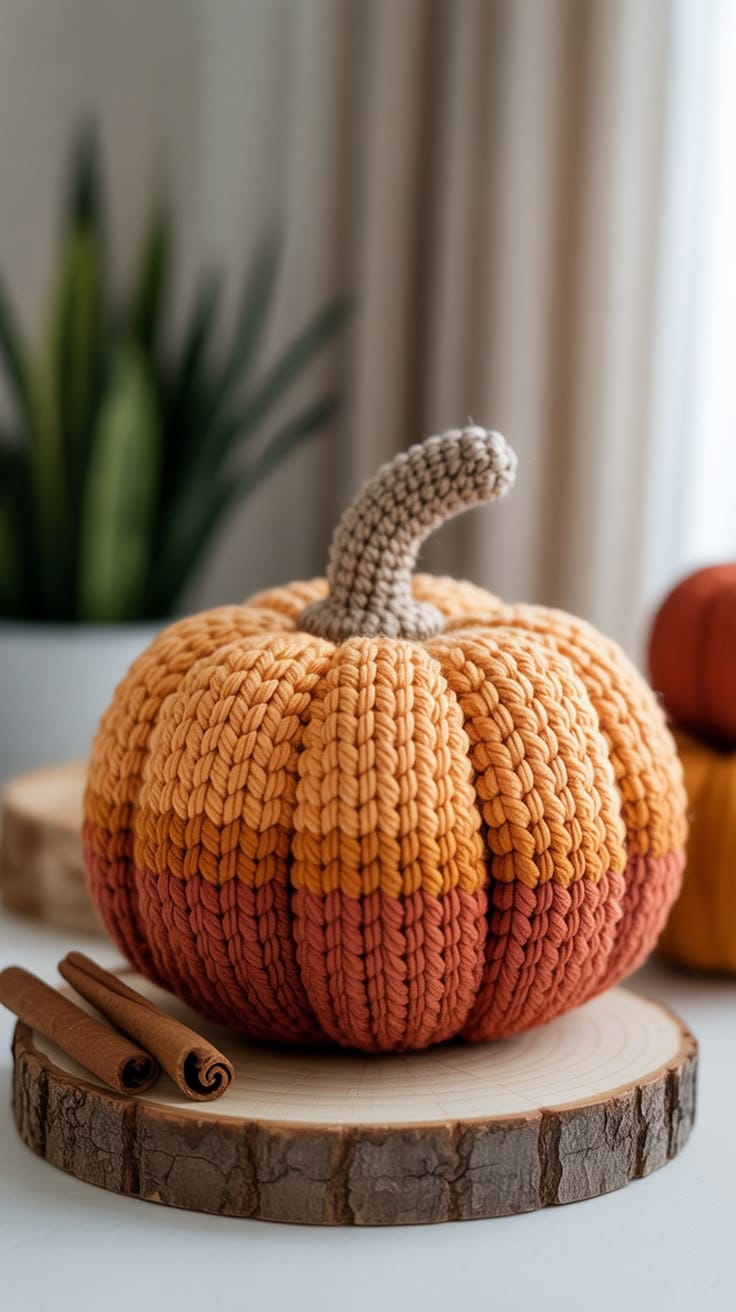
The rust band on this pumpkin has to cross every vertical rib at exactly the same height or the color boundary immediately looks crooked. This two tone ribbed crochet pumpkin pattern uses Aran yarn and a 5 mm hook to make an approximately 21–24 cm pumpkin. Golden upper stitches, a terracotta base, deep sculpted sections and a long taupe stem reproduce the photographed structure.
The Design: What Makes This Two-Tone Pumpkin Different
The body starts as one ribbed rectangle, but every row contains two colors. Nine stitches form the rust lower section and fourteen stitches form the golden upper section, so the color change stays in the same physical position from the first rib to the last. After the rectangle is seamed into a tube, those back-loop rows turn vertically and the color boundary wraps horizontally around the stuffed pumpkin. External sculpting then creates approximately eight deeper lobes without interrupting the fine rib texture. The neutral stem is deliberately longer than a typical tabletop pumpkin stem and widens at its base for stability. One frequent mistake in a color block crochet pumpkin is carrying the inactive yarn loosely across the full row. That can show through the opposite color and creates unnecessary bulk exactly where the horizontal boundary needs to remain clean.
Project Info at a Glance
| Skill Level | Time | Finished Size | Hook | Best For |
|---|---|---|---|---|
| Intermediate | 7–9 hours | Approx. 21–24 cm wide × 22–25 cm high including stem | 5.0 mm | Fall shelves, tables and Thanksgiving displays |
Materials and Tools
Yarn
- Golden pumpkin orange — Aran / worsted #4 — approximately 100–125 g — upper 60–65% of the pumpkin.
- Terracotta / rust — matching Aran / worsted #4 — approximately 65–80 g — lower 35–40% of the pumpkin.
- Taupe / mushroom beige — matching Aran / worsted #4 — approximately 20–25 g — long curved stem.
Use orange and rust yarns from the same yarn line when possible. A difference in fiber or twist can make the two sections shrink differently and turn a level color boundary into a visible wave.
Tools
- 5.0 mm crochet hook
- 4.0 mm crochet hook for a firmer stem if required
- Polyester stuffing — approximately 190–230 g
- Long tapestry or doll needle
- Standard yarn needle
- Eight locking stitch markers
- Scissors
- Measuring tape
Abbreviations
- MR — magic ring
- ch — chain
- sc — single crochet
- hdc — half double crochet
- inc — two stitches in one stitch
- sl st — slip stitch
- BLO — back loop only
- RS — right side
- WS — wrong side
Working HDC through the back loop leaves the front loop exposed, producing the raised rib that becomes vertical after the rectangle is assembled into the pumpkin.
Pattern — Step by Step
The pumpkin body is worked flat. Each row contains 23 stitches: nine rust stitches at the lower end and fourteen golden stitches at the upper end. The turning chain does not count as a stitch.
Two-Tone Ribbed Body Rectangle
Yarn: terracotta/rust and golden orange — construction based on established flat ribbed pumpkin geometry.
With rust, ch 10.
Change to golden orange and ch 14 more.
You now have 24 chains total.
Row 1: Starting in the second ch from the hook, work 14 hdc in golden orange. Change to rust during the final yarn-over of stitch 14. Work 9 hdc in rust. Turn. (23)
The color change sits between stitches 9 and 10 when counting upward from the rust end.
Row 2 — Return Across the Color Split
Ch 1.
Work 9 hdc BLO in rust.
On the ninth stitch, complete the final yarn-over with golden orange.
Work 14 hdc BLO in golden orange. Turn. (23)
Do not carry the orange through the nine rust stitches or the rust through the fourteen orange stitches.
Drop the unused color at the transition.
Row 3
Ch 1.
Work 14 hdc BLO in golden orange.
Change to rust during the last yarn-over.
Work 9 hdc BLO in rust. Turn. (23)
Continue the Ribbed Rectangle
Repeat Rows 2 and 3 until the long row-end edge measures approximately 49–53 cm without stretching.
This will normally require roughly 44–50 rows, depending on yarn and tension.
Count 23 stitches after every fifth row. One missing edge stitch can create a diagonal color boundary that becomes very visible after assembly.
Check the Two-Tone Boundary
Lay the rectangle flat with the ribs running across its short dimension.
The rust section should measure approximately 6.5–7.5 cm high.
The golden section should measure approximately 11–12 cm high.
The complete short edge should measure approximately 18–19 cm.
Inspect the line where rust meets gold.
The transition should remain within approximately 3 mm of a straight horizontal line across the entire rectangle.
Control the Yarn at Every Color Change
Before changing colors, place the old yarn toward the wrong side.
Pick up the new color from beneath the old strand so the two yarns cross once.
Complete the final yarn-over with the new color.
This closes the tiny opening that can otherwise form between the two sections.
Do not pull the crossed strands tightly. A tight transition shortens the middle of the rectangle and creates an hourglass-shaped panel.
Join the Short Edges
Fold the rectangle so the foundation row meets the final row.
Align rust with rust and golden orange with golden orange.
Slip stitch the two short edges together through corresponding loops.
When you reach the color boundary, change yarn color so the seam remains visually matched.
Continue to the opposite edge.
Turn the tube right side out.
The seam should sit inside a natural rib valley rather than on top of a raised ridge.
Gather the Rust Bottom
Yarn: terracotta / rust.
Cut approximately 100 cm of rust yarn.
Thread a long tapestry needle.
Run the yarn in and out through the rust row ends around the complete lower opening, catching one point approximately every 8–10 mm.
Pull until the opening reduces to approximately 1–2 cm.
Cross the center several times and knot securely.
Do not create a hard protruding knot because the finished pumpkin must rest on this lower section.
Initial Stuffing
Place small pieces of stuffing against the outer wall first.
Fill the rust lower section evenly before moving upward into the golden area.
Rotate the tube every few handfuls.
Keep the stuffing distribution equal on both sides of the color boundary. A heavily packed lower zone can force the rust band to bulge beyond the golden section.
Shape the Broad Body
Continue stuffing until the circumference feels firm but compressible.
Push filling outward into the ribbed wall and keep the central axis slightly softer.
Firm thumb pressure should still create approximately 10–15 mm of temporary indentation.
The profile should already look wider than it is tall.
Gather the Golden Crown
Yarn: golden orange.
Cut approximately 110 cm of golden yarn.
Run the yarn around the upper row-end opening using the same 8–10 mm spacing.
Pull until the opening reduces to approximately 3–4 cm.
Add the final stuffing around the outer crown.
Reduce the opening to approximately 1–1.5 cm.
Secure without burying the tail.
Vertical Compression
Pass the golden crown tail through the exact center of the stuffed pumpkin and exit at the rust bottom center.
Return through the same vertical axis.
Pull gradually until the pumpkin loses approximately 1–1.5 cm of height.
The rust/gold boundary should remain horizontal while the circumference expands slightly.
Tie the shaping strand temporarily.
Mark Eight Deep Lobe Positions
View the pumpkin directly from above.
Divide the circumference into approximately eight equal sections.
Place one removable marker in a natural rib valley at each division.
One marker should conceal the body seam.
Trace each marked valley visually from the golden crown through the rust band to the lower center. Move any marker whose path drifts sideways.
First Deep Lobe
Yarn: golden orange and rust, or a strong matching neutral hidden inside a rib valley.
Cut approximately 140 cm of shaping yarn.
Anchor at the bottom center.
Carry the yarn along the first marked rib valley to the crown.
Enter at the top center and pass through the entire pumpkin to the bottom.
Pull until the groove sits approximately 10–12 mm below the fullest neighboring ribs.
Do not knot permanently yet.
Second Lobe
Work the groove directly opposite the first.
Match the depth carefully.
Set the pumpkin on the table and compare both halves.
If one lobe has become flat, loosen the nearest shaping strand and redistribute filling.
Lobes Three and Four
Add the next pair at approximately 90 degrees to the first two channels.
Each strand should remain seated inside a fine BLO valley.
After four channels, the pumpkin should appear divided into four broad quarters from above.
Lobes Five and Six
Place one shaping line halfway between two existing channels.
Rotate the pumpkin 180 degrees and complete the matching opposite line.
Check that the rust band remains level around the newly compressed sections.
Lobes Seven and Eight
Add the final opposite pair.
Rotate the pumpkin slowly and compare all eight sections.
Adjust each strand until no lobe projects more than approximately 10 mm beyond its opposite partner.
Knot securely at the base and bury the structural tails deeply through the stuffing.
Refine the Color Boundary
Place the pumpkin at eye level.
Follow the rust/gold line around all eight lobes.
If one segment appears higher, massage the stuffing upward or downward rather than pulling on the crochet fabric.
A difference of more than approximately 5 mm becomes visible because the color split wraps around the complete circumference.
Taupe Curved Stem
Yarn: taupe / mushroom beige.
R1: 6 sc in MR (6)
R2–R7: sc around (6)
R8: (2 sc, inc) ×2 (8)
R9–R11: sc around (8)
R12: (3 sc, inc) ×2 (10)
R13–R14: sc around (10)
R15: (4 sc, inc) ×2 (12)
R16: sc around (12)
R17: (sc, inc) ×6 (18)
R18: sc around (18)
Stuff R12–R18 lightly. Leave the upper R1–R11 almost empty so the stem can form a broad forward curve.
Fasten off. Leave a 40 cm sewing tail.
Stem Base Disc
Yarn: taupe.
R1: 6 sc in MR (6)
R2: inc ×6 (12)
R3: (sc, inc) ×6 (18)
Do not stuff.
Fasten off. Leave a 30 cm sewing tail.
Shape the Stem Curve
Hold the wider lower six rounds firmly.
Bend the narrow upper tube gradually across approximately 5–6 cm.
The tip should finish about 2–3 cm away from the vertical center line.
Make two concealed taupe stitches along the inside of the curve if the yarn returns to its original position.
Avoid folding the stem sharply at one round. The reference uses a continuous arc.
Assembly
- Complete the full two-color rectangle and verify that every row contains exactly 23 stitches with the transition after the same nine rust stitches.
- Join the short edges into a tube, matching rust to rust and golden orange to golden orange at the seam.
- Gather the rust bottom, add stuffing around the outer wall and keep the central axis slightly softer than the circumference.
- Gather the golden crown and vertically compress the pumpkin by approximately 1–1.5 cm without distorting the horizontal color boundary.
- Mark eight natural rib valleys around the circumference, placing one channel directly over the rectangle seam.
- Form the eight deep lobes in four opposite pairs and adjust stuffing after each pair rather than shaping all grooves in one direction.
- Set the pumpkin on a hard surface and correct the base until several rust lobes share the weight evenly.
- Sew the 18-stitch taupe stem base disc over the crown gathering point so it covers the meeting point of the sculpting strands.
- Attach the stem through its 18-stitch lower edge and shape the upper section into a gradual forward curve.
- Weave every structural tail through at least 4–5 cm of dense crochet, reverse direction once and trim only after the yarn retracts beneath the stitches.
The finished pumpkin should have a level rust lower band, golden upper body, fine vertical ribbing, approximately eight deeper sculpted sections and one neutral curved stem centered over the crown.
7 Technical Tips
- Crooked color boundary: Changing color after eight stitches on one row and nine on the next creates a diagonal stripe. Count exactly nine rust stitches and fourteen golden stitches on every 23-stitch row.
- Hole at the color transition: Picking up the new yarn without crossing the old strand can leave a 3–5 mm vertical gap. Cross the two colors once on the wrong side before completing the first stitch in the new section.
- Rust section bulging: Packing more stuffing into the lower third makes the dark band project beyond the golden body. Distribute filling evenly on both sides of the color line and maintain roughly 10–15 mm of temporary thumb compression.
- Ribbing disappearing: Working through both top loops interrupts the raised columns. Use BLO HDC on every rib row and check the texture after approximately every five rows.
- Unequal deep lobes: Tightening all shaping strands clockwise moves stuffing toward the unfinished side. Form one groove and then its exact opposite before starting the next pair.
- Stem kinking: Firmly stuffing all 18 rounds forces the bend into one isolated section. Keep R1–R11 nearly empty and distribute the curve across approximately 5–6 cm.
- Pumpkin rocking: A tight lower gather can create one projecting center knot. Push the center upward only about 5–8 mm and move stuffing into the bases of several rust lobes so the weight is shared.
Conclusion
Check the rust-to-gold line before attaching the stem because the two-tone boundary makes uneven stuffing easier to see than on a solid pumpkin. Next, rotate the body on a level surface and compare band height, lobe width and groove depth from every side. Correct those measurements before burying the shaping strands. Share the finished two tone ribbed crochet pumpkin pattern project on Pinterest with a vertical fall photograph, then post a close view of the color transition and BLO ribs on Instagram using #TwoToneRibbedCrochetPumpkin. For this pumpkin specifically, would you keep the rust band around the lower third or increase it to an exact half-and-half color split?









