Introduction
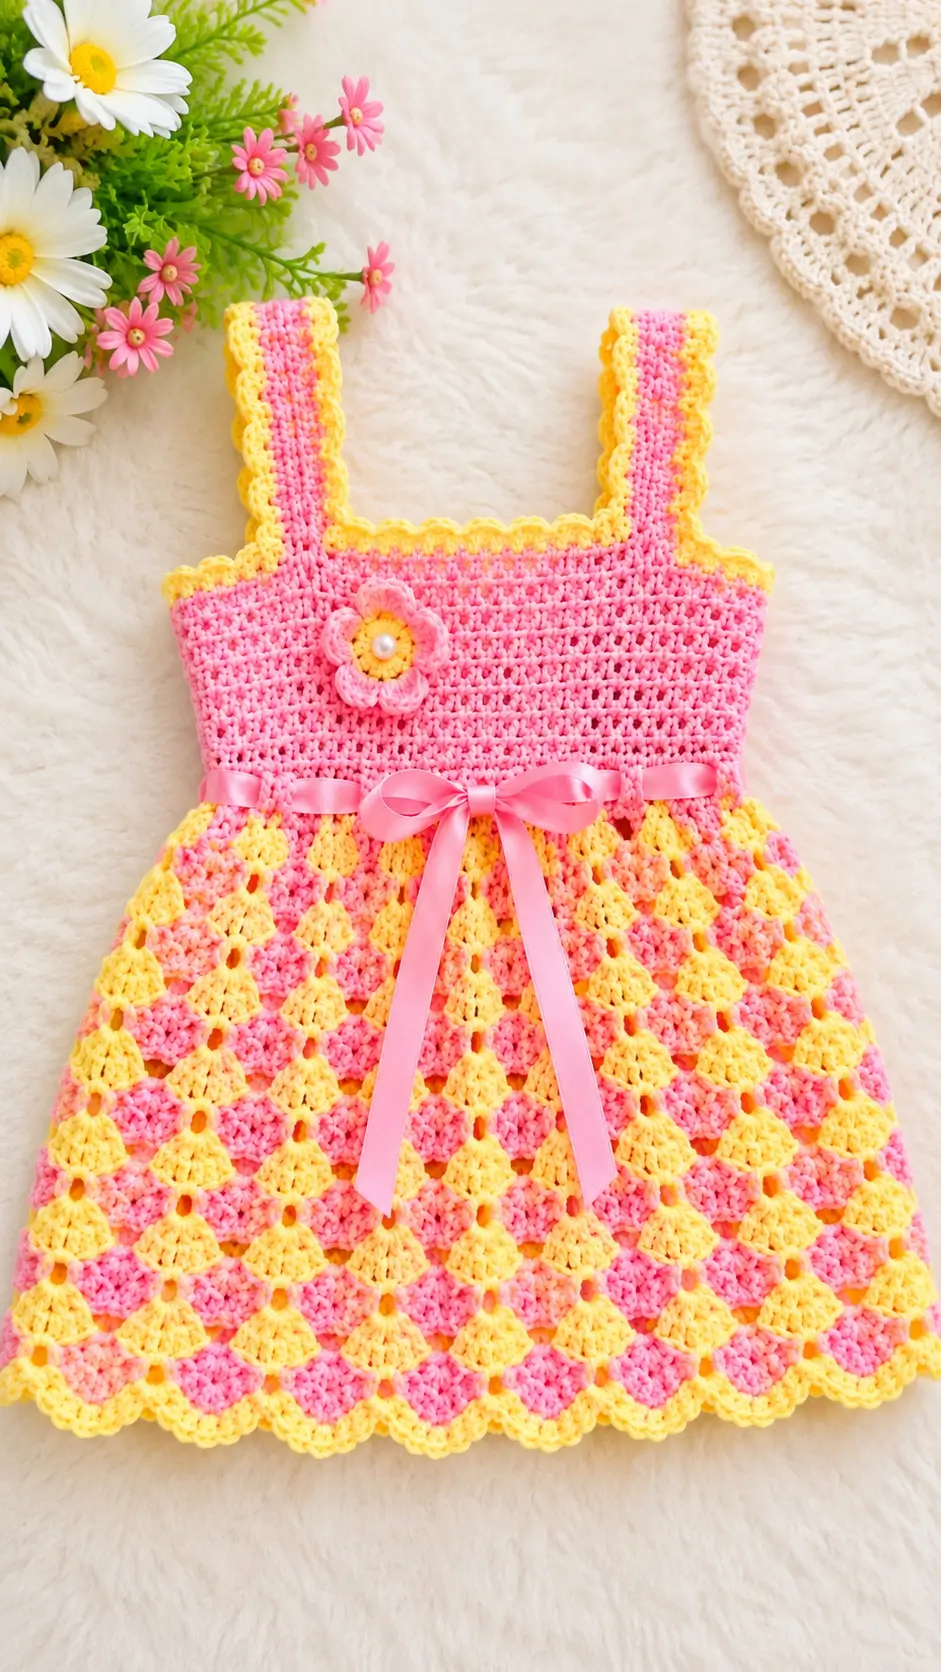
The wide square straps, yellow scalloped borders, and alternating shell fans identify this dress before the ribbon bow does. This crochet toddler sundress pattern is drafted as a photo-inspired 3–4-year size using light cotton, a 3.5 mm hook, and a target length near 56.5 cm. The skill level is intermediate. Its fixed bodice and adjustable ribbon waist give the finished garment a small amount of fitting tolerance.
The Design: What Makes This Pink and Yellow Sundress Different
Three structural decisions control the shape. First, the bodice stays almost rectangular rather than using a deep armhole curve; that matches the square neckline and keeps the wide straps stable. Second, skirt expansion happens before and between shell sections, which gives the shell stitch crochet dress a visible flare without forcing extra stitches into every decorative fan. Third, yellow edging is repeated on the straps, neckline and hem so the contrast color reads as part of the construction rather than a single isolated stripe.
A frequent error with a crochet summer dress for toddler sizing is measuring only the flat bodice width. Crochet can stretch after blocking, and a ribbon cannot correct a chest section that is several centimetres too wide. Measure the finished circumference at the gauge stage.
Project Info at a Glance
| Skill Level | Time | Finished Size | Hook | Best For |
|---|---|---|---|---|
| Intermediate | Approx. 10–20 hours | Approx. 56.5 cm long; 59 cm waist benchmark | 3.5 mm | Sleeveless toddler summer garment |
The finished measurements are sizing references from comparable published patterns, not measurements taken directly from the photograph.
Materials and Tools
Yarn
- Bright pink — fingering/sport cotton — allow about 250 g — suggested yarn: Scheepjes Catona or another cotton that reaches gauge.
- Lemon yellow — same yarn family — allow about 150 g for alternating fans, strap edging and hem.
- Orange or deeper yellow — small quantity for the flower center.
Scheepjes Catona is a mercerised cotton yarn supplied in 50 g balls. Total yarn use for a toddler dress can vary substantially according to gauge, skirt length and yarn thickness, so the 400 g allowance should be treated as a working estimate rather than an exact requirement.
Tools
- 3.5 mm crochet hook
- 15 mm pink satin ribbon, approximately 120 cm
- Yarn needle
- Locking stitch markers
- Measuring tape
- Scissors
- Optional pearl-style bead for the flower center
For a garment intended for a child under three, replace a detachable bead with an embroidered yarn center.
Gauge
Work a washed and dried swatch before sizing the bodice.
Target gauge: approximately 20 hdc × 14 rows = 10 × 10 cm.
At that gauge, 120 hdc measures close to 60 cm around. Adjust the foundation in multiples of six if your measured circumference differs.
Abbreviations
- MR — magic ring
- ch — chain
- sc — single crochet
- hdc — half double crochet
- dc — double crochet
- sl st — slip stitch
- inc — 2 stitches worked into one stitch
- sk — skip
- st/sts — stitch/stitches
- BLO — back loop only
Invisible decrease is not required in this garment; when used in a shaped crochet component, it is normally formed through the front loops of two adjacent stitches.
Pattern — Step by Step
Work the bodice and skirt in joined rounds. The shell rows are decorative rounds rather than an amigurumi spiral.
Bodice
Yarn: bright pink.
Ch 120. Join with a sl st to the first ch, taking care not to twist the chain.
R1: Ch 1, hdc in each ch around, sl st to first hdc. (120)
R2: Ch 1, hdc around, join. (120)
R3: Ch 1, hdc around, join. (120)
R4: Ch 1, hdc around, join. (120)
R5: Ch 1, hdc around, join. (120)
R6: Ch 1, hdc around, join. (120)
R7: Ch 1, hdc around, join. (120)
R8: Ch 1, hdc around, join. (120)
R9: Ch 1, hdc around, join. (120)
R10: Ch 1, hdc around, join. (120)
R11: Ch 1, hdc around, join. (120)
R12: Ch 1, hdc around, join. (120)
R13: Ch 1, hdc around, join. (120)
Check the circumference now. A significant gauge error is easier to correct before the skirt is attached.
Ribbon Eyelet Round
Yarn: bright pink.
R14: Ch 2, *dc in next st, ch 1, sk 1*, repeat around, join. (60 dc + 60 ch-1 spaces)
R15: Ch 1, hdc in every dc and every ch-1 space, join. (120)
Do not insert the ribbon yet. It is easier to handle the skirt without long ribbon tails attached.
Skirt Expansion
Yarn: bright pink.
R16: Ch 1, *(hdc in next 4 sts, 2 hdc in next st)* ×24, join. (144)
R17: Ch 1, hdc around, join. (144)
The first expansion changes 120 stitches to 144 stitches, producing 24 six-stitch fan repeats.
Lower Skirt — First Fan Section
Yarn: alternate lemon yellow and bright pink.
R18, yellow: *Sc in next st, sk 2, 5 dc in next st, sk 2*, repeat around. (24 fans)
R19, pink: Work 5 dc into each sc from the prior round and 1 sc into the center dc of each fan. (24 fans)
R20, yellow: Repeat the shifted fan placement. (24 fans)
R21, pink: Repeat. (24 fans)
R22, yellow: Repeat. (24 fans)
R23, pink: Repeat. (24 fans)
Keep the center sc directly over the middle dc of the previous shell. A one-stitch drift becomes visible within two rows.
Second Skirt Expansion
Yarn: bright pink.
R24: Ch 1, *(hdc in next 5 sts, 2 hdc in next st)* ×24, join. (168)
Middle Fan Section
Change colors at the beginning of each round.
R25, yellow: Work the fan repeat evenly around. (28 fans)
R26, pink: Shift fans into the anchor stitches from R25. (28 fans)
R27, yellow: Repeat. (28 fans)
R28, pink: Repeat. (28 fans)
R29, yellow: Repeat. (28 fans)
R30, pink: Repeat. (28 fans)
Final Skirt Expansion
Yarn: bright pink.
R31: Ch 1, *(hdc in next 6 sts, 2 hdc in next st)* ×24, join. (192)
The 192-stitch circumference divides into 32 fan repeats.
Lower Fan Section
R32, yellow: Fan repeat around. (32 fans)
R33, pink: Shifted fan repeat. (32 fans)
R34, yellow: Repeat. (32 fans)
R35, pink: Repeat. (32 fans)
R36, yellow: Repeat. (32 fans)
R37, pink: Repeat. (32 fans)
R38, yellow: Repeat. (32 fans)
R39, pink: Repeat. (32 fans)
R40, yellow: Repeat. (32 fans)
R41, pink: Repeat. (32 fans)
R42, yellow: Repeat. (32 fans)
R43, pink: Repeat. (32 fans)
Measure from the intended shoulder line to the lower edge. Add another pair of alternating rounds if extra length is required.
Scalloped Hem
Yarn: lemon yellow.
R44: *Sc in next anchor point, sk 2 sts, 7 dc in next center point, sk 2 sts*, repeat evenly around. (32 scallops)
Sl st to the first sc. Fasten off and weave the tail through at least 5 cm of reverse-direction stitches.
Shoulder Straps — Make 2
Yarn: bright pink.
Ch 57.
Row 1: Sc in second ch from hook and across. (56)
Row 2: Ch 1, turn, sc across. (56)
Row 3: Ch 1, turn, sc across. (56)
Row 4: Ch 1, turn, sc across. (56)
Row 5: Ch 1, turn, sc across. (56)
Row 6: Ch 1, turn, sc across. (56)
Row 7: Ch 1, turn, sc across. (56)
Fasten off pink.
Join yellow along one long side. Work small shells consisting of *sc, sk approximately one row-end, 5 dc in next row-end, sk approximately one row-end*. Repeat to the end.
Work the same edging on the opposite long side.
Fasten off. Leave a 25 cm pink sewing tail at each strap end.
Strap Placement
Flatten the bodice with the joining seam at center back. Mark center front directly opposite the seam.
Position each front strap end approximately 6–8 cm from the center-front marker. Place the corresponding back end symmetrically on the back edge.
Pin both straps before sewing. Check that neither strap twists.
Whipstitch each end over a 3.5–4 cm section of the bodice edge.
Upper Bodice Scallop Trim
Yarn: lemon yellow.
Join yellow at center back between the straps.
Work *sc in next st, sk 1, 5 dc in next st, sk 1* along the exposed upper bodice edge. Adjust the final repeat by one stitch if necessary so the two sides remain visually balanced.
Do not work over the sections covered by the strap ends.
Fasten off.
Flower Applique
Yarn: yellow center and pink petals.
With yellow:
R1: 6 sc in MR. (6)
R2: Inc ×6. (12)
Change to pink.
R3: *Sl st in next st, 3 dc in next st* ×6. (6 petals)
For a fuller flower, work a second pink layer behind R3 with ch-4 loops and 5 dc into each loop.
Fasten off. Leave a 25 cm sewing tail.
Position the flower slightly left of center on the bodice, matching the photograph rather than centering it under the neckline.
Flower Center
The photograph shows a pearl-like center. A securely attached decorative bead can reproduce that appearance for an age-appropriate garment.
For younger children, embroider several tight yellow or cream stitches through the flower center instead.
Ribbon Waist
Accessory: pink satin ribbon.
Cut approximately 120 cm of 15 mm ribbon.
Starting near center front, weave the ribbon alternately over and under the R14 dc posts through the ch-1 openings. Bring both ends out at the front.
Center the ribbon before tying the bow. Finished tails of about 20–25 cm create proportions close to the photographed dress.
Fold and stitch the ribbon ends or treat them with a suitable anti-fray method.
Assembly
- Lay the finished bodice flat and identify the center-front and center-back positions.
- Pin both straps at equal distances from the center-front point.
- Attach the strap backs symmetrically and check the complete shoulder opening before final stitching.
- Sew each strap end firmly through both the strap and bodice stitches.
- Work the yellow upper-edge trim between the attached strap sections.
- Position the flower applique slightly left of the bodice center and pin it through the outer petal layer.
- Sew the flower around its center and selected petal bases so the petals remain raised.
- Weave the satin ribbon through the R14 eyelets and equalize the two front tails.
- Weave every yarn tail back through at least 5 cm of matching-color stitches, reversing direction once.
- Measure chest circumference, shoulder-to-hem length and strap symmetry after the final wash and flat dry.
The completed garment should have a square upper profile, fitted bodice, flared two-color fan skirt and continuous yellow edging.
7 Technical Tips
- Mark the joining seam every round. Losing the seam position by one stitch per round can rotate the ribbon opening several centimetres away from center front by the time the bodice is finished.
- Check the 120-stitch bodice after R5. If its circumference differs from the target by more than about 2 cm, change hook size or foundation count before adding another eight rounds.
- Do not over-tighten the shell anchors. A tight sc between two 5-dc fans can pull the skirt into vertical ridges instead of allowing the fabric to flare.
- Measure both straps before attachment. A difference of even 1 cm between the two finished strap lengths can make one side of the neckline sit higher.
- Pin the flower through at least three petal bases. Sewing only through its center allows a 6-petal applique to curl forward or rotate after washing.
- Keep the ribbon channel free of yarn tails. A tail woven directly across a ch-1 eyelet can block the 15 mm ribbon or make the waist gather unevenly.
- Reverse direction when weaving long tails. A 5 cm tail passed in one direction only can work back through an open fan fabric; turning through nearby stitches gives the tail a mechanical change of direction.
Conclusion
Check the child’s chest measurement against the blocked bodice before treating the 56.5 cm length benchmark as the final target. The next practical step is to make the gauge swatch, wash it, and calculate whether 120 stitches will produce the required circumference with your chosen cotton. Photograph the completed fan sequence before threading the ribbon; that image can also document color placement for a second size. Save the finished project to Pinterest and share the front view on Instagram with #PinkYellowShellDress. This crochet toddler sundress pattern depends heavily on color order, so which section would you change first: the alternating shell rows or the yellow scalloped strap borders?









