Introduction
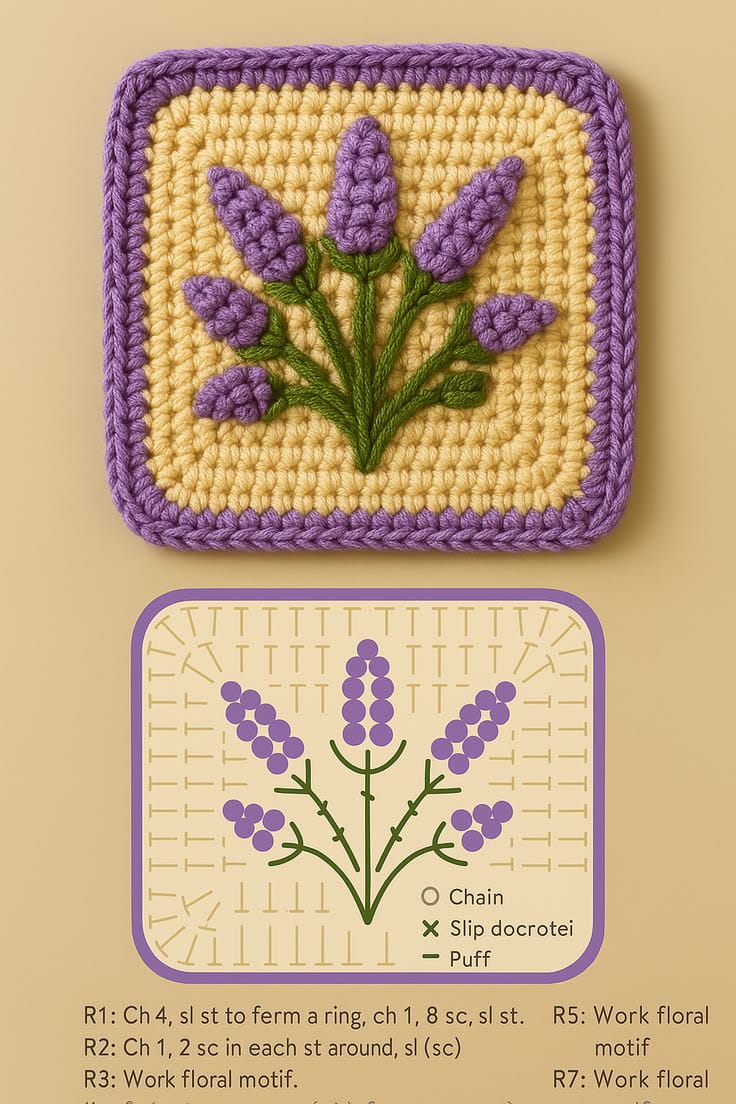
Five lavender spikes only read as one botanical branch when their green stems converge at a single lower point. This lavender crochet square pattern uses worsted yarn and a 5 mm hook to make an approximately 23 cm block. A buttercream background, raised purple buds, narrow green branches and a lavender border create an intermediate floral square suitable for blankets, cushions and decorative panels.
The Design: What Makes This Lavender Square Different
The square is deliberately dense because the raised floral work needs a stable surface rather than an open traditional granny-square center. Purple flower buds sit above the background as compact puff clusters, while narrow green surface stems connect five separate flower spikes to one central base. The middle spike is tallest, two upper side spikes angle outward, and two smaller blooms fill the lower sides. That hierarchy prevents the botanical motif from becoming a symmetrical five-point star. A lavender border repeats the flower color and visually contains the cream field without competing with the stems. This floral crochet square also depends on placement more than stitch complexity. One common maker error is starting the side stems too high. Their lower ends should converge near the lower third of the block or the finished lavender spray appears disconnected.
Project Info at a Glance
| Skill Level | Time | Finished Size | Hook | Best For |
|---|---|---|---|---|
| Intermediate | 2.5–3.5 hours | Approx. 23 × 23 cm | 5.0 mm | Blankets, cushions, tote bags and botanical wall panels |
Materials and Tools
Yarn
- Warm buttercream / pale yellow — worsted #4 — approximately 45–55 g — used for the dense square background.
- Lavender purple — worsted #4 — approximately 18–25 g — used for the five flower spikes and border.
- Leaf green — worsted #4 — approximately 10–15 g — used for stems, branches and leaves.
Use yarns from the same weight category. Thick lavender yarn paired with a thinner background yarn makes the buds disproportionately large and can pull the finished block out of square.
Tools
- 5.0 mm crochet hook
- 4.0 mm crochet hook for surface stems if tighter lines are required
- Yarn needle
- Locking stitch markers
- Blocking mat
- Rust-resistant pins
- Scissors
- Measuring tape
Abbreviations
- ch — chain
- sc — single crochet
- hdc — half double crochet
- dc — double crochet
- sl st — slip stitch
- sp — space
- st — stitch
- RS — right side
- WS — wrong side
- puff — raised four-partial-dc cluster
For the puff stitch, work four incomplete double crochets into the same point, yarn over and pull through all remaining loops, then chain one to close the cluster.
Pattern — Step by Step
Work the background square first. Block it before adding the dimensional lavender motif so the flower placement can be measured against the final dimensions.
Buttercream Square Foundation
Yarn: warm buttercream — original dense-square reconstruction.
Ch 36.
Row 1: Sc in second ch from hook and in each chain across. Turn. (35)
Row 2: Ch 1, sc across. Turn. (35)
Repeat Row 2 until the work forms a square measuring approximately 19–20 cm before the border.
This will normally require approximately 34–38 rows depending on gauge.
Measure width and height every six rows. Stop when the dimensions match rather than relying only on row count.
Do not fasten off.
Prepare the Square for Border Rounds
Ch 1.
Work 35 sc across the top edge.
At the corner work:
sc,
ch 2,
sc.
Work sc evenly down the first row-end edge, placing approximately one sc in each row end.
Repeat the corner sequence.
Work 35 sc across the foundation edge.
Repeat the corner.
Work sc evenly along the final side.
At the last corner work sc, ch 2, sc and join with sl st.
Each side should contain the same number of stitches before the purple border begins.
Fasten off buttercream.
Lavender Border — Round 1
Yarn: lavender purple.
Join in any corner ch-2 space.
Ch 1.
Work:
sc,
ch 2,
sc
in the same corner space.
Sc in every stitch across the first side.
At each following corner work sc, ch 2, sc.
Continue around all four sides.
Join with sl st in the first sc.
Lavender Border — Round 2
Ch 1.
Sc in each stitch across.
At every corner ch-2 space work:
2 sc,
ch 2,
2 sc.
Repeat around the square.
Join with sl st.
Stop after one border round if the square already measures approximately 23 cm. Use the second round only when additional size or a heavier purple frame is needed.
Fasten off and weave in the tail.
Mark the Botanical Layout
Place the blocked square with the right side facing upward.
Mark the lower convergence point approximately 5.5–6.5 cm above the bottom border and centered horizontally.
Place a second marker approximately 12–13 cm above that point for the tip of the central lavender spike.
Mark one upper branch to the left and one to the right, each ending approximately 3–4 cm below the central flower tip.
Add two lower branch markers approximately 4–5 cm from the center line.
Check the complete layout before stitching. The outer flower buds should remain at least 20–25 mm inside the purple border.
Central Green Stem
Yarn: leaf green.
With a yarn needle, bring the green yarn from the wrong side at the lower convergence point.
Work a chain-style surface line upward approximately 8–9 cm.
Each visible stitch should measure roughly 5–7 mm.
Stop immediately below the future central flower spike.
Keep the yarn resting on the surface rather than pulling it deep into the buttercream stitches.
Upper Left Branch
Bring the green yarn through the central stem approximately 4–5 cm above the lower convergence point.
Work diagonally upward to the left for approximately 5–6 cm.
Use the same chain-style surface stitches.
Fasten the yarn temporarily on the wrong side.
Upper Right Branch
Repeat the same branch structure on the right.
Compare both upper branch angles.
They do not need to mirror perfectly, but the endpoints should remain within approximately 10 mm of the same height.
Lower Left Branch
Begin approximately 2.5–3 cm above the lower convergence point.
Work diagonally left for approximately 4 cm.
Stop where the smaller lower flower spike will begin.
Lower Right Branch
Repeat on the opposite side.
Keep this branch slightly shorter if you want the asymmetry visible in the supplied botanical motif.
Central Lavender Spike
Yarn: lavender purple.
The central spike contains approximately 8 raised buds.
Join lavender at the upper end of the central green stem.
Work one puff directly above the stem.
Sl st approximately one background stitch higher.
Work another puff slightly to the left.
Move upward one stitch and work the next puff slightly to the right.
Continue alternating left and right until 7 puffs are complete.
Place the eighth puff at the top center.
The finished spike should taper from approximately 22–25 mm wide near the base to one puff at the tip.
Fasten off and secure the yarn on the wrong side.
Upper Left Lavender Spike
Yarn: lavender purple.
Join at the end of the upper-left branch.
Work approximately 7 puff buds.
Alternate the buds along both sides of the imaginary flower axis.
Finish with one top puff.
Angle the whole spike in the same direction as its green branch rather than working vertically.
Upper Right Lavender Spike
Repeat the upper-left flower with approximately 7 puff buds.
The finished spike should measure approximately 5–6 cm long.
Fasten off securely.
Lower Left Lavender Spike
Join lavender at the end of the lower-left branch.
Work approximately 4–5 puff buds.
Keep this flower shorter and slightly broader than the upper spikes.
The small flower should not extend farther outward than the branch above it.
Lower Right Lavender Spike
Repeat with approximately 4–5 puff buds.
Adjust one bud position if necessary so the two lower flowers do not appear mechanically identical.
Fasten off.
Green Flower Calyx — Central Flower
Yarn: leaf green.
Bring the yarn through immediately below the central flower.
Ch 3.
Sl st back into the same attachment point to form one narrow green point.
Repeat twice, angling one point left and one right.
The three small points should cover the transition between the purple flower and green stem.
Fasten off.
Flower Calyxes — Remaining Spikes
Repeat the three-point calyx under each of the remaining four lavender spikes.
Use slightly smaller ch-2 points beneath the two lower flowers.
Large Left Leaf
Yarn: leaf green.
Ch 7.
Starting in the second chain from the hook:
sl st,
sc,
hdc,
dc,
hdc,
sc.
Work 3 sc into the final chain.
Continue down the opposite side:
sc,
hdc,
dc,
hdc,
sc,
sl st.
Do not stuff. Pinch the foundation chain gently so it forms the center vein.
Fasten off. Leave a 15 cm sewing tail.
Large Right Leaf
Repeat the Large Left Leaf.
Position both large leaves in the middle third of the botanical spray rather than directly at the bottom.
Small Leaves (Make 2–4)
Yarn: leaf green.
Ch 5.
Starting in second chain from hook:
sl st,
sc,
hdc,
sc.
Work 3 sc into the final chain.
Continue along the opposite side:
sc,
hdc,
sc,
sl st.
Fasten off. Leave a 12 cm sewing tail.
Use these leaves to fill empty branch sections rather than spacing them uniformly.
Sew the Leaves
Pin the two large leaves beside the central branching area.
Place the smaller leaves along the outer branches.
Sew through the center vein only.
Leave the outer 5–8 mm of each leaf edge free.
This keeps the botanical motif dimensional without making the square bulky enough to resist joining.
Optional Stem Reinforcement
If any green branch appears too thin compared with the flowers, thread a second strand of green yarn.
Work one surface chain line directly over the first stem.
Stop before reaching the calyx.
Use reinforcement selectively; doubling every branch can overpower the flower buds.
Blocking and Finishing
Place the completed block on a blocking mat.
Pin all four corners to approximately 23 × 23 cm.
Add one pin at the midpoint of every side.
Shape each lavender spike with the fingers so the puff clusters remain raised.
Align the central stem vertically and keep the four side branches naturally angled.
Mist or wet block according to the yarn manufacturer’s care instructions.
Do not press the floral motif with an iron. Compression will flatten the puff buds and leaves.
Assembly
- Finish the buttercream background first and check that its width and height differ by no more than approximately 5 mm before bordering.
- Add the lavender border and block the square to approximately 23 × 23 cm before marking any stems.
- Mark the lower convergence point, central flower tip and four side flower endpoints so the complete spray remains centered inside the border.
- Work the central green stem first, then add the four side branches while keeping the outer endpoints at least 20–25 mm inside the purple edge.
- Add the central eight-bud lavender spike, then the two upper seven-bud spikes and finally the two shorter lower flowers.
- Cover each flower-to-stem transition with a small green calyx so no purple or green yarn tails remain visible from the front.
- Pin the two largest leaves near the middle branching area and distribute the smaller leaves along the outer stems.
- Sew leaves only through their center veins, leaving their outer edges free enough to project slightly above the background.
- Block the completed square again, correcting any border side that pulls inward by more than approximately 5 mm.
- Weave every tail through at least 4 cm of matching-color stitches on the wrong side, reverse direction once and trim after the block is dry.
The completed block should remain square with five distinct lavender flower spikes, one converging green branch structure and an uninterrupted purple frame.
7 Technical Tips
- Lavender spray leaning sideways: A central stem displaced by more than approximately 5 mm from the square center makes the whole botanical design look tilted. Mark both the lower convergence point and central flower tip before stitching the first green line.
- Puff buds flattening: Sewing through the complete flower cluster pulls it into the background. Anchor each puff only at its base and leave roughly 5–8 mm of the raised upper surface free.
- Background puckering: Tight surface stems shorten the buttercream fabric. Keep each chain-style stem stitch around 5–7 mm long and stop pulling as soon as the yarn rests flat against the square.
- Flower spikes becoming rectangular: Equal-width bud placement from top to bottom removes the tapered lavender shape. Keep the base around 22–25 mm wide and finish each spike with one centered puff.
- Leaves looking pasted flat: Sewing around the complete perimeter eliminates their raised edges. Fix each leaf mainly through the center vein and leave approximately 5–8 mm of its outer edge unattached.
- Border corners curling: Too few stitches in a corner pull the purple frame inward. Work at least sc, ch 2, sc in every corner and increase to 2 sc, ch 2, 2 sc on the second border round.
- Square growing beyond joining size: An extra border round can add more than 1 cm to each dimension. Measure after the first purple round and stop when the block reaches approximately 23 cm unless adjoining squares require a larger standard size.
Conclusion
Check the central flower position before securing the final leaves because the five-spike arrangement depends on a clear vertical axis through the lower stem and tallest bloom. Next, measure the finished block at all four sides and correct any border distortion during blocking before joining it to other motifs. Keep the raised buds uncompressed so the botanical relief remains visible. Share the finished lavender crochet square pattern project on Pinterest with a flat overhead photograph, then post a close view of the purple puff buds and green surface stems on Instagram using #RaisedLavenderCrochetSquare. For this square specifically, would you keep the buttercream background or switch it to soft ivory for stronger lavender contrast?









