Introduction
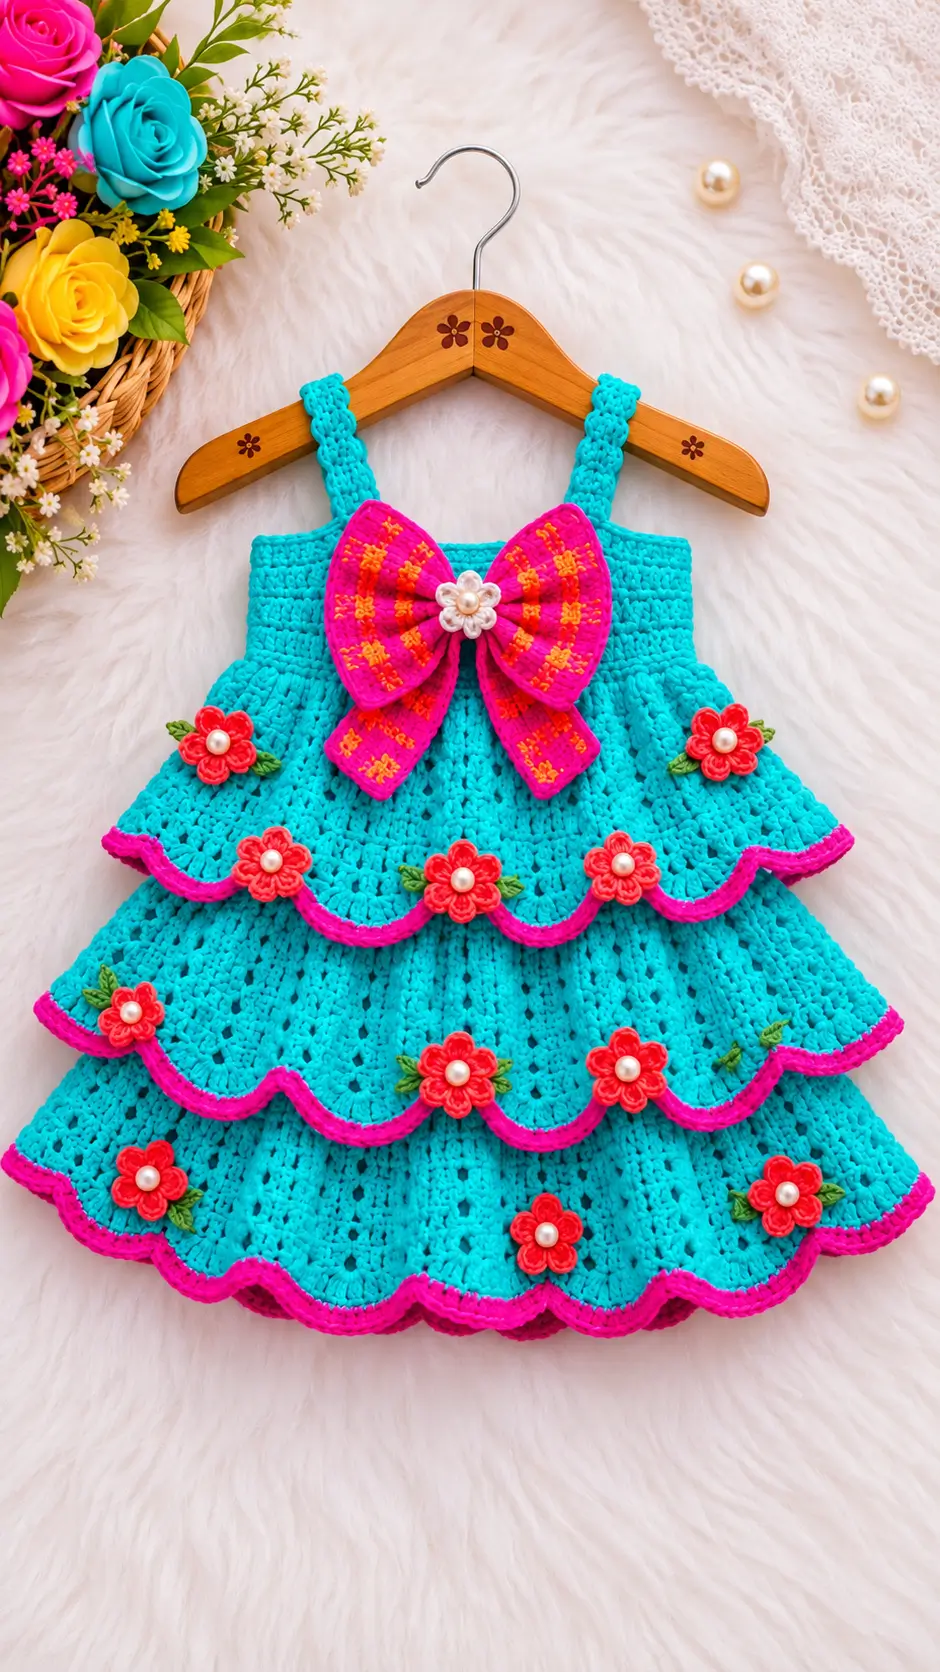
Three scalloped turquoise tiers make this dress structurally different from a standard crochet frock before the bow is even attached. This tiered crochet baby dress pattern uses DK yarn, a 4 mm hook and a measurement-led 12–24 month framework inspired by the photographed garment. The project is intermediate because ruffle placement and appliqué spacing require counting. The layered construction also gives you a practical way to add skirt volume without widening the fitted bodice.
The Design: What Makes This Dress Different
The skirt is built around overlapping decorative layers rather than one continuously flared fabric. Each tier projects beyond the layer beneath it, which keeps the scalloped outline visible and produces the strong horizontal rhythm seen in the reference photo. A compact sleeveless bodice holds that extra skirt weight better than a loose yoke, while two broad straps reduce stretching at the shoulder.
The oversized bow is positioned at center front because the bodice itself is visually plain. That leaves room for the crochet ruffle baby dress structure to remain readable below it. Small floral motifs are then distributed near scallop peaks instead of scattered randomly.
A common mistake in a layered crochet dress is making every ruffle from the same attachment round. The tiers then stack into one bulky ridge instead of descending cleanly.
Project Info at a Glance
| Skill Level | Time | Finished Size | Hook | Best For |
|---|---|---|---|---|
| Intermediate | 10–14 hours | Measurement-led 12–24 months | 4.0 mm | Decorative summer dress / photography garment |
The 4 mm DK combination is supported by published 1–2 year crochet-dress specifications using about 200 g of yarn. Gauge must still be checked because garment sizing changes with yarn, hook and stitch height.
Materials and Tools
Yarn
- Turquoise/Aqua — DK / Light #3 — approximately 200–250 g for the three-tier treatment — smooth cotton, cotton/acrylic or baby-DK yarn.
- Hot Pink — DK — approximately 20–30 g for scalloped edging and bow outlines.
- Coral/Red — DK — approximately 15–20 g for flowers.
- Green — DK — approximately 5–10 g for leaves.
- Orange — DK or embroidery-weight yarn — small quantity for bow surface details.
- Cream/White — small quantity for the bow-center flower.
Published crochet dress patterns commonly use DK yarn for this size range. A 1–2 year dress may require around 200 g before dense ruffles and decorative appliqués are added.
Tools
- 4.0 mm crochet hook
- 3.5 mm crochet hook for firmer appliqués if required
- Yarn needle
- Locking stitch markers
- Tape measure
- Scissors
- Rustproof blocking pins
For an infant or young toddler garment, embroidered knots or tightly crocheted centers are preferable to loose pearl-style decorations. Small detachable components may present a choking hazard.
Abbreviations
- ch — chain
- sc — single crochet
- hdc — half double crochet
- dc — double crochet
- sl st — slip stitch
- st / sts — stitch / stitches
- sp — space
- sk — skip
- inc — work two stitches into one stitch
- BLO — back loop only
- RS — right side
- WS — wrong side
Invisible decrease is an amigurumi shaping technique and is not required for the main dress construction.
Gauge and Sizing
Work a 12 × 12 cm swatch in the bodice stitch before beginning the garment. A useful DK benchmark is approximately 20 stitches and 10 rows of double crochet per 10 cm when using a 4 mm hook.
Take four measurements from the intended wearer: chest circumference, shoulder-to-waist depth, shoulder-to-finished-hem length and desired strap length. Add approximately 3–5 cm of positive ease at the chest.
The reference photo does not contain a dependable scale, so an exact clothing size cannot be calculated from the image alone.
Pattern — Step by Step
This is an original photo-inspired construction. It does not claim to reproduce an identified commercial or designer pattern.
Bodice Front
Yarn: turquoise — DK.
Using a gauge target of roughly 20 double crochet stitches per 10 cm, calculate half the desired finished chest circumference and convert that measurement into stitches.
For a sample 54 cm finished chest:
Foundation: Ch 57.
Row 1: Dc in 4th ch from hook and across. Turn. (54 dc)
Rows 2–5: Ch 3, dc across. Turn. (54)
Rows 6–10: Ch 2, hdc across. Turn. (54)
Rows 11–14: Ch 2, hdc across. Turn. (54)
The photographed bodice is relatively compact. Stop when the piece reaches the intended underarm-to-waist depth rather than adding unnecessary rows.
Fasten off. Leave a 25 cm sewing tail.
Bodice Back
Make the back to the same width and depth as the front.
Foundation: Ch 57.
Row 1: Dc in 4th ch from hook and across. Turn. (54)
Rows 2–5: Ch 3, dc across. Turn. (54)
Rows 6–14: Ch 2, hdc across. Turn. (54)
Fasten off.
Join front and back at the side seams. Leave the upper edge open for the straps.
Shoulder Straps — Make 2
Yarn: turquoise.
The straps in the photograph are broad enough to resist stretching.
Foundation: Ch 8.
Row 1: Sc in 2nd ch from hook and across. Turn. (7)
Rows 2–26: Ch 1, sc across. Turn. (7)
Check the strap length against the wearer before fastening off. Add or remove rows to match the required measurement.
Sew one strap at each front corner and align the opposite ends on the back.
Skirt Foundation
Join turquoise yarn around the lower bodice edge.
Round 1: Ch 2, hdc evenly around; join.
Round 2: Ch 2, work approximately 2 hdc, inc around to increase the skirt circumference; join.
Round 3: Hdc around without increases.
Round 4: Increase evenly again until the skirt has enough circumference to fall freely.
The exact stitch total depends on the finished bodice count. Place increases at regular intervals to keep the skirt symmetrical.
Upper Ruffle Tier
Yarn: turquoise with hot-pink edging.
Attach turquoise to the first designated skirt attachment round.
Round 1: Ch 1, sc around.
Round 2: Repeat sk 2 sts, 5 dc in next st, sk 2 sts, sc in next st around.
Round 3: Work a second shell row into the center of the previous shells.
Rounds 4–6: Continue the shell sequence while keeping each shell centered.
Round 7: With hot pink, work sc along the edge. Place 3 sc in the central stitch of each shell to sharpen the scallop.
Fasten off.
Middle Ruffle Tier
Attach turquoise behind the first ruffle several rows lower on the skirt foundation.
Round 1: Sc evenly around.
Round 2: Establish five-dc shells.
Rounds 3–7: Continue the shell arrangement.
Round 8: Add one extra shell row so the second tier projects below the upper tier.
Round 9: Edge in hot-pink sc, adding extra stitches around the scallop curves where required to prevent puckering.
Fasten off.
Lower Ruffle Tier
Attach turquoise below the middle tier.
Round 1: Sc evenly around.
Round 2: Establish the shell pattern.
Rounds 3–9: Repeat shells, adding length until the dress reaches its target shoulder-to-hem measurement.
Round 10: Work the final turquoise shell row.
Round 11: Join hot pink and sc around the complete hem. Work 3 sc at each lowest scallop point.
Fasten off and weave the tail horizontally through several stitches.
Large Front Bow
Main yarn: hot pink. Decorative details: orange.
The reference image uses a large bow whose width covers much of the front bodice.
Foundation: Ch 33.
Row 1: Hdc in 2nd ch from hook and across. Turn. (32)
Rows 2–12: Ch 2, hdc across. Turn. (32)
Fasten off.
Fold the rectangle so both short ends meet at the back. Sew the join securely.
Pinch the center into two symmetrical loops and wrap a separate crocheted band around the middle.
Bow Tails — Make 2
Foundation: Ch 12.
Row 1: Hdc across.
Rows 2–18: Hdc across.
Shape the lower ends with short rows or create rounded crochet points.
Surface-stitch small orange crosses or bars over the pink fabric to reproduce the visual pattern shown in the reference image.
Center Bow Flower
Yarn: cream or white.
Round 1: 6 sc into a magic ring. (6)
Round 2: Work sl st, ch 3, 2 dc, ch 3, sl st into each stitch to form six petals.
Fasten off.
For a young child’s garment, use a tightly embroidered or crocheted center instead of a loose pearl bead.
Coral Flowers — Make 9 to 10
Yarn: coral/red.
Round 1: 6 sc in MR. (6)
Round 2: In each stitch work sl st, ch 2, 2 dc, ch 2, sl st.
This produces six compact petals.
For a five-petal flower closer to the photograph, begin with 5 sc in the magic ring instead of 6.
Sew each flower through multiple points of the petal base rather than fixing it only through the center.
Leaves — Make 12 to 18
Yarn: green.
Foundation: Ch 6.
Working down one side: sc, hdc, dc, hdc.
Work 3 sc into the final chain.
Continue along the opposite side: hdc, dc, hdc, sc.
Sl st to finish.
Leave a 15 cm tail for sewing.
Place one or two leaves beside selected flowers rather than every flower so the surface does not become overcrowded.
Hot-Pink Edge Reinforcement
Inspect all three tiers after blocking. If a scallop rolls inward, join hot-pink yarn at the side seam and work a second loose slip-stitch or single-crochet edging through the affected section.
Do not pull the edging yarn tightly. A contracted contrast row can distort the turquoise shell fabric and cause the hem to curl.
Assembly
- Sew the bodice front and back together at both side seams.
- Attach both straps and measure the neckline opening before burying their yarn tails.
- Add the skirt foundation evenly around the lower bodice.
- Complete and block all three ruffle tiers before adding surface decorations.
- Center the large bow horizontally on the front bodice and pin its two upper corners.
- Sew the bow through its center band and several discreet points along the back edges.
- Place the cream flower over the bow’s center wrap.
- Pin the coral flowers near selected scallop peaks and check left-to-right balance before sewing.
- Add the green leaves beneath or beside the flower appliqués and weave every tail to the wrong side.
- Inspect seams, edging and all decorative attachments, then block the completed garment to its final measurements.
The finished dress should hang with all three ruffle edges visible instead of collapsing into a single skirt layer.
7 Technical Tips
- Mark every ruffle attachment round. Losing the correct round can cause two tiers to begin at the same level. Place four locking markers around each planned attachment line before making the first shell.
- Do not add stuffing behind appliqués. This is a garment, and padded flowers or bow sections can create hard raised areas against the wearer.
- Do not use amigurumi decrease formulas for skirt shaping. Garment hems require distributed increases based on gauge and circumference rather than fixed six-stitch shaping cycles.
- Pin every flower before sewing. A flower shifted by 2 cm from its intended scallop peak can disrupt the repeated placement across the skirt.
- Check the hot-pink edging tension. If 10 cm of turquoise shell edge contracts to less than approximately 9.5 cm after edging, the contrast yarn is being worked too tightly.
- Pin the bow at three or more points. Sewing a wide bow only through its center allows the loops to rotate or sag under their own weight.
- Weave each long tail in two directions. Run the yarn through 3–4 cm of stitches, reverse through a neighboring row, then trim the remaining end.
Safety and Wearability Note
The photographed dress uses pearl-style centers on several flowers. The image does not show how those decorations are attached, so their security cannot be verified.
For garments intended for babies or young toddlers, crocheted or embroidered centers are a practical alternative to detachable beads. Inspect every decorative attachment after washing and before the garment is worn.
The shoulder straps should also be checked for stretching. Cotton-rich yarn can lengthen after washing, so compare the blocked strap measurement with the required shoulder length before final use.
Conclusion
Finish the garment by measuring the shoulder-to-hem length again after blocking and comparing the chest width with the intended wearer rather than relying only on an age label. If the three tiers overlap evenly, the next step is to sew the flower appliqués through several secure points and inspect every decorative center after washing. Save this tiered crochet baby dress pattern to Pinterest with a close-up of the scalloped layers, then share the finished version on Instagram using #TieredFlowerDress. For this turquoise design, would you keep the oversized hot-pink bow or make it narrower so more of the bodice remains visible?









