Introduction
A tablet sleeve made from one square has a geometric constraint: three corners must form the pocket while the fourth still has enough reach to close over the device. This granny square crochet tablet sleeve uses worsted yarn, a 5 mm hook and a multicolor envelope construction sized directly against the tablet. The project suits intermediate beginners and avoids separate front, back and flap pieces.
The Design: What Makes This Tablet Sleeve Different
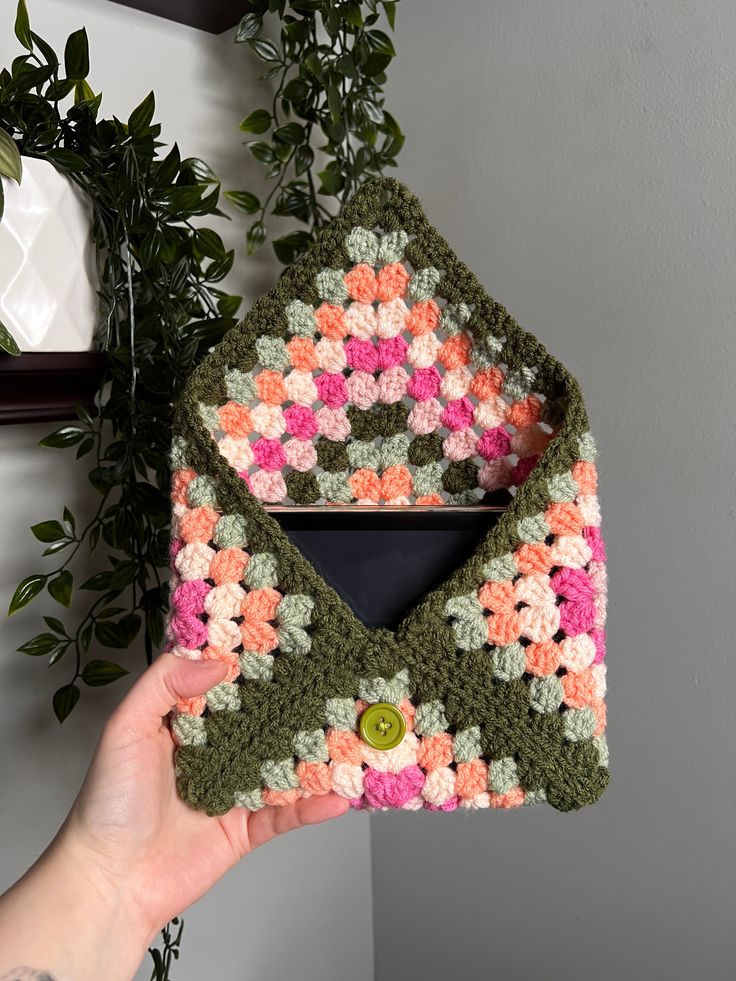
The photographed sleeve is controlled by color placement as much as by shape. Dark olive yarn forms the outer frame and structural folding areas, while sage, coral, cream, blush and bright pink clusters create concentric bands through the center. That distribution leaves the high-stress corners darker and visually anchors the flap.
Three corners of the granny square fold inward to form the device pocket. The remaining corner stays free as a pointed closure flap, turning a flat motif into a crochet envelope tablet case without adding another crocheted panel.
The lime-green button is placed below the front overlap rather than at the center of the entire square. Its location is determined after folding.
A common error with a granny square iPad sleeve is sizing against screen width alone. Device thickness and any existing protective case also consume internal space.
Project Info at a Glance
| Skill Level | Time | Finished Size | Hook | Best For |
|---|---|---|---|---|
| Intermediate beginner | 3–5 hours | Approx. 25 × 20 cm, adjustable | 5 mm | Tablets, iPads, e-readers, journals |
A comparable crochet tablet sleeve measures approximately 25.4 × 20.3 cm, while envelope-style versions can begin from a square around 30 × 30 cm before folding.
Materials and Tools
Yarn
- Dark olive green — worsted/Aran #4 — approximately 45–60 g
- Sage green — worsted/Aran #4 — approximately 15–20 g
- Coral/orange — worsted/Aran #4 — approximately 10–15 g
- Cream — worsted/Aran #4 — approximately 8–12 g
- Blush pink — worsted/Aran #4 — approximately 8–12 g
- Bright pink — worsted/Aran #4 — approximately 8–12 g
Allow roughly 100–130 g total for a medium tablet sleeve. Actual yarn use depends on device dimensions, yarn density and the number of rounds worked.
Tools
- 5 mm crochet hook
- Approximately 25 mm four-hole button
- Tapestry needle
- Scissors
- 4 locking stitch markers
- Flexible measuring tape
- Tablet or e-reader being fitted
Abbreviations
- MR — magic ring
- ch — chain
- sl st — slip stitch
- sc — single crochet
- dc — double crochet
- sp — space
- ch-sp — chain space
- st/sts — stitch/stitches
- rnd — round
- RS — right side
Invisible decreases are not required because the sleeve grows as a flat square rather than a three-dimensional form.
Before You Crochet: Measure the Device
Measure the tablet with any permanent case still attached.
Record:
- Height — top to bottom
- Width — side to side
- Thickness — front surface to back surface
A sleeve that fits the width but ignores thickness can become several centimeters too narrow once folded.
For an average tablet around 24 × 17 cm, begin checking the granny square when it reaches approximately 30–32 cm across. Larger devices may require 34–38 cm or more.
The photographed sleeve has a relatively close fit. Aim for approximately 1–1.5 cm of clearance around the device rather than a loose bag-like fit.
Pattern — Step by Step
Main Granny Square
Yarn: olive, sage, coral, cream, blush and bright pink.
The project begins in the center and grows outward. Work with the right side facing unless noted.
Round 1 — Dark Olive
Make a MR.
Ch 3. Work 2 dc into the ring, ch 2.
Work:
[3 dc, ch 2] ×3 into the ring.
Join with sl st to the top of the beginning ch 3.
You now have four granny clusters and four corner spaces.
Fasten off.
Round 2 — Blush Pink
Join blush yarn in any corner space.
Ch 3, 2 dc, ch 2, 3 dc in the same corner.
Ch 1.
In each remaining corner work:
3 dc, ch 2, 3 dc, ch 1.
Join with sl st.
Fasten off.
Round 3 — Bright Pink
Join bright pink in any corner.
Work:
3 dc, ch 2, 3 dc in the corner.
Ch 1.
Work 3 dc into the side ch-1 space, ch 1.
Repeat around, placing the full corner group in each corner.
Join and fasten off.
The center should now show the strongest pink concentration seen in the reference.
Round 4 — Cream
Join cream in a corner.
Work:
3 dc, ch 2, 3 dc in the corner.
Ch 1.
Work one 3-dc cluster in every side ch-1 space, separated by ch 1.
Repeat around.
Join.
Fasten off.
Round 5 — Coral
Join coral yarn in a corner.
Repeat the established granny-square structure:
Corners: 3 dc, ch 2, 3 dc.
Side spaces: 3 dc.
Place ch 1 between neighboring clusters.
Join and fasten off.
At this stage the color bands should read clearly as separate stepped rings.
Round 6 — Sage
Join sage green at any corner.
Work the standard granny-square round.
Each corner receives:
3 dc, ch 2, 3 dc.
Each side space receives:
3 dc.
Ch 1 between clusters.
Join and fasten off.
Round 7 — Dark Olive
Join dark olive in a corner.
Repeat the same granny construction around.
The darker ring starts separating the central color section from the following accent bands.
Join and fasten off.
Round 8 — Sage and Coral Accent Round
The reference does not behave like a perfectly uniform striped granny square. Selected color blocks shift as the motif expands.
Start with sage.
Work the first corner and two neighboring clusters in sage.
Change to coral at the final yarn-over of the last sage dc.
Work the next two clusters in coral.
Change to sage again.
Repeat similar sections around the square, keeping the transitions balanced on opposite sides.
Each corner must still contain:
3 dc, ch 2, 3 dc.
Fasten off each color cleanly rather than carrying yarn across long unused sections.
Round 9 — Cream, Pink and Coral
Work selected 3-dc clusters in cream, blush, bright pink and coral.
Use the following sequence as a guide along each side:
cream → coral → bright pink → blush → coral → cream
Adjust the exact order when needed to keep each corner predominantly sage or olive.
The reference shows staggered color placement rather than four identical sides. Minor asymmetry works well for this design.
Round 10 — Sage
Work one complete granny round in sage.
At each corner:
3 dc, ch 2, 3 dc.
In every side space:
3 dc, ch 1.
A full sage round visually reconnects the fragmented accent colors.
Round 11 — Dark Olive
Work one complete round in dark olive.
This is the first major structural border.
Keep the corner chains at ch 2 rather than making loose ch-3 gaps. Smaller corner spaces produce a firmer folded sleeve.
Join and fasten off.
Round 12 — Optional Accent Round
If more size is needed, repeat selected sage, coral, cream and pink blocks through the side spaces.
Keep all four corners dark olive.
This gives the eventual flap and side seams stronger outer points.
Round 13 — Dark Olive Border
Work a complete dark olive granny round.
Each side space:
3 dc, ch 1.
Each corner:
3 dc, ch 2, 3 dc.
Join.
Lay the square flat.
Measure it before continuing.
Check the Square Against the Tablet
Rotate the square so one corner points upward.
Place the tablet in the middle.
Fold the bottom corner upward.
Its tip should cover approximately the lower 35–40% of the device.
Bring the left corner across, followed by the right.
Each side should pass the device edge by approximately 1–2 cm without stretching the granny clusters open.
Now bring the top point downward.
The point should cross the upper device edge and extend far enough to reach the future button location.
If any of those conditions fail, crochet another round.
Round 14 — Optional Final Size Round
If needed, work one more complete dark olive round.
This extra perimeter adds size without introducing another dominant color band.
Join.
Do not fasten off if adding the border immediately.
Firm Outer Border
The reference has a comparatively solid dark olive perimeter.
Ch 1.
Work 1 sc in every dc and 1 sc in each ch-1 space.
In each corner ch-2 space work:
2 sc, ch 1, 2 sc.
Continue around the entire square.
Join with sl st.
Fasten off, leaving a 30 cm tail if the position is useful for seaming.
The sc border limits corner stretch and gives the envelope edges a cleaner line.
Folding the Tablet Sleeve
Place the square RS down.
One corner should point directly upward.
Fold the bottom point toward the center.
Next fold the left and right points inward so they overlap the lower panel.
The two side tips should create a shallow V at the front rather than crossing far past the center.
Insert the tablet.
Check that the device slides in without forcing the side seams outward.
Remove the tablet before permanent assembly.
Button Loop
The pictured flap can use either an existing granny opening or a dedicated chain loop.
For better control, make a chain loop.
Join dark olive yarn approximately 1–1.5 cm above the flap tip.
Ch 8–12, depending on the button.
Sl st back into the same attachment area.
Test the loop around the button before fastening off.
For an approximately 25 mm button, the finished loop should pass over the widest point with little excess space.
If it stretches heavily, sl st into each chain around the loop before fastening off.
Button
Use an approximately 25 mm lime, chartreuse or olive four-hole button.
Insert the tablet and close the flap.
Pull only until the flap lies flat.
Mark the point where the loop reaches the front.
Remove the tablet.
Sew the button through a dense olive section rather than through an open chain space.
Catch several neighboring crochet stitches on the back with each pass.
Make at least six passes before knotting and weaving the tail.
Assembly
- Lay the granny square RS down with a dark olive corner pointing upward.
- Fold the bottom corner toward the center until it covers approximately 35–40% of the tablet height.
- Fold the left side inward and pin its lower diagonal edge to the bottom panel.
- Fold the right side inward to the matching position and compare both overlaps.
- Insert the tablet and confirm approximately 1–2 cm of usable side clearance without forcing the granny holes wider.
- Remove the device and sew the left lower diagonal seam through both overlapping layers.
- Sew the right diagonal seam at the same height, leaving the entire top flap unattached.
- Close the flap and mark the natural button location through the completed loop.
- Sew the button through multiple olive stitches and test the closure repeatedly with the tablet inserted.
- Weave every tail through at least 4 cm of matching-color crochet, trim excess yarn and check the interior for protruding knots.
The completed sleeve forms one device pocket from three folded corners with the fourth corner acting as a reusable envelope flap.
7 Technical Tips
- Tablet thickness: Measuring only screen width can leave the sleeve too tight after folding. Add the device case before measuring and require roughly 1–2 cm functional clearance at each side.
- Loose corner spaces: Oversized corner chains can stretch into large holes directly along the flap. Keep corner spaces consistently at ch 2 throughout this version.
- Color placement failure: Accent clusters that look balanced while flat may disappear under the folded sides. Perform a temporary envelope fold after every two multicolor rounds once Round 7 is complete.
- Crooked side seams: One side sewn a cluster higher than the other will pull the front V off-center. Place stitch markers through corresponding granny clusters on both sides before sewing.
- Button strain: Attaching the button through one chain strand can tear that strand after repeated opening. Pass sewing yarn through at least three adjacent crochet stitches beneath the button.
- Oversized flap loop: A loop with more than about 5 mm excess clearance may slip off the button while the sleeve is carried. Test it five times before securing the yarn tail.
- Interior abrasion: Thick yarn knots can press against a tablet case or screen edge. Weave every joining tail through at least 4 cm of matching stitches and keep knots away from the device-facing center panel.
Sizing for Different Devices
The construction scales by continuing the granny square rather than rewriting every round.
A small e-reader may need a square around 26–30 cm.
A standard tablet can fall around 30–36 cm.
Larger tablets or compact laptops may require 36–42 cm or more, depending on thickness.
Those figures are starting ranges, not universal measurements.
Stop adding rounds only after performing the folding test with the real device.
A bare tablet and the same tablet inside a protective shell can require noticeably different sleeve dimensions.
Planning the Color Bands
The reference works because the dark olive does not compete equally with every accent color.
Bright pink sits near the center, where a small quantity reads strongly. Cream and blush create lighter breaks. Coral forms warmer intermediate bands. Sage then connects those accents to the dark olive border.
For a close visual match, keep approximately 40–50% of the visible outer fabric dark olive.
Sage can occupy roughly 20%.
Divide the remaining color area among coral, cream, blush and bright pink.
Those percentages do not need stitch-level precision. Their purpose is to prevent the outer square from becoming so multicolored that the envelope outline disappears.
The last full granny round and single-crochet edging should remain dark olive.
Why the Envelope Fold Works
A traditional granny square expands evenly from four identical corners. Once rotated 45 degrees, those corners naturally become top, bottom, left and right points.
Three points can therefore overlap to make a pocket without separate shaping.
The top point remains structurally identical to the others but functions as the flap.
This construction also permits resizing late in the project. If the tablet does not fit after a folding test, another complete granny round adds fabric around all four sides at once.
The trade-off is openness. Granny clusters contain spaces between groups, so this case protects mainly against scratches, light bumps and contact with objects in a bag.
It is not padding equivalent to a foam laptop case, and it is not water-resistant.
Improving Device Protection
For more protection, a fabric lining can be added after the square is complete but before the corners are permanently folded.
Cut one fabric square approximately 1 cm smaller on every side than the crochet piece.
Turn the fabric edges under by roughly 1 cm.
Hand-sew the lining to the dense outer crochet border.
Keep stitches out of the corner chain spaces so the fabric does not restrict folding.
A lining closes the larger granny openings and prevents small objects such as pens or keys from contacting the tablet through the crochet fabric.
Do not insert thick batting unless the granny square was intentionally made larger. Added padding consumes interior width and can make a previously correct sleeve too tight.
Button Placement and Flap Tension
The lime-green button is a small feature, but its position controls the finished geometry.
Do not measure its placement from the lower edge before the sleeve is assembled.
Insert the tablet.
Fold the flap down.
Bring the loop toward the front without stretching it.
Mark that resting point.
After removing the tablet, attach the button exactly there.
If closing the button pulls the top corner into a narrow, elongated point, the closure is too tight. Either add one chain to the loop or move the button approximately 5–10 mm upward.
If the flap lifts away from the sleeve, shorten the loop or move the button slightly downward.
Conclusion
Test the folded square around the actual device before sewing either side seam. The lower corner needs enough height to support the tablet, both side panels should overlap without stretching, and the upper point must reach the closure with light tension only. Keep the outer rounds dark olive to reproduce the strong frame seen in the reference, then position the button after the tablet is inside the assembled pocket. Save this granny square crochet tablet sleeve to Pinterest and share the closed and open views on Instagram using #OliveGrannyTabletSleeve. For this color layout, would you keep the bright pink center or replace it with another coral band?









