Introduction
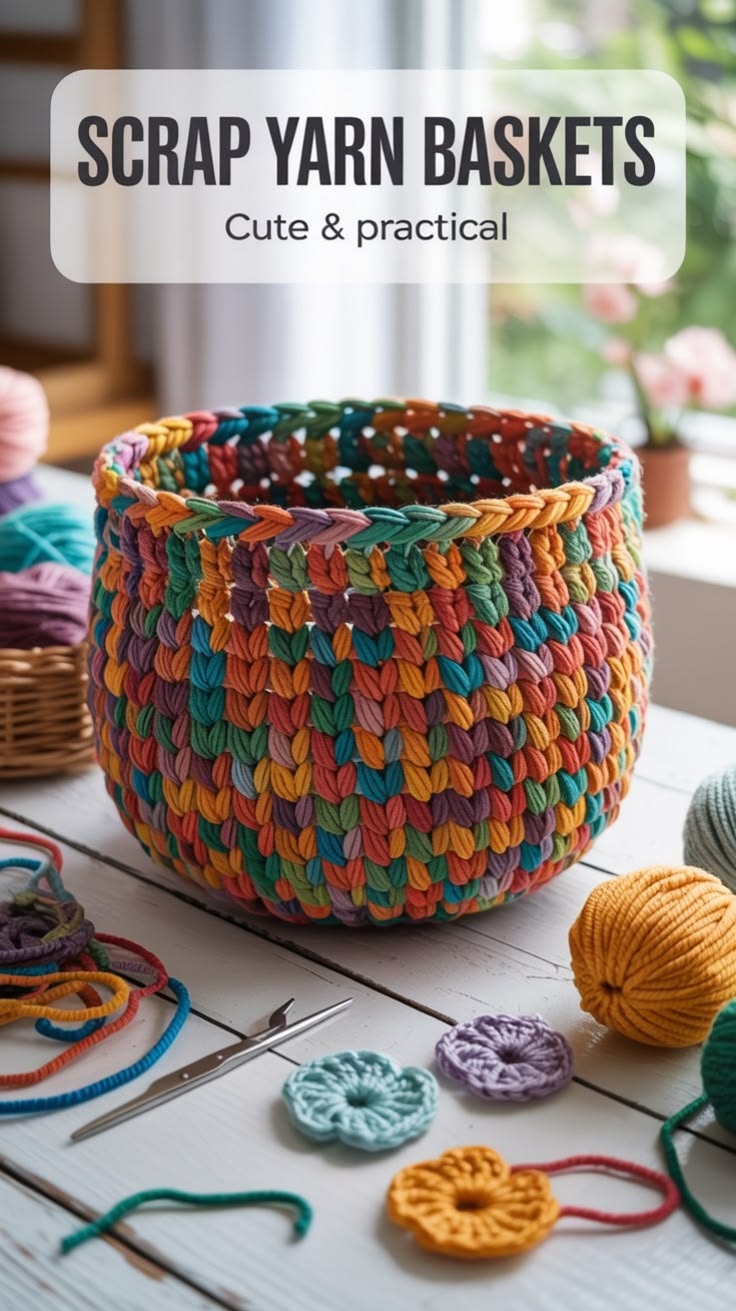
A scrap basket fails structurally when random yarn is treated as random thickness. This scrap yarn crochet basket keeps four to five strands together at all times so dozens of leftover colors behave as one consistent jumbo yarn. Using a 9 mm hook, tight single crochet and a 33 cm target diameter produces a large intermediate-beginner storage basket suitable for yarn, fabric remnants or lightweight craft supplies.
The Design: What Makes This Scrap Basket Different
The reference basket depends on density rather than internal stiffening. Several yarn strands are worked together to form substantial stitches, while frequent color changes distribute short scraps across the surface instead of creating conventional stripes.
The circular base grows in six-stitch increments until it reaches storage-basket width. One back-loop-only round then creates a distinct turn from floor to wall, helping the lower edge remain rounded but controlled. The walls continue without increases so the finished crochet storage basket remains cylindrical.
A doubled finishing section strengthens the top opening without adding handles. This matters because a large multicolor crochet basket tends to flare at the rim when the same loose tension is used from base to top.
The most common failure is allowing the combined yarn thickness to change. Replacing two thin strands with two bulky scraps at once can visibly alter both gauge and wall stiffness.
Project Info at a Glance
| Skill Level | Time | Finished Size | Hook | Best For |
|---|---|---|---|---|
| Intermediate beginner | 6–10 hours | Approx. 33 cm diameter × 29 cm tall | 9 mm | Yarn, craft supplies, soft toys, fabric scraps |
Materials and Tools
Yarn
- Mixed scrap yarn — primarily DK/light-worsted leftovers — hold 4–5 strands together continuously
- Teal scraps — approximately 30–70 g distributed through the basket
- Coral/orange scraps — approximately 30–70 g
- Mustard scraps — approximately 20–50 g
- Sage/green scraps — approximately 30–70 g
- Purple/lavender scraps — approximately 30–70 g
- Pink/red scraps — approximately 30–70 g
- Pale blue or neutral scraps — optional for additional variation
Plan on roughly 600–900 g total for a large dense basket if using several DK strands together. Actual yarn use depends on basket size, strand count and yarn density.
Tools
- 9 mm crochet hook
- Large locking stitch marker
- Tapestry needle with a large eye
- Scissors
- Flexible measuring tape
- Digital kitchen scale, optional for sorting scraps
Do not choose yarn only by printed weight category. The combined thickness in your hand matters more because the basket is made from several strands simultaneously.
Abbreviations
- MR — magic ring
- sc — single crochet
- inc — 2 sc in one stitch
- sl st — slip stitch
- ch — chain
- BLO — back loop only
- FLO — front loop only
- st/sts — stitch/stitches
- rnd — round
An invisible decrease is not required because the basket expands to its full base diameter and then continues vertically without narrowing.
Preparing the Scrap Yarn
Separate the leftovers into three rough thickness groups: thin, medium and thick.
The goal is to maintain the equivalent of approximately 4–5 DK strands throughout the project. If one strand is noticeably thicker, combine it with three thinner strands rather than four additional medium strands.
Do not join every strand at the same location.
Instead, replace one color whenever that individual strand ends. The other three or four strands continue uninterrupted.
This staggered replacement creates the mixed appearance visible in the photograph and prevents large knots from accumulating in one stitch.
Keep new joins on the inside whenever possible.
Pattern — Step by Step
Work in a continuous spiral unless stated otherwise.
Use four or five scrap strands together as though they were one strand of yarn.
Place a stitch marker into the first stitch of every round.
Circular Base
Round 1
Make a MR.
Work 6 sc in MR. (6)
Pull the ring firmly closed.
Round 2
Inc in every stitch around.
Inc ×6. (12)
Round 3
Sc 1, inc.
Repeat 6 times.
(18)
Round 4
Sc 2, inc.
Repeat 6 times.
(24)
Round 5
Sc 3, inc.
Repeat 6 times.
(30)
Round 6
Sc 4, inc.
Repeat 6 times.
(36)
Round 7
Sc 5, inc.
Repeat 6 times.
(42)
Round 8
Sc 6, inc.
Repeat 6 times.
(48)
Round 9
Sc 7, inc.
Repeat 6 times.
(54)
Round 10
Sc 8, inc.
Repeat 6 times.
(60)
The base now contains 60 stitches.
Lay it on a flat surface before continuing.
If your base measures substantially less than 30 cm, add another increase round.
Optional Round 11
Sc 9, inc.
Repeat 6 times.
(66)
Do not add this round automatically. Basket diameter should control the decision.
Checking Base Flatness
A circular basket base gives immediate feedback when the increase rate and tension disagree.
If the outer edge waves upward and down, the fabric has too much circumference. Undo the last round or tighten the working tension.
If the base cups strongly before the wall transition, there is too little circumference. Check for missed increases first.
A slight upward curve at the final base round is acceptable because the next round intentionally begins the wall.
The reference shape has a rounded lower transition rather than a sharp right-angle corner, so the pattern uses one BLO round instead of a rigid insert.
Wall Transition
Round 11
Work 1 sc BLO in every stitch around. (60)
Do not increase.
The unused front loops form a subtle horizontal line around the base.
Round 12
Sc in both loops of each stitch around.
(60)
Round 13
Sc in each stitch around.
(60)
At the end of Round 13, push the walls upward with your hands and flatten the base against a table.
The vertical shape should now be visible.
Basket Walls
Keep all wall rounds at 60 stitches.
Round 14
Sc around. (60)
Round 15
Sc around. (60)
Round 16
Sc around. (60)
Round 17
Sc around. (60)
Round 18
Sc around. (60)
Round 19
Sc around. (60)
Round 20
Sc around. (60)
Round 21
Sc around. (60)
Round 22
Sc around. (60)
Round 23
Sc around. (60)
Round 24
Sc around. (60)
Round 25
Sc around. (60)
Round 26
Sc around. (60)
Round 27
Sc around. (60)
Round 28
Sc around. (60)
Round 29
Sc around. (60)
Round 30
Sc around. (60)
Round 31
Sc around. (60)
Round 32
Sc around. (60)
Round 33
Sc around. (60)
Check the height.
For the photographed proportions, continue until the basket measures approximately 26–27 cm from the base before beginning the reinforced rim.
Add plain 60-stitch rounds if your row gauge produces a shorter basket.
Do not compensate for insufficient height by loosening your stitches. That reduces wall strength.
Creating the Random Scrap-Yarn Color Effect
The reference uses short color segments rather than clear horizontal bands.
To duplicate that distribution, change one held strand at a time.
For example, suppose the four active strands are teal, coral, lavender and mustard.
When the coral strand ends, replace only coral with sage.
Several stitches later, replace lavender with pink.
The composite yarn then changes gradually:
teal + coral + lavender + mustard
becomes:
teal + sage + lavender + mustard
then:
teal + sage + pink + mustard
This system keeps colors mixed at stitch level.
Avoid changing all four strands simultaneously unless a deliberate color block is wanted.
For scraps shorter than about 40 cm, reserve them for joins, decorative wrapping or another project. Extremely short pieces create too many bulky connection points in a storage basket.
Reinforced Upper Rim
The basket has a visually heavier top edge that helps the opening remain round.
Round 34
Sc BLO around.
(60)
Round 35
Sc in both loops around.
(60)
Round 36
Work sl st loosely in each stitch around.
(60 sl sts)
Do not pull the slip stitches tight enough to reduce the opening circumference.
Fasten off, leaving approximately a 20 cm tail.
Weave the tail downward through at least four wall rounds.
The BLO round creates a controlled fold line, while the final slip-stitch round adds density along the upper edge without adding handles.
Optional Extra-Firm Rim
If the basket opening still collapses inward, work one additional surface round.
Join the multi-strand yarn into an unused front loop from Round 34.
Work one loose sl st into each visible loop around.
This creates a second horizontal ridge beneath the main edge.
Do not use this extra round if the rim already feels significantly tighter than the wall fabric.
Assembly and Finishing
- Place the basket on a hard flat surface and press the center of the base downward.
- Check the base diameter in at least two directions; both measurements should be within approximately 1 cm.
- Push the BLO transition outward so the lower wall forms an even circular footprint.
- Pull the side walls upward and check that the 60-stitch rounds have not gained or lost stitches.
- Move visible yarn knots toward the inside and weave each tail into at least 4 cm of dense fabric.
- Shape the rim into a circle and compare opposite sides for equal height.
- Check the final slip-stitch round for tight sections that pull the opening inward.
- If one rim section is tight, remove and rework those slip stitches with less tension.
- Fill the basket temporarily with folded towels or yarn balls for several hours to help the walls settle into shape.
- Remove the contents and verify that the basket can stand empty without one side collapsing substantially inward.
The finished basket should have a flat circular base, rounded lower transition, cylindrical walls and a stable open rim.
7 Technical Tips
- Base ruffling: A circular base that develops waves has more circumference than the stitch tension can support. Check the increase placement every round and keep the increase rate at exactly +6 stitches per base round.
- Base cupping: A base that forms a bowl before the BLO transition may contain a missed increase. Count the final base round and confirm 60 stitches before beginning the wall.
- Changing yarn thickness: Replacing several thin scraps with bulky strands at one time can alter wall gauge in a few stitches. Maintain approximately the equivalent of 4–5 DK strands throughout the basket.
- Collapsing walls: Loose single crochet produces soft fabric that cannot support a 25–30 cm wall. Use a firm tension with the 9 mm hook and multi-strand yarn.
- Visible join lumps: Tying four new strands at the same stitch creates a concentrated knot on the basket surface. Stagger strand changes by at least 3–5 stitches whenever several scraps end near one another.
- Flared rim: Accidentally adding stitches during the wall section makes the opening wider than the base. Count the basket at least every five rounds and return to exactly 60 stitches.
- Tight rim: Slip stitches worked with normal tight tension can reduce the top circumference dramatically. Pull each final-round loop to approximately the same width as the single crochet immediately below it.
Choosing Scraps That Work Together
Scrap yarn does not require matching fiber content, but structural compatibility matters.
Acrylic DK, wool-blend DK and similar light-worsted leftovers can generally be combined effectively because several strands average out modest differences.
Very elastic yarn should be distributed rather than grouped together.
The same rule applies to cotton. One cotton strand mixed among acrylic scraps may add firmness. Four non-stretch cotton strands appearing suddenly for several inches can create a noticeably rigid patch.
Avoid eyelash, heavily brushed or fragile novelty yarn in load-bearing sections unless it is accompanied by several conventional plied strands.
The basket in the image achieves its visual effect through color density rather than exotic texture. Smooth scraps also make it easier to see the individual chunky stitches.
How Much Scrap Yarn Is Required?
There is no single reliable gram figure for all scrap baskets.
Diameter changes yarn demand quickly because every additional base round also increases the stitch count of every wall round that follows.
For a basket close to the photographed size — roughly 33 cm across and 29 cm tall — collecting 700–900 g of mixed light and medium yarn before beginning reduces the risk of running short.
The scraps do not need to be divided equally by color.
A strong mix can use one dominant family such as teal and green, then smaller quantities of coral, mustard, pink, purple and blue.
Why Multiple Strands Make the Basket Stand
A storage basket requires more resistance to bending than a hat, scarf or blanket.
Holding several yarns together increases the effective diameter of the working strand. The resulting single crochet becomes thicker and deeper.
If the hook slides through the fabric with almost no resistance and the wall folds immediately under its own weight, the combination is probably too loose.
Changing to an 8 mm hook can improve stiffness, but only if your hands can work the dense fabric comfortably.
Adjusting the Basket Diameter
The pattern base ends at 60 stitches.
Every increase round adds exactly six stitches.
For a smaller basket, stop at:
Round 8: 48 stitches
or
Round 9: 54 stitches.
Then begin the BLO wall transition.
For a larger basket, continue:
Round 11: (sc 9, inc) ×6 = 66 stitches
Round 12: (sc 10, inc) ×6 = 72 stitches
Only continue increasing while the base remains flat.
Once the base reaches the required diameter, stop all increases.
The wall count must match the final base count. A basket stopped at 54 stitches should maintain 54 stitches throughout its wall rounds rather than switching to the 60-stitch count used in the main instructions.
Preventing the Basket From Leaning
Continuous crochet spirals naturally shift slightly because each stitch sits offset from the one below.
That does not usually cause structural trouble, but inconsistent tension can make the entire cylinder lean.
Rotate the basket in your hands rather than pulling the working yarn repeatedly from one direction.
Place the basket on a table every five wall rounds.
Measure from the tabletop to the current edge at four points around the circumference.
A difference greater than roughly 1.5 cm usually means one section is being worked more loosely than another or extra stitches have entered the round.
Correct that problem before adding more height.
Using Magic Scrap-Yarn Balls
Long continuous scrap balls can make this project faster.
Join one short leftover to the next until a large multicolor ball forms, then create three or four balls in the same way.
Hold those balls together while crocheting.
Keep bulky knots away from one another. If two prepared scrap balls have knots approaching the hook at the same time, pause one strand and substitute another scrap for several stitches.
This spreads the thick join points across the fabric.
What the Basket Can Store
Dense crochet is suitable for lightweight household storage rather than heavy structural loads.
The photographed proportions work well for:
- yarn balls and skeins
- fabric scraps
- soft toys
- folded scarves
- craft supplies in secondary containers
- unfinished crochet projects
- lightweight towels
Avoid loading a soft-bottom crochet basket with dense books, metal tools or other concentrated weight unless a rigid base insert is added.
Conclusion
Check the base before adding height: it should lie flat at approximately the intended 30–33 cm diameter, with exactly 60 stitches if you follow the main size. Keep four or five compatible scrap strands active as the walls grow, replacing individual colors rather than changing the entire bundle at once. Finish with the denser rim only after the basket reaches roughly 27–29 cm tall. Save this scrap yarn crochet basket to Pinterest and share your finished color mix on Instagram with #ScrapYarnStorageBasket. Which leftover color would dominate your version: teal, coral, mustard or purple?









