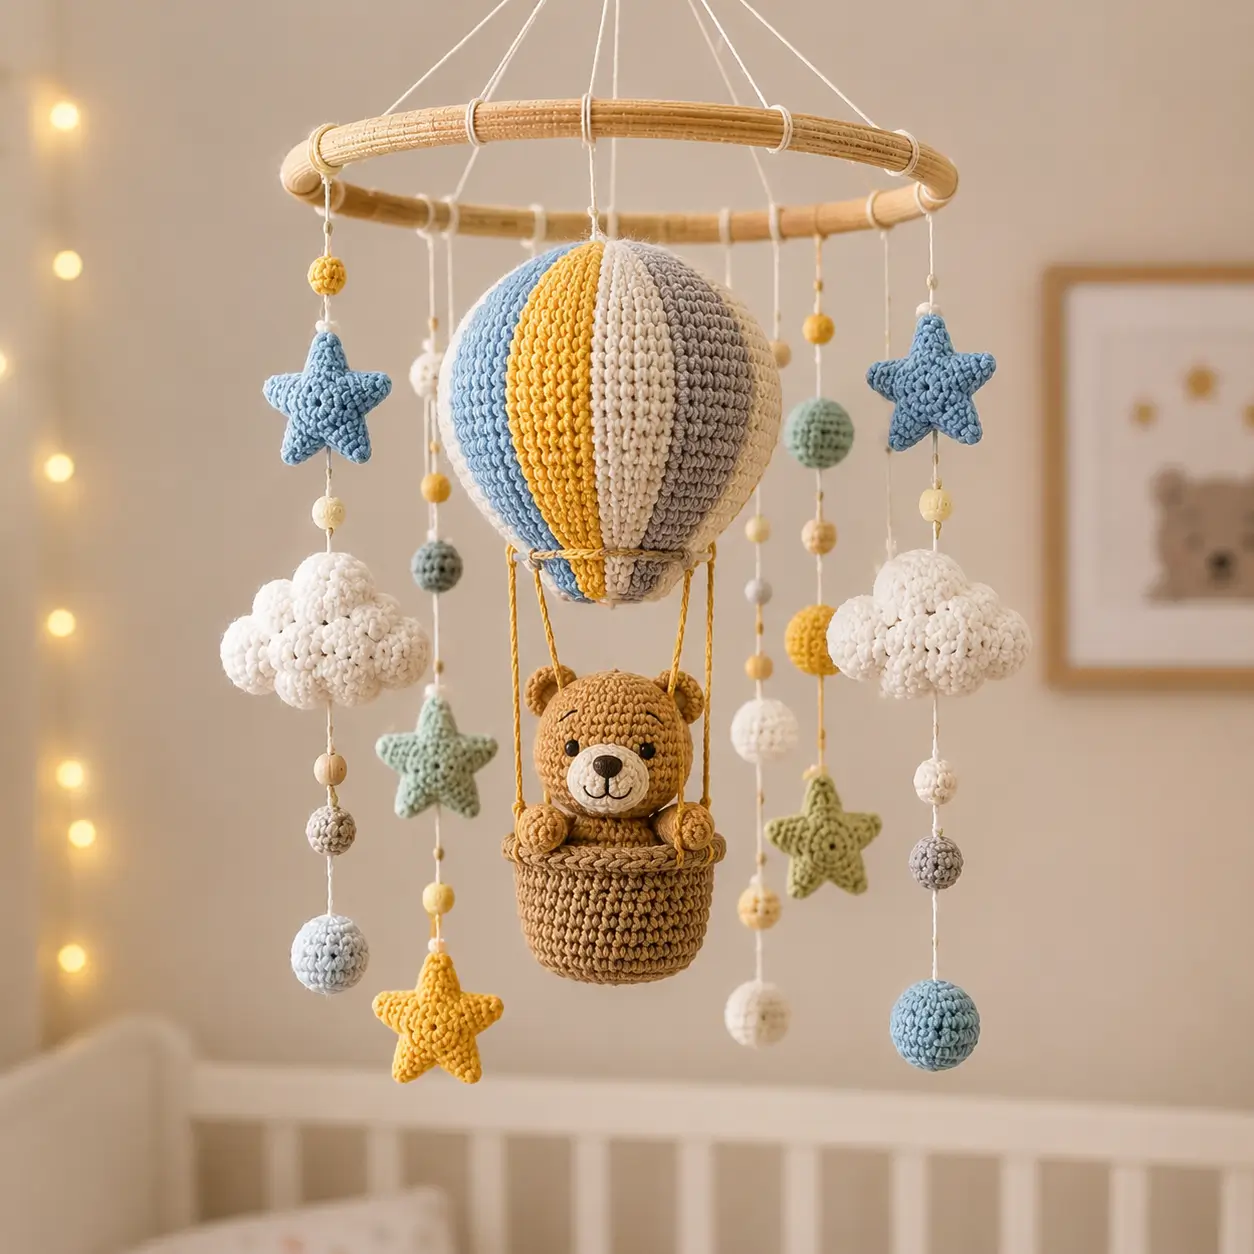
A teddy bear in a balloon basket has one balance problem: round ears pull the viewer upward while the basket pulls the body down. This teddy bear hot air balloon amigurumi pattern uses DK cotton, a 3.0 mm hook, 8 mm safety eyes, and a 20 cm display scale for intermediate makers. Make it as a nursery mobile component where the bear, basket, clouds, and stars read as one unit.
The Design: What Makes This Teddy Bear Hot Air Balloon Different
You need the balloon to dominate, but not crush the bear visually. The balloon uses a 42-stitch large plateau, then vertical surface lines create the striped-panel look without forcing unstable color joins every few stitches. The bear head stays wider than the body because most of the torso sits inside the basket; the maker sees face first, then basket rim. Ears are shallow half-domes, not tall cones, so the teddy bear amigurumi pattern keeps a calm silhouette under the balloon cords. The basket uses a firm BLO wall and a raised rim because a crochet hot air balloon mobile can sag when the passenger is attached late. A common mistake with amigurumi nursery mobile pieces is making the basket too soft. Third-party patterns show balloon and basket structures separately; this build ties them into one hanging assembly.
Project Info at a Glance
| Skill Level | Time | Finished Size | Hook | Best For |
|---|---|---|---|---|
| Intermediate | 8–10 hours | About 20 cm main feature | 3.0 mm | Nursery display, mobile topper, wall hanging |
Materials and Tools
Yarn
- Warm brown — DK cotton — 24 g — Rico Ricorumi DK or Paintbox Cotton DK
- Cream — DK cotton — 2 g — for muzzle and cheek patches
- Basket tan — DK cotton — 18 g — for basket and rim
- Sky blue — DK cotton — 10 g — balloon panel and stars
- Mustard yellow — DK cotton — 10 g — balloon panel, stars, beads
- Gray — DK cotton — 8 g — balloon panel and beads
- White — DK cotton — 18 g — clouds
- Sage green — DK cotton — 8 g — stars or beads
Tools
- Hook 3.0 mm
- 8 mm safety eyes for display only
- Fiberfill stuffing
- Tapestry needle
- Stitch markers
- Pins
- Strong cotton cord
- Wooden mobile hoop
- Small scale for yarn control
Safety eyes are measured in millimeters and are not rated safe for children under 3 years; embroider the eyes for a baby-handled item.
Abbreviations
MR = magic ring; sc = single crochet; inc = increase; dec = decrease; sl st = slip stitch; ch = chain; BLO = back loop only; FLO = front loop only. Use invisible decrease by catching front loops only on the two stitches being reduced so the closing rounds do not form raised bars.
Pattern — Step by Step
Continuous spiral unless noted. Mark the first stitch of every round.
Head
Yarn: warm brown.
R1: 6 sc in MR (6)
R2: inc ×6 (12)
R3: (sc, inc) ×6 (18)
R4: (2 sc, inc) ×6 (24)
R5: (3 sc, inc) ×6 (30)
R6: (4 sc, inc) ×6 (36)
R7: (5 sc, inc) ×6 (42)
R8–R14: sc around (42)
R15: (5 sc, dec) ×6 (36)
R16: (4 sc, dec) ×6 (30)
R17: (3 sc, dec) ×6 (24)
Place safety eyes between R10 and R11, 7 stitches apart. Use embroidery instead for child-handled items.
R18: (2 sc, dec) ×6 (18)
Stuff firmly, shaping the cheeks outward.
R19: (sc, dec) ×6 (12)
R20: dec ×6 (6)
Fasten off. Leave a 20 cm tail for closing.
Body
Yarn: warm brown.
R1: 6 sc in MR (6)
R2: inc ×6 (12)
R3: (sc, inc) ×6 (18)
R4: (2 sc, inc) ×6 (24)
R5: (3 sc, inc) ×6 (30)
R6: (4 sc, inc) ×6 (36)
R7–R12: sc around (36)
R13: (4 sc, dec) ×6 (30)
R14: (3 sc, dec) ×6 (24)
R15: (2 sc, dec) ×6 (18)
Stuff the upper body only; keep the lower body flatter for basket seating.
R16: (sc, dec) ×6 (12)
R17: dec ×6 (6)
Fasten off. Leave a 25 cm tail for joining to the head.
Arms / Front Legs — Make 2
Yarn: warm brown.
R1: 6 sc in MR (6)
R2: inc ×6 (12)
R3–R7: sc around (12)
R8: (2 sc, dec) ×3 (9)
R9–R10: sc around (9)
R11: (sc, dec) ×3 (6)
Fasten off. Leave a 20 cm tail. Lightly stuff the paw end only.
Back Legs — Make 2
Yarn: warm brown.
R1: 6 sc in MR (6)
R2: inc ×6 (12)
R3: (sc, inc) ×6 (18)
R4–R5: sc around (18)
R6: (sc, dec) ×6 (12)
R7–R8: sc around (12)
R9: dec ×6 (6)
Fasten off. Leave a 20 cm tail. Do not overstuff.
Ears — Make 2
Yarn: warm brown.
R1: 6 sc in MR (6)
R2: inc ×6 (12)
R3: (sc, inc) ×6 (18)
R4: sc around (18)
R5: (sc, dec) ×6 (12)
Fasten off. Leave a 25 cm tail. Flatten; do not stuff.
Muzzle
Yarn: cream.
R1: 6 sc in MR (6)
R2: inc ×6 (12)
R3: (sc, inc) ×6 (18)
R4: sc around (18)
Fasten off. Leave a 25 cm tail. Add a small brown embroidered oval nose across R2–R3.
Cheek Patches — Make 2
Yarn: cream.
R1: 6 sc in MR (6)
R2: inc ×6 (12)
Sl st to first stitch (12)
Fasten off. Leave a 15 cm tail. Keep flat.
Hot Air Balloon
Yarn: sky blue, mustard, cream, gray, and white.
R1: 6 sc in MR (6)
R2: inc ×6 (12)
R3: (sc, inc) ×6 (18)
R4: (2 sc, inc) ×6 (24)
R5: (3 sc, inc) ×6 (30)
R6: (4 sc, inc) ×6 (36)
R7: (5 sc, inc) ×6 (42)
R8–R16: sc around (42)
Work the balloon in one base color, or divide each round into six panel markers and change color at each marker. For photo matching, embroider six vertical ribs after stuffing.
R17: (5 sc, dec) ×6 (36)
R18: (4 sc, dec) ×6 (30)
R19: (3 sc, dec) ×6 (24)
Stuff firmly enough that the top does not collapse under hanging tension.
R20: (2 sc, dec) ×6 (18)
R21: (sc, dec) ×6 (12)
R22: dec ×6 (6)
Fasten off. Leave a 30 cm tail. Close tightly.
Basket
Yarn: basket tan.
R1: 6 sc in MR (6)
R2: inc ×6 (12)
R3: (sc, inc) ×6 (18)
R4: (2 sc, inc) ×6 (24)
R5: (3 sc, inc) ×6 (30)
R6: (4 sc, inc) ×6 (36)
R7: BLO sc around (36)
R8–R14: sc around (36)
R15: sl st around loosely (36)
Fasten off. Leave a 40 cm tail for sewing the bear inside.
Basket Rim
Yarn: basket tan.
Ch 38.
Row 1: sc in second ch from hook and across (37)
Row 2: ch 1, turn, sc across (37)
Fasten off. Leave a 35 cm tail. Sew around the top edge of the basket, overlapping one stitch.
Suspension Cords — Make 4
Yarn: mustard or tan cord.
Ch 45 (45)
Sl st in each ch back across (45)
Fasten off. Leave 15 cm tails at both ends. Make all four cords the same length.
Stars — Make 4
Yarn: sky blue, mustard, sage green.
Center front:
R1: 6 sc in MR (6)
R2: inc ×6 (12)
R3: (sc, inc) ×6 (18)
Fasten off.
Center back:
R1: 6 sc in MR (6)
R2: inc ×6 (12)
R3: (sc, inc) ×6 (18)
Do not fasten off. Place wrong sides together and sc through both layers for 18 sts.
Points, make 5 per star:
R1: 6 sc in MR (6)
R2–R3: sc around (6)
Fasten off. Sew five points evenly around the stuffed center.
Clouds — Make 2
Yarn: white.
Large puff:
R1: 6 sc in MR (6)
R2: inc ×6 (12)
R3: (sc, inc) ×6 (18)
R4–R5: sc around (18)
R6: (sc, dec) ×6 (12)
R7: dec ×6 (6)
Fasten off.
Medium puff, make 2:
R1: 6 sc in MR (6)
R2: inc ×6 (12)
R3–R4: sc around (12)
R5: dec ×6 (6)
Fasten off.
Small puff, make 2:
R1: 6 sc in MR (6)
R2–R3: sc around (6)
Fasten off.
Sew the five puffs into one flat-bottom cloud: medium, small, large, small, medium.
Hanging Beads — Make 8
Yarn: mustard, cream, gray, sage, blue.
R1: 6 sc in MR (6)
R2: inc ×6 (12)
R3: sc around (12)
R4: dec ×6 (6)
Fasten off. Leave a 15 cm tail. Thread beads onto hanging cords, not onto loose yarn ends.
Assembly
- Sew the head to the body with the face centered above the narrower chest.
- Attach the ears between R5 and R9 of the head, slightly forward from the side line.
- Sew the muzzle between R10 and R15, then add the nose and mouth embroidery.
- Place cheek patches at the lower outer edge of the muzzle and sew flat.
- Sew arms to the body at R7–R10 so the paws rest on the basket rim.
- Attach back legs low on the body; these become anchor points inside the basket.
- Seat the bear inside the basket and stitch through legs, body base, and basket wall.
- Pin four suspension cords at equal points on the basket rim and balloon lower curve.
- Sew stars, clouds, and beads to separate hanging cords around the hoop.
- Tie the balloon cord to the hoop center and check that the basket hangs level.
The finished piece is a display mobile component with a bear, basket, balloon, stars, clouds, and bead drops.
7 Technical Tips
- Stitch marker drift: If the marker moves more than 2 stitches from the visual back line, pause and re-center the start point before the next decrease round. A twisted marker path makes the balloon ribs spiral.
- Stuffing firmness: The balloon should resist a light thumb press by about 5 mm, not collapse inward. Under-stuffing makes the suspension cords dent the lower curve.
- Invisible decrease gaps: On R18–R22 of the balloon, a normal decrease can leave six visible bars. Use front-loop invisible decreases and keep the working yarn below the hook throat.
- Eye placement timing: Install eyes after R17 of the head, before the opening drops below 18 stitches. Once the head is closed, 8 mm backs are difficult to set flat.
- Basket wall lean: A basket that leans more than 5 mm at the rim needs firmer BLO tension on R7. Add one hidden running stitch around the inside rim to stiffen it.
- Pinning cords: Measure all four suspension cords from basket rim to balloon base at 9–10 cm before sewing. Unequal cords tilt the bear even when the basket itself is round.
- Tail weaving: Every hanging ornament needs a buried tail of at least 6 cm. Shorter tails can slip out when the mobile rotates.
Conclusion
Block the balloon first, then assemble the bear and basket only after the cords are measured. That order keeps the center line clean and reduces basket tilt. The teddy bear hot air balloon amigurumi pattern works best when the balloon is firm, the basket rim is stiff, and the bear arms sit over the front edge. Next, make one test star and one test bead before cutting all hanging cords. Share the finished mobile on Pinterest and Instagram with #TeddyBearHotAirBalloon. Which balloon panel order matches the photo best for your version: blue–mustard–cream–gray, or a softer repeated pastel sequence?









