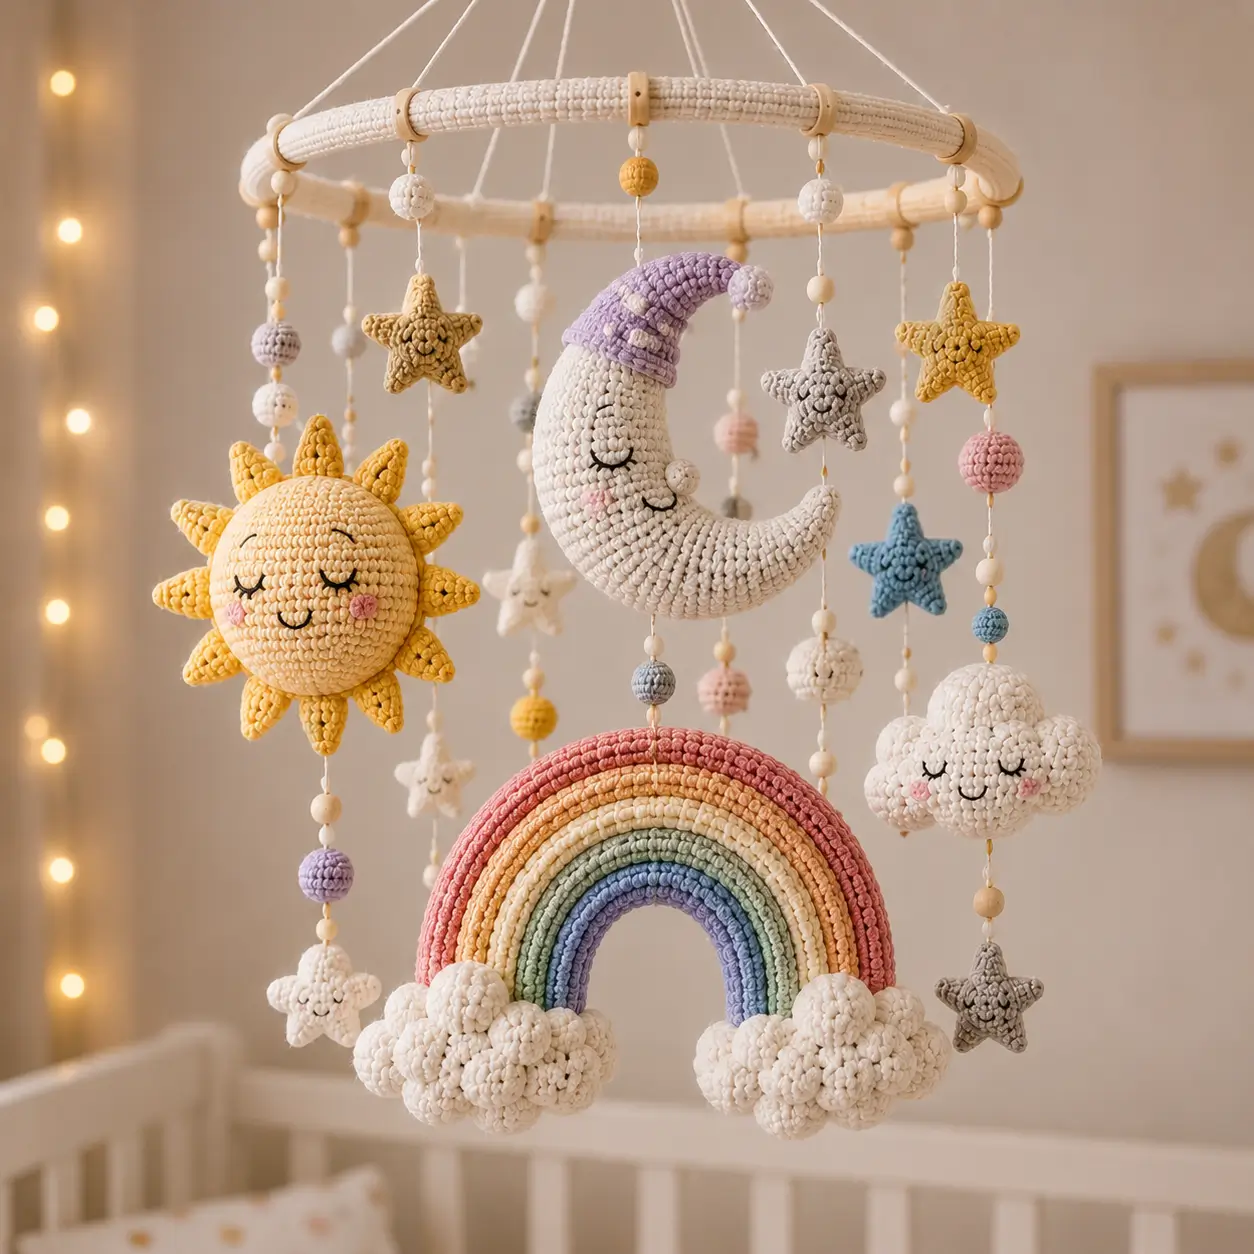
A crescent moon wearing a lavender sleep cap has to hang off-center or it twists. This celestial baby mobile amigurumi pattern builds that crescent with a sun, rainbow, cloud, stars, and beads. Use DK cotton, a 3.5 mm hook, embroidered faces, and a 25 cm ring. The finished mobile suits intermediate crocheters and works as nursery décor kept above reach.
The Design: What Makes This Mobile Different
The crescent is the control point. A tapered tube gives it weight at the belly and lighter tips, so the moon can face forward after the hanging strand is stitched through the upper curve. Clouds are built from separate puffs, not one oval, because the photo shows stacked lobes under the rainbow and on the side cloud. The rainbow uses filled tubes instead of flat appliqué; this keeps the arch dimensional enough for a crochet baby mobile pattern while still staying light. Many makers make the stars too heavy. That pulls the ring down on one side. For a celestial baby mobile amigurumi pattern, the smallest hanging items should be stars and beads, while the moon and rainbow take the central vertical line.
Project Info at a Glance
| Skill Level | Time | Finished Size | Hook | Best For |
|---|---|---|---|---|
| Intermediate | 9–12 hours | 45–55 cm hanging length; rainbow about 14 cm | 3.5 mm | Nursery décor, photo prop, baby shower gift |
Size and hook choices are benchmarked against DK rainbow mobile listings and published celestial mobile kit data.
Materials and Tools
Yarn
- Cream white — DK cotton — 50 g — Hobbii Rainbow Cotton 8/8, Scheepjes Catona, or similar.
- Mustard yellow — DK cotton — 20 g — sun and stars.
- Lavender — DK cotton — 15 g — moon cap and beads.
- Coral, peach, lemon, mint, blue, violet — DK cotton — 10–20 g each — rainbow bands.
- Blush pink — DK cotton — 5 g — cheek patches.
- Gray — DK cotton — 10 g — stars and beads.
- Black embroidery thread — small amount — sleepy eyes and smiles.
Tools
- Hook 3.5 mm
- 25 cm wooden ring
- 15 mm wooden beads
- Fiberfill stuffing
- Tapestry needle
- Stitch markers
- Pins
- Thin nylon thread or strong cotton cord
- Scissors
Use embroidered faces for this nursery version. Hard safety eyes are not used here because baby-focused amigurumi benefits from fully soft face details.
Abbreviations
MR = magic ring; sc = single crochet; inc = 2 sc in one stitch; dec = invisible decrease over 2 stitches; sl st = slip stitch; ch = chain; BLO = back loop only; FO = fasten off.
Invisible decrease is worked through front loops only so the decrease line compresses without leaving a visible gap.
Pattern — Step by Step
Continuous spiral unless a row section says otherwise. Mark the first stitch of every round.
Sun Face Head (Make 1)
Yarn: mustard yellow — Source: standard 6-stitch amigurumi math.
R1: 6 sc in MR (6)
R2: inc ×6 (12)
R3: (sc, inc) ×6 (18)
R4: (2 sc, inc) ×6 (24)
R5: (3 sc, inc) ×6 (30)
R6: (4 sc, inc) ×6 (36)
R7–R12: sc around (36)
R13: (4 sc, dec) ×6 (30)
R14: (3 sc, dec) ×6 (24)
R15: (2 sc, dec) ×6 (18)
Stuff firmly. Embroider sleepy eyes across R8–R9, 7 stitches apart. Add mouth under R10.
R16: (sc, dec) ×6 (12)
R17: dec ×6 (6)
Fasten off. Leave a 20 cm tail and close.
Sun Rays (Make 12)
Yarn: mustard yellow — Source: standard amigurumi math.
R1: 6 sc in MR (6)
R2: sc around (6)
R3: inc ×6 (12)
R4–R5: sc around (12)
Do not stuff hard. Flatten the open edge.
Fasten off. Leave a 15 cm tail for sewing.
Sew rays around the sun between R6 and R12. Space every 3 stitches. Pin all 12 first, then sew.
Crescent Moon Body (Make 1)
Yarn: cream white — Source: original tapered tube.
R1: 6 sc in MR (6)
R2: sc around (6)
R3: inc ×6 (12)
R4: sc around (12)
R5: (sc, inc) ×6 (18)
R6: sc around (18)
R7: (2 sc, inc) ×6 (24)
R8: sc around (24)
R9: (3 sc, inc) ×6 (30)
R10: sc around (30)
R11: (4 sc, inc) ×6 (36)
R12–R22: sc around (36)
Stuff as you go. Bend the body into a crescent before the stuffing gets packed.
R23: (4 sc, dec) ×6 (30)
R24: sc around (30)
R25: (3 sc, dec) ×6 (24)
R26: sc around (24)
R27: (2 sc, dec) ×6 (18)
R28: sc around (18)
R29: (sc, dec) ×6 (12)
R30: sc around (12)
R31: dec ×6 (6)
Fasten off. Leave a 25 cm tail and close the tip.
Embroider the moon’s sleepy eye on the outer curve around R15–R17. Stitch the smile below it. Sew two cheek patches below the eye.
Lavender Sleep Cap (Make 1)
Yarn: lavender — Source: standard amigurumi cone math.
R1: 6 sc in MR (6)
R2–R3: sc around (6)
R4: inc ×6 (12)
R5–R6: sc around (12)
R7: (sc, inc) ×6 (18)
R8: sc around (18)
R9: (2 sc, inc) ×6 (24)
R10: sc around (24)
R11: (3 sc, inc) ×6 (30)
R12: sc around (30)
R13: BLO sc around (30)
R14: sl st around (30)
Fasten off. Leave a 30 cm sewing tail.
For the pom-pom:
R1: 6 sc in MR (6)
R2: inc ×6 (12)
R3: sc around (12)
R4: dec ×6 (6)
Fasten off. Sew to the cap tip.
Sew the cap to the upper moon curve. Let the tip lean left, matching the photo.
Rainbow Tubes (Make 6)
Yarn: coral, peach, lemon, mint, blue, violet — Source: DK rainbow mobile size benchmark.
For each tube:
R1: 6 sc in MR (6)
R2: inc ×6 (12)
Work the straight section listed below.
Final round: dec ×6 (6)
Fasten off. Close both ends.
| Band | Color | Straight Section |
|---|---|---|
| 1 outer | Coral | R3–R56: sc around (12) |
| 2 | Peach | R3–R52: sc around (12) |
| 3 | Lemon | R3–R48: sc around (12) |
| 4 | Mint | R3–R44: sc around (12) |
| 5 | Blue | R3–R40: sc around (12) |
| 6 inner | Violet | R3–R36: sc around (12) |
Stuff each tube lightly. Bend the tubes into nested arches, pin from outer to inner, and sew adjacent bands together along the inside seams.
Cloud Puff Spheres for Rainbow Ends
Yarn: cream white — Source: standard amigurumi sphere math.
Make 6 large puffs and 6 small puffs for the rainbow ends.
Large puff:
R1: 6 sc in MR (6)
R2: inc ×6 (12)
R3: (sc, inc) ×6 (18)
R4: (2 sc, inc) ×6 (24)
R5–R6: sc around (24)
R7: (2 sc, dec) ×6 (18)
R8: (sc, dec) ×6 (12)
Stuff lightly.
R9: dec ×6 (6)
Fasten off. Leave a 20 cm tail.
Small puff:
R1: 6 sc in MR (6)
R2: inc ×6 (12)
R3: (sc, inc) ×6 (18)
R4–R5: sc around (18)
R6: (sc, dec) ×6 (12)
R7: dec ×6 (6)
Fasten off. Leave a 20 cm tail.
For each rainbow end, sew 3 large puffs and 3 small puffs into an uneven cluster. Attach the cluster over the tube ends.
Hanging Cloud (Make 1)
Yarn: cream white — Source: same cloud puff math above.
Make 3 large puffs and 2 small puffs. Sew them into a horizontal cloud with one large puff in the center, two large puffs beside it, and small puffs at the edges. Embroider sleepy eyes across the center puff and sew two cheek patches below the eyes. Fasten off all tails inside the cloud.
Stars (Make 6)
Yarn: mustard, cream, gray, blue — Source: standard amigurumi math with light mobile sizing.
For each star, make 2 center discs and 5 points.
Center disc:
R1: 6 sc in MR (6)
R2: inc ×6 (12)
R3: (sc, inc) ×6 (18)
Fasten off first disc. Make the second disc but do not fasten off. Hold wrong sides together and sc around through both discs (18).
Point:
R1: 6 sc in MR (6)
R2–R3: sc around (6)
Flatten. Fasten off with a 12 cm tail.
Sew 5 points evenly around the joined disc. Add a small embroidered smile on two front-facing stars only, keeping the others plain to reduce visual clutter.
Cheek Patches (Make 8)
Yarn: blush pink — Source: standard flat circle.
R1: 6 sc in MR (6)
Sl st into first sc.
Fasten off. Leave a 12 cm sewing tail.
Use 2 on the sun, 2 on the moon, 2 on the hanging cloud, and 2 as optional star cheeks.
Mini Hanging Beads (Make 10)
Yarn: lavender, mustard, gray, pink, blue — Source: standard amigurumi ball math.
R1: 6 sc in MR (6)
R2: inc ×6 (12)
R3–R4: sc around (12)
Stuff with a pea-sized amount of fiberfill.
R5: dec ×6 (6)
Fasten off. Leave a 20 cm tail.
Thread these between wood beads on the side strands.
Ring Cover Strip
Yarn: cream white — Source: 25 cm hoop benchmark.
Ch 9.
Row 1: sc in 2nd ch from hook and across (8)
Rows 2–120: ch 1, turn, sc across (8)
Fasten off. Leave a long tail.
Wrap the strip around the 25 cm wooden ring with edges touching. Sew the long seam closed around the ring.
Assembly
- Cover the wooden ring first, then mark four equal points with stitch markers.
- Attach the rainbow to the lower central hanging strand with two stitches through the top coral tube.
- Sew one cloud cluster to each rainbow end, covering every tube closure.
- Attach the crescent moon above the rainbow but slightly off-center so the cap clears the upper strand.
- Place the sun on the left side strand, level with the moon’s lower curve.
- Place the hanging cloud on the right side strand, lower than the sun by 3–4 cm.
- Add stars around the ring, using the lightest stars on longer strands and heavier stars close to the ring.
- Thread wooden beads and crochet beads between ornaments, tying a knot above and below each bead.
- Tie four 80–90 cm top cords from the ring to a central knot, then test balance before trimming tails.
- Stitch through knots with a needle and thread after the balance is correct.
The completed mobile is decorative nursery work and should hang out of reach, with all knots tied more than once.
7 Technical Tips
- Skipped stitch markers cause a visible spiral shift on the sun face after R8. Move the marker every round and count 36 stitches before starting R13.
- Overstuffed rainbow tubes make the arch kink at the center. Stop filling when the tube bends into a curve without forming flat creases.
- Visible decreases on cream yarn create gray shadow dots under nursery lighting. Work invisible decreases through front loops only on every R7, R8, R9, R23, R25, R27, R29, and R31 decrease section.
- Late eye placement makes the moon face land too close to the inner curve. Embroider the eye before final closing, with the highest eyelash sitting around R15.
- Loose velvet or chenille tension can stretch the hanging points by 1–2 cm overnight. Use cotton for the structural mobile, or reduce hook size by 0.5 mm when using softer yarn.
- Unpinned sun rays drift into uneven spacing after the sixth ray. Pin all 12 rays first, then sew opposite pairs: top, bottom, left, right, and the diagonals.
- Short woven tails can pull free inside hanging ornaments. Leave at least 15 cm on stars and 20 cm on beads, then weave through the stuffed body twice before trimming.
Conclusion
Use this celestial baby mobile amigurumi pattern as a measured build, not a loose collection of sky motifs. The balance depends on order: ring cover first, rainbow on the center line, crescent slightly off-center, then sun, cloud, stars, and beads. Make one full dry layout before sewing the final knots. Photograph the mobile from below for Pinterest, then post the finished hanging angle on Instagram with #CelestialRainbowMobile. One detail changes the whole piece: will you angle the lavender moon cap toward the sun or away from it?









