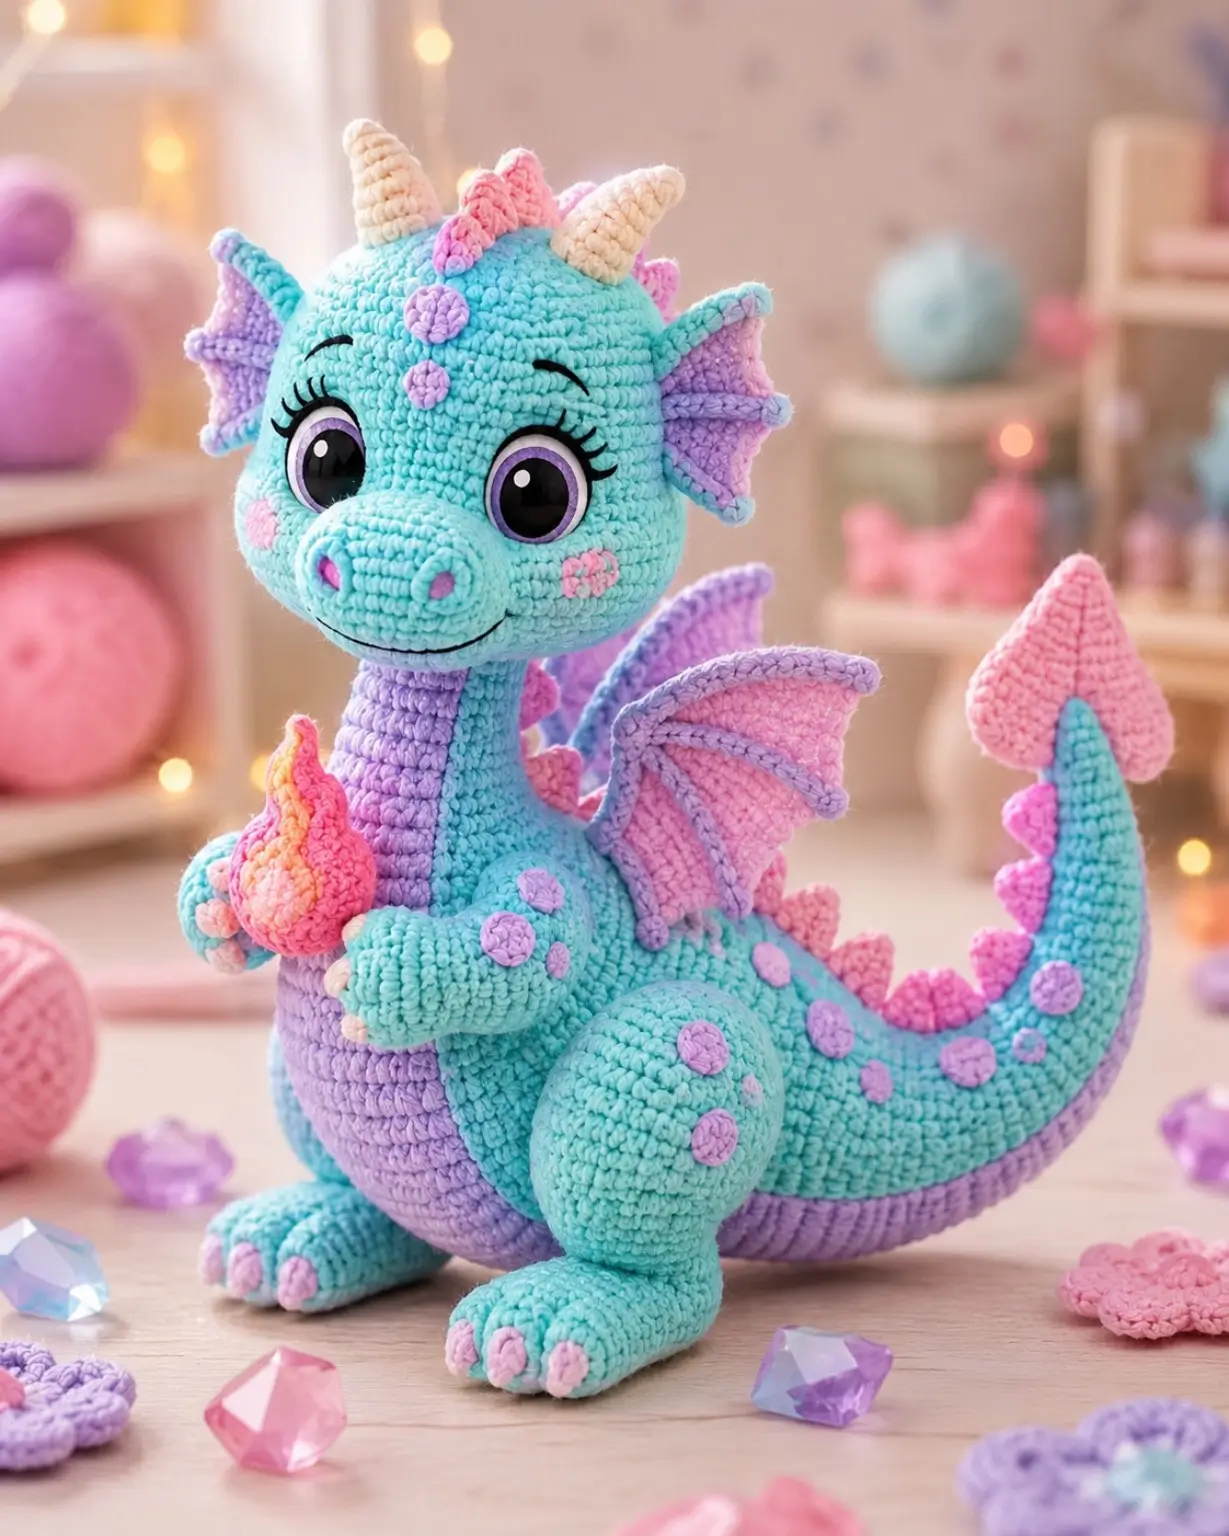
A dragon has wings, horns, a ridge, and a tail before it has a body. This dragon amigurumi crochet pattern builds those parts around a 20 cm seated plush using worsted yarn, a 4 mm hook, and intermediate amigurumi skills. Make it when you need a shelf-size fantasy mascot with stable feet, readable face details, and a small flame prop.
The Design: What Makes Aqua Flame Different
This design starts with a large head because the photo depends on face scale. The snout is not a flat oval; it projects forward, so the head needs a 42-stitch plateau to carry the eyes and muzzle without collapsing. The body stays at a 36-stitch plateau. That smaller torso keeps the toy seated and prevents the tail from dragging the dragon backward.
The wings use flat rows instead of spiral rounds. That choice gives a thin membrane, then surface ribs add the purple frame seen in the reference. A common maker mistake with a baby dragon amigurumi is making the wings too heavy; the finished plush then leans back. This crochet dragon pattern also separates horns, side fins, cheek patches, and ridge spikes, because those small parts create the character’s silhouette.
Project Info at a Glance
| Skill Level | Time | Finished Size | Hook | Best For |
|---|---|---|---|---|
| Intermediate | 5–7 hours | 20 cm seated reference | 4 mm | Display plush, pattern sample, fantasy nursery shelf |
Materials and Tools
Yarn
- Aqua main yarn — Worsted/Aran or tight chenille — 70–90 g — suggested: Hobbii Honey Bunny, Premier Basix Chenille, Rico Creative Cotton Aran, or similar.
- Lavender accent yarn — Same weight — 25–35 g — for belly, wings, side fins, spots, and wing ribs.
- Pink accent yarn — Same weight — 15–25 g — for ridge spikes, cheek details, and tail tip.
- Cream yarn — Same weight or slightly lighter — 8–12 g — for horns and claws.
- Peach/yellow yarn — Same weight — 6–10 g total — for the flame prop.
- Black embroidery thread — Small amount — for mouth, lashes, and brows.
Tools
- Hook 4 mm
- 12 mm safety eyes for worsted; scale to 20–24 mm only for chunky velvet
- Polyester stuffing
- Yarn needle
- Stitch markers
- Straight pins
- Scissors
- Optional felt circles for eye highlights and purple iris rings
Abbreviations
MR = magic ring; sc = single crochet; inc = 2 sc in next stitch; dec = invisible single crochet decrease; sl st = slip stitch; ch = chain; BLO = back loop only; st = stitch; R = round or row.
Invisible decrease is worked through front loops only so the fabric closes without a visible bar on aqua yarn.
Pattern — Step by Step
Continuous spiral unless noted. The head uses a large 42-stitch plateau for the photo’s oversized face; the body uses a medium 36-stitch plateau for a stable sitting toy.
Head — Make 1
Yarn: aqua
R1: 6 sc in MR (6)
R2: inc ×6 (12)
R3: (sc, inc) ×6 (18)
R4: (2 sc, inc) ×6 (24)
R5: (3 sc, inc) ×6 (30)
R6: (4 sc, inc) ×6 (36)
R7: (5 sc, inc) ×6 (42)
R8–R14: sc around (42)
R15: (5 sc, dec) ×6 (36)
R16: (4 sc, dec) ×6 (30)
R17: (3 sc, dec) ×6 (24)
R18: (2 sc, dec) ×6 (18)
R19: (sc, dec) ×6 (12)
R20: dec ×6 (6)
Insert safety eyes between R10 and R11, 9 stitches apart. Add stuffing firmly around the eye backs before closing.
Fasten off. Leave 20 cm tail and close through front loops.
Snout — Make 1
Yarn: aqua
R1: 6 sc in MR (6)
R2: inc ×6 (12)
R3: (sc, inc) ×6 (18)
R4–R6: sc around (18)
R7: (sc, dec) ×6 (12)
Stuff lightly. Flatten the open edge into an oval before sewing.
Fasten off. Leave 30 cm tail.
Nostrils — Make 2
Yarn: lavender
R1: 6 sc in MR (6)
R2: sl st around BLO (6)
Do not stuff. Pull center tight to form a raised dot.
Fasten off. Leave 15 cm tail.
Body — Make 1
Yarn: aqua
R1: 6 sc in MR (6)
R2: inc ×6 (12)
R3: (sc, inc) ×6 (18)
R4: (2 sc, inc) ×6 (24)
R5: (3 sc, inc) ×6 (30)
R6: (4 sc, inc) ×6 (36)
R7–R14: sc around (36)
R15: (4 sc, dec) ×6 (30)
R16: sc around (30)
R17: (3 sc, dec) ×6 (24)
R18: sc around (24)
R19: (2 sc, dec) ×6 (18)
R20: (sc, dec) ×6 (12)
R21: dec ×6 (6)
Stuff the base firmly and the neck area less firmly so the head can sit level.
Fasten off. Leave 25 cm tail.
Belly Panel — Make 1
Yarn: lavender
R1: ch 9, sc in second ch from hook and across (8)
R2: ch 1, turn, inc, 6 sc, inc (10)
R3–R9: ch 1, turn, sc across (10)
R10: ch 1, turn, dec, 6 sc, dec (8)
R11: ch 1, turn, dec, 4 sc, dec (6)
R12: ch 1, turn, dec, 2 sc, dec (4)
Work one round of sc around the edge in aqua if you want a raised seam.
Fasten off. Leave 35 cm tail.
Front Legs / Arms — Make 2
Yarn: aqua
R1: 6 sc in MR (6)
R2: inc ×6 (12)
R3: (sc, inc) ×6 (18)
R4–R5: sc around (18)
R6: (sc, dec) ×6 (12)
R7–R13: sc around (12)
R14: dec ×6 (6)
Stuff paw firmly. Stuff arm tube only halfway so it can curve around the flame.
Fasten off. Leave 30 cm tail.
Back Legs — Make 2
Yarn: aqua
R1: 6 sc in MR (6)
R2: inc ×6 (12)
R3: (sc, inc) ×6 (18)
R4: (2 sc, inc) ×6 (24)
R5–R7: sc around (24)
R8: (2 sc, dec) ×6 (18)
R9: (sc, dec) ×6 (12)
R10–R14: sc around (12)
R15: dec ×6 (6)
Stuff foot and upper leg. Flatten the final six-stitch edge before attaching.
Fasten off. Leave 35 cm tail.
Claws — Make 12
Yarn: cream or pale pink
R1: 6 sc in MR (6)
R2: sc around (6)
Use three claws per foot and three per front paw.
Fasten off. Leave 10 cm tail on each claw.
Wings — Make 2
Yarn: pink for membrane, lavender for ribs
R1: ch 2, 2 sc in second ch from hook (2)
R2: ch 1, turn, inc ×2 (4)
R3: ch 1, turn, inc, 2 sc, inc (6)
R4: ch 1, turn, inc, 4 sc, inc (8)
R5: ch 1, turn, inc, 6 sc, inc (10)
R6: ch 1, turn, inc, 8 sc, inc (12)
R7: ch 1, turn, inc, 10 sc, inc (14)
R8: ch 1, turn, inc, 12 sc, inc (16)
R9: ch 1, turn, sc across (16)
R10: ch 1, turn, sl st 2, sc 4, hdc 4, sc 4, sl st 2 (16)
With lavender, surface crochet three ribs from the wing root to the lower edge. Work sc around the outside edge if the membrane curls.
Fasten off. Leave 40 cm tail.
Side Head Fins / Ears — Make 2
Yarn: lavender membrane with aqua edge
R1: ch 2, 2 sc in second ch from hook (2)
R2: ch 1, turn, inc ×2 (4)
R3: ch 1, turn, inc, 2 sc, inc (6)
R4: ch 1, turn, inc, 4 sc, inc (8)
R5: ch 1, turn, sc across (8)
R6: ch 1, turn, dec, 4 sc, dec (6)
Add one aqua sc border around each fin. Keep the base unstuffed.
Fasten off. Leave 25 cm tail.
Horns — Make 2
Yarn: cream
R1: 6 sc in MR (6)
R2: sc around (6)
R3: inc ×6 (12)
R4–R5: sc around (12)
R6: (sc, inc) ×6 (18)
R7–R8: sc around (18)
Stuff only the base. Leave the tip slightly hollow so it bends inward like the photo.
Fasten off. Leave 30 cm tail.
Tail — Make 1
Yarn: aqua
R1: 6 sc in MR (6)
R2: inc ×6 (12)
R3–R4: sc around (12)
R5: (sc, inc) ×6 (18)
R6–R8: sc around (18)
R9: (2 sc, inc) ×6 (24)
R10–R12: sc around (24)
R13: (3 sc, inc) ×6 (30)
R14–R16: sc around (30)
R17: (4 sc, inc) ×6 (36)
R18–R21: sc around (36)
Stuff as you go. Bend the tip upward while stuffing so the curve sets before sewing.
Fasten off. Leave 45 cm tail.
Tail Tip Heart / Flame Leaf — Make 1
Yarn: pink
R1: ch 5, sc in second ch from hook and across (4)
R2: ch 1, turn, inc, 2 sc, inc (6)
R3: ch 1, turn, inc, 4 sc, inc (8)
R4: ch 1, turn, sc across (8)
R5: ch 1, turn, dec, 4 sc, dec (6)
R6: ch 1, turn, dec, 2 sc, dec (4)
Fold slightly at the center before sewing to the tail tip.
Fasten off. Leave 25 cm tail.
Spine Spikes — Make 9
Yarn: pink
R1: 6 sc in MR (6)
R2: sc around (6)
R3: inc ×6 (12)
R4: sc around (12)
Make three for head, three for back, and three for tail. Stuff lightly.
Fasten off. Leave 20 cm tail on each spike.
Cheek Patches — Make 2
Yarn: pale pink
R1: 6 sc in MR (6)
R2: inc ×6 (12)
Block flat. Sew under the eyes, not on the snout.
Fasten off. Leave 18 cm tail.
Body Spots — Make 10–14
Yarn: lavender and pink
Small spot: R1: 6 sc in MR (6)
Large spot: R1: 6 sc in MR (6); R2: inc ×6 (12)
Mix sizes along haunches and tail. Do not place spots where wings or legs will cover them.
Fasten off. Leave 12 cm tail on each.
Flame Prop — Make 1
Yarn: yellow, peach, pink
R1: yellow, 6 sc in MR (6)
R2: sc around (6)
R3: peach, inc ×6 (12)
R4: sc around (12)
R5: pink, (sc, inc) ×6 (18)
R6–R7: sc around (18)
R8: (sc, dec) ×6 (12)
R9: dec ×6 (6)
Stuff lightly. Pinch the top into a point with the yarn tail and add two side stitches to create the flame curve.
Fasten off. Leave 25 cm tail.
Assembly
- Sew the snout to the head across R11–R15, centered between the eyes.
- Attach the head to the body with the face angled slightly downward.
- Sew nostrils to the snout, then embroider a shallow smile and short brow arcs.
- Place cheek patches below the eyes and sew with small whipstitches.
- Sew the belly panel to the front of the body from neck base to lower belly.
- Attach back legs first, then front legs so the paws can hold the flame.
- Sew wings to the upper back with a 3 cm vertical seam at each root.
- Attach horns, side fins, and spine spikes along the head and back centerline.
- Sew the tail to the lower back, add the pink tail tip, then add body spots.
- Place the flame between the front paws and tack it to both arms.
The finished toy should sit without rear support when the tail rests on the table and both back legs touch the surface.
7 Technical Tips
- Stitch marker drift of one stitch by R7 makes the snout lean. Move the marker at the start of every round and recount 42 stitches before R8.
- Stuffing dents appear under 12 mm eyes when the head is packed after R18. Add pea-size tufts around eye backs before closing R20.
- Invisible dec gaps show first on aqua chenille at R15 of the head. Work decreases through front loops only and pull the working yarn flat after each group of six.
- Eye placement after R14 leaves no room to lock washers. Set eyes between R10 and R11, 9 stitches apart, before the first head decrease.
- Velvet tension can grow the body 3–4 cm wider than planned. Use a 4 mm hook for worsted or drop 0.5 mm if holes appear.
- Pinning failure at the wing root makes both wings slump backward. Pin each wing from body R10 to R13 and sew a 3 cm vertical anchor.
- Tail weaving that ends inside the curve can pop through the front. Bury tails toward the underside for at least 6 cm and trim only after tugging twice.
Conclusion
Block the wings before final photos, then check the toy from the side. The head should sit over the belly, the tail should act as a rear support, and the flame should remain visible between both front paws. For a cleaner market sample, make the body spots last so they can balance the finished silhouette. Save this dragon amigurumi crochet pattern to Pinterest, share the finished Aqua Flame Dragon on Instagram, and tag it with #AquaFlameDragon. Next step: crochet one test wing in scrap yarn before cutting into the pink yarn. Should the tail tip stay pink, or should it match the peach flame?









