Introduction
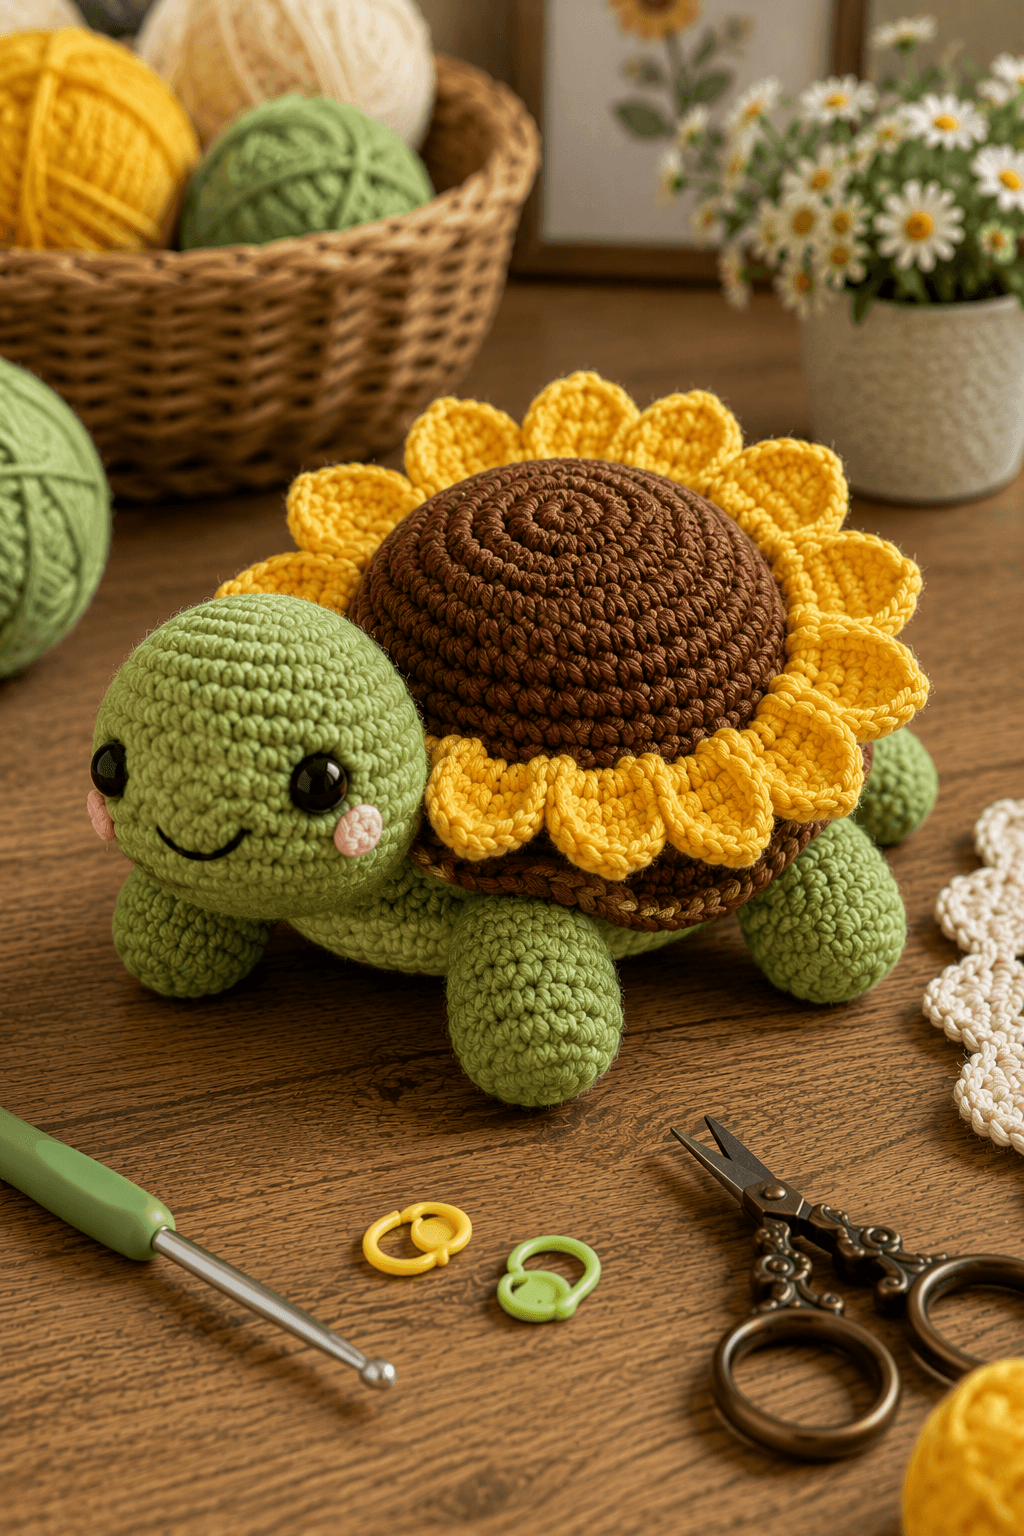
A turtle shell can become a sunflower only if the yellow petals stay visible after the brown dome is sewn to the body. This sunflower turtle amigurumi crochet pattern uses worsted yarn and a 4 mm hook to make an approximately 25–28 cm turtle. A green head and four legs support a dimensional brown shell surrounded by twelve yellow petals, making this an intermediate amigurumi project.
The Design: What Makes This Turtle Different
The upper shell does double duty as both turtle anatomy and the dark center of the sunflower. It reaches 42 stitches for a broad dome, then decreases slightly so the lower edge can sit against the belly without becoming spherical. Twelve individual yellow petals are arranged around that edge, which keeps their pointed tips visible beyond the shell. The green body remains flatter than the shell because the turtle needs four stable contact points at the legs. A 36-stitch head gives enough width for large eyes, cheeks and a curved smile without competing with the oversized flower. This crochet turtle with sunflower shell is especially sensitive to petal placement. A common maker error is sewing petals too far under the brown dome; only their tips remain visible and the shell loses its sunflower silhouette.
Project Info at a Glance
| Skill Level | Time | Finished Size | Hook | Best For |
|---|---|---|---|---|
| Intermediate | 10–13 hours | Approx. 25–28 cm long × 18–21 cm high | 4.0 mm | Spring displays, floral collections and turtle-themed decor |
Materials and Tools
Yarn
- Leaf green — worsted / Aran #4 — approximately 110–135 g — head, belly, four legs and tail.
- Chocolate brown — worsted / Aran #4 — approximately 80–100 g — upper sunflower shell and narrow lower shell edge.
- Sunflower yellow — worsted / Aran #4 — approximately 70–90 g — twelve dimensional petals.
- Soft pink — worsted / Aran #4 — approximately 5–8 g — cheek patches.
- Black embroidery yarn — small amount — smile.
Tools
- 4.0 mm crochet hook
- 12–14 mm safety eyes — two
- Polyester stuffing — approximately 170–210 g
- Yarn needle
- Long tapestry needle
- Locking stitch markers
- Dressmaking pins
- Scissors
Replace plastic safety eyes with embroidered eyes when the finished turtle is intended for a child under three.
Abbreviations
- MR — magic ring
- sc — single crochet
- inc — two single crochet stitches in one stitch
- dec — invisible single crochet decrease
- sl st — slip stitch
- ch — chain
- hdc — half double crochet
- dc — double crochet
- tr — treble crochet
- BLO — back loop only
- FLO — front loop only
An invisible decrease is worked through the front loops of the next two stitches before one single crochet is completed through both loops.
Pattern — Step by Step
Work all stuffed pieces in continuous spirals unless stated otherwise. Mark the first stitch of every round and verify the count before continuing.
Head
Yarn: leaf green — original reconstruction using standard six-stitch amigurumi math.
R1: 6 sc in MR (6)
R2: inc ×6 (12)
R3: (sc, inc) ×6 (18)
R4: (2 sc, inc) ×6 (24)
R5: (3 sc, inc) ×6 (30)
R6: (4 sc, inc) ×6 (36)
R7–R12: sc around (36)
R13: (4 sc, dec) ×6 (30)
R14: sc around (30)
R15: (3 sc, dec) ×6 (24)
R16: sc around (24)
R17: (2 sc, dec) ×6 (18)
R18: (sc, dec) ×6 (12)
R19: dec ×6 (6)
Insert the 12–14 mm safety eyes between R9 and R10 with approximately seven visible stitches between the posts. Begin stuffing after R13 and keep the cheeks evenly rounded.
Fasten off. Leave a 40 cm attachment tail and close the remaining six front loops.
Pink Cheeks (Make 2)
Yarn: soft pink.
R1: 6 sc in MR (6)
Join with sl st.
Fasten off. Leave a 10 cm tail.
The patches should remain small, approximately 15–18 mm across.
Smile
Yarn: black embroidery yarn.
Position the smile approximately one round below the midpoint between the eyes.
Work a shallow upward curve approximately 25–30 mm wide.
Secure both ends inside the head.
Lower Body and Belly
Yarn: leaf green.
R1: 6 sc in MR (6)
R2: inc ×6 (12)
R3: (sc, inc) ×6 (18)
R4: (2 sc, inc) ×6 (24)
R5: (3 sc, inc) ×6 (30)
R6: (4 sc, inc) ×6 (36)
R7: (5 sc, inc) ×6 (42)
R8–R10: sc around (42)
R11: (5 sc, dec) ×6 (36)
R12: sc around (36)
R13: (4 sc, dec) ×6 (30)
R14: sc around (30)
R15: (3 sc, dec) ×6 (24)
R16: (2 sc, dec) ×6 (18)
R17: (sc, dec) ×6 (12)
R18: dec ×6 (6)
Stuff moderately rather than firmly. The belly should remain lower and flatter than the brown upper shell.
Fasten off. Leave a 35 cm tail and close.
Front Legs (Make 2)
Yarn: leaf green.
R1: 6 sc in MR (6)
R2: inc ×6 (12)
R3: (sc, inc) ×6 (18)
R4–R6: sc around (18)
R7: (sc, dec) ×6 (12)
R8–R10: sc around (12)
Stuff the lower rounded section firmly through R6. Add less stuffing toward the attachment end.
Fasten off. Leave a 30 cm sewing tail.
Back Legs (Make 2)
Yarn: leaf green.
R1: 6 sc in MR (6)
R2: inc ×6 (12)
R3: (sc, inc) ×6 (18)
R4–R7: sc around (18)
R8: (sc, dec) ×6 (12)
R9–R11: sc around (12)
The rear legs are one round longer so their outer ends remain visible behind the sunflower shell.
Fasten off. Leave a 30 cm sewing tail.
Tail
Yarn: leaf green.
R1: 6 sc in MR (6)
R2: inc ×6 (12)
R3: sc around (12)
R4: (sc, dec) ×4 (8)
R5–R7: sc around (8)
R8: dec ×4 (4)
Stuff only the widest base lightly. Leave the tip flexible.
Fasten off. Leave a 20 cm tail.
Brown Sunflower Shell
Yarn: chocolate brown — 42-stitch large shell plateau.
R1: 6 sc in MR (6)
R2: inc ×6 (12)
R3: (sc, inc) ×6 (18)
R4: (2 sc, inc) ×6 (24)
R5: (3 sc, inc) ×6 (30)
R6: (4 sc, inc) ×6 (36)
R7: (5 sc, inc) ×6 (42)
R8–R12: sc around (42)
R13: (5 sc, dec) ×6 (36)
R14: sc around (36)
Stuff until the shell forms a broad dome approximately 6–7 cm high rather than a full ball.
Fasten off. Leave a 60 cm sewing tail.
Lower Brown Shell Ring
Yarn: chocolate brown.
R1: 6 sc in MR (6)
R2: inc ×6 (12)
R3: (sc, inc) ×6 (18)
R4: (2 sc, inc) ×6 (24)
R5: (3 sc, inc) ×6 (30)
R6: (4 sc, inc) ×6 (36)
Fasten off. Leave a 45 cm tail.
This disc sits between the domed shell and green belly, giving the yellow petal bases a defined attachment line.
Sunflower Petals (Make 12)
Yarn: sunflower yellow.
Ch 10.
Starting in the second chain from the hook:
sl st,
sc,
hdc,
dc,
2 tr,
dc,
hdc,
sc.
Work 4 sc in the final chain.
Continue down the opposite side:
sc,
hdc,
dc,
2 tr,
dc,
hdc,
sc,
sl st.
Pinch the final chain end gently so each petal has a defined rounded point. Finished petals should measure approximately 7–8 cm long.
Fasten off. Leave a 25 cm sewing tail.
Petal Edge Reinforcement
For a thicker outline like the photographed petals, join yellow yarn at the base of one completed petal.
Sl st loosely around the complete outer edge.
Keep one slip stitch per available edge stitch.
Fasten off.
Do not tighten the edge row enough to cup the petal more than approximately 10–15 mm.
Repeat for all twelve petals.
Shell Center Texture
Yarn: chocolate brown.
Thread a long strand onto a tapestry needle.
Starting near the shell center, work a loose spiral of surface chain stitches following the crochet rounds.
Continue outward for approximately five to six turns.
This optional surface line emphasizes the sunflower-center appearance without changing shell dimensions.
Assembly
- Complete the face before attaching the head, sewing both pink cheeks below the eyes and embroidering the black smile between them.
- Sew the head to the front edge of the green body through a broad seam approximately 5–6 cm wide, with the lower head sitting slightly above the belly center.
- Pin the two front legs beside the head and the two back legs farther toward the rear, then check that all four rounded ends contact the table before sewing.
- Attach the green tail at the rear center, leaving approximately 3–4 cm visible beyond the future sunflower shell.
- Sew the flat brown lower shell ring to the upper surface of the green body, centering it between the four legs.
- Arrange all twelve yellow petals around the brown ring before sewing any permanently, spacing their centers approximately 30 degrees apart.
- Sew only the lower 15–20 mm of each petal to the shell ring so most of every yellow petal projects freely beyond the brown center.
- Place the stuffed brown dome over the petal bases and sew its 36-stitch lower edge to the brown shell ring, trapping the yellow bases securely between both brown layers.
- Rotate the turtle on a hard surface and reposition any petal whose visible length differs from its opposite by more than approximately 10 mm.
- Weave every structural tail through at least 4 cm of matching crochet, reverse direction once and trim after the yarn retracts beneath the stitches.
The completed turtle should rest on four green legs with the head centered in front, the tail visible behind and all twelve sunflower petals extending clearly beyond the brown domed shell.
7 Technical Tips
- Sunflower disappearing under the shell: Petals sewn more than 20 mm beneath the brown dome lose too much visible length. Attach only their lower 15–20 mm and test the complete circle before fixing the shell.
- Shell leaning to one side: Unequal stuffing can shift the heavy 42-stitch dome away from the belly center. Keep its highest point directly above the brown lower ring and compare both side profiles before closing the seam.
- Turtle rocking on three legs: One leg attached 10 mm higher than its opposite can lift another foot off the table. Pin all four pieces first and test the body on a hard surface before sewing.
- Petals forming a square-looking flower: Uneven spacing becomes obvious with twelve pieces. Mark attachment centers around the ring at approximately 30-degree intervals before placing the first permanent stitch.
- Head rotating downward: A narrow head seam cannot counter the weight of the shell behind it. Sew across approximately 5–6 cm and add firm stuffing immediately behind the head attachment.
- Visible decrease holes: Loose decreases in the green head expose stuffing near the lower face. Work each decrease through the front loops and match its tension to the surrounding single crochet stitches.
- Petal edges curling excessively: Tight slip-stitch edging shortens the perimeter. Keep the reinforcement loose and limit the natural cup to approximately 10–15 mm from flat.
Conclusion
Check the sunflower ring from directly above before sewing the brown dome because petal spacing controls the entire shell silhouette. Next, set the assembled body on a hard surface and compare all four leg heights, head angle and visible petal lengths before burying structural tails. Keep most of each yellow petal free so the flower reads independently from the shell. Share the finished sunflower turtle amigurumi crochet pattern project on Pinterest with a top-front photograph, then post a close view of the brown shell center and yellow petal ring on Instagram using #SunflowerTurtleAmigurumi. For this turtle specifically, would you keep the body spring green or use a darker olive shade?









