Introduction
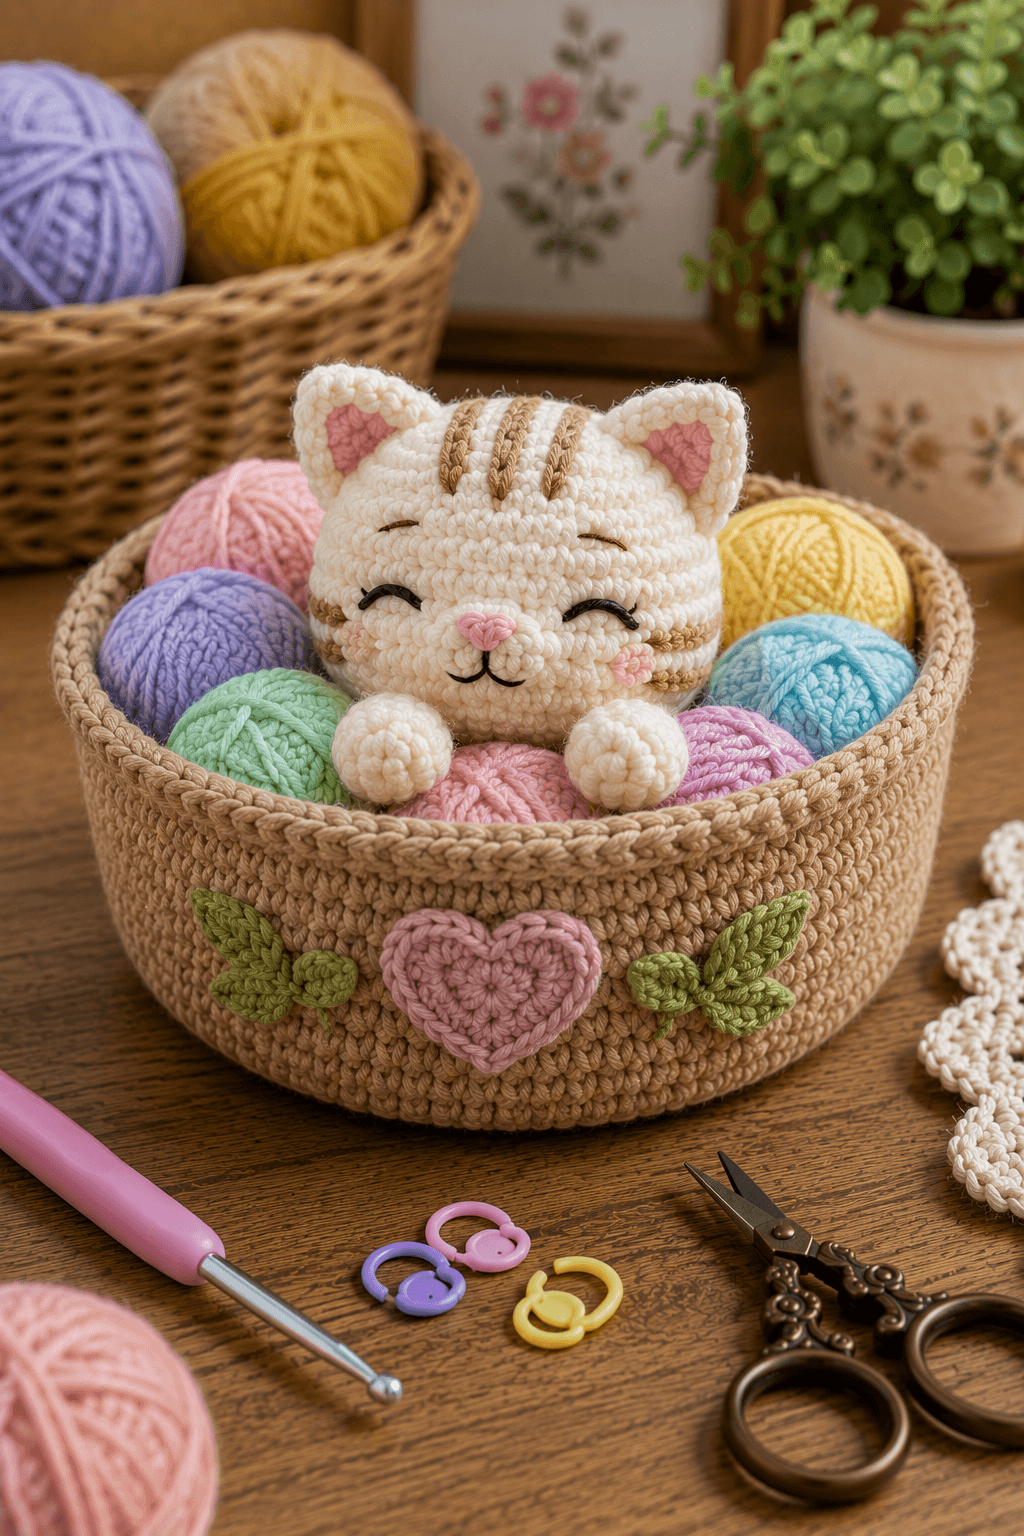
A sleeping tabby only looks tucked into a yarn basket when the paws clear the rim but the body remains completely hidden. This cat in yarn basket amigurumi pattern uses worsted yarn and a 4 mm hook to build an approximately 25–29 cm display. A cream striped head, closed embroidered eyes, two paws, structured basket, pink heart and green leaves create an intermediate character project.
The Design: What Makes This Cat in a Basket Different
The head reaches a 42-stitch plateau because the face is intentionally oversized relative to the hidden body. That proportion keeps the ears, forehead stripes, closed eyes and small pink nose readable above the basket rim. The body is narrower at 36 stitches and sits below the yarn balls, acting mainly as an anchor for the head and paws. Both paws are positioned forward so they appear to rest on the colorful yarn rather than hang over the basket. The basket itself uses a broad circular base and firm vertical walls to carry the weight without collapsing inward. This sleeping cat amigurumi also uses embroidery instead of safety eyes. A frequent maker error is setting the head too low. The nose should remain several centimeters above the rim or the basket will cover the facial expression.
Project Info at a Glance
| Skill Level | Time | Finished Size | Hook | Best For |
|---|---|---|---|---|
| Intermediate | 12–15 hours | Approx. 25–29 cm overall | 4.0 mm | Craft-room decor, yarn displays and cat-themed gifts |
Materials and Tools
Yarn
- Warm cream / ivory — worsted / Aran #4 — approximately 95–120 g — head, hidden body, ears and paws.
- Camel / warm brown — worsted / Aran #4 — approximately 140–170 g — crochet basket.
- Light tan — worsted / Aran #4 — approximately 15 g — tabby forehead and cheek stripes.
- Soft pink — worsted / Aran #4 — approximately 10 g — ear centers, nose, cheeks and heart.
- Olive green — worsted / Aran #4 — approximately 10–15 g — decorative leaves.
- Black embroidery yarn — small amount — closed eyes and mouth.
Tools
- 4.0 mm crochet hook
- Polyester stuffing — approximately 160–200 g
- Yarn needle
- Long tapestry needle
- Locking stitch markers
- Dressmaking pins
- Scissors
- Optional cardboard or plastic canvas disc approximately 15–17 cm across for a firmer basket base
The photographed colored yarn balls function as loose props rather than crocheted pattern pieces. Use small leftover yarn balls around the cat after final assembly.
Abbreviations
- MR — magic ring
- sc — single crochet
- inc — two single crochet stitches in one stitch
- dec — invisible decrease
- sl st — slip stitch
- ch — chain
- hdc — half double crochet
- dc — double crochet
- BLO — back loop only
An invisible decrease is worked through the front loops of the next two stitches before completing one single crochet through both loops.
Pattern — Step by Step
Work stuffed pieces in continuous spirals unless a section is described as flat rows. Mark the first stitch of every round.
Cat Head
Yarn: warm cream — Source: standard six-stitch amigurumi math scaled to a 42-stitch large head.
R1: 6 sc in MR (6)
R2: inc ×6 (12)
R3: (sc, inc) ×6 (18)
R4: (2 sc, inc) ×6 (24)
R5: (3 sc, inc) ×6 (30)
R6: (4 sc, inc) ×6 (36)
R7: (5 sc, inc) ×6 (42)
R8–R14: sc around (42)
R15: (5 sc, dec) ×6 (36)
R16: sc around (36)
R17: (4 sc, dec) ×6 (30)
R18: sc around (30)
R19: (3 sc, dec) ×6 (24)
R20: (2 sc, dec) ×6 (18)
R21: (sc, dec) ×6 (12)
R22: dec ×6 (6)
Begin stuffing after R15. Pack the forehead and cheeks firmly while leaving the lower center slightly softer for face sculpting.
Fasten off. Leave a 35 cm tail and close the remaining six front loops.
Hidden Cat Body
Yarn: warm cream.
R1: 6 sc in MR (6)
R2: inc ×6 (12)
R3: (sc, inc) ×6 (18)
R4: (2 sc, inc) ×6 (24)
R5: (3 sc, inc) ×6 (30)
R6: (4 sc, inc) ×6 (36)
R7–R12: sc around (36)
R13: (4 sc, dec) ×6 (30)
R14–R15: sc around (30)
R16: (3 sc, dec) ×6 (24)
R17: (2 sc, dec) ×6 (18)
R18: (sc, dec) ×6 (12)
R19: dec ×6 (6)
Stuff firmly enough to support the head. The body will be concealed by the basket and surrounding yarn balls.
Fasten off. Leave a 40 cm attachment tail.
Front Paws (Make 2)
Yarn: warm cream.
R1: 6 sc in MR (6)
R2: inc ×6 (12)
R3: (sc, inc) ×6 (18)
R4–R6: sc around (18)
R7: (sc, dec) ×6 (12)
R8–R10: sc around (12)
Stuff the rounded paw end through R6. Leave the upper section lightly filled so it can angle over the yarn balls.
Fasten off. Leave a 25 cm sewing tail.
Outer Ears (Make 2)
Yarn: warm cream. Worked flat.
Row 1: Ch 9, sc in second ch from hook and across. Turn. (8)
Row 2: Ch 1, dec, 4 sc, dec. Turn. (6)
Row 3: Ch 1, dec, 2 sc, dec. Turn. (4)
Row 4: Ch 1, dec ×2. Turn. (2)
Row 5: Ch 1, dec. (1)
Fasten off. Leave a 25 cm tail.
Pink Inner Ears (Make 2)
Yarn: soft pink. Worked flat.
Row 1: Ch 7, sc in second ch from hook and across. Turn. (6)
Row 2: Ch 1, dec, 2 sc, dec. Turn. (4)
Row 3: Ch 1, dec ×2. Turn. (2)
Row 4: Ch 1, dec. (1)
Fasten off. Leave a 20 cm tail.
Cheek Patches (Make 2)
Yarn: soft pink.
R1: 6 sc in MR (6)
Join with sl st.
Do not increase. The cheek patches should remain compact.
Fasten off. Leave a 10 cm sewing tail.
Pink Nose
Yarn: soft pink.
R1: 6 sc in MR (6)
R2: (sc, inc) ×3 (9)
Fasten off.
Fold the small circle into a shallow triangle while sewing it to the face.
The finished nose should measure approximately 18–20 mm across.
Closed Eyes
Yarn: black embroidery yarn.
Mark each eye approximately 3.5–4 cm from the vertical center line.
Work one shallow curved line approximately 25–30 mm wide on each side.
Add two short outward lashes at the outer ends.
Both eye curves should sit on the same crochet round before the yarn is secured.
Mouth
Bring black yarn through directly below the center of the pink nose.
Work one short vertical stitch approximately 8–10 mm long.
Add one curved stitch to the left and one to the right to form the small cat mouth.
Secure all ends inside the head.
Forehead Tabby Stripes
Yarn: light tan.
Work three raised embroidered lines from the crown toward the forehead.
Each stripe should measure approximately 4–5 cm.
Leave approximately 10–12 mm between neighboring lines near the lower ends.
The center stripe can finish slightly lower than the two outer stripes.
Cheek Tabby Stripes
Yarn: light tan.
Work two short curved stripes on each side of the face.
Place them outside the cheeks and below the eyes.
Keep each stripe approximately 25–30 mm long.
Basket Base
Yarn: camel brown.
R1: 6 sc in MR (6)
R2: inc ×6 (12)
R3: (sc, inc) ×6 (18)
R4: (2 sc, inc) ×6 (24)
R5: (3 sc, inc) ×6 (30)
R6: (4 sc, inc) ×6 (36)
R7: (5 sc, inc) ×6 (42)
R8: (6 sc, inc) ×6 (48)
R9: (7 sc, inc) ×6 (54)
The finished base should lie flat and measure approximately 16–18 cm across.
Basket Walls
R10: BLO sc around (54)
R11–R22: sc around (54)
Insert a rigid base disc after R10 if the basket will be used as a display container rather than a soft toy.
Basket Rim
R23: hdc around (54)
R24: reverse sc or firm sl st around (54)
Fasten off and weave in the tail.
The finished wall should measure approximately 9–11 cm high.
Pink Heart Appliqué
Yarn: soft pink.
Ch 4.
Work all following stitches into the first chain:
3 dc,
3 hdc,
ch 1,
dc,
ch 1,
3 hdc,
3 dc,
ch 2,
sl st.
Pull the starting tail to tighten the center.
Fasten off. Leave a 25 cm sewing tail.
Large Decorative Leaves (Make 2)
Yarn: olive green.
Ch 8.
Starting in second chain from hook:
sl st,
sc,
hdc,
dc,
hdc,
sc,
sl st.
Work 3 sc in the final chain.
Continue down the opposite side:
sl st,
sc,
hdc,
dc,
hdc,
sc,
sl st.
Fasten off. Leave a 20 cm sewing tail.
Small Decorative Leaves (Make 2)
Yarn: olive green.
Ch 5.
Starting in second chain from hook:
sl st,
sc,
hdc,
sc.
Work 3 sc in the final chain.
Continue down the opposite side:
sc,
hdc,
sc,
sl st.
Fasten off. Leave a 15 cm tail.
Assembly
- Sew each pink inner ear to one cream outer ear, then attach both completed ears to the upper sides of the head with approximately 6–7 cm between the inner bases.
- Complete the closed eyes, nose, mouth, pink cheek patches and tan tabby stripes before attaching the head to the hidden body.
- Sew the body to the lower rear of the head through a broad circular seam approximately 6–7 cm across so the large head does not rotate forward.
- Attach both front paws high on the body and angle them forward so the rounded ends will remain visible above the basket filling.
- Complete the basket and place the cat body in its center, adding stuffing or scrap yarn around the hidden torso until the nose sits approximately 8–10 cm above the rim.
- Tack the body to the basket base through four concealed points so the head cannot rotate when the decorative yarn balls are added.
- Place small leftover yarn balls in pink, lavender, yellow, green and blue around the hidden body, keeping both paws visible at the front.
- Sew the pink heart to the center front of the basket approximately 3–4 cm above the base.
- Position one large and one small olive leaf on each side of the heart and sew through their center veins, leaving the outer edges free.
- Place the complete arrangement on a level surface, correct any forward head tilt and weave all structural tails through at least 4 cm of matching crochet.
The completed display should show a sleeping cream tabby head and two rounded paws above a stable brown basket, with colored yarn filling the surrounding space and the heart-and-leaf motif centered on the front.
7 Technical Tips
- Head falling forward: A narrow neck seam cannot support a 42-stitch head. Attach the hidden body across a seam approximately 6–7 cm wide and add firm stuffing directly beneath the back of the head.
- Ears collapsing outward: Attaching only the bottom edge leaves a soft triangle that can fold. Sew approximately 10–15 mm up each lower side of the ear base in addition to the horizontal seam.
- Closed eyes becoming uneven: A difference of one crochet round is obvious on a sleeping face. Mark all four eye endpoints before embroidering and keep both curves approximately 25–30 mm wide.
- Tabby stripes puckering: Tight surface embroidery compresses the cream head fabric. Leave each tan stripe resting on the surface and stop pulling when it remains raised by roughly 2–3 mm.
- Basket wall collapsing: Loose single crochet around a 54-stitch wall can fold beneath the head weight. Work the wall firmly and add a 16–18 cm rigid base insert when the piece is intended for display.
- Paws disappearing into the yarn: Arms attached below the basket rim become hidden after filling. Position the paw centers approximately 2–3 cm above the rim line before the body is fixed to the base.
- Heart appliqué curling: Pulling its sewing thread around the complete perimeter can cup the motif. Fix the heart through the center and outer points with four to six small stitches rather than stitching every edge loop.
Conclusion
Check the head height before filling the basket because the sleeping face must remain fully visible above the surrounding yarn. The next practical step is to pin the cat body inside the empty basket and test the paw position, ear angle and nose height from the front. Add the decorative yarn balls only after those proportions are fixed. Share the finished cat in yarn basket amigurumi pattern project on Pinterest with a vertical craft-room photograph, then post a close view of the embroidered eyes and tabby stripes on Instagram using #CatInYarnBasketAmigurumi. For this cat specifically, would you keep the cream tabby markings or make the next version gray with charcoal stripes?









