Introduction
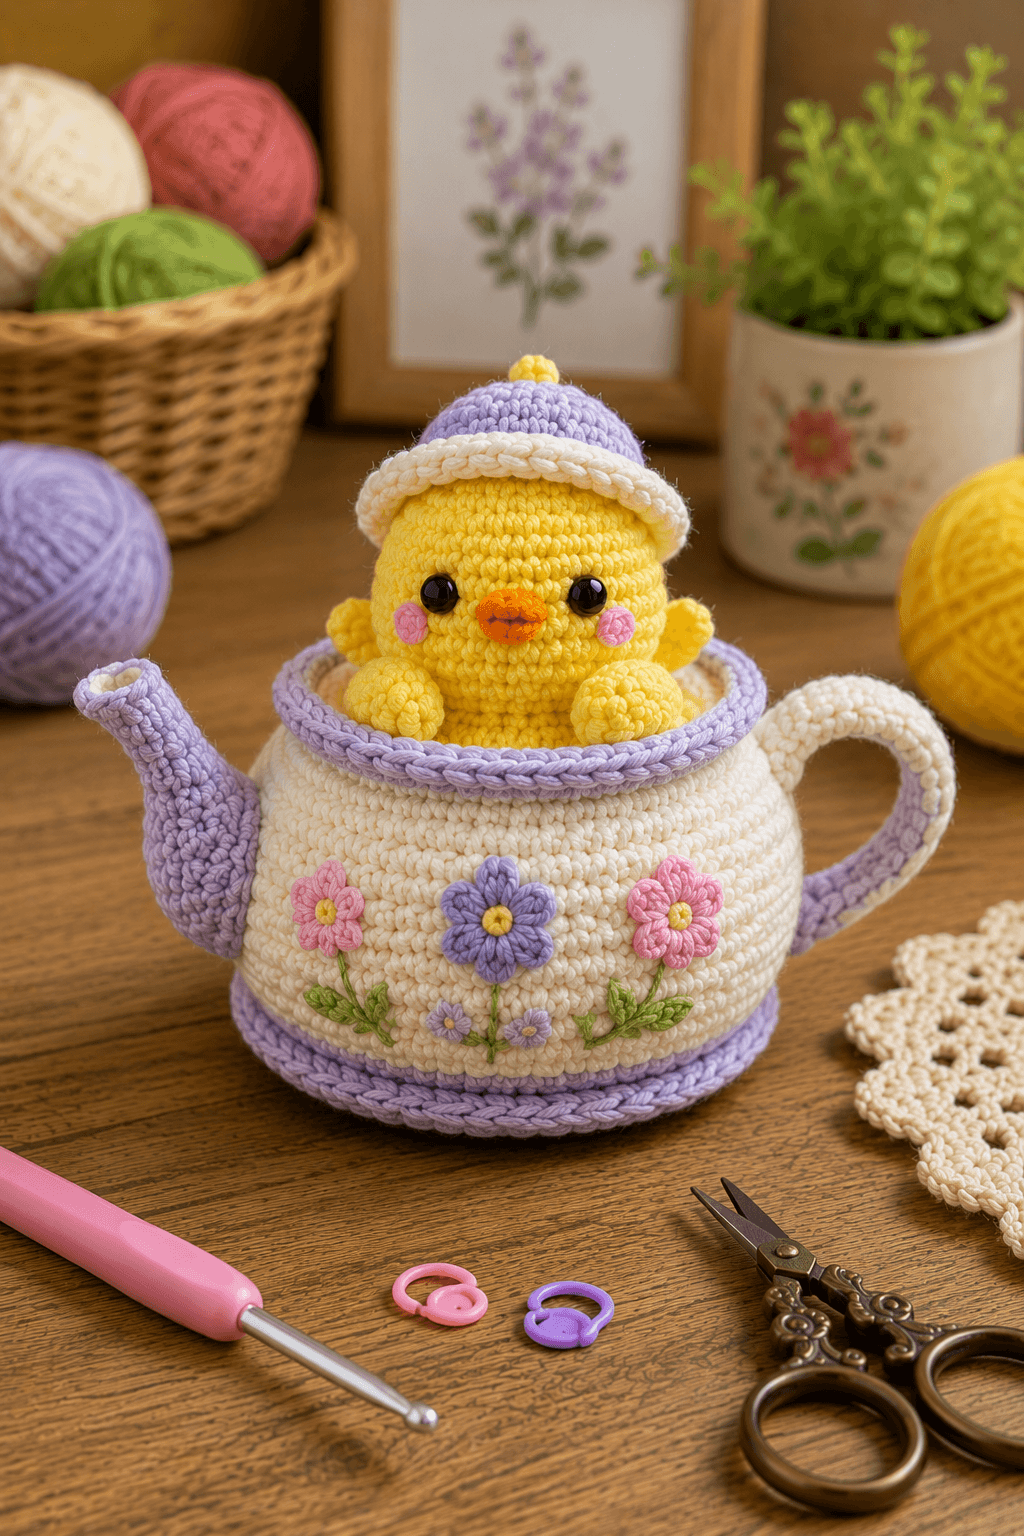
A chick can only look seated inside a teapot when its wings clear the lavender rim while the lower body disappears below it. This chick in teapot amigurumi crochet pattern uses worsted yarn and a 4 mm hook to make an approximately 27–31 cm display. The project combines a yellow chick, fitted cap, structured teapot, curved spout, handle and floral appliqués at intermediate level.
The Design: What Makes This Chick in a Teapot Different
The chick is built smaller than the teapot opening so its head and wings remain the focal point while the torso stays partly concealed. A 36-stitch head provides enough width for the large black eyes, pink cheeks and orange beak without making the character top-heavy. The teapot expands to 54 stitches and uses a flatter lower profile than a spherical amigurumi body, giving the display a stable base. Lavender edging repeats the cap color at the rim and foot of the pot, linking the two sections visually. The spout and handle are separate structural pieces because each needs a different curve. This crochet chick in teapot also depends on vertical positioning. A common error is mounting the chick too deeply; when the beak approaches the rim, the wings and body disappear and the character reads as a head inside a container.
Project Info at a Glance
| Skill Level | Time | Finished Size | Hook | Best For |
|---|---|---|---|---|
| Intermediate | 14–18 hours | Approx. 27–31 cm high | 4.0 mm | Spring displays, tea-room decor and Easter collections |
Materials and Tools
Yarn
- Sunflower yellow — worsted / Aran #4 — approximately 75–95 g — chick head, body, wings, feet and hat button.
- Warm cream — worsted / Aran #4 — approximately 150–180 g — teapot body, hat brim and handle sections.
- Lavender purple — worsted / Aran #4 — approximately 55–70 g — hat crown, teapot rim, foot, spout and handle accents.
- Soft pink — worsted / Aran #4 — approximately 15–20 g — cheeks and floral appliqués.
- Olive green — worsted / Aran #4 — approximately 15–20 g — stems and leaves.
- Orange — worsted / Aran #4 — approximately 8–12 g — chick beak.
- Black embroidery yarn — small amount for optional eye details.
Tools
- 4.0 mm crochet hook
- 10–12 mm safety eyes — 2
- Polyester stuffing — approximately 250–300 g total
- Yarn needle
- Long tapestry needle
- Locking stitch markers
- Dressmaking pins
- Scissors
- Optional plastic canvas disc approximately 15–17 cm across for the teapot base
Use embroidered eyes instead of plastic components when the finished piece is intended for a child under three.
Abbreviations
- MR — magic ring
- sc — single crochet
- inc — two single crochet stitches in one stitch
- dec — invisible decrease
- sl st — slip stitch
- ch — chain
- hdc — half double crochet
- dc — double crochet
- tr — treble crochet
- BLO — back loop only
- FLO — front loop only
An invisible decrease is worked through the front loops of the next two stitches before completing one single crochet through both loops.
Pattern — Step by Step
Work stuffed sections in continuous spirals unless stated otherwise. Mark the first stitch of every round.
Chick Head
Yarn: sunflower yellow — standard six-stitch amigurumi shaping adapted to the photographed head.
R1: 6 sc in MR (6)
R2: inc ×6 (12)
R3: (sc, inc) ×6 (18)
R4: (2 sc, inc) ×6 (24)
R5: (3 sc, inc) ×6 (30)
R6: (4 sc, inc) ×6 (36)
R7–R12: sc around (36)
R13: (4 sc, dec) ×6 (30)
R14: sc around (30)
R15: (3 sc, dec) ×6 (24)
R16: (2 sc, dec) ×6 (18)
R17: (sc, dec) ×6 (12)
R18: dec ×6 (6)
Insert safety eyes between R9 and R10 with approximately seven visible stitches between the posts. Begin stuffing after R13 and keep the lower face slightly softer for beak placement.
Fasten off. Leave a 35 cm tail and close the remaining six front loops.
Chick Body
Yarn: sunflower yellow.
R1: 6 sc in MR (6)
R2: inc ×6 (12)
R3: (sc, inc) ×6 (18)
R4: (2 sc, inc) ×6 (24)
R5: (3 sc, inc) ×6 (30)
R6–R10: sc around (30)
R11: (3 sc, dec) ×6 (24)
R12: sc around (24)
R13: (2 sc, dec) ×6 (18)
R14: (sc, dec) ×6 (12)
R15: dec ×6 (6)
Stuff firmly through R10. The body acts as the hidden support inside the teapot.
Fasten off. Leave a 40 cm tail and close.
Wings (Make 2)
Yarn: sunflower yellow.
R1: 6 sc in MR (6)
R2: (sc, inc) ×3 (9)
R3: (2 sc, inc) ×3 (12)
R4–R5: sc around (12)
R6: (2 sc, dec) ×3 (9)
Flatten the opening and work 4 sc through both layers.
Do not stuff. The wings should remain flat enough to sit just above the teapot rim.
Fasten off. Leave a 25 cm sewing tail.
Rounded Feet (Make 2)
Yarn: sunflower yellow.
R1: 6 sc in MR (6)
R2: inc ×6 (12)
R3–R4: sc around (12)
R5: dec ×6 (6)
Stuff lightly.
Fasten off. Leave a 20 cm sewing tail.
Orange Beak
Yarn: orange.
R1: 6 sc in MR (6)
R2: (sc, inc) ×3 (9)
R3: sc around (9)
Stuff with only a small pinch of filling. Flatten the upper and lower edges slightly while sewing so the beak projects forward rather than becoming round.
Fasten off. Leave a 20 cm tail.
Pink Cheeks (Make 2)
Yarn: soft pink.
R1: 6 sc in MR (6)
Join with sl st.
Fasten off. Leave a 10 cm tail.
Lavender Hat Crown
Yarn: lavender purple.
R1: 6 sc in MR (6)
R2: inc ×6 (12)
R3: (sc, inc) ×6 (18)
R4: (2 sc, inc) ×6 (24)
R5: (3 sc, inc) ×6 (30)
R6: (4 sc, inc) ×6 (36)
R7–R9: sc around (36)
Fasten off. Leave a 30 cm tail.
Cream Hat Brim
Yarn: warm cream.
Join to any stitch of R9.
Brim R1: FLO (5 sc, inc) ×6 (42)
Brim R2: sc around (42)
Fasten off.
The brim should project approximately 10–15 mm beyond the lavender crown.
Yellow Hat Button
Yarn: sunflower yellow.
R1: 6 sc in MR (6)
R2: sc around (6)
Stuff with a tiny amount of filling.
Fasten off. Leave a 15 cm tail and sew to the center of the lavender crown.
Teapot Base
Yarn: warm cream.
R1: 6 sc in MR (6)
R2: inc ×6 (12)
R3: (sc, inc) ×6 (18)
R4: (2 sc, inc) ×6 (24)
R5: (3 sc, inc) ×6 (30)
R6: (4 sc, inc) ×6 (36)
R7: (5 sc, inc) ×6 (42)
R8: (6 sc, inc) ×6 (48)
R9: (7 sc, inc) ×6 (54)
The base should lie flat. Insert an approximately 15–17 cm plastic-canvas disc above this section when additional display stability is required.
Teapot Lower Wall
R10: BLO sc around (54)
R11–R14: sc around (54)
R15: (7 sc, dec) ×6 (48)
R16–R18: sc around (48)
Begin stuffing the outer wall lightly.
Teapot Upper Wall
R19: (6 sc, dec) ×6 (42)
R20–R22: sc around (42)
R23: (5 sc, dec) ×6 (36)
R24–R25: sc around (36)
Do not close the opening. The 36-stitch top forms the cavity where the chick is installed.
Fasten off.
Lavender Teapot Foot
Yarn: lavender purple.
Join around the lower edge near R10.
Work 54 surface sl st around the circumference.
On the next round, work 54 sc into those surface stitches.
Fasten off.
The foot should project only approximately 5–8 mm beyond the cream body.
Lavender Upper Rim
Yarn: lavender purple.
Join to the open 36-stitch top.
Rim R1: sc around (36)
Rim R2: (5 sc, inc) ×6 (42)
Fasten off.
For the thicker cord-like edge visible in the image, work one round of surface slip stitches around R2 with relaxed tension.
Spout
Yarn: lavender purple.
R1: 6 sc in MR (6)
R2–R5: sc around (6)
R6: (2 sc, inc) ×2 (8)
R7–R9: sc around (8)
R10: (3 sc, inc) ×2 (10)
R11–R12: sc around (10)
R13: (4 sc, inc) ×2 (12)
R14: (sc, inc) ×6 (18)
Stuff R8–R14 lightly. Leave the narrow tip unstuffed so it can angle upward.
Fasten off. Leave a 40 cm sewing tail.
Cream Spout Opening
Yarn: warm cream.
Join around the six-stitch spout tip.
Work 6 sc around.
Join with sl st and fasten off.
Teapot Handle
Yarn: warm cream.
R1: 10 sc in MR (10)
R2–R30: sc around (10)
Stuff lightly as the tube grows. Leave the center flexible enough to bend into a broad C-shape.
Fasten off. Leave a 50 cm tail.
Lavender Handle Accent
Thread approximately 100 cm of lavender yarn onto a tapestry needle.
Work a surface chain line along the inner side of the cream handle.
Keep the line centered from attachment point to attachment point.
Large Pink Flowers (Make 2)
Yarn: soft pink with yellow center.
With yellow:
R1: 6 sc in MR (6)
Change to pink.
In each stitch work:
(sl st, ch 3, 2 dc, ch 3, sl st).
Repeat around for six petals.
Fasten off. Leave a 20 cm tail.
Large Lavender Flower
Repeat the Large Pink Flower using lavender petals and a yellow center.
Small Lavender Flowers (Make 2)
Yarn: lavender.
R1: 5 sc in MR (5).
In each stitch work:
(sl st, ch 2, hdc, ch 2, sl st).
Repeat for five petals.
Fasten off.
Large Green Leaves (Make 4)
Yarn: olive green.
Ch 7.
Starting in second ch from hook:
sl st,
sc,
hdc,
dc,
hdc,
sc.
Work 3 sc in the final chain.
Continue down the opposite side:
sc,
hdc,
dc,
hdc,
sc,
sl st.
Fasten off. Leave a 15 cm tail.
Small Green Leaves (Make 4)
Ch 5.
Starting in second ch from hook:
sl st,
sc,
hdc,
sc.
Work 3 sc in the final chain and repeat the same stitches along the opposite side.
Fasten off.
Green Flower Stems
Yarn: olive green.
Use surface chain stitches to connect the lower flowers and leaves.
Keep each visible stem approximately 2–4 mm wide.
Do not pull the surface chains tightly enough to distort the teapot wall.
Assembly
- Complete the chick face first, placing the beak between and slightly below the eyes and sewing one pink cheek approximately 15–20 mm from each side of the beak.
- Sew the chick head to the body through a circular attachment approximately 5–6 cm wide so the head remains upright above the teapot opening.
- Attach both wings to the upper body and the two rounded feet to the lower front, then pin the complete chick inside the empty teapot before permanent installation.
- Set the chick body into the teapot so the feet rest just above the lavender rim and the beak remains approximately 8–10 cm above the rim.
- Tack the hidden chick body to the teapot base at four points and add stuffing around it until the character cannot rotate forward or backward.
- Sew the lavender spout to the left side across an attachment area approximately 4–5 cm wide, angling the tip slightly upward.
- Curve the handle into a broad C and attach its upper and lower ends to the opposite side, checking that both connection points line up vertically before tightening.
- Fit the lavender hat over the chick crown, angle the cream brim slightly forward and tack it through four concealed points so it remains removable-looking but stable.
- Arrange the three large flowers and two small flowers across the teapot front, then add green stems and paired leaves while keeping the central lavender flower on the vertical midpoint.
- Place the complete piece on a hard surface, correct any teapot rocking or chick head tilt, then weave all structural tails through at least 4 cm of matching crochet.
The completed display should have a stable cream teapot, clear lavender rim and foot, balanced spout and handle, a centered floral panel and a yellow chick whose head, wings and feet remain visible above the opening.
7 Technical Tips
- Chick sinking into the teapot: A loosely packed cavity lets the hidden body drop below the rim. Fix the torso to the base at four points and keep the beak approximately 8–10 cm above the upper edge.
- Teapot collapsing under the handle: A soft 48–54 stitch wall can distort when the handle is pulled tight. Stuff the outer wall firmly and spread each handle attachment across approximately 4 cm instead of one or two stitches.
- Spout drooping: Filling only the wide base leaves the middle unsupported. Add light stuffing through R8–R14 while leaving the final narrow tip flexible enough to point upward.
- Hat brim curling: Tight tension in the 42-stitch cream brim can force the edge upward. Keep the brim stitches slightly looser than the lavender crown and target approximately 10–15 mm of projection.
- Flower panel puckering: Pulling surface stems tightly shortens the cream pot fabric. Stop tensioning as soon as each green line lies flat and keep the flowers attached through their centers rather than every petal edge.
- Handle twisting sideways: Sewing the upper connection before setting the lower point can rotate the C-shape. Pin both ends first and compare them from the front, side and top before stitching.
- Feet disappearing below the rim: Attaching the chick too low removes an important visible character feature. Position each rounded foot center approximately 10–20 mm above the lavender rim before fixing the hidden body.
Conclusion
Check the chick height before attaching the handle and flowers because the character establishes the vertical balance of the entire teapot. The next practical step is to pin the completed chick inside the unfinished pot and compare beak height, foot visibility and wing clearance from the front. Fix those measurements before adding decorative appliqués. Share the finished chick in teapot amigurumi crochet pattern project on Pinterest with a full front-facing photograph, then post a close view of the lavender edging and floral panel on Instagram using #ChickInTeapotAmigurumi. For this chick specifically, would you keep the lavender cap or make the next version with a soft pink crown?









