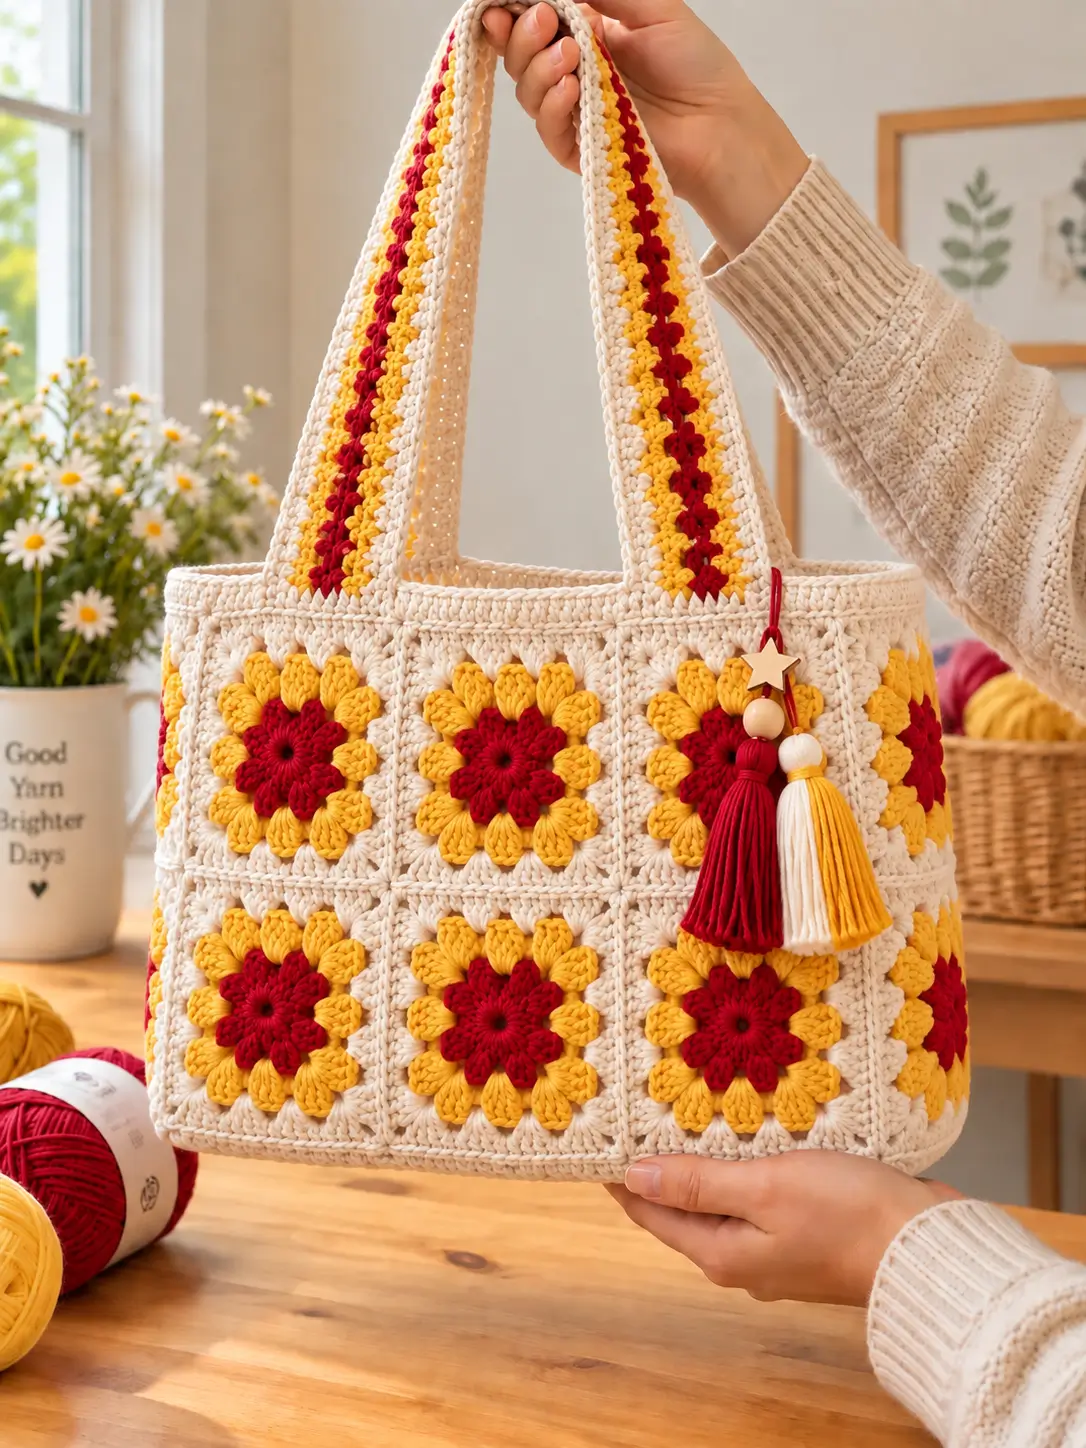
Sixteen raised petals have to become a square before this sunflower can become a bag. This sunflower granny square tote bag crochet pattern uses worsted-weight yarn, a 4.5 mm hook and modular flower motifs to build a medium structured tote. The project suits an intermediate crocheter comfortable with puff stitches, joining and color changes. Its reinforced handles make the finished bag practical for books, yarn or everyday carry.
The Design: What Makes This Sunflower Tote Different
The photographed bag uses the flower itself as structural fabric rather than placing appliqués over finished squares. Deep-red inner petals establish a compact center, while yellow outer petals increase the apparent diameter before cream stitches convert the circle into a square. That sequence keeps the sunflower granny square bag recognizable without allowing the raised flower to distort the seams.
A second decision concerns the handles. Their red-and-yellow center stripes visually continue the motif colors, while cream borders connect them to the upper edge. The handle attachment must span several stitches; concentrating the load at one or two stitches can pull the top border out of shape.
Finally, the crochet flower tote bag needs consistent blocking. A frequent mistake is joining motifs with different side lengths, producing diagonal seams and a twisted base.
Project Info at a Glance
| Skill Level | Time | Finished Size | Hook | Best For |
|---|---|---|---|---|
| Intermediate | 15–20 hours | Approx. 35–38 cm | 4.5 mm | Everyday tote / project bag |
The 35–38 cm target is an adaptation to the photographed bag rather than a claimed measurement of the original object. The exact finished dimensions depend on yarn, hook, tension and the blocked size of each granny square.
Materials and Tools
Yarn
- Cream — worsted/Aran cotton or cotton blend — approximately 250–300 g for frames, joining, upper edge and handles.
- Golden yellow — worsted/Aran — approximately 100–130 g for outer petals and handle stripes.
- Deep red — worsted/Aran — approximately 80–110 g for flower centers, inner petals and handle stripes.
- Tassel colors — cream, yellow and red — approximately 10–15 g of each color.
Cotton or a cotton-rich blend works particularly well for this construction because a tote requires firm fabric with limited stretch. The exact yarn quantity can change considerably with motif size and individual tension, so allow extra cream yarn for joining, edging and handles.
Tools
- 4.5 mm crochet hook
- Tapestry needle
- Locking stitch markers
- Scissors
- Blocking pins and mat
- Optional fabric lining
- Three wooden beads
- Small wooden star or similar charm
- Sewing needle and matching thread if adding a lining
Abbreviations
- MR — magic ring
- sc — single crochet
- hdc — half double crochet
- dc — double crochet
- tr — treble crochet
- sl st — slip stitch
- ch — chain
- sp — space
- st/sts — stitch/stitches
- puff — puff stitch
- FO — fasten off
An invisible decrease is an amigurumi technique and is not required for the flat floral motifs used in this tote.
Sunflower Granny Square Tote Bag Pattern
This project is constructed from flat floral motifs, joined panels, edging and straps. Unlike amigurumi, the pieces are not worked as stuffed continuous spirals.
Two-Layer Sunflower Granny Square — Make 18
Yarn: deep red, golden yellow and cream.
The bag uses modular flower squares to create the front, back, sides and base. Blocking every completed square to the same dimensions before joining is critical.
Round 1 — Deep Red: Make an MR. Ch 3, then work 15 dc into the ring. Join with sl st to the top of the beginning chain. (16 dc)
Round 2 — Deep Red: Work one compact puff into each stitch around, followed by ch 1 after each puff. Join with sl st. (16 puffs, 16 ch-1 spaces)
Round 3 — Golden Yellow: Join yellow in any ch-1 space. Work one puff or cluster-style petal into each ch-1 space. Ch 1 between petals and join at the end of the round. (16 petals)
Round 4 — Cream: Join cream yarn. Divide the 16 petals into four equal sections. Establish one corner after every fourth petal. Work the cream stitches evenly around the flower, placing a larger corner group at each of the four marked positions.
Round 5 — Cream: Continue the granny-square expansion. Work a corner group into each corner space and distribute the remaining groups evenly across all four sides.
Round 6 — Cream: Ch 1 and sc evenly around the entire motif. At each corner work (sc, ch 2, sc).
Fasten off and weave in the yarn ends. Block every completed motif to exactly the same dimensions before beginning panel assembly.
Front Panel
Arrange six sunflower squares in a grid measuring three motifs across and two motifs high.
Place the squares with the right sides facing upward. Join neighboring motifs using cream yarn and a flat slip-stitch seam or another low-bulk joining method.
Complete the vertical joins first. Work the horizontal seam only after all three columns have been connected.
Lay the completed panel flat and measure diagonally from corner to corner. The two diagonal measurements should remain within approximately 5 mm of each other. A larger difference usually indicates inconsistent blocking or excessive seam tension.
Back Panel
Repeat the same process using another six sunflower granny squares.
Place the completed front and back panels directly on top of one another before proceeding. Their width, height and corner positions should match.
Correct significant differences now rather than attempting to conceal them when attaching the side panels.
Side Panels — Make 2
Use four additional sunflower squares.
Join two squares vertically to form the first side panel. Repeat with another two squares for the opposite side.
Attach one side panel between the left edges of the front and back sections. Attach the second side panel to the opposite edges.
Keep the flowers facing the same direction throughout the bag. Although the underlying squares are symmetrical, the raised petal structure can make an upside-down motif visually noticeable.
Base
Use the remaining two sunflower squares to form the base.
Join the two motifs side by side. Position the resulting rectangle between the lower edges of the front and back panels.
Join the long edges first. Close the short ends against the bottom edges of the side panels.
For a firmer bag, cut a piece of plastic canvas approximately 1 cm smaller than the finished internal base. Place it beneath a fabric lining so the insert does not rub directly against the crochet stitches.
Upper Border
Join cream yarn at one of the side seams.
Round 1: Ch 1 and work sc evenly around the complete bag opening. Add one extra sc at a seam only when the seam naturally pulls inward.
Round 2: Ch 1 and sc in every stitch around. Join.
Round 3: Repeat Round 2.
The finished border should sit flat. Do not add unnecessary increases because excessive stitches can produce a flared opening.
Before making the handles, mark four attachment positions. The front and back pairs must be symmetrical.
Striped Crochet Handles — Make 2
Yarn: cream, golden yellow and deep red.
Make a foundation row long enough to produce a finished handle approximately 50–55 cm long. Adjust the starting stitch count according to your individual gauge rather than relying on a fixed chain count.
Row 1 — Cream: Sc across.
Row 2 — Cream: Sc across.
Row 3 — Golden Yellow: Change color and sc across.
Row 4 — Deep Red: Sc across.
Row 5 — Deep Red: Sc across.
Row 6 — Golden Yellow: Change color and sc across.
Row 7 — Cream: Sc across.
Row 8 — Cream: Sc across.
Fasten off and leave a long sewing tail.
Test the handle before attachment. Hold both ends and apply moderate tension. If the strap stretches by more than approximately 2 cm, work an additional cream row along each long edge or reinforce the underside with cotton tape.
Handle Attachment
Position the first handle symmetrically on the front panel and pin both ends before sewing.
Each attachment area should span approximately 5–6 cm across the upper border. Avoid attaching a handle through only one or two stitches because that concentrates the load in a very small area.
Sew through the strap and upper border repeatedly. When possible, form a rectangular attachment area and add diagonal reinforcement.
Repeat for the second handle on the back panel.
Hang the bag from both handles before weaving in the sewing tails. Confirm that both straps have equal working lengths and that neither side pulls the upper border downward.
Red Tassel
Cut approximately 20–25 strands of deep-red yarn, each about 20 cm long.
Arrange the strands evenly and fold the bundle through its midpoint. Secure the top firmly.
Wrap another red strand around the bundle approximately 2 cm below the folded end. Wrap several times, knot securely and hide the yarn ends inside the tassel.
Trim the lower strands evenly.
Cream Tassel
Repeat the same method with cream yarn.
Keep the completed length similar to the red tassel so the finished charm remains balanced.
Golden Yellow Tassel
Repeat the tassel process with golden-yellow yarn.
Place all three tassels beside one another before making the final cut. Trim them so their bottom edges finish within approximately 5 mm of one another.
Bead and Star Charm
Thread a strong red yarn loop through a small wooden star or similar decorative charm.
Add wooden beads above the tassels. Secure each tassel independently instead of relying on one weak strand to support the entire decoration.
Attach the completed charm beside one of the front handle bases.
For a washable tote, make the charm removable. A small loop attachment allows it to be taken off before washing.
Assembly
- Block all 18 floral motifs to one consistent square measurement and allow them to dry completely.
- Join six motifs into the front panel, keeping every flower facing the same direction.
- Join another six motifs into the back panel and compare its dimensions with the front.
- Assemble two two-square side panels and join them between the front and back sections.
- Join the final two motifs to form the base, then attach the base along all four lower edges.
- Work three firm rounds of cream single crochet around the complete bag opening.
- Pin both striped handles in position and compare their working lengths before sewing.
- Sew every handle end across a 5–6 cm attachment area with several reinforcing passes.
- Make the red, cream and yellow tassels, add the beads and star, and attach the finished charm beside one handle.
- Weave structural yarn tails through at least three directional changes, trim them, and add an optional fabric lining.
The finished tote should stand symmetrically when empty, with level upper edging, matching side panels and parallel handle attachments.
7 Technical Tips for a Better Sunflower Granny Square Tote
- Mark every corner. Missing a corner during the squaring round can distort the motif into an irregular shape. Place four markers at equal intervals before working the first cream squaring round.
- Control blocking dimensions. A difference of only 5 mm between neighboring squares becomes visible across a three-motif panel. Block every square against the same measured template.
- Watch petal tension. Sixteen dimensional petals can make the flower cup when the puff stitches are worked too tightly. Correct the petal tension rather than aggressively stretching the cream border during blocking.
- Test handle stretch. A handle that lengthens more than approximately 2 cm under moderate tension can deform during use. Add firm edge rows or cotton reinforcement before attaching it.
- Spread the handle load. Attaching a strap through one or two stitches concentrates weight and can damage the upper border. Use an attachment zone approximately 5–6 cm wide for each strap end.
- Check joining tension. Slip-stitch seams worked more tightly than the granny squares will pull the panel inward. Lay the work flat after each complete seam and correct puckering immediately.
- Secure structural tails. A yarn tail passed through the fabric only once can work loose around handles and seams. Weave structural tails in at least three different directions before trimming them.
Finishing the Tote
Place the completed bag on a flat surface and check all four corners. The base should sit evenly without twisting toward either side.
Inspect every handle attachment from inside the bag. Add another reinforcing pass anywhere the stitches visibly separate when the handle is pulled upward.
If adding a lining, measure the interior only after the crochet assembly is finished. Cut the lining to the actual finished dimensions rather than calculating it from the original granny-square measurements.
A fabric lining is particularly useful when the tote will carry pens, crochet hooks, keys or other narrow objects that could push through spaces in the granny-square fabric.
Conclusion
Block one completed motif before committing yarn to the full set; that measurement determines the tote’s final width, side depth and handle proportions. For the photographed effect, keep the cream frame dominant, use deep red for the compact inner flower and reserve golden yellow for the outer petals and handle accents. Add a lining when the bag will carry small or heavy objects. Save this sunflower granny square tote bag crochet pattern to Pinterest and share your finished version on Instagram with #SunflowerGrannySquareTote. For your own version, will you keep the red petals inside the yellow ring or reverse the two flower colors?









