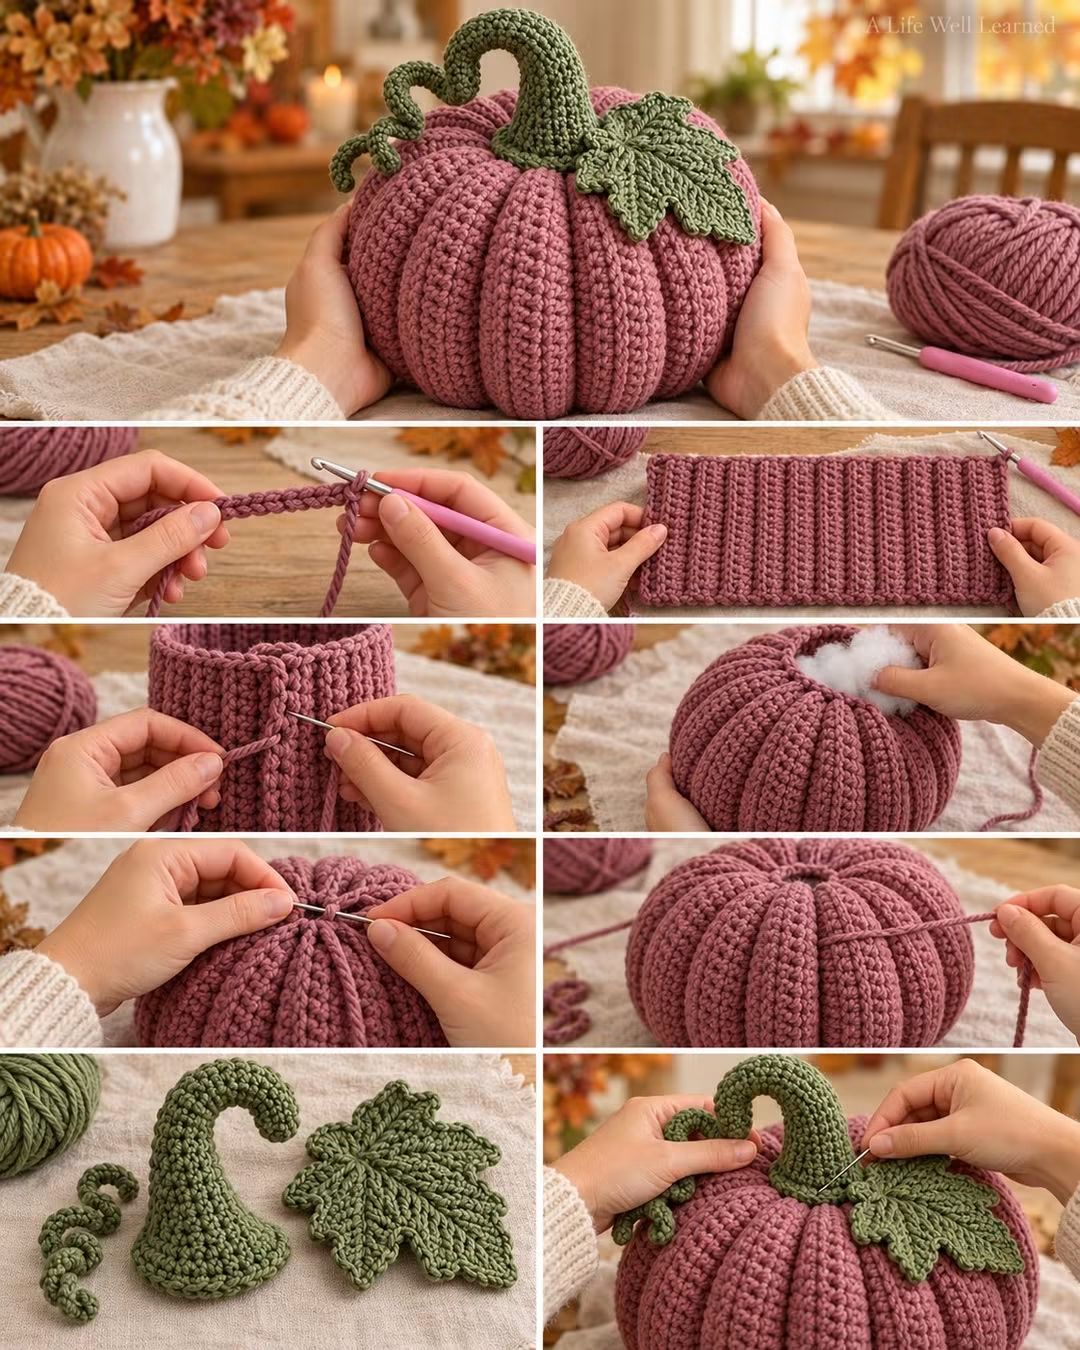
A pumpkin this deeply segmented starts as a rectangle, not a sphere. This ribbed crochet pumpkin pattern turns a dusty-rose crochet panel into a stuffed pumpkin with pronounced vertical ribs, then adds a curved sage stem, veined leaf, and two spiral tendrils. Use worsted or Aran yarn with a 4.5–5 mm hook as a practical starting point. The project suits confident beginners and intermediate crocheters making structured fall décor.
The Design: What Makes This Crochet Pumpkin Different
The body gets its shape from vertical crochet ribbing rather than repeated increase and decrease rounds. Working a flat rectangle through one loop creates parallel ridges; after the short edges are joined, those ridges run from the pumpkin’s top to its base. Gathering both openings converts the tube into a rounded stuffed form.
The second structural decision is proportion. A rectangle that is too short around its circumference produces a narrow pumpkin, while excessive length creates an overfilled sphere. The reference is deliberately broad and squat.
Finally, the oversized green stem, leaf, and tendrils turn a basic stuffed crochet pumpkin into a botanical design. A common failure is excessive stuffing. That stretches the ribbing, opens stitch gaps, and reduces the depth of the vertical channels.
Project Info at a Glance
| Skill Level | Construction | Reference Medium Size | Hook | Best For |
|---|---|---|---|---|
| Confident beginner/intermediate | Flat rectangle, seamed and stuffed | Approx. 9–10 × 10–11 cm | 4.5–5 mm | Fall and Thanksgiving décor |
The published dimensions above provide a medium-pumpkin benchmark rather than the exact size of the photographed piece. The reference image appears larger. Increase both the foundation length and number of ribbed rows when making a substantial centerpiece.
Materials and Tools
Yarn
- Dusty rose worsted/Aran yarn — pumpkin body — approximately 35–40 g for a medium reference size; allow more for the larger photo-inspired version.
- Sage or olive green worsted yarn — stem, leaf, and tendrils.
Use a smooth yarn with enough stitch definition to expose the ribs. The body fabric should be dense enough that white fiberfill does not show through after stuffing.
Tools
- 4.5–5 mm crochet hook
- Polyester fiberfill
- Yarn needle
- Locking stitch markers
- Scissors
- Tape measure
Abbreviations
- ch — chain
- sc — single crochet
- hdc — half double crochet
- dc — double crochet
- sl st — slip stitch
- BLO — back loop only
- FLO — front loop only
- inc — increase
- dec — decrease
- st/sts — stitch/stitches
- RS — right side
- WS — wrong side
An invisible decrease inserts the hook through the front loops of two neighboring stitches before completing one sc; it reduces bulk when shaping amigurumi, although the main pumpkin body here is shaped by gathering rather than decrease rounds.
Ribbed Crochet Pumpkin Pattern — Step by Step
Pumpkin Body
Yarn: dusty rose. Construction: worked flat in rows.
The following dimensions create a larger decorative pumpkin than the published medium-size reference. Make a gauge swatch first if an exact finished measurement matters.
Foundation: Ch 26.
Row 1: Hdc in second ch from hook and each chain across. (25)
Row 2: Ch 1, turn. Hdc BLO in each stitch across. (25)
Rows 3–40: Repeat Row 2. (25)
Do not fasten off immediately. Lay the rectangle flat with the ribs running vertically relative to the intended pumpkin.
The rectangle should be substantially longer than it is tall. If the circumference still looks too narrow for the intended pumpkin, continue adding rows in pairs.
Seaming the Body
Fold the rectangle so Row 1 meets the final row with right sides together.
Sl st through corresponding stitches of both short edges. (25 joining stitches)
Fasten off, leaving a tail of approximately 40–50 cm.
Turn the tube right side out. The ribbed columns should now run vertically from one open edge to the other.
Closing the Pumpkin Base
Thread the long yarn tail through a yarn needle.
Run the needle in and out around one open edge, catching approximately one stitch or row end at regular intervals.
Pull the yarn gradually until the opening closes.
Pass the needle across the gathered center several times and secure it.
Do not cut the yarn directly beside the knot. Weave the remaining tail through several centimeters of dense fabric.
Stuffing the Pumpkin
Turn the closed end downward.
Add polyester fiberfill in small portions rather than inserting one large wad.
Fill the outer circumference first, pushing stuffing toward the ribbed walls. Add more fiberfill through the center until the pumpkin becomes broad and rounded.
Keep approximately 1–2 cm of compressibility when pressing the sides. Packing the fiberfill until the crochet stretches visibly will reduce the rib definition.
Closing the Pumpkin Top
Cut approximately 60 cm of matching dusty-rose yarn and thread the yarn needle.
Work a running stitch around the complete upper opening.
Pull gradually while pushing loose fiberfill away from the gathering line.
When the opening is approximately 2–3 cm across, check the shape from every side.
Add a final small amount of stuffing if necessary.
Pull the opening closed and secure the yarn across the center several times.
Leave the remaining yarn attached for additional shaping.
Defining the Pumpkin Segments
The ribbed fabric already creates visible vertical channels. For deeper segmentation, use the remaining body-color yarn to reinforce selected grooves.
Insert the needle through the top center and bring it out through the bottom center.
Bring the yarn around the outside of the pumpkin along one rib valley.
Insert the needle through the top and bottom centers again.
Pull until a visible indentation forms.
Repeat around the circumference at evenly spaced intervals.
Six to eight shaping lines are usually sufficient for a medium or large decorative pumpkin.
Pull every line to approximately the same tension. Unequal tension produces one compressed side and shifts the top center away from the base.
Curved Green Stem
Yarn: sage green.
Round 1: MR, 6 sc in MR. (6)
Round 2: Inc ×6. (12)
Rounds 3–5: Sc around. (12)
Round 6: Sc 8, sl st 4. (12)
Round 7: Sc 8, sl st 4. (12)
The shorter slip-stitch side begins pulling the stem into a curve.
Round 8: Sc around. (12)
Round 9: Sc 7, sl st 5. (12)
Round 10: Sc around. (12)
Round 11: (Sc, dec) ×4. (8)
Rounds 12–14: Sc around. (8)
Add a small amount of stuffing to the broad lower stem. Leave the curved upper section relatively lightly stuffed so it can retain its hook shape.
Fasten off with a 25 cm sewing tail.
Green Leaf
Yarn: sage green.
Foundation: Ch 13.
Row 1: Beginning in the second chain, work sc, hdc, dc, dc, tr, tr, tr, dc, dc, hdc, sc, then 3 sc in the final chain.
Continue down the opposite side of the foundation chain, mirroring the stitch heights toward the base.
Do not fasten off.
Edging: Work sc around the leaf. At selected positions work (sc, ch 2, sl st in second ch from hook, sc) to form pointed lobes.
Use slip stitches between the points to deepen the indentations.
Fasten off with a 20 cm sewing tail.
Leaf Veins
Join green yarn at the base of the leaf.
Work surface slip stitches along the original foundation chain toward the tip.
Add two or three short diagonal branches on each side.
Keep the surface stitches loose. Tight veins can cause the leaf to curl upward after attachment.
Fasten off and weave the short tail into the back of the leaf.
Large Curly Tendril
Yarn: sage green.
Ch 28.
Starting in the second chain from the hook, work 3 sc in every chain.
The concentrated increases cause the strip to curl naturally.
Fasten off with a 15 cm tail.
Small Curly Tendril
Ch 18.
Work 3 sc in each chain beginning in the second chain from the hook.
Fasten off with a 15 cm sewing tail.
Assembly
- Seam the dusty-rose ribbed rectangle into a tube with all row ends aligned.
- Gather and secure the lower opening before adding any stuffing.
- Fill the pumpkin gradually, distributing fiberfill around the outer walls before filling the center.
- Gather the upper opening and check that it aligns vertically with the bottom center.
- Add six to eight shaping passes through the center if deeper pumpkin segments are required.
- Position the green stem directly over the gathered top opening and pin its broad base in place.
- Sew the stem securely through its lower edge without flattening the curved upper section.
- Position the large green leaf beside the stem and sew its center and lower edge to the pumpkin.
- Attach the large and small tendrils around the stem base, leaving their curled sections free.
- Weave all remaining tails into dense stitches and reshape the ribs by hand.
The completed pumpkin should sit without rolling, show evenly distributed vertical ribs, and support the curved stem without collapsing around the top opening.
7 Technical Tips
- Count all 25 stitches after every ribbed row. Missing the final BLO stitch gradually narrows the rectangle and produces a slanted seam after forty rows.
- Keep the seam within one rib valley. A seam displaced by even one ridge creates a doubled rib that remains visible after stuffing.
- Stop stuffing before stitch gaps expose the white fiberfill. Excessive stuffing stretches the ribbing and makes the pumpkin look spherical instead of segmented.
- Keep the top and bottom gathering centers vertically aligned. A center displaced by 1–2 cm makes the stem lean even when it has been sewn on correctly.
- Use six to eight evenly spaced shaping lines. Irregular spacing produces one wide pumpkin segment beside several narrow ones.
- Stuff only the broad lower section of the stem firmly. Dense fiberfill throughout the upper curve makes the stem resist bending and can pull its base away from the pumpkin.
- Sew the leaf through its center vein and base rather than its entire perimeter. Stitching every edge flat removes the raised botanical structure visible in the reference.
Choosing the Pumpkin Rectangle Size
The flat rectangle controls both height and circumference. Its short dimension becomes the approximate top-to-bottom measurement before gathering, while its long dimension wraps around the pumpkin.
A current ribbed-pumpkin construction uses a rectangle-length formula of approximately 2.5 times the first-row height. Other published methods use roughly a 2:1 rectangle. The ideal proportion changes with yarn elasticity and the amount of stuffing.
For a squat pumpkin similar to the reference, err toward additional circumference rather than excessive height. Make the rectangle longer by adding ribbed rows rather than increasing the foundation chain.
Record the rectangle dimensions before seaming. That measurement is much easier to reproduce than trying to match two stuffed pumpkins by eye.
Choosing Yarn and Hook Size
Worsted or Aran yarn provides a practical balance between stitch definition and project size. Published ribbed pumpkins use hooks around 4.5–5 mm with these yarn weights, while some bulkier constructions use 5.5–6.5 mm hooks.
The correct hook should create a dense fabric. Stretch the swatch lightly before committing to the body. If large holes appear between stitches, reduce the hook size.
Using the same yarn weight for the green accessories keeps the leaf and stem proportional to the body. A slightly smaller hook can make the stem firmer without changing yarn.
Calculating Yarn Requirements
A documented medium worsted pumpkin uses approximately 35–40 g for a body around 9–10 cm high and 10–11 cm in diameter. Larger ribbed pumpkins consume more because both the rectangle height and circumference increase.
The most reliable calculation is sample-based. Weigh the yarn before and after crocheting the completed rectangle, then record the amount consumed before seaming.
Allow additional dusty-rose yarn for gathering and segment shaping. Reserve a separate quantity of green for the stem, leaf, and tendrils.
If several matching pumpkins are planned, purchase the main color from one dye lot. Subtle shade differences become obvious when finished decorations are displayed together.
How to Keep the Pumpkin Ribs Even
The texture depends on inserting the hook through the same loop on every ribbing row. Accidentally working under both loops interrupts the raised line and creates a flat patch.
Place a stitch marker in the first and last stitch while learning the ribbing sequence. Edge stitches are easy to overlook because turning chains can resemble working stitches.
Count rows rather than judging circumference from the unstretched rectangle. Forty uniform rows provide a more reproducible result than stopping when the fabric appears long enough.
After stuffing, run the fingers from top to bottom through each valley. This redistributes fiberfill away from the groove and restores the raised columns.
Making the Stem Hold Its Curve
The curved stem requires unequal stitch height or tension along its two sides. In this reconstruction, short slip-stitch sections contract one side while regular single crochet maintains length on the opposite side.
Do not force the bend by pulling the sewing tail. That can distort the base and create a visible gap where the stem meets the pumpkin.
Shape the stem while adding small amounts of fiberfill. Keep the lower third firm and the upper section softer.
After sewing, rotate the curved tip toward the leaf and tendrils. The accessories should read as one connected top cluster rather than four unrelated pieces.
Conclusion
The rectangle is the measurement that controls this ribbed crochet pumpkin pattern. Crochet and measure the dusty-rose panel before seaming it, then record its stitch and row counts so additional pumpkins can be reproduced accurately. Gather the tube firmly, add fiberfill gradually, and use the existing rib valleys as guides when defining the segments. Finish by attaching the curved sage stem first, followed by the leaf and two spiral tendrils. Share the completed project on Pinterest or Instagram with #DustyRoseCrochetPumpkin. For this specific pumpkin, would you keep the sage-green botanical top or switch the stem and leaf to a darker olive shade?









