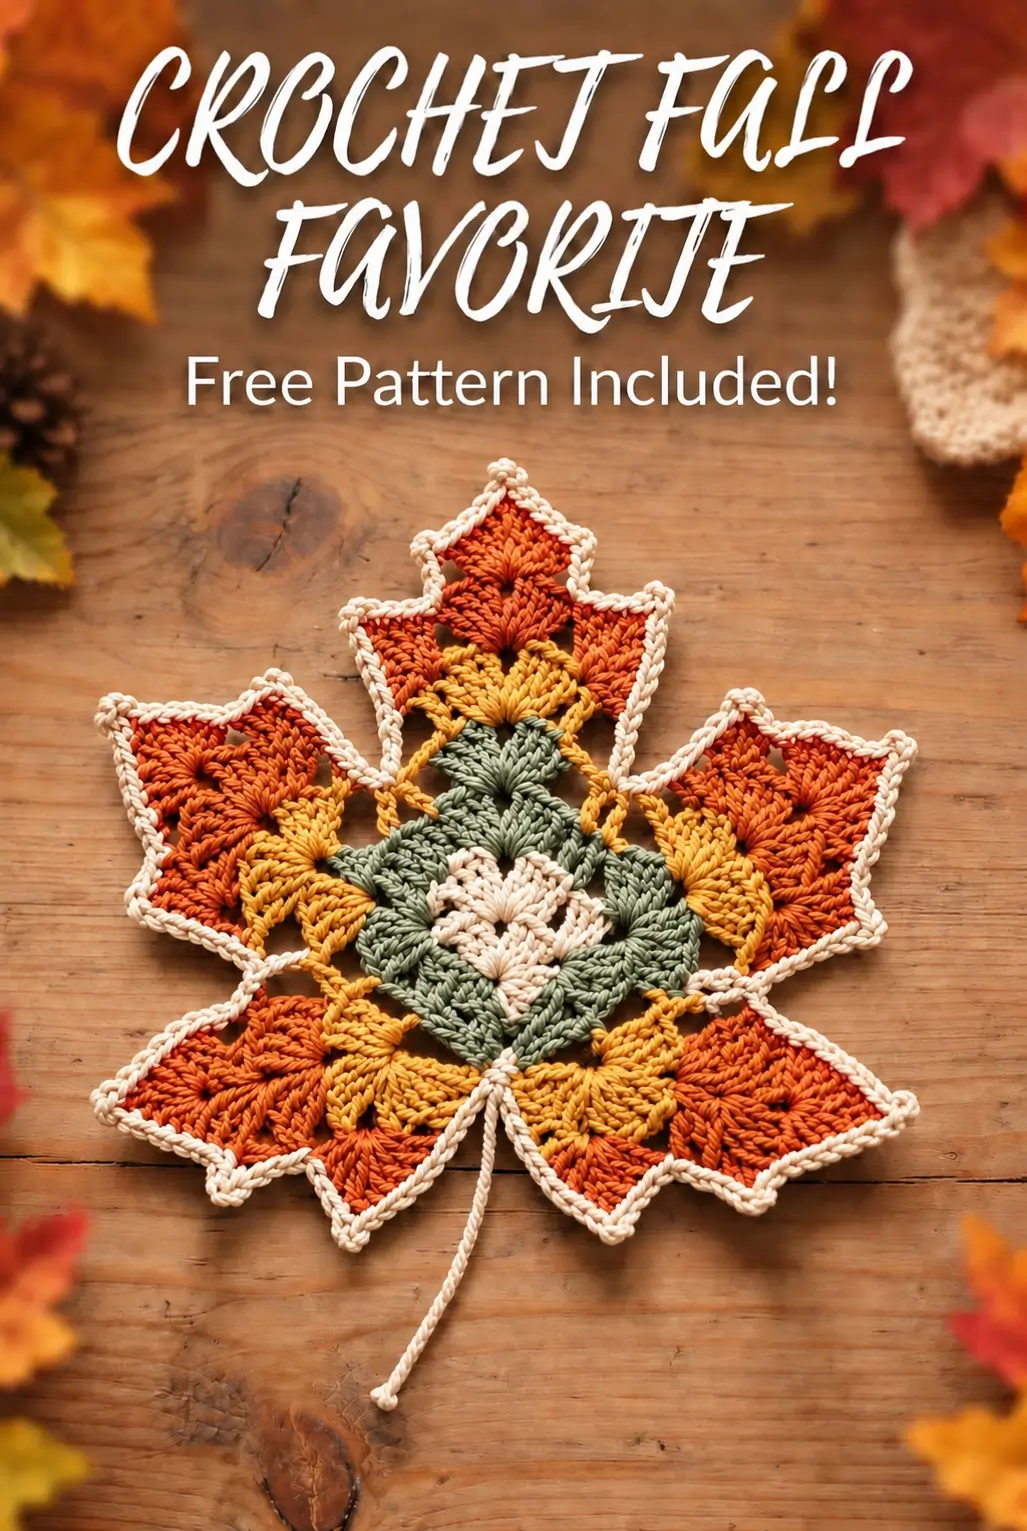
Five pointed lobes have to share one center without turning a maple leaf into a five-pointed star. This crochet maple leaf pattern uses rust orange, mustard yellow, sage green and cream edging to reproduce the layered fall motif in the reference image. Worked with DK or light worsted yarn and a 3.5–4.0 mm hook, the finished leaf can measure approximately 15–17 cm before the stem.
The Design: What Makes This Maple Leaf Different
The photographed motif is larger and more decorative than a basic leaf appliqué. Five distinct lobes create the maple silhouette, with the center point extending farther than the two upper side points. Smaller lower lobes keep the base broad without competing with the central tip.
Color placement adds another structural layer. Sage green occupies the center, mustard forms the transitional sections and rust orange defines the outer lobes. A narrow cream outline separates the leaf from the background and emphasizes every point.
The crochet fall leaf also uses open spaces between sections instead of forming one completely solid disk. A common mistake is adding too many stitches where two lobes meet. That creates rippling. The valleys need fewer stitches than the points so the finished autumn crochet decoration lies flat after blocking.
Project Info at a Glance
| Skill Level | Time | Finished Size | Hook | Best For |
|---|---|---|---|---|
| Intermediate | 1–2 hours | Approx. 15–17 cm plus stem | 3.5–4.0 mm | Table décor, garlands, appliqués and fall displays |
A published DK maple-leaf construction measures approximately 15–17 cm with a 3.5 mm hook. Other patterns demonstrate how strongly scale changes with materials: one worsted-weight maple leaf measures about 7.5 × 10 cm with a 4.25 mm hook, while a large decorative worsted cotton version reaches approximately 25.5 × 23 cm with a 3.5 mm hook. Make one test motif before producing a complete set.
Materials and Tools
Yarn
- Sage green — DK #3 or light worsted #4 — approximately 5–8 g for the center.
- Mustard yellow — DK #3 or light worsted #4 — approximately 5–8 g for the middle sections.
- Rust orange — DK #3 or light worsted #4 — approximately 10–15 g for the five outer lobes.
- Cream — DK #3 or light worsted #4 — approximately 3–5 g for the outline.
The color quantities are working budgets for the photo-inspired motif rather than measurements from the pictured leaf. Published small maple-leaf patterns can use only a few grams, while larger decorative leaves require considerably more yarn.
Tools
- 3.5 mm crochet hook for DK yarn
- 4.0 mm crochet hook for light worsted yarn
- Tapestry needle
- Scissors
- Stitch markers
- Blocking mat
- Rust-resistant pins
Abbreviations
- MR — magic ring
- ch — chain
- sc — single crochet
- hdc — half double crochet
- dc — double crochet
- tr — treble crochet
- dtr — double treble crochet
- sl st — slip stitch
- st/sts — stitch/stitches
- sp — space
- FO — fasten off
Different stitch heights create the points in this pattern: shorter stitches form the valleys while treble and double-treble stitches extend the outer lobes.
Crochet Maple Leaf Pattern — Step by Step
This is an original photo-inspired construction rather than a transcription of a published maple-leaf pattern. The motif is worked from the center outward, followed by individually shaped lobes, a contrasting outline and a stem.
Sage Green Center
Yarn: sage green. Hook: 3.5–4.0 mm.
R1: Make an MR. Ch 1 and work 6 sc into the ring. Join with sl st (6).
R2: Ch 2. Work 2 hdc into each stitch around. Join with sl st (12).
R3: Ch 1. Repeat [sc in next stitch, 2 sc in next stitch] around. Join with sl st (18).
Do not pull the center excessively tight. It should remain flat enough to support the five surrounding sections.
Fasten off sage green.
Five Lobe Foundations
Yarn: mustard yellow.
Mark five approximately equal sections around the center. Because 18 stitches do not divide exactly by five, the spacing is intentionally adjusted rather than mechanically repeated.
Join mustard yarn at the first marked position.
Section 1: Ch 3, dc, tr, dc into the working area, ch 3 and sl st back to the center.
Move to the next marked section.
Section 2: Ch 4, dc, 2 tr, dc, ch 3, sl st to center.
Section 3: Ch 5, tr, dtr, tr, ch 4, sl st to center.
Section 4: Repeat Section 2.
Section 5: Repeat Section 1.
The middle section should already extend farther than the remaining four sections.
Mustard Inner Lobes
Work back across each foundation to increase its width.
On a lower side lobe work:
sc, hdc, dc, tr, dc, hdc, sc.
On each upper side lobe work:
sc, hdc, dc, 2 tr, dc, hdc, sc.
On the central lobe work:
sc, hdc, dc, tr, 2 dtr, tr, dc, hdc, sc.
Fasten off mustard yarn.
The five sections should now be clearly distinguishable, but they do not yet need to resemble finished maple points.
Rust Orange Lower Left Lobe
Yarn: rust orange.
Join at the base of the first mustard section.
Work upward along the edge:
sc, hdc, dc, tr.
At the tip work:
tr, ch 3, sl st into first ch, tr.
Continue down the opposite edge:
dc, hdc, sc.
Sl st into the valley between lobes.
The ch-3 picot creates a defined point rather than a rounded petal.
Rust Orange Upper Left Lobe
Continue with rust orange.
Work:
sc, hdc, dc, tr, dtr.
At the tip work:
dtr, ch 3, sl st into first ch, dtr.
Work down the opposite side:
tr, dc, hdc, sc.
Sl st into the next valley.
This lobe should be larger than the lower lobe but slightly shorter than the central point.
Rust Orange Central Lobe
The central lobe establishes the overall height of the maple leaf.
Work upward:
sc, hdc, dc, tr, dtr, dtr.
At the top work:
dtr, ch 4, sl st into first ch, dtr.
Work downward:
dtr, tr, dc, hdc, sc.
Sl st into the next valley.
The central point should extend approximately 1–2 cm beyond the upper side lobes after blocking.
Rust Orange Upper Right Lobe
Mirror the upper-left lobe.
Work:
sc, hdc, dc, tr, dtr.
At the tip:
dtr, ch 3, sl st into first ch, dtr.
Return with:
tr, dc, hdc, sc.
Sl st into the valley.
Rust Orange Lower Right Lobe
Mirror the lower-left section.
Work:
sc, hdc, dc, tr.
At the tip:
tr, ch 3, sl st into first ch, tr.
Return with:
dc, hdc, sc.
Sl st near the base.
Fasten off rust orange.
Shaping the Valleys Between Points
The indentations between maple lobes are as important as the points themselves.
If a valley looks too shallow, attach rust yarn at its lowest point and work one slip stitch into each of the two neighboring stitches. This pulls the transition inward without changing the outer point.
If the valley pulls too tightly and causes cupping, replace one slip stitch with a single crochet.
Lay the motif flat after adjusting each valley. Do not wait until all five sections have been modified.
Cream Contrast Outline
Yarn: cream.
Join cream yarn at the lower left edge.
Work one loose sc into each available edge stitch.
At each lobe tip work:
sc, ch 2, sc into the point.
At each deep valley, use a slip stitch instead of adding multiple single crochets.
Continue around all five lobes.
Keep the cream outline narrow. Its purpose is to define the rust-orange silhouette rather than create another full color band.
Do not fasten off if the stem will also be cream.
Crochet Stem
From the lower center of the leaf:
Ch 28.
Starting in the second chain from the hook, sl st into each chain back toward the leaf.
Sl st into the base of the motif.
For a thicker stem, work sc instead of sl st along the return chain.
Fasten off and weave the tail through the back of the leaf.
The finished stem should hang freely rather than being blocked rigidly straight.
Optional Raised Center Vein
The photographed motif contains visible lines leading from the center toward the major lobes.
Thread a tapestry needle with cream, mustard or sage yarn.
Begin at the base of the leaf and work a line of surface stitches toward the center.
Branch one line toward each of the five lobes.
Stop the branch approximately 1–2 cm before each point.
Keep the surface stitches relaxed. Tight veins will pull the leaf into a cup.
Optional Surface-Crochet Veins
For stronger relief, replace embroidered veins with surface slip stitches.
Insert the hook from the front near the base of the leaf and pull up a loop.
Follow the visual center of the motif with loose slip stitches.
At the central color section, branch toward the five lobes.
Fasten off each branch on the reverse.
This technique creates more texture but also increases the risk of distortion, so check the motif on a flat surface after each branch.
Blocking the Maple Leaf
Blocking determines whether the five-point silhouette remains sharp.
Pin the central top point first.
Pin the two upper side points next, keeping them slightly lower than the center.
Pin the two lower lobes last.
Adjust the valleys so the five sections remain visually separate.
Pin the base without stretching the stem.
For the large DK version, aim for approximately 15–17 cm from the central point to the base before the stem. This measurement matches a published large decorative DK maple-leaf scale.
Allow the motif to dry completely before removing the pins.
Making a Fall Leaf Garland
Make 7–11 leaves for a short mantel or window garland.
Alternate rust-dominant leaves with mustard, burgundy and sage variations.
Ch approximately 40 cm before attaching the first leaf.
At each leaf position, sl st through the top of the stem or one concealed stitch near the base.
Ch approximately 12–18 cm between motifs.
After attaching the final leaf, ch another 40 cm for the second hanging end.
Do not attach through the central lobe. Hanging from a point can stretch and blunt the maple silhouette.
Making Crochet Maple Leaf Coasters
Use cotton yarn if the motif will function as a coaster.
Reduce the hook to approximately 3.0–3.5 mm when a firmer fabric is required.
Omit the long flexible stem or reduce it to 4–6 chains.
Keep all surface details flat enough that a cup can stand securely on the center.
Published maple-leaf patterns demonstrate a broad size range. Thread versions can measure around 10–11 cm, while large worsted cotton placemat versions can reach approximately 25 cm. Yarn and hook changes are therefore the simplest way to resize this project.
Making a Fall Table Centerpiece
Make leaves in rust, mustard, burgundy, brown and muted green.
Block every motif to the same general shape but allow slight size variation.
Arrange three large leaves around a candle holder or vase.
Place smaller motifs between them with the stems pointing toward the center.
For a washable table arrangement, sew the leaves together only at concealed lower points. The centerpiece can then be moved as one piece without permanently flattening the lobes.
Assembly
- Complete the sage center first. Check that the circle lies flat before adding any mustard sections.
- Mark all five lobe positions. Keep the central lobe aligned with the lower stem position so the finished leaf does not appear twisted.
- Build the mustard foundations. Make the center section longer than the upper side sections and keep the lower lobes shortest.
- Add the rust-orange lobes. Use taller stitches near each point and shorter stitches toward the valleys.
- Inspect all five valleys. Correct any excess fullness before adding the cream outline.
- Work the cream edging. Use a ch-2 point at each lobe tip and a slip stitch through deep valleys.
- Add the stem. Keep its foundation chain relaxed enough to hang without twisting.
- Add optional veins. Stop each branch before the outer point so the cream edging remains visually separate.
- Block the motif. Pin all five points individually and measure the center point before allowing the leaf to dry.
- Weave all remaining tails. Hide them behind matching color sections rather than carrying dark yarn beneath mustard or cream stitches.
The completed motif should have five clearly separated points, a dominant central lobe, defined valleys and a narrow cream outline.
7 Technical Tips for a Better Crochet Maple Leaf
- Prevent a star-shaped leaf. Do not make all five lobes the same length. The center point should finish approximately 1–2 cm beyond the upper side points on a 15–17 cm motif.
- Control valley rippling. Use slip stitches at the deepest indentations instead of adding extra single crochets. Too many stitches between lobes produce a wavy perimeter.
- Stop the center from cupping. Lay the motif flat after every color section. If the center rises more than a few millimeters, loosen the following round rather than relying on aggressive blocking.
- Protect sharp points. Pin through each picot during blocking. An unpinned point can dry rounded and reduce the recognizable maple-leaf silhouette.
- Keep surface veins loose. A vein that shortens a lobe by more than approximately 3 mm is too tight. Remove it and work the surface stitches with additional slack.
- Avoid twisted stems. Make the foundation chain with relaxed tension and work the return slip stitches loosely. Tight return stitches cause the stem to spiral.
- Control the cream edging. Do not force one sc into every tiny side loop. If the edge begins to wave, skip selected loops while maintaining even visual spacing.
How to Change the Leaf Size
Changing yarn and hook size is more reliable than rewriting the five-lobe shaping.
For a small appliqué, use fingering or sport yarn with approximately a 2.5–3.25 mm hook.
For a standard decoration, use DK yarn with a 3.5–4.0 mm hook.
For a larger coaster or garland motif, use worsted yarn with approximately a 4.5–5.0 mm hook.
An oversized decoration can be made with bulky yarn and a 6–7 mm hook, but the valleys may require additional blocking because thicker yarn reduces the visual separation between lobes.
Choosing Fall Colors
The reference motif uses four colors in distinct structural zones. Sage green anchors the center, mustard bridges the center and outer lobes, rust orange supplies the dominant autumn color and cream defines the perimeter.
For a red maple version, replace rust with burgundy or brick red while retaining mustard near the center.
A late-autumn variation can combine dark brown outer lobes, burnt orange inner sections and muted gold around the center.
For a single-color leaf, keep the entire motif rust or red and use surface crochet rather than color changes to define the internal structure.
How Much Yarn Does One Maple Leaf Need?
Yarn consumption varies widely with size. One published small worsted maple leaf uses approximately 4 g, while another worsted pattern specifies roughly 6–8 yards. Larger versions naturally require more.
For the multi-color 15–17 cm motif described here, prepare approximately 25–35 g total across all four colors. This is a conservative project budget rather than an exact consumption claim.
For a garland, make one complete leaf and weigh it. Multiply that number by the planned motif count and add approximately 10 percent for tails, swatching and tension differences.
Conclusion
The maple silhouette depends on unequal lobes, deep valleys and a dominant central point rather than simply adding five identical crochet sections around a circle. Make one complete motif first and block it to the 15–17 cm target before preparing a full garland or table set. Check the valleys before adding the cream outline, keep the surface veins relaxed and leave the stem flexible. Your next step is to crochet the sage center and mark all five lobe positions before introducing the mustard yarn. Save this crochet maple leaf pattern to Pinterest and share your finished fall project on Instagram with #AutumnMapleLeafCrochet. Which lobe color would you change first: rust orange, mustard yellow or sage green?









