Introduction
A bee sitting inside a sunflower only reads correctly when the brown flower center frames its striped body instead of hiding it. This sunflower bee amigurumi crochet pattern uses worsted yarn and a 4 mm hook to make an approximately 27–31 cm display. A yellow-and-black bee, white wings, twelve petals and two broad leaves create an intermediate floral amigurumi construction.
The Design: What Makes This Sunflower Bee Different
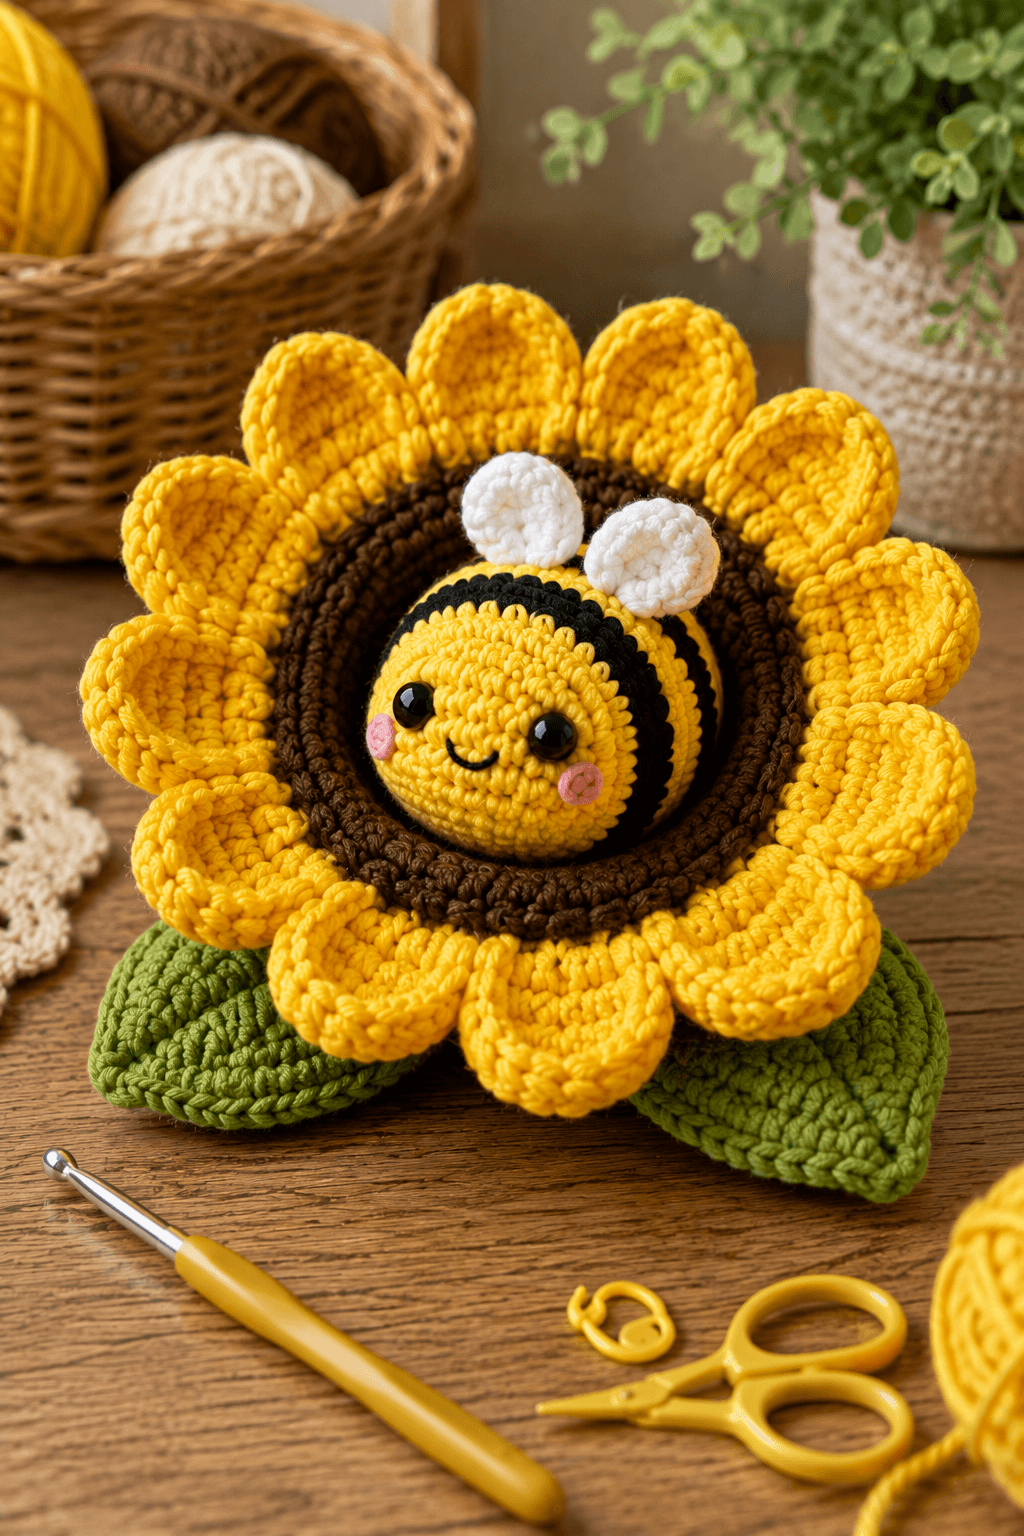
The bee is intentionally smaller than the sunflower center so its face remains framed by brown crochet rather than covering the flower. A 36-stitch head gives enough width for 12–14 mm eyes, pink cheeks and a curved smile, while the striped body uses the same maximum count but gains length through plain rounds. Two white wings rise behind the body and stay visible above the brown center. The sunflower itself combines a padded circular core with twelve separately shaped petals, producing much more depth than a flat crochet applique. Two broad green leaves stabilize the lower silhouette. This crochet bee in sunflower design depends heavily on assembly order. Sewing the brown center closed before test-fitting the bee can leave the opening too narrow and force the striped body to sit unnaturally high.
Project Info at a Glance
| Skill Level | Time | Finished Size | Hook | Best For |
|---|---|---|---|---|
| Intermediate | 12–15 hours | Approx. 27–31 cm wide × 22–25 cm high | 4.0 mm | Spring decor, nursery displays and pollinator-themed collections |
Materials and Tools
Yarn
- Sunflower yellow — worsted / Aran #4 — approximately 120–145 g — bee, petals and flower details.
- Chocolate brown — worsted / Aran #4 — approximately 90–110 g — thick sunflower center.
- Black — worsted / Aran #4 — approximately 30–40 g — bee stripes.
- White / cream — worsted / Aran #4 — approximately 20–25 g — wings.
- Olive green — worsted / Aran #4 — approximately 45–60 g — two large leaves.
- Soft pink — worsted / Aran #4 — approximately 5 g — cheek patches.
- Black embroidery yarn — small amount — smile.
Tools
- 4.0 mm crochet hook
- 12–14 mm safety eyes — 2
- Polyester stuffing — approximately 190–230 g
- Yarn needle
- Long tapestry needle
- 12 locking stitch markers
- Dressmaking pins
- Scissors
For an item intended for a child under three, substitute embroidered eyes for plastic safety eyes.
Abbreviations
- MR — magic ring
- sc — single crochet
- inc — two single crochet stitches in one stitch
- dec — invisible decrease
- sl st — slip stitch
- ch — chain
- hdc — half double crochet
- dc — double crochet
- tr — treble crochet
- BLO — back loop only
- FLO — front loop only
An invisible decrease is worked through the front loops of the next two stitches before completing one single crochet through both loops.
Pattern — Step by Step
Work stuffed amigurumi pieces in continuous spirals unless stated otherwise. Mark the first stitch of every round.
Bee Head
Yarn: sunflower yellow — standard six-stitch amigurumi shaping.
R1: 6 sc in MR (6)
R2: inc ×6 (12)
R3: (sc, inc) ×6 (18)
R4: (2 sc, inc) ×6 (24)
R5: (3 sc, inc) ×6 (30)
R6: (4 sc, inc) ×6 (36)
R7–R11: sc around (36)
R12: (4 sc, dec) ×6 (30)
R13: sc around (30)
R14: (3 sc, dec) ×6 (24)
R15: (2 sc, dec) ×6 (18)
R16: (sc, dec) ×6 (12)
R17: dec ×6 (6)
Insert the safety eyes between R8 and R9 with approximately seven visible stitches between the posts. Begin stuffing after R12 and keep the lower face evenly rounded.
Fasten off. Leave a 35 cm sewing tail and close the remaining six loops.
Bee Body
Yarn: yellow and black.
Begin with yellow.
R1: 6 sc in MR (6)
R2: inc ×6 (12)
R3: (sc, inc) ×6 (18)
R4: (2 sc, inc) ×6 (24)
R5: (3 sc, inc) ×6 (30)
R6: (4 sc, inc) ×6 (36)
R7–R8: yellow sc around (36)
R9–R10: change to black, sc around (36)
R11–R12: change to yellow, sc around (36)
R13–R14: change to black, sc around (36)
R15–R16: change to yellow, sc around (36)
R17: (4 sc, dec) ×6 (30)
R18: (3 sc, dec) ×6 (24)
R19: (2 sc, dec) ×6 (18)
R20: (sc, dec) ×6 (12)
R21: dec ×6 (6)
Stuff after R16. Keep the body firm through the middle stripes because it will be anchored inside the sunflower center.
Fasten off and close.
White Wings (Make 2)
Yarn: white / cream.
R1: 6 sc in MR (6)
R2: inc ×6 (12)
R3: (sc, inc) ×6 (18)
R4–R5: sc around (18)
R6: (sc, dec) ×6 (12)
Flatten without stuffing and work 6 sc through both layers.
The finished wings should remain approximately 5–6 cm tall and slightly oval.
Fasten off. Leave a 25 cm tail.
Cheek Patches (Make 2)
Yarn: soft pink.
R1: 6 sc in MR (6)
Join with sl st.
Fasten off. Leave a 10 cm sewing tail.
Bee Smile
Yarn: black embroidery yarn.
Mark the mouth approximately one round below the midpoint between the eyes.
Embroider a shallow upward curve approximately 25–30 mm wide.
Secure the ends inside the head.
Sunflower Brown Center — Back Disc
Yarn: chocolate brown.
R1: 6 sc in MR (6)
R2: inc ×6 (12)
R3: (sc, inc) ×6 (18)
R4: (2 sc, inc) ×6 (24)
R5: (3 sc, inc) ×6 (30)
R6: (4 sc, inc) ×6 (36)
R7: (5 sc, inc) ×6 (42)
Fasten off. Leave a 60 cm tail.
Sunflower Brown Center — Front Ring
Yarn: chocolate brown.
R1: 6 sc in MR (6)
R2: inc ×6 (12)
R3: (sc, inc) ×6 (18)
R4: (2 sc, inc) ×6 (24)
R5: (3 sc, inc) ×6 (30)
R6: (4 sc, inc) ×6 (36)
R7: (5 sc, inc) ×6 (42)
R8–R10: sc around (42)
Do not close the center over the bee yet. The front section functions as a padded ring surrounding the striped body.
Fasten off. Leave a 60 cm sewing tail.
Sunflower Petals (Make 12)
Yarn: sunflower yellow.
Ch 11.
Starting in the second chain from the hook:
sl st,
sc,
hdc,
dc,
2 tr,
dc,
hdc,
sc,
sl st.
Work 4 sc into the final chain.
Continue down the opposite side:
sl st,
sc,
hdc,
dc,
2 tr,
dc,
hdc,
sc,
sl st.
Finished petals should measure approximately 7–8 cm. Curve each petal slightly inward before sewing to match the cupped shape visible in the photo.
Fasten off. Leave a 25 cm sewing tail.
Petal Edge Round
Join yellow at the lower edge of one petal.
Work relaxed sl st around the entire outer edge.
Fasten off.
Stop if the edge pulls the petal into a cup deeper than approximately 15 mm.
Repeat for all twelve petals.
Large Green Leaves (Make 2)
Yarn: olive green.
Ch 13.
Starting in the second chain from the hook:
sl st,
sc,
hdc,
2 dc,
3 tr,
2 dc,
hdc,
sc.
Work 5 sc into the final chain.
Continue down the opposite side with the stitches in reverse order.
The finished leaves should measure approximately 10–12 cm long and remain broad through the middle.
Fasten off. Leave a 30 cm sewing tail.
Leaf Center Vein
Thread the green tail through a yarn needle.
Work one surface stitch from the leaf base to the tip along the foundation chain.
Add two short diagonal veins on each side.
Do not tighten enough to curl the leaf.
Optional Bee Stinger
Yarn: black.
R1: 6 sc in MR (6)
R2: sc around (6)
R3: (sc, dec) ×2 (4)
Fasten off. Leave a 15 cm tail.
The stinger is optional because the rear of the bee is largely hidden inside the flower center.
Assembly
- Sew the two pink cheek patches below the bee’s eyes and embroider the curved smile before joining the head and striped body.
- Attach the bee head to the yellow end of the striped body through a circular seam approximately 5 cm wide, keeping the eye line horizontal.
- Sew the two white wings to the upper rear of the body, spacing their bases approximately 2–3 cm apart and angling the rounded ends upward.
- Lay the brown back disc flat and arrange the twelve sunflower petals evenly around its circumference, with their attachment centers approximately 30 degrees apart.
- Sew only the lower 15–20 mm of each yellow petal to the brown disc so the majority of every petal remains free and dimensional.
- Position the two green leaves behind the lower quarter of the flower, one pointing down-left and one down-right, then sew through the lower third of each leaf.
- Place the brown front ring over the petal bases and sew its outer 42-stitch edge to the back disc, adding stuffing between the two brown layers to form a thick raised sunflower center.
- Insert the bee through the center opening and position it so approximately the front half of the striped body projects beyond the brown ring.
- Tack the hidden bee body to the brown back disc at four points and add stuffing around the cavity until the bee remains upright without compressing the petals.
- Rotate the completed sunflower on a hard surface, compare opposite petal lengths and leaf angles, then weave all structural tails through at least 4 cm of matching crochet.
The completed piece should show a centered yellow-and-black bee, two visible white wings, an even brown sunflower center, twelve cupped yellow petals and two broad green leaves supporting the lower silhouette.
7 Technical Tips
- Bee sinking into the flower: A loosely filled brown cavity lets the striped body slide backward. Tack the body at four points and keep approximately 6–8 cm of the bee visible beyond the front ring.
- Petals disappearing: Sewing more than 20 mm of each petal beneath the brown ring reduces the flower diameter. Fix only the lower 15–20 mm and inspect all twelve pieces before covering their bases.
- Sunflower becoming oval: Unequal petal spacing exaggerates one axis. Mark twelve attachment points at approximately 30-degree intervals around the 42-stitch center before sewing.
- Bee eyes looking uneven: A one-round height difference is visible on a 36-stitch face. Insert both safety eyes between R8 and R9 before adding stuffing and count approximately seven visible stitches between the posts.
- Wing tips collapsing behind the flower: Wings sewn too low disappear against the brown center. Attach their bases high on the body and leave approximately 4–5 cm of each white oval visible above the bee.
- Petal edges curling too tightly: A firm slip-stitch border can shorten the perimeter. Work the edging with relaxed tension and limit the finished cup depth to approximately 15 mm.
- Leaves folding under the flower: Sewing the complete leaf surface removes its supporting width. Attach only the lower third and keep approximately 7–9 cm of each leaf projecting beyond the sunflower.
Conclusion
Check all twelve petal positions before fixing the bee because the flower ring establishes the symmetry of the entire project. The next practical step is to pin the brown center, petals and leaves together without sewing, then compare the top, side and lower spacing from directly in front. Install the bee only after that circle is balanced. Share the finished sunflower bee amigurumi crochet pattern project on Pinterest with a centered front photograph, then post a close view of the striped bee and cupped petals on Instagram using #SunflowerBeeAmigurumi. For this sunflower specifically, would you keep the brown center dark chocolate or switch it to a warmer chestnut shade?









