Introduction
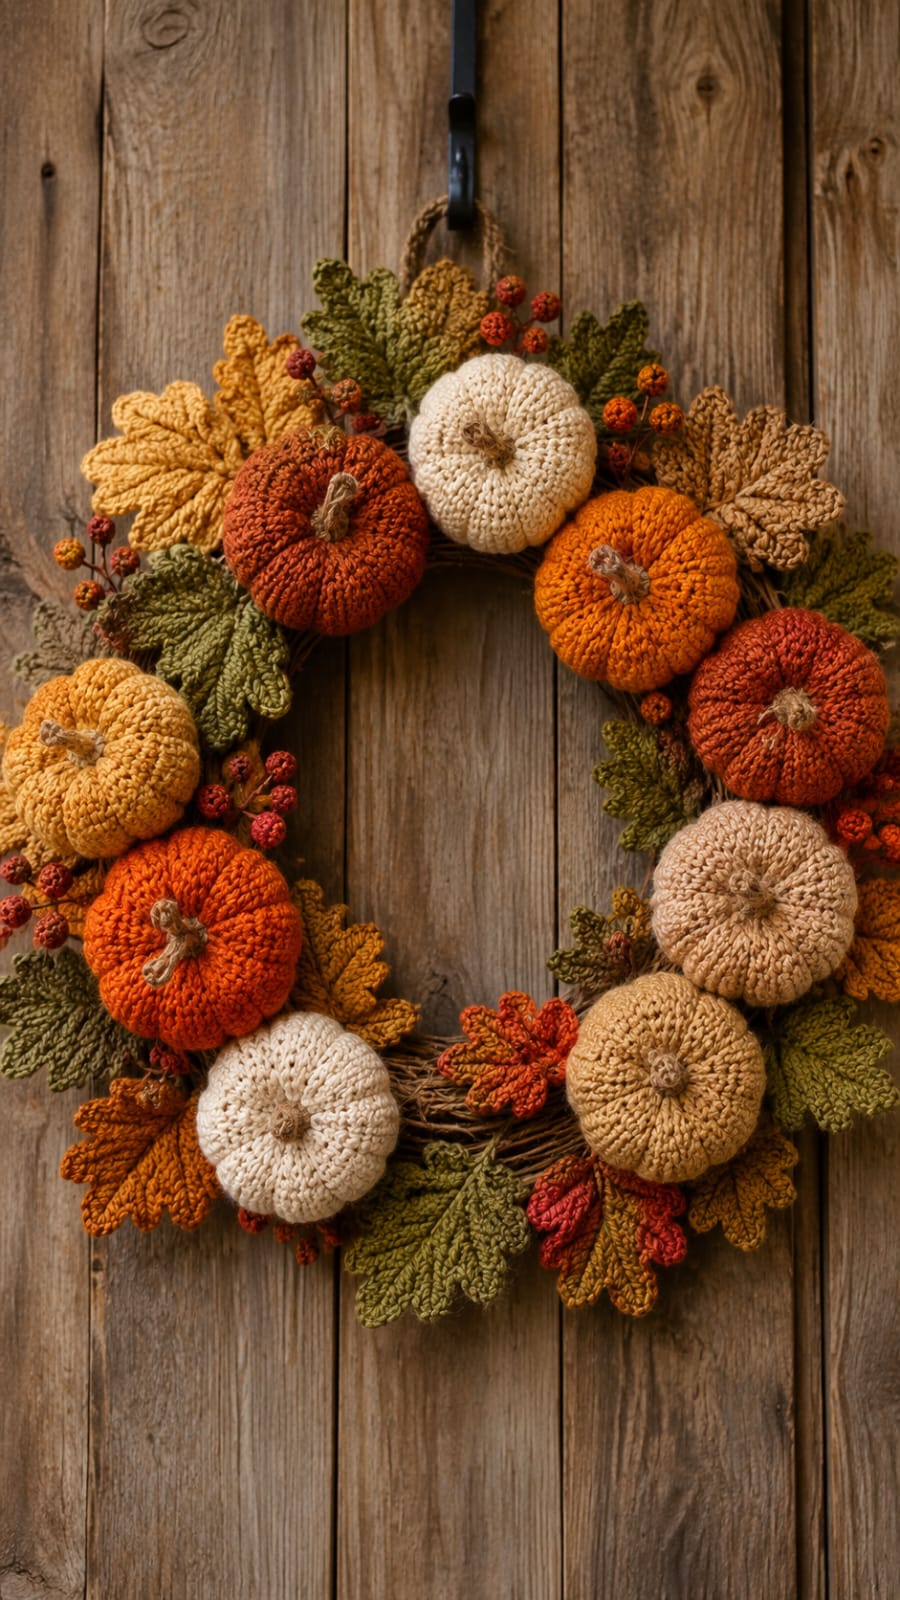
Eight pumpkins cannot sit evenly around one wreath unless the leaves first create a second, wider silhouette behind them. This crochet autumn pumpkin wreath pattern uses DK-to-worsted yarn, a 4 mm hook, eight stuffed pumpkins, approximately twenty leaves, berry clusters, and a 40–45 cm wreath form. The project is intermediate because pumpkin sculpting, layered foliage, color distribution, and secure vertical assembly all affect the finished shape.
The Design: What Makes This Autumn Wreath Different
The pumpkins are not confined to one bottom cluster. They travel around almost the complete circle, alternating orange, rust, mustard, cream, and camel so no single color forms a heavy block. Leaves create the outer silhouette first, while berry sprays occupy narrow spaces between larger components. The pumpkins then sit on top of that foliage layer. This arrangement gives the crochet fall wreath pattern depth without requiring a bulky crocheted wreath cover. A second structural choice is scale: each pumpkin remains near 8–11 cm wide, large enough to show sculpted ribs but small enough to fit eight pieces around the form. One common failure is attaching pumpkins directly to the wreath before the leaves. The later foliage then has nowhere to tuck behind the stuffed pieces, producing a flat ring with exposed gaps instead of the dense botanical edge visible in the photograph.
Project Info at a Glance
| Skill Level | Time | Finished Size | Hook | Best For |
|---|---|---|---|---|
| Intermediate | 18–24 hours | Approx. 42–46 cm diameter | 4.0 mm | Autumn door, wall, mantel, or Thanksgiving décor |
Materials and Tools
Yarn
- Pumpkin orange — DK/light worsted or worsted — approximately 70–90 g — two pumpkins and berries
- Deep rust — same yarn weight — approximately 70–90 g — two pumpkins and berry accents
- Warm cream — same yarn weight — approximately 70–90 g — two pumpkins
- Mustard gold — same yarn weight — approximately 35–45 g — one pumpkin and leaves
- Camel / tan — same yarn weight — approximately 35–45 g — one pumpkin and tan foliage
- Olive green — same yarn weight — approximately 70–90 g — green leaves
- Golden brown — same yarn weight — approximately 35–50 g — autumn leaves
- Dark brown — same yarn weight — approximately 15–20 g — pumpkin stems
Tools
- 4.0 mm crochet hook
- 40–45 cm grapevine, wire, or foam wreath form
- Polyester stuffing
- Large-eye yarn needle
- Long doll needle for pumpkin sculpting
- Locking stitch markers
- Strong sewing thread or matching yarn
- Floral wire, optional
- Scissors
- Rust-resistant pins
- 30–35 cm hanging cord or jute loop
A grapevine form gives the closest photo match because small sections of brown structure remain visible between the crochet elements. A foam ring can also be used, but cover exposed areas with brown yarn or foliage before attaching the pumpkins.
Abbreviations
MR — magic ring
sc — single crochet
inc — increase, 2 sc in one stitch
dec — invisible decrease
sl st — slip stitch
ch — chain
hdc — half double crochet
dc — double crochet
tr — treble crochet
BLO — back loop only
For an invisible decrease, insert through the front loops of the next two stitches, draw up a loop, then complete both stitches together as one single crochet.
Pattern — Step by Step
Work the stuffed pumpkins in continuous spirals. Leaves are worked flat. This is an original photo-matched construction based on standard amigurumi shaping and wreath assembly.
Small Sculpted Pumpkins — Make 8
Make two pumpkin orange, two rust, two cream, one mustard, and one camel.
R1: 6 sc in MR (6)
R2: inc ×6 (12)
R3: (sc, inc) ×6 (18)
R4: (2 sc, inc) ×6 (24)
R5: (3 sc, inc) ×6 (30)
R6: sc around (30)
R7: sc around (30)
R8: sc around (30)
R9: sc around (30)
R10: sc around (30)
R11: sc around (30)
R12: sc around (30)
R13: sc around (30)
R14: sc around (30)
Begin stuffing. Keep the pumpkin broad and slightly flattened rather than spherical.
R15: (3 sc, dec) ×6 (24)
R16: (2 sc, dec) ×6 (18)
Add the remaining stuffing firmly. Leave a slight indentation at the upper and lower centers.
R17: (sc, dec) ×6 (12)
R18: dec ×6 (6)
Fasten off with a 25 cm tail.
Thread the tail through the remaining six front loops and close.
Pumpkin Sculpting
Cut approximately 90–110 cm of matching pumpkin yarn.
Thread the long needle and pass it from the bottom center to the top center.
Carry the yarn down the outside and pass through the center again.
Pull until the first vertical groove forms.
Make the opposite groove second.
Divide each half twice more to form six sections.
Repeat until every pumpkin has six visible lobes.
Do not pull one ridge to full depth before establishing all six. Tighten them gradually in opposing pairs.
Brown Pumpkin Stems — Make 8
Yarn: dark brown.
R1: 6 sc in MR (6)
R2: sc around (6)
R3: sc around (6)
R4: sc around (6)
R5: sc around (6)
For two larger pumpkins, add:
R6: sc around (6)
Fasten off with a 20 cm sewing tail.
Stuff only the lower half if the stem collapses in the selected yarn.
Large Five-Lobed Maple Leaves — Make 10
Use olive, mustard, rust, and camel in mixed quantities.
R1: 6 sc in MR (6)
R2: inc ×6 (12)
R3: *ch 9, beginning in second ch from hook work sl st, sc, hdc, dc, tr, dc, hdc, sc; sl st in next 2 base stitches*.
Repeat the branch sequence five times, varying the center branch by adding two extra chains so the middle lobe is longer.
Fasten off with a 25 cm tail.
Gently block each leaf so the five lobes remain separate.
Medium Pointed Leaves — Make 8
Use olive and golden brown.
Ch 11.
Starting in second ch from hook:
sl st,
sc,
hdc,
dc in next 2 ch,
tr in next 2 ch,
dc,
hdc,
3 sc in final ch.
Continue down the opposite side:
hdc,
dc,
tr in next 2 ch,
dc in next 2 ch,
hdc,
sc,
sl st.
Fasten off with a 20 cm sewing tail.
Small Filler Leaves — Make 6
Ch 8.
Starting in second ch:
sl st, sc, hdc, dc, hdc, sc, 3 sc in final ch.
Continue down opposite side:
sc, hdc, dc, hdc, sc, sl st.
Fasten off.
Rust Berry — Make 14
Yarn: rust red.
R1: 6 sc in MR (6)
R2: inc ×6 (12)
R3: sc around (12)
R4: dec ×6 (6)
Add a pinch of stuffing before closing.
Fasten off and close.
Orange Berry — Make 12
Yarn: pumpkin orange.
R1: 6 sc in MR (6)
R2: inc ×6 (12)
R3: sc around (12)
R4: dec ×6 (6)
Stuff lightly and close.
Berry Stems — Make 8
Yarn: olive, brown, or rust.
Ch 14.
Sl st back through all 13 chains.
Fasten off with a long tail.
Attach three or four berries at staggered positions along each stem.
Hanging Loop
Use jute cord, brown yarn held double, or a crocheted cord.
Ch 40.
Sl st in second chain from hook and in each remaining chain.
Fasten off.
Fold the cord in half and attach it to the top-rear portion of the wreath form.
Color Plan
Do not place the pumpkins in a simple repeating color order.
A photo-matched arrangement can use:
12 o’clock: cream.
1:30: pumpkin orange.
3 o’clock: rust.
4:30: camel.
6 o’clock: cream.
7:30: pumpkin orange.
9 o’clock: mustard.
10:30: rust.
This keeps matching colors separated and prevents one side from becoming visually heavier.
Preparing the Wreath Base
Place the empty wreath form flat on a work surface.
If using grapevine, remove only sharp protruding twigs that could snag the crochet pieces.
If using wire, wrap the frame in brown or olive yarn before assembly.
For foam, cover the visible front surface with brown yarn or a narrow crocheted strip.
Attach the hanging loop before the foliage. Once the pumpkins are installed, the rear center becomes harder to access.
Building the Foliage Layer
The leaves form the first decorative layer.
Place one large leaf behind each future pumpkin position.
Angle alternate leaves toward the outside and inside of the wreath.
Add medium leaves between those anchor points.
The reference uses enough foliage that the outer diameter becomes several centimeters wider than the rigid wreath form.
Pin or loosely tie the leaves before permanently attaching them.
Keep approximately one-third of every leaf hidden beneath the future pumpkin layer. The visible two-thirds should project far enough to create a jagged autumn silhouette.
Attaching the Pumpkins
Place all eight pumpkins on the pinned foliage before securing any one of them.
The pumpkins should overlap the inner and outer edges of the wreath form slightly.
Do not align all pumpkin centers on one exact circular line. Shift some 1–2 cm inward or outward to create depth.
For sewn assembly, pass a long strand through the lower back of a pumpkin, around the wreath frame, and back into the pumpkin.
Repeat through a second anchor point.
For wire assembly, run floral wire through the lower back stitches and twist it behind the form.
Each pumpkin needs at least two attachment points so it cannot rotate when the wreath hangs vertically.
Adding the Berry Clusters
Berry clusters solve small composition gaps that are too narrow for another leaf.
Tuck the stems between neighboring pumpkins and position the berries in groups of three or four.
Use rust near cream pumpkins and orange near olive foliage for visible contrast.
Do not distribute berries with mathematical regularity.
The supplied wreath shows small clusters concentrated around gaps and transitions rather than one identical spray beside every pumpkin.
Assembly
- Finish and sculpt all eight pumpkins, attach their brown stems, and arrange them around the empty wreath to confirm that their combined circumference fits the selected form.
- Attach the hanging loop securely to the rear of the wreath before any foliage blocks access to the top section.
- Place the ten large maple-style leaves around the form, alternating inward and outward angles so their points extend beyond both wreath edges.
- Fill the spaces with eight medium pointed leaves and six smaller leaves, keeping roughly one-third of each leaf hidden beneath future pumpkin positions.
- Lay all eight pumpkins over the foliage using the planned cream, orange, rust, camel, and mustard distribution, then photograph the arrangement before moving any pieces.
- Secure each pumpkin at two points through its lower back and the wreath frame, keeping the stems approximately radial rather than all perfectly vertical.
- Insert berry sprays between neighboring pumpkins, concentrating the berries where bare wreath structure remains visible.
- Add any remaining small leaves behind berry stems and under pumpkin edges until exposed framework is limited mainly to the inner ring.
- Lift the wreath vertically and check for rotating pumpkins, sagging foliage, or pieces that obscure the center opening; reinforce weak attachment points from the back.
- Weave or trim all visible tails, straighten each pumpkin stem, spread the maple lobes, and check that the hanging loop holds the full wreath without changing its orientation.
The finished wreath should retain an open center while eight pumpkins form an irregular outer ring over layered foliage and small berry clusters.
7 Technical Tips
- Pumpkin rotation: One attachment point allows a stuffed pumpkin to turn when the wreath hangs. Anchor every pumpkin to the frame at two points spaced approximately 3–4 cm apart.
- Flattened foliage: Leaves sewn completely beneath a pumpkin disappear from the front. Leave at least two-thirds of each 8–10 cm leaf visible beyond the pumpkin edge.
- Uneven pumpkin ribs: Tightening the first sculpting strand fully before placing the remaining grooves produces unequal lobes. Establish all six channels first, then tighten opposite pairs in stages.
- Closed center opening: Pumpkins shifted too far inward make the wreath look like a solid disk. Keep no more than approximately one-third of each pumpkin diameter projecting into the opening.
- Berry sagging: A 13-chain berry stem can fold under three stuffed berries if crocheted loosely. Use a hook 0.5 mm smaller for the stems or insert thin floral wire when the cluster drops more than 2 cm.
- Color imbalance: Two cream or two rust pumpkins adjacent to one another create an obvious block on a circular wreath. Separate matching pumpkin colors with at least one different-color pumpkin.
- Hanger shift: Installing the loop after assembly can move the visual top away from the intended cream pumpkin. Test the empty wreath vertically and mark the 12 o’clock position before attaching leaves.
How the Eight-Pumpkin Layout Works
A wreath can hold many small motifs, but eight medium pumpkins are enough to establish the full circular rhythm shown in the photograph.
Each pumpkin occupies roughly one eighth of the ring while overlapping nearby leaves and berries.
The shapes do not need equal visible widths. A cream pumpkin can sit slightly farther inward, while a rust pumpkin can project toward the outer edge.
That variation prevents the wreath from looking like eight identical objects attached at fixed compass points.
Position opposite pumpkins first. Add the remaining six between them. This gives more control than starting at the top and working clockwise.
Keeping the Pumpkins Compact
The 30-stitch plateau is appropriate for a small decorative pumpkin in DK-to-worsted yarn.
A 36- or 42-stitch body would create fewer, larger pumpkins and change the balance of the wreath.
Stuff each piece firmly enough to maintain rounded lobes but not so firmly that the sculpting strands barely compress the fabric.
Before adding the grooves, press the top and bottom centers toward each other slightly.
The unsculpted form should already be wider than tall.
Once all six ridges are tightened, the finished pumpkin generally becomes shorter and visually broader.
Using Several Autumn Neutrals
The palette depends on warm variations rather than one bright orange.
Cream lightens the top and lower-left areas. Camel and mustard bridge the gap between ivory and pumpkin orange. Rust introduces the darkest warm value.
Olive foliage then provides the principal cool contrast.
If substituting colors, keep at least one pale neutral, one golden tone, one bright pumpkin orange, one dark rust, and one muted green.
A wreath made from eight identical orange pumpkins would still function structurally but would lose the layered harvest appearance of the reference.
Making the Maple Leaves Large Enough
The photograph uses foliage with visible lobes even after the pumpkins are attached.
A published maple-leaf reference produces approximately 10 × 10 cm leaves in DK cotton with a 3 mm hook. :contentReference[oaicite:16]{index=16}
That is a useful target range.
If the selected leaf measures only 5–6 cm, it will function as filler but cannot form the wreath’s outer silhouette.
Use several leaf sizes. Place the largest pieces behind the pumpkins and reserve the smaller pointed leaves for narrow gaps.
Building Berry Sprays Instead of Individual Berries
Attaching each berry separately adds unnecessary sewing and makes the composition look dotted rather than botanical.
Group three or four berries onto one crocheted stem.
Place the highest berry near the end of the stem and the others at staggered positions 1–2 cm below it.
Several sprays can then be tucked under one pumpkin edge and secured at a single lower point.
The stems should remain mostly hidden. Their purpose is to position the berries, not create a visible branch network across the pumpkins.
Choosing the Wreath Form
A rigid frame is preferable to a fully stuffed crochet ring for this specific design.
The pumpkins, leaves, and berries already supply substantial crochet texture. A grapevine form adds a narrow brown structure around the inner opening and resembles the natural base visible in the reference.
Current free tutorials use both wire forms and styrofoam wreaths in the 14–18 inch range, while one published pumpkin wreath specifically uses a 15.9-inch form. :contentReference[oaicite:17]{index=17}
A 40–45 cm form therefore gives enough circumference for eight 8–11 cm pumpkins without forcing them into one dense cluster.
Sewn Assembly Versus Floral Wire
Sewing produces an all-yarn finish and works well on wire or yarn-wrapped forms.
Grapevine wreaths can be harder to penetrate with a yarn needle. In that case, thin floral wire can pass through several back crochet stitches and wrap around the vine structure.
Current fall-wreath instructions also use floral wire through the bottoms of pumpkins as a removable or secure attachment method. :contentReference[oaicite:18]{index=18}
Whatever method is chosen, keep the fastener behind the pumpkin.
Never wrap visible wire across the front or around the stem.
Checking the Wreath in Vertical Position
A composition that looks balanced on a table can change once gravity acts on the pumpkins.
After attaching only two or three pieces, hang the wreath temporarily.
Repeat the check after the full pumpkin layer is secured.
Look specifically at the lower third, where heavy stuffed components can pull foliage downward.
If a pumpkin rotates, add a second rear attachment point.
If a large leaf folds behind the form, stitch its base 1–2 cm farther outward.
Do the final berry placement while the wreath is vertical whenever possible.
Competition Gap
Current autumn wreath patterns often combine crochet with premade floral picks, sunflowers, mushrooms, ribbon, foam forms, or only a few pumpkins. A current Etsy autumn-wreath pattern includes pumpkins, leaves, and berries, but recent buyer feedback specifically mentions limited photographs and missing decorative elements in the supplied instructions. :contentReference[oaicite:19]{index=19}
The supplied reference offers a clear content opportunity: every major visible seasonal element can be constructed in yarn, and the assembly can be documented as a deliberate three-layer system of foliage, pumpkins, and berry fillers.
That makes the strongest angle a complete crochet pumpkin and leaf wreath rather than another isolated pumpkin pattern attached to purchased greenery.
Estimating Yarn From the First Pumpkin
Finish one 30-stitch pumpkin before purchasing or dividing all colors.
Weigh it before adding the stem.
If one finished pumpkin uses 34 g, eight pumpkins require approximately 272 g of body yarn before allowing for sculpting strands and gauge differences.
Weigh one large leaf as well.
Multiply by ten, then add the medium and filler pieces separately.
This approach matters because equal-weight skeins can have very different meterage depending on fiber and twist.
Reserve at least 10% extra yarn in orange and rust because those colors are also used in the berry clusters.
Finishing Checks
Hang the finished wreath at eye level.
Check that the center remains visibly open and roughly circular.
Count all eight pumpkins and confirm that repeated colors are separated.
Look around the outer edge next. Leaf tips should project at different distances rather than forming one smooth ring.
Inspect the berries from several feet away. They should fill gaps without competing with the pumpkins.
Turn the wreath over and check every structural connection from the back.
Finally, shake the form gently. No pumpkin should rotate, no berry spray should drop below its intended position, and the hanging loop should remain centered.
Conclusion
Make all eight 30-stitch pumpkins before fixing anything to the wreath, because their actual blocked and sculpted diameter determines the spacing for this crochet autumn pumpkin wreath pattern. Build the foliage layer first, position the pumpkins second, and reserve berries for the remaining gaps. The next concrete step is to mark eight approximate pumpkin locations around a 40–45 cm form and photograph the dry layout before sewing. Share a close-up of the layered leaves on Pinterest and the finished door wreath on Instagram with #AutumnPumpkinCrochetWreath. Which pumpkin would you place at the 12 o’clock position: cream, rust, or orange?









