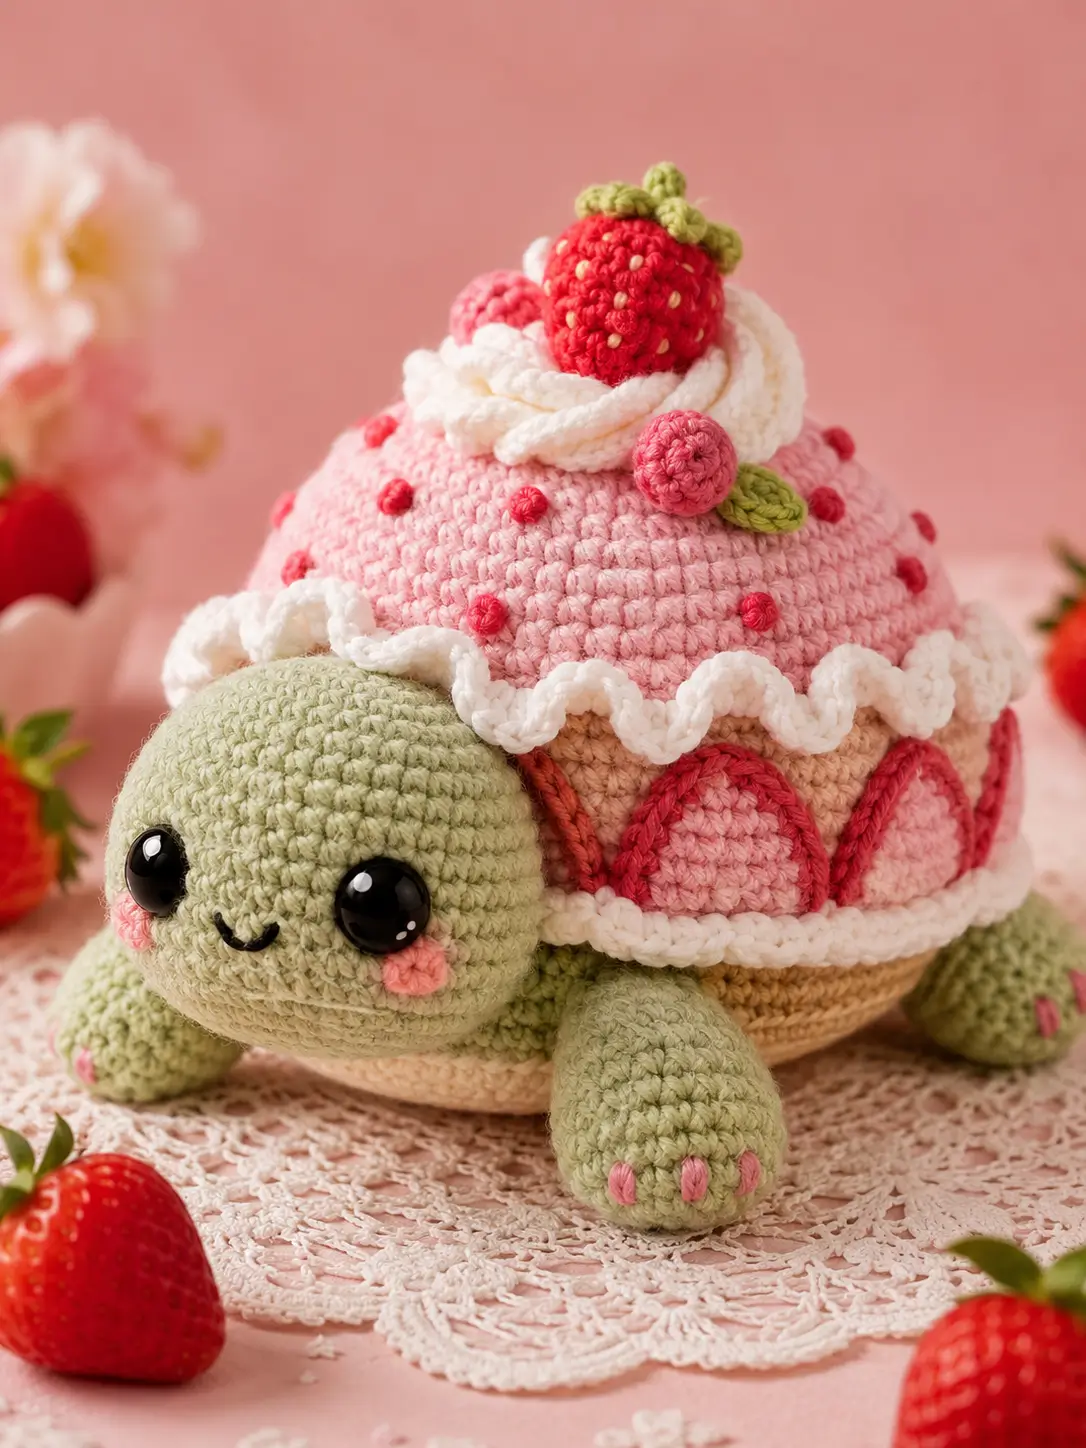
A strawberry shortcake turtle has to carry a dessert dome without losing the flat, forward turtle profile. This strawberry shortcake turtle amigurumi pattern uses chunky yarn, a 5 mm hook, 12 mm safety eyes, and a large shell worked to about 23–25 cm long. Skill level: advanced beginner. Make it when a market table needs one dessert-themed animal with clear structure.
The Design: What Makes This Turtle Different
The shell is not a plain oval. It is built as a raised pink cake dome, then dressed with white scallops, red dots, cream piping, and a strawberry topper so the crochet turtle plushie reads as shortcake from every angle. You shape the head wider than a mini strawberry turtle crochet pattern because the large cake shell would otherwise make the face look too small; the maker then treats the flippers as stabilizers, not decoration. The front legs sit wider than the back legs to stop the dessert turtle amigurumi from tipping forward. A common mistake is sewing the cream ruffle too low, which hides the tan cake panels and makes the shell look like a flower instead of layered cake. Use the scallop line as the divider between sponge and frosting.
Project Info at a Glance
| Skill Level | Time | Finished Size | Hook | Best For |
|---|---|---|---|---|
| Advanced beginner | 5–7 hours | 23–25 cm long | 5.0 mm | Market plush, dessert display, themed nursery shelf |
Published large strawberry turtle data supports 5 mm hooks, size 6 yarn, 12 mm eyes, and about 10 inches of length for a chunky build.
Materials and Tools
Yarn
- Pale sage green — size 6 chunky chenille — 80 g — Premier Parfait Chunky, Hobbii Honey Bunny, or similar
- Soft pink — size 6 chunky chenille — 65 g — shell dome and cake panels
- White or cream — size 6 chunky chenille — 40 g — scallops, piping, underside trim
- Tan or biscuit beige — size 6 chunky chenille — 22 g — cake-side band
- Red — size 6 chunky chenille — 18 g — strawberry topper and shell dots
- Leaf green — size 6 chunky chenille — 8 g — calyx and side leaves
- Peach pink — worsted or chenille scrap — 3 g — cheek patches and toe marks
- Pale yellow embroidery yarn — under 1 g — strawberry seeds
Tools
- Hook 5.0 mm
- 12 mm safety eyes
- Polyester stuffing
- Yarn needle
- Locking stitch markers
- Pins
- Scissors
- Black embroidery floss
- Optional fabric glue for seed ends only
Abbreviations
- MR = magic ring
- sc = single crochet
- inc = increase
- dec = decrease
- invdec = invisible decrease
- sl st = slip stitch
- ch = chain
- BLO = back loop only
- FLO = front loop only
- hdc = half double crochet
- dc = double crochet
- st/sts = stitch/stitches
- FO = fasten off
An invisible decrease is worked through the front loops of the next two stitches so the decrease line stays flatter on the shell and head.
Pattern — Step by Step
Continuous spiral unless noted. This is an original pattern drafted from the photo structure and checked against standard 6-stitch amigurumi shaping.
Head
Yarn: pale sage green.
R1: 6 sc in MR (6)
R2: inc ×6 (12)
R3: (1 sc, inc) ×6 (18)
R4: (2 sc, inc) ×6 (24)
R5: (3 sc, inc) ×6 (30)
R6: (4 sc, inc) ×6 (36)
R7–R10: sc around (36)
R11: (4 sc, dec) ×6 (30)
R12: sc around (30)
R13: (3 sc, dec) ×6 (24)
R14: sc around (24)
R15: (2 sc, dec) ×6 (18)
Insert 12 mm safety eyes between R8 and R9, 16 sts apart. Embroider mouth between the eyes before the head is fully closed.
R16: (1 sc, dec) ×6 (12)
Stuff firmly at the cheeks and lightly at the neck edge.
R17: dec ×6 (6)
Fasten off. Leave a 30 cm tail.
Body Underside
Yarn: cream or pale tan.
R1: 6 sc in MR (6)
R2: inc ×6 (12)
R3: (1 sc, inc) ×6 (18)
R4: (2 sc, inc) ×6 (24)
R5: (3 sc, inc) ×6 (30)
R6: (4 sc, inc) ×6 (36)
R7: (5 sc, inc) ×6 (42)
R8–R11: sc around (42)
R12: (5 sc, dec) ×6 (36)
R13: (4 sc, dec) ×6 (30)
R14: (3 sc, dec) ×6 (24)
R15: (2 sc, dec) ×6 (18)
Stuff to a flat oval, not a ball. Keep the bottom stable.
R16: (1 sc, dec) ×6 (12)
R17: dec ×6 (6)
Fasten off. Weave the tail through the front loops and close.
Cake Shell Dome
Yarn: soft pink.
R1: 6 sc in MR (6)
R2: inc ×6 (12)
R3: (1 sc, inc) ×6 (18)
R4: (2 sc, inc) ×6 (24)
R5: (3 sc, inc) ×6 (30)
R6: (4 sc, inc) ×6 (36)
R7: (5 sc, inc) ×6 (42)
R8–R14: sc around (42)
R15: BLO sc around (42)
R16: sc around (42)
Fasten off. Leave a 45 cm tail for sewing the shell to the body.
Front Flippers
Make 2. Yarn: pale sage green.
R1: 6 sc in MR (6)
R2: inc ×6 (12)
R3: (1 sc, inc) ×6 (18)
R4–R6: sc around (18)
R7: (1 sc, dec) ×6 (12)
R8: sc around (12)
R9: fold flat and work 6 sc through both layers (6)
Fasten off. Leave a 25 cm tail on each flipper.
Back Flippers
Make 2. Yarn: pale sage green.
R1: 6 sc in MR (6)
R2: inc ×6 (12)
R3: (1 sc, inc) ×6 (18)
R4–R5: sc around (18)
R6: (1 sc, dec) ×6 (12)
R7: fold flat and work 6 sc through both layers (6)
Fasten off. Leave a 20 cm tail on each flipper.
Shell Side Wings / Cake Arches
Make 2 side strips. Yarn: tan with red trim.
Row 1: ch 25, starting in second ch from hook, 24 sc (24)
Row 2: ch 1, turn, 24 sc (24)
Row 3: ch 1, turn, 24 sc (24)
Fasten off tan. Join red at one short edge.
Red border row: work 24 sl st across the top edge, ch 1 at the corner, work 3 sc down the short edge, ch 1, work 24 sl st across the lower edge, ch 1, work 3 sc up the final short edge (54)
Fasten off. Make the second strip the same way.
Pink Cake Panels
Make 5. Yarn: soft pink.
R1: 6 sc in MR (6)
R2: inc ×6 (12)
R3: (1 sc, inc) ×6 (18)
R4: sl st around (18)
Fasten off. Leave a 15 cm tail. Sew each circle halfway under the white scallop so only the arch shows.
Lower Whipped Cream Scallop
Yarn: white or cream.
Row 1: ch 55, starting in second ch from hook, 54 sc (54)
Row 2: ch 1, turn, [sl st, hdc, 3 dc in next st, hdc, sl st, sl st] ×9 across 54 base sts (63 worked sts)
Fasten off. Leave a 50 cm sewing tail.
Top Whipped Cream Coil
Yarn: white or cream.
R1: 6 sc in MR (6)
R2–R34: sc around (6)
Fasten off. Stuff only if the tube collapses; most chenille holds the coil without stuffing. Leave a 35 cm tail and spiral it into a ring on the shell top.
Strawberry Topper
Yarn: red.
R1: 6 sc in MR (6)
R2: inc ×6 (12)
R3: (1 sc, inc) ×6 (18)
R4: (2 sc, inc) ×6 (24)
R5–R7: sc around (24)
R8: (2 sc, dec) ×6 (18)
R9: (1 sc, dec) ×6 (12)
Stuff lightly. Overstuffing makes the strawberry round instead of berry-shaped.
R10: dec ×6 (6)
Fasten off. Close the top. Embroider pale yellow seed stitches in staggered rows.
Strawberry Leaves / Calyx
Yarn: leaf green.
R1: 6 sc in MR (6)
R2: [sl st, ch 5, sc in second ch from hook, hdc, dc, hdc, sl st into next base st] ×6 (6 leaves)
Fasten off. Sew under the red strawberry before attaching the strawberry to the cream coil.
Side Berries
Make 2. Yarn: raspberry pink.
R1: 6 sc in MR (6)
R2: inc ×6 (12)
R3: sc around (12)
R4: dec ×6 (6)
Fasten off. Leave a 15 cm tail. Do not overstuff.
Small Side Leaves
Make 2. Yarn: leaf green.
Row 1: ch 6, starting in second ch from hook, sc, hdc, dc, hdc, sc (5)
Row 2: turn along the other side of the chain, sc, hdc, dc, hdc, sc (5)
Fasten off. Leave a 12 cm tail.
Red Shell Sprinkles
Make 14. Yarn: red.
R1: 6 sc in MR (6)
R2: sl st around (6)
Fasten off. Leave a 10 cm tail for sewing.
Cheek Patches
Make 2. Yarn: peach pink.
R1: 6 sc in MR (6)
R2: inc ×6 (12)
R3: sl st around (12)
Fasten off. Leave a 15 cm tail.
Toe Embroidery
Yarn: peach pink.
Use three vertical stitches on each front flipper. Each stitch should measure about 1 cm. Place the marks across R5–R6, not at the folded seam.
Assembly
- Sew the head to the front of the cream body with the eye line sitting just above the body centerline.
- Pin the cake shell dome over the body so R16 of the shell overlaps the body by about 1 cm.
- Sew the shell to the body through the BLO ridge, keeping the seam hidden under the shell edge.
- Attach the front flippers under the shell at the front corners, about 7 cm apart.
- Attach the back flippers at the rear corners, angled outward so the turtle rests flat.
- Sew the tan cake arch strips around the visible shell side and place the pink cake panels under the future scallop line.
- Sew the lower whipped cream scallop over the top edge of the tan panels.
- Coil the top whipped cream tube into a ring, then sew it to the upper shell.
- Attach the strawberry topper, calyx, side berries, leaves, red shell sprinkles, cheeks, mouth, and toe embroidery.
- Check the turtle from the front, side, and top; correct any tilted topper before the final knots are buried.
The finished turtle is a large dessert-shell amigurumi with a flat base and raised strawberry shortcake shell.
7 Technical Tips
- A wandering stitch marker will shift the strawberry topper off center by R14. Move the marker into the first stitch of every round, not the space beside it.
- Overstuffing the shell creates a ball and lifts the flippers off the table. Fill the cake dome to about 80% firmness before sewing it to the body.
- Visible decrease bars on the head will draw attention away from the eyes. Use invdec on R15–R17 and keep those decreases on the underside when positioning the head.
- Late eye placement can crack the stuffed face open. Install the 12 mm eyes between R8 and R9, 16 sts apart, before closing past R15.
- Loose velvet tension causes gaps wider than 3 mm between stitches. Use a 5 mm hook and pull each working loop to the same height as the previous sc.
- Unpinned flippers twist during sewing and make the turtle rock. Pin the front flippers 7 cm apart and test the base on a flat table before stitching.
- Short tails work loose inside chenille. Leave at least 20 cm on limbs and weave each tail in three directions through the body stuffing path.
Conclusion
Photograph the turtle from a low front angle so the head, flippers, scallop trim, and strawberry topper all stay visible. The next practical step is to make one shell-only test in scrap chunky yarn and check whether the 42-st plateau gives the dessert dome enough width for your tension. Save this strawberry shortcake turtle amigurumi pattern to Pinterest, then post the finished plush on Instagram with a clear side view of the cake panels. Use #StrawberryShortcakeTurtle. For your version, should the top fruit stay as one large strawberry, or would two smaller berries balance the whipped cream ring better?









