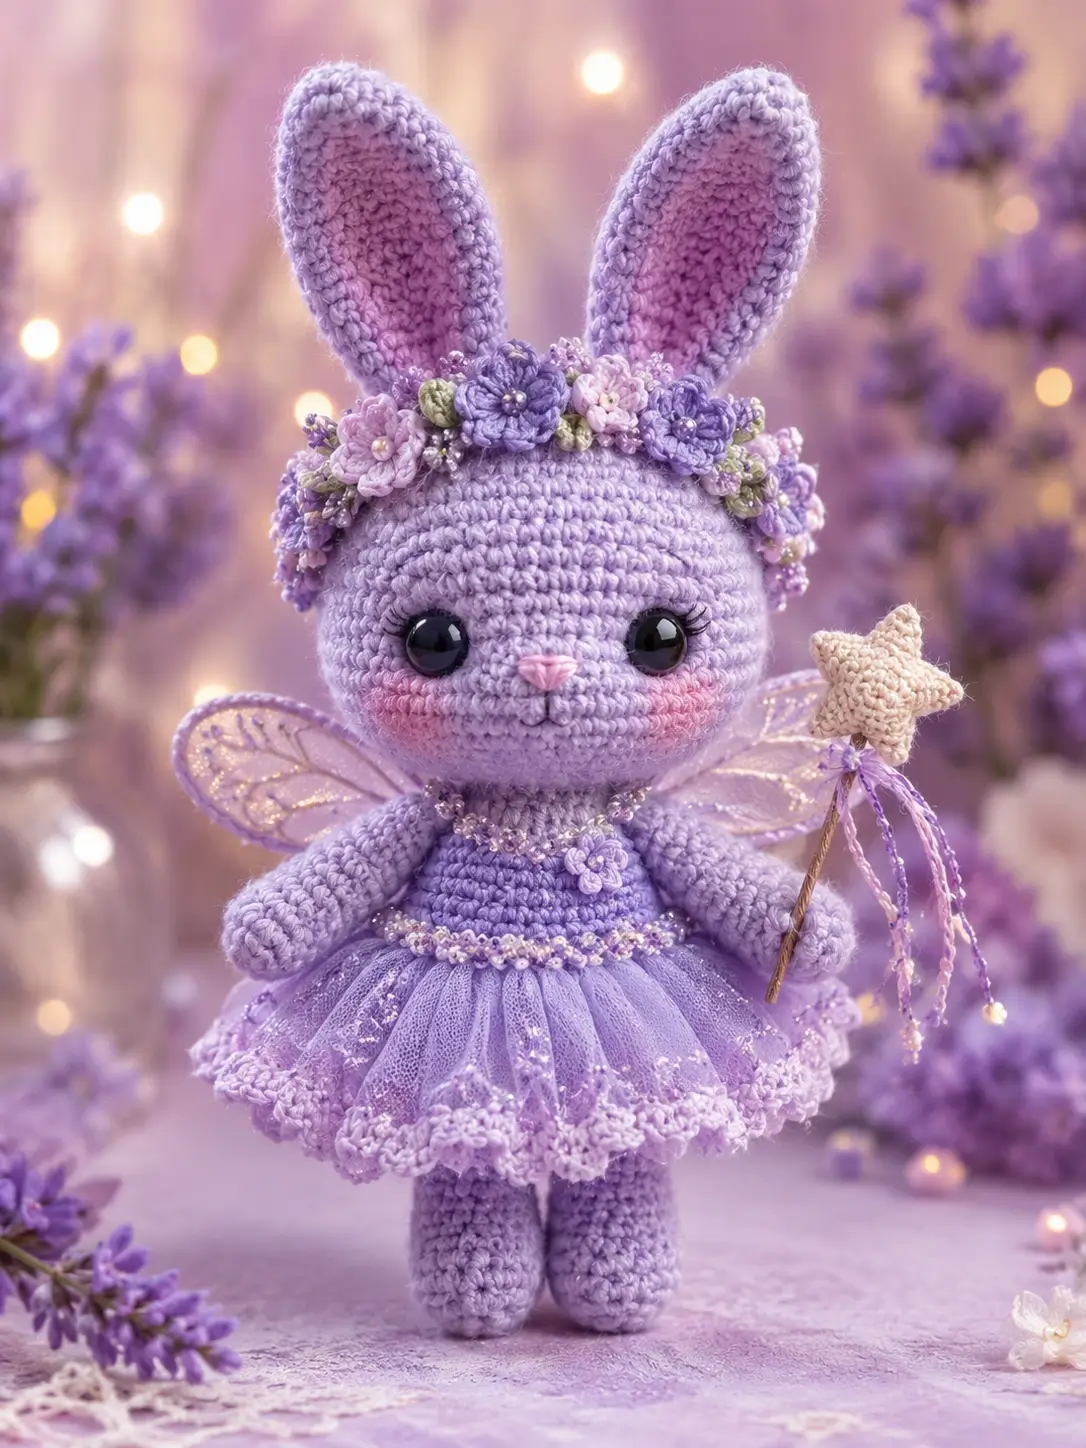
Rabbit ears are not decorative here; they have to clear a flower crown, hold upright, and still read as a bunny. This fairy bunny amigurumi crochet pattern uses cotton-blend DK yarn, an 8 mm eye scale, and a 2.2–2.5 mm hook to make an 18–19 cm intermediate toy. Make it when the figure needs both display weight and removable costume detail.
The Design: What Makes the Lavender Fairy Bunny Different
The photo is built around vertical tension: tall ears, crown, and wand all pull the eye upward, so the head must be wider than the torso. Use a 36-stitch head plateau and a 30-stitch body plateau; that keeps the face round while the tutu can sit without covering the arms. The ears are worked narrow at the base because a broad ear base fights the flower crown and tilts outward after sewing.
For a lavender bunny crochet pattern, cheek circles should be flat appliqués, not embroidered ovals; flat circles copy the photo’s cheek area and reduce face distortion. A common mistake in a fairy rabbit amigurumi is putting wings at shoulder height before the head is attached. Makers then crowd the back neck seam, and the wings roll forward.
Project Info at a Glance
| Skill Level | Time | Finished Size | Hook | Best For |
|---|---|---|---|---|
| Intermediate | Multi-session; many sewn parts | 18–19 cm including ears | 2.2–2.5 mm | Display doll, shelf figure, photo prop |
Materials and Tools
Yarn
- Lavender — sport/DK cotton-acrylic — 75 g on hand — YarnArt Jeans, Scheepjes Catona, or similar
- Lilac purple — sport/DK cotton-acrylic — 15–25 g — bodice, skirt trim, flowers
- Pink — sport/DK cotton-acrylic — 10 g — cheeks, nose, small flowers
- Cream — sport/DK cotton-acrylic — 10 g — star wand
- Green — sport/DK cotton-acrylic — 5–10 g — leaves
- White or clear thread — lace/thread weight — small amount — wing edging or bead stitching
Tools
- Hook 2.2–2.5 mm
- 8 mm black safety eyes
- Fiberfill stuffing
- Yarn needle
- Stitch markers
- Pins
- Small scissors
- Embroidery needle
- Organza or tulle strips for skirt overlay
- Two small transparent wing inserts, or crocheted wings below
- Wooden skewer or floral wire for wand stem
For toys intended for babies or toddlers, replace plastic safety eyes with embroidered or crocheted eyes because safety-eye parts can still be a choking risk.
Abbreviations
MR = magic ring / sc = single crochet / inc = 2 sc in same stitch / dec = single crochet 2 stitches together / sl st = slip stitch / ch = chain / BLO = back loop only / FLO = front loop only / dc = double crochet / hdc = half double crochet / FO = fasten off.
Invisible decrease means inserting the hook through front loops only of the next two stitches before drawing through, which reduces the visible gap on closed amigurumi rounds.
Pattern — Step by Step
Continuous spiral unless noted.
Head
Yarn: lavender.
R1: 6 sc in MR (6)
R2: inc ×6 (12)
R3: (1 sc, inc) ×6 (18)
R4: (2 sc, inc) ×6 (24)
R5: (3 sc, inc) ×6 (30)
R6: (4 sc, inc) ×6 (36)
R7–R13: sc around (36)
R14: (4 sc, dec) ×6 (30)
R15: (3 sc, dec) ×6 (24)
R16: (2 sc, dec) ×6 (18)
Insert 8 mm safety eyes between R10 and R11, 7 stitches apart. Embroider a small pink nose centered between them.
R17: (1 sc, dec) ×6 (12)
R18: dec ×6 (6)
Fasten off. Leave a 25 cm tail and close the remaining hole.
Body
Yarn: lavender, then lilac at bodice.
R1: 6 sc in MR (6)
R2: inc ×6 (12)
R3: (1 sc, inc) ×6 (18)
R4: (2 sc, inc) ×6 (24)
R5: (3 sc, inc) ×6 (30)
R6–R8: sc around (30)
R9: BLO sc around in lilac (30)
R10: (3 sc, dec) ×6 (24)
R11–R12: sc around (24)
R13: (2 sc, dec) ×6 (18)
R14: sc around (18)
R15: (1 sc, dec) ×6 (12)
Stuff firmly through the neck opening. Fasten off and leave a 35 cm tail for sewing.
Arms / Front Legs
Yarn: lavender. Make 2.
R1: 6 sc in MR (6)
R2–R7: sc around (6)
Stuff only the paw end. Flatten the top edge. Fasten off and leave a 20 cm tail.
Back Legs
Yarn: lavender. Make 2.
R1: 6 sc in MR (6)
R2: inc ×6 (12)
R3–R7: sc around (12)
Stuff each leg firmly enough that it stands under the skirt. Fasten off and leave a 25 cm tail.
Ears
Yarn: lavender. Make 2.
R1: 6 sc in MR (6)
R2: inc ×6 (12)
R3: (1 sc, inc) ×6 (18)
R4–R10: sc around (18)
R11: (1 sc, dec) ×6 (12)
R12–R14: sc around (12)
R15: dec ×6 (6)
R16–R17: sc around (6)
Do not stuff. Flatten the base. Fasten off and leave a 30 cm tail.
Inner Ear Panels
Yarn: pale pink-lilac. Make 2.
Ch 8.
Row 1: sc in 2nd ch from hook, sc 6, ch 1, turn (7)
Row 2: sc 7, ch 1, turn (7)
Row 3: dec, sc 3, dec, ch 1, turn (5)
Row 4: dec, sc 1, dec, ch 1, turn (3)
Row 5: sc 3 (3)
Fasten off. Leave a 20 cm tail and sew to the front of each ear.
Cheek Patches
Yarn: soft pink. Make 2.
R1: 6 sc in MR (6)
R2: inc ×6 (12)
Sl st to first stitch (12)
Fasten off. Leave a 20 cm tail. Sew under the eyes, slightly outside the nose line.
Tiny Muzzle Disk
Yarn: lavender or pale lilac.
R1: 6 sc in MR (6)
R2: inc ×6 (12)
Fasten off. Leave a 20 cm tail. Sew flat between the eyes before embroidering the pink nose if extra snout definition is needed.
Fairy Wings
Yarn: white, clear thread, or pale lilac. Make 2.
R1: 6 sc in MR (6)
R2: inc ×6 (12)
R3: (1 sc, inc) ×6 (18)
R4: (2 sc, inc) ×6 (24)
R5: sc around (24)
Fold each circle into a teardrop. Pinch one side and sew 5 stitches through both layers to form the inner wing point. Fasten off with a 30 cm tail. For a photo-accurate look, layer organza behind each crocheted wing and stitch only along the inner edge.
Tutu Waistband and Skirt Trim
Yarn: lilac purple.
Join yarn to the unused FLO of Body R9.
R1: ch 2, 2 dc in each FLO around, sl st to join (60)
R2: ch 2, dc around, sl st to join (60)
R3: (sl st, ch 3, sl st in next st) around (30 loops)
Fasten off and weave in the tail. Knot 8–10 cm tulle strips into every third R1 stitch if a transparent skirt layer is wanted.
Flower Crown Base
Yarn: green.
Ch 42.
Row 1: sc in 2nd ch from hook, sc across, ch 1, turn (41)
Row 2: sc across (41)
Fasten off. Leave two 20 cm ties. Test the band around the head just in front of the ear bases.
Crown Flowers
Yarn: lilac, pink, white. Make 7.
R1: 6 sc in MR (6)
R2: (sl st, ch 2, 2 dc, ch 2, sl st) in each stitch around (6 petals)
Fasten off. Leave a 15 cm tail for sewing to the crown base.
Crown Leaves
Yarn: green. Make 6.
Ch 5.
Row 1: sc in 2nd ch from hook, hdc, dc, 3 sc in last ch; working back on other side, dc, hdc, sc, sl st to base (9 edge stitches)
Fasten off. Leave a 15 cm tail.
Star Wand
Yarn: cream. Make 2 stars.
Ch 2.
R1: 5 sc in 2nd ch from hook (5)
R2: (sl st in next st, ch 4, sc in 2nd ch from hook, hdc in next ch, dc in next ch) ×5, sl st to close (5 points)
Fasten off the first star with a 10 cm tail. Fasten off the second with a 30 cm tail. Place both stars wrong sides together around the top of a skewer or floral wire, sew the edges, and lightly stuff the center before closing.
Beaded Collar and Belt
Yarn: white thread or lilac.
Collar: ch 24, test around neck, add or remove chains in pairs, sl st into first ch to close (24)
Belt: ch 34, test around R9 skirt line, add or remove chains in pairs, sl st into first ch to close (34)
Sew beads only after the chains fit. Fasten off with a 15 cm tail.
Assembly
- Pin the head to the body with the face centered over the bodice color change.
- Sew the head to the body, adding stuffing into the neck seam before the last 6 stitches close.
- Sew the muzzle disk if used, then secure the pink nose and short vertical mouth line.
- Place cheek patches 1 round below the eyes and 1 stitch outside each eye edge.
- Sew ears to the top of the head between R3 and R6, tilting them back by 10–15 degrees.
- Attach arms at the upper body sides, just under the head seam.
- Sew back legs under the skirt line so the feet point forward and the body stands.
- Attach wings to the back between Body R10 and R13, lower than the neck seam.
- Sew the flower crown across the front ear bases and add leaves between flowers.
- Add the tutu, collar, belt, and star wand, then weave all tails through the stuffed body.
The finished bunny should stand with the ears behind the crown and the wand outside the wing span.
7 Technical Tips
- Stitch marker drift: If the marker shifts more than 3 stitches by Head R10, the eye line will twist. Move the marker only at the end of a completed round, not halfway through a face round.
- Stuffing firmness: A soft neck creates a forward-drooping head once the ears and crown are added. Pack the neck seam until it resists thumb pressure by about 5 mm.
- Invisible decrease gaps: Standard decreases on R16–R18 of the head can leave six visible holes around the chin. Work front-loop invisible decreases on those rounds and pull the final tail through all 6 front loops.
- Eye placement timing: Safety eyes must be inserted before Head R16 because the opening gets too narrow after that. Set them between R10 and R11, 7 stitches apart, then check that the nose falls exactly between them.
- Ear angle failure: Upright ears sewn straight up will look too flat after the crown is added. Pin each ear with a 10–15 degree backward lean and test the crown band before sewing.
- Wing rolling: Wings attached at the neck seam roll forward and hide behind the arms. Sew them between Body R10 and R13, with the inner points 3–4 stitches apart.
- Tail weaving: Short accessory tails can pop out through the tutu. Weave every crown, belt, and flower tail through at least 3 cm of stuffed fabric before trimming.
Conclusion
Before publishing, pin the ears and crown for a full hour, then check the side view: the ears should lean back slightly while the wand remains outside the wing line. That single alignment check prevents most finish-stage repairs. The fairy bunny amigurumi crochet pattern works best when the maker treats costume parts as engineering parts, not decoration. Next, photograph the toy against a plain lavender or white background so the cheek patches and transparent wings stay readable. Share the finished bunny on Pinterest and Instagram with #LavenderFairyBunny. Which detail changed the silhouette more on your version: the tall ears or the star wand angle?









