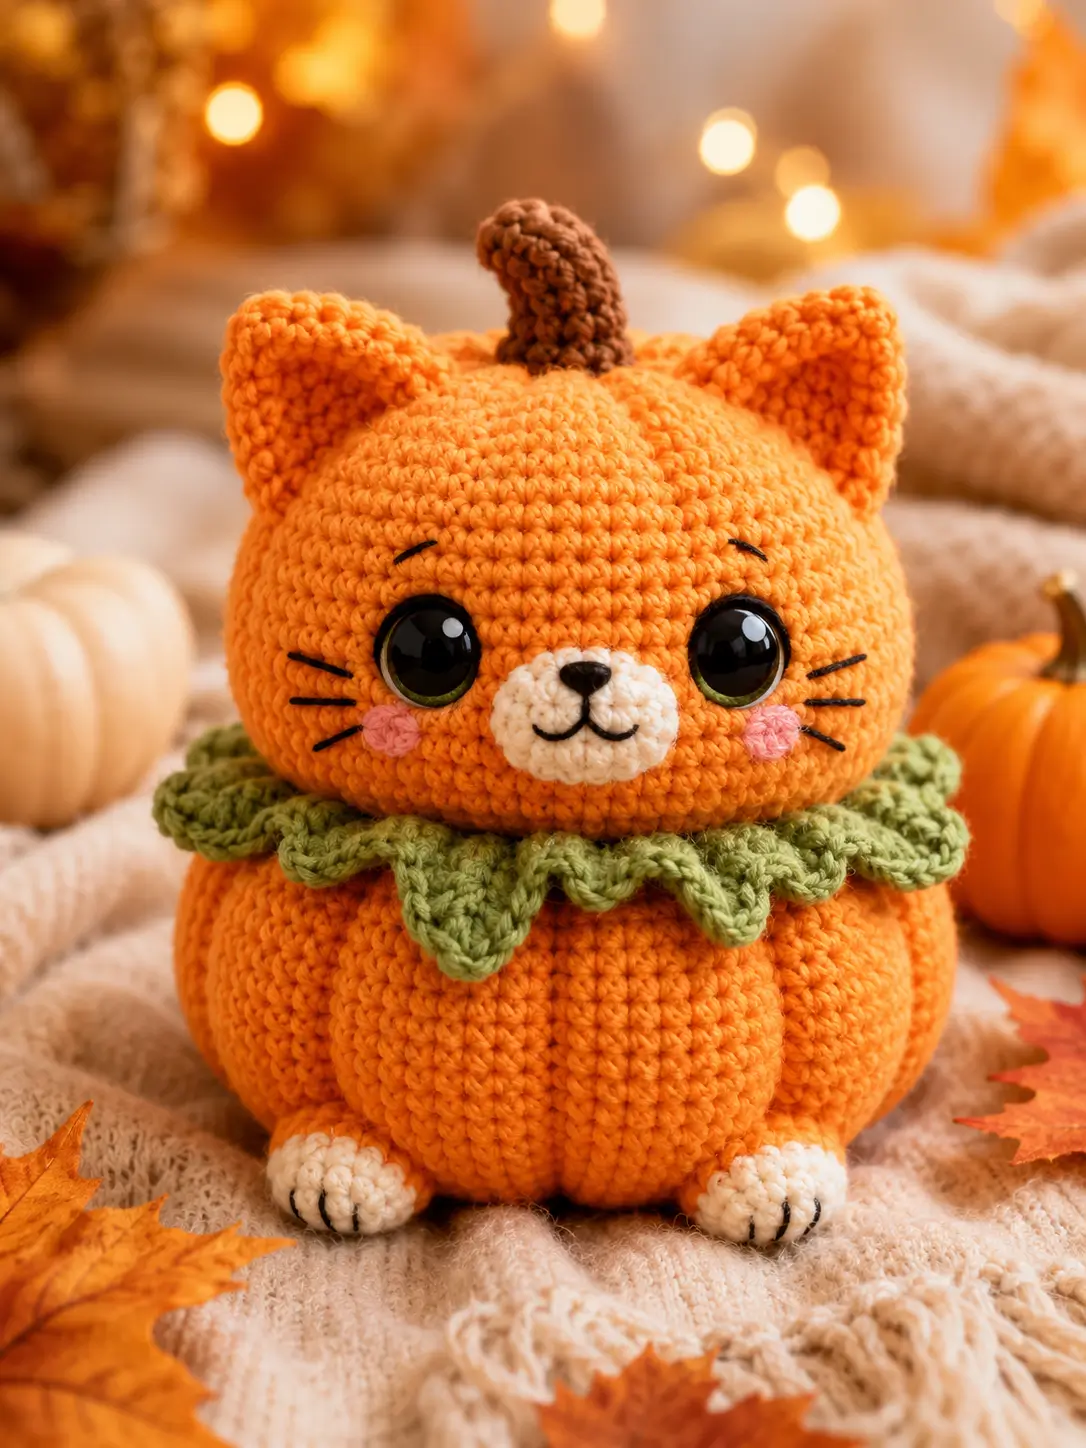
Cats do not grow stems, so the pumpkin read depends on where the ears break the round. This pumpkin cat amigurumi uses worsted yarn and a 4.0 mm hook to build a photo-inspired plush around 15 cm tall. Skill level sits at intermediate because the ribbed body, collar, and facial placement all matter. The finished piece works well for shelf décor or a fall market table.
The Design: What Makes Pumpkin Cat Different
Not the usual cat-in-a-pumpkin setup. This photo reads as a pumpkin kitty crochet pattern only because three structural decisions stay separate. First, the ears sit high and wide, interrupting the head sphere before the stem takes visual control. Second, the leafy collar hides the join and creates a hard stop between smooth face and ribbed torso. Third, the lower body gets its pumpkin channels after stuffing, not during the main rounds, so the silhouette stays full instead of collapsing inward. You need a broad muzzle with low whiskers, or the face turns fox-like. Then the maker has another problem: eye placement. A common failure in Halloween cat amigurumi is dropping the eyes too low, which shortens the muzzle and makes the stem read oversized. Across the sampled market and free-pattern pages, that exact leafy-collar build was not the dominant solution.
Project Info at a Glance
| Skill Level | Time | Finished Size | Hook | Best For |
|---|---|---|---|---|
| Intermediate | 1 hour in mini published references; allow longer for this fuller build | 15 cm / 6 in target | 4.0 mm / Size G | Shelf décor, tiered trays, small-market stock |
Published pumpkin-cat references list medium/intermediate difficulty, mini versions around 1 hour, and fuller worsted builds around 15 cm with Size G or 4.0 mm hooks.
Materials and Tools
Yarn
- Orange — worsted — keep one main skein on hand — Paintbox, Red Heart, or similar
- Cream — worsted — scraps for muzzle and paw tips
- Green — worsted — small amount for the leaf collar
- Brown — worsted — small amount for the stem
- Pink — small scrap for cheek patches
Tools
- Hook 4.0 mm / Size G
- 9 mm safety eyes
- Polyfill stuffing
- Tapestry needle
- Stitch markers
- Black embroidery floss or cotton thread
Comparable published builds use worsted yarn with Size G or 5.0 mm hooks in fuller versions, while mini versions shrink down with DK and 2.0–3.0 mm hooks. The photo is closer to the fuller worsted look.
Abbreviations
MR / sc / inc / dec / sl st / ch / BLO / FLO
Use invisible decrease through the front loops only so the closing rounds stay flatter and the muzzle line does not facet.
Pattern — Step by Step
Continuous spiral unless noted.
Head (Make 1)
Yarn: orange — Source: Standard amigurumi math; large round-head proportion cross-checked against a published 42-stitch pumpkin-cat head reference.
R1: 6 sc in MR (6)
R2: inc ×6 (12)
R3: (1 sc, inc) ×6 (18)
R4: (2 sc, inc) ×6 (24)
R5: (3 sc, inc) ×6 (30)
R6: (4 sc, inc) ×6 (36)
R7: (5 sc, inc) ×6 (42)
R8: sc around (42)
R9: sc around (42)
R10: sc around (42)
R11: sc around (42)
R12: sc around (42)
R13: sc around (42)
R14: (5 sc, dec) ×6 (36)
R15: (4 sc, dec) ×6 (30)
R16: (3 sc, dec) ×6 (24)
R17: (2 sc, dec) ×6 (18)
R18: (1 sc, dec) ×6 (12)
R19: dec ×6 (6)
Insert 9 mm safety eyes between R10 and R11, leaving 8 visible stitches between them. Stuff firmly after R16. Keep the top dense enough to support the stem without dimpling.
Fasten off. Leave 25 cm tail.
Body (Make 1)
Yarn: orange — Source: Standard amigurumi math; widest-point benchmark cross-checked against published pumpkin bases that reach 42 stitches.
R1: 6 sc in MR (6)
R2: inc ×6 (12)
R3: (1 sc, inc) ×6 (18)
R4: (2 sc, inc) ×6 (24)
R5: (3 sc, inc) ×6 (30)
R6: (4 sc, inc) ×6 (36)
R7: (5 sc, inc) ×6 (42)
R8: sc around (42)
R9: sc around (42)
R10: sc around (42)
R11: sc around (42)
R12: sc around (42)
R13: (5 sc, dec) ×6 (36)
R14: sc around (36)
R15: (4 sc, dec) ×6 (30)
R16: (3 sc, dec) ×6 (24)
R17: (2 sc, dec) ×6 (18)
R18: (1 sc, dec) ×6 (12)
R19: dec ×6 (6)
Stuff low and wide. The body should feel firmer at the base than at the shoulder line. After assembly, add six sculpting wraps from top center to bottom center to create the pumpkin ribs.
Fasten off. Leave 30 cm tail.
Front Legs (Make 2)
Yarn: orange and cream — Source: Standard amigurumi math.
R1: 6 sc in MR with orange (6)
R2: inc ×6 (12)
R3: sc around (12)
R4: change to cream, sc around (12)
R5: sc around (12)
R6: change to orange, dec ×6 (6)
Stuff very lightly before the final decrease. Flatten slightly so the paw faces forward when sewn on.
Fasten off. Leave 20 cm tail.
Back Legs (Make 2)
Yarn: orange and cream — Source: Standard amigurumi math.
R1: 6 sc in MR with orange (6)
R2: inc ×6 (12)
R3: sc around (12)
R4: change to cream, sc around (12)
R5: dec ×6 (6)
Do not overstuff. These sit lower and act as hidden stabilizers more than display paws.
Fasten off. Leave 20 cm tail.
Ears (Make 2)
Yarn: orange — Source: Standard amigurumi math; compact ear scale cross-checked against published pumpkin-cat ear references.
R1: 4 sc in MR (4)
R2: (inc, 1 sc) ×2 (6)
R3: (inc, 2 sc) ×2 (8)
R4: (inc, 3 sc) ×2 (10)
R5: (inc, 4 sc) ×2 (12)
Flatten the ear without stuffing. Pin before sewing so both ears interrupt the head circle at the same height.
Fasten off. Leave 18 cm tail.
Muzzle (Make 1)
Yarn: cream — Source: Standard amigurumi math.
R1: 6 sc in MR (6)
R2: inc ×6 (12)
R3: (1 sc, inc) ×6 (18)
Do not stuff. Sew it on slightly stretched into a soft oval.
Fasten off. Leave 20 cm tail.
Cheek Patches (Make 2)
Yarn: pink — Source: Standard amigurumi math.
R1: 6 sc in MR (6)
R2: inc ×6 (12)
R3: sl st to close (12)
Keep them flat. They should sit below and slightly outside the eyes, not beside the muzzle centerline.
Fasten off. Leave 12 cm tail.
Stem (Make 1)
Yarn: brown — Source: Standard amigurumi math; pumpkin-top placement informed by comparable stemmed pumpkin-cat designs.
R1: 6 sc in MR (6)
R2: sc around (6)
R3: (1 sc, inc) ×3 (9)
R4: sc around (9)
R5: sc around (9)
R6: sc around (9)
R7: (1 sc, dec) ×3 (6)
R8: sc around (6)
Add a pinch of stuffing only in the lower half. Bend the stem slightly backward before sewing.
Fasten off. Leave 20 cm tail.
Leaf Collar (Make 1)
Yarn: green — Source: photo reconstruction informed by crochet leaf-edging and pumpkin-leaf references.
Foundation: Ch 31
Row 1: starting in 2nd ch from hook, sc 30 (30), turn
Row 2: *sl st in next 2 sts, [sc, hdc, dc, ch 2, sl st in 2nd ch from hook, dc, hdc, sc] in next st, sl st in next 2 sts* repeat 6 times (6 points)
This row is worked flat, not in spiral. Wrap the collar around the neck join with the points facing downward.
Fasten off. Leave 25 cm tail.
Assembly
- Sew the head centered on the body, keeping the face square to the front.
- Stitch the muzzle onto the lower center of the head, roughly spanning the area between R11 and R16.
- Embroider a small black nose at the top center of the muzzle, then add the mouth in a shallow “w” curve.
- Attach the cheek patches one round below eye level and one to two stitches outside the muzzle edge.
- Embroider three whiskers on each side, plus one short brow line above each eye.
- Sew the ears high on the head so they sit slightly wider than the eye line.
- Attach the stem centered between the ears and tilt it a little toward the back.
- Add the front legs low on the body front, then place the back legs wider apart near the rear base for support.
- Create six pumpkin ribs by running orange yarn from the body top center to the bottom center, spacing each channel evenly.
- Sew the leaf collar around the neck seam, weave in all tails, and flatten the base with your hands.
The finished piece should sit upright without added weight.
7 Technical Tips
- Marker drift: The first failure mode on a round orange head is spiral drift after the 42-stitch expansion. Move your marker every round and recount at R7, R14, and R16 or the face will rotate off center.
- Stuffing firmness: Overstuffing the body rounds pushes the rib wraps outward and turns the pumpkin channels shallow. Fill the body to roughly 80 percent, then add the last small tufts only after the base can still flatten.
- Invisible decrease: Standard decreases on the closing rounds create six visible corners under the muzzle. Work the decreases through front loops only from the first reduction round onward.
- Eye placement timing: Do not wait until the head is nearly closed. Insert the eyes while the opening is still at 24 stitches or wider, and keep them between R10 and R11 for this scale.
- Velvet tension: If you swap the project to velvet or chenille, the failure mode is a sagging stem and a collar that rolls upward. Drop the hook size by at least 0.5 mm and reduce stuffing in the head by one small handful.
- Pinning: Pin both ears, the stem, and the collar before sewing anything permanent. A 2 mm shift in ear height is enough to make one side read cat and the other side read pumpkin.
- Tail weaving: Short woven tails can work loose at the stem and collar because those pieces get handled from above. Run each tail through at least 5 cm of internal stuffing path before trimming.
Conclusion
Start with the head and body, then test the eye spacing before you commit to the stem. That order keeps the pumpkin read under control and gives you room to widen or narrow the leaf collar. Once finished, photograph the plush from the front and from above, then pin both views to Pinterest and post the top view on Instagram so the stem placement reads clearly. This pumpkin cat amigurumi rewards accurate shaping more than extra trim. Make the orange sample first, then repeat it in cream, sage, or rust if you need a small seasonal set. Hashtag: #PumpkinCatPattern. Did you keep the stem exactly between the ears, or angle it back like the photo?









