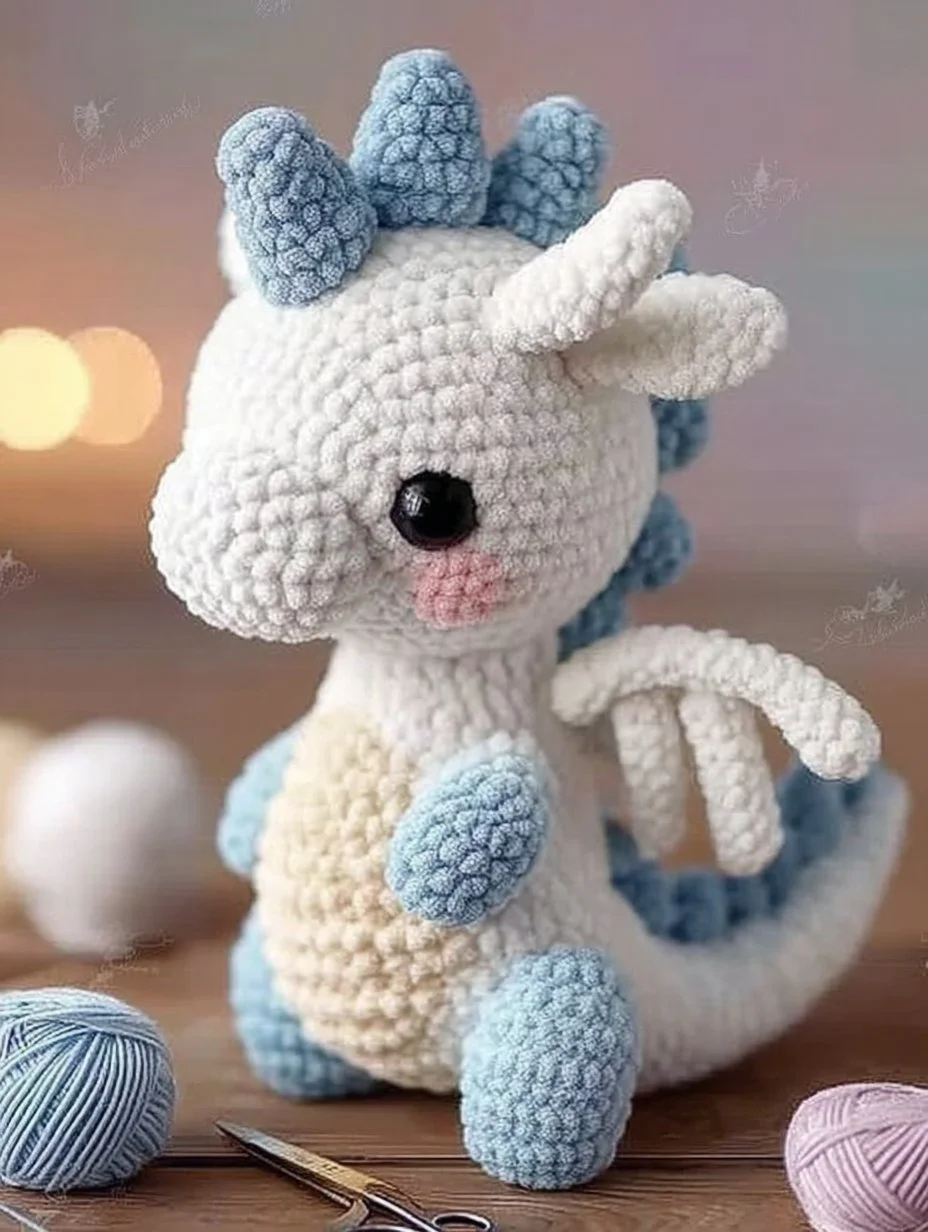
Strawberry Dragon Amigurumi Pattern
A strawberry dragon pattern requires a careful balance of fruit-inspired elements and mythical features, prominently displayed in its vibrant texture and unique shape. This amigurumi project will yield a delightful plush that stands around 25 cm tall, making it a charming addition to any collection or a perfect gift for a lover of whimsical creatures. This crochet pattern is designed for an intermediate-level crocheter, taking approximately 5–6 hours to complete. You will use super bulky yarn for this pattern, which enhances the character’s plushness, providing a soft and cuddly finish suitable for play or display.
The Design: What Makes Strawberry Dragon Different
The strawberry dragon features a squat, rounded body that mimics the shape of a fruit, with a distinctive head showcasing large expressive eyes and sculpted features that stand out against the plush texture. Its head is proportionate yet slightly larger than the body, giving it an appealing, cartoonish feel that enhances its charm. The design incorporates small, bat-like wings and a spiky back, adding character without compromising the plush’s stability. Each limb is strategically placed to support the overall structure, ensuring that the dragon remains upright without tipping over.
Using super bulky yarn in bright colors not only contributes to the visual appeal but also alters the overall dimensions, making this plush noticeably larger and more engaging than other amigurumi designs that use lighter yarn. Beginners should be cautious of excessive tension, which may lead to unwanted tightness in stitches, impacting the dragon’s rounded appearance. It’s essential to maintain a uniform stitch tension throughout the pattern to avoid distorting key features such as the wings and tail, crucial for capturing the spirit of this whimsical creature.
For those new to amigurumi, one common mistake is under-stuffing key sections, which can lead to an overall limp structure. To avoid this, take care when stuffing the body and limbs, ensuring that each section maintains a firm shape without pulling the stitches excessively tight. This design succeeds as a handmade amigurumi toy due to its vibrant character and substantial plush form, making it both visually appealing and tactilely satisfying.
Project Info at a Glance
| Skill Level | Time | Finished Size | Hook | Yarn | |—————-|————-|—————|——–|————–| | Beginner Plus | 5–6 hours | 25 cm | 4.5 mm | Super Bulky |
Materials and Tools
For this strawberry dragon, selecting plush materials is crucial to achieving the soft and cuddly look that defines the character. Using super bulky yarn not only speeds up the crochet process but also enhances the plush’s overall texture, creating an inviting tactile experience.
Yarn
- Main color super bulky yarn — 150 g for head, body, and limbs
- Accent color super bulky yarn — 80 g for wings, spikes, and tail
- Detail color yarn — 30 g for embroidery features, such as nostrils and facial expressions
When choosing colors, consider substitutions with similar bright shades to maintain the fruity theme while allowing for personal flair.
Tools
- 4.5 mm crochet hook
- 18 mm safety eyes
- Polyester fiberfill
- Yarn needle
- Locking stitch marker
- Pins
- Scissors
- Embroidery thread
Using pins during assembly assists in visualizing the placement of limbs and features comfortably before finalizing stitches, while safety eyes should be added to ensure secure placement as you approach the head closure.
Abbreviations
MR = magic ring
sc = single crochet
inc = increase
dec = invisible decrease
sl st = slip stitch
ch = chain
BLO = back loop only
FO = fasten off
Invisible decrease is worked through the front loops of the next two stitches before completing one single crochet.
Pattern Notes
This strawberry dragon pattern is worked in continuous spirals, making it essential to use a stitch marker to keep track of rounds. A firm but not overly stretched stuffing is recommended to maintain the plush’s round shape, particularly in the head and body regions. It’s vital to add safety eyes before completely closing the head to ensure a secure fit.
When pinning the limbs and special features before sewing, make sure to adjust based on the dragon’s balance and posture, especially when ensuring that legs and tail align properly. Be mindful of how plush yarn can obscure certain stitches; maintaining a consistent tension helps achieve the desired look. To create a balanced plush, periodically check the stance while assembling each part.
Pattern — Step by Step
Head Make 1
R1: 6 sc in MR (6)
R2: inc ×6 (12)
R3: [sc, inc] ×6 (18)
R4: [2 sc, inc] ×6 (24)
R5: [3 sc, inc] ×6 (30)
R6: [4 sc, inc] ×6 (36)
R7: [5 sc, inc] ×6 (42)
R8-10: sc around (42)
R11: [5 sc, dec] ×6 (36)
R12: [4 sc, dec] ×6 (30)
R13: [3 sc, dec] ×6 (24)
R14: [2 sc, dec] ×6 (18)
R15: [1 sc, dec] ×6 (12)
R16: dec ×6 (6)
FO, leaving a long tail for sewing.
When stuffing the head, ensure it is firmly packed to maintain its shape, and place the safety eyes securely according to your design. The head shape should retain a rounded appearance, conducive to the dragon’s expressions.
Body Make 1
R1: 6 sc in MR (6)
R2: inc ×6 (12)
R3: [sc, inc] ×6 (18)
R4: [2 sc, inc] ×6 (24)
R5: [3 sc, inc] ×6 (30)
R6: [4 sc, inc] ×6 (36)
R7: [5 sc, inc] ×6 (42)
R8-12: sc around (42)
R13: [5 sc, dec] ×6 (36)
R14: [4 sc, dec] ×6 (30)
R15: [3 sc, dec] ×6 (24)
R16: [2 sc, dec] ×6 (18)
R17: [1 sc, dec] ×6 (12)
R18: dec ×6 (6)
FO, leaving a long tail for sewing.
For the body, stuff firmly but avoid over-stuffing to ensure the neck aligns well when attached to the head. The body should have a stable base for sitting.
Front Legs Make 2
R1: 6 sc in MR (6)
R2: inc ×6 (12)
R3: sc around (12)
R4: [1 sc, dec] ×4 (8)
R5: dec ×4 (4)
FO, leaving a tail for sewing.
Strategically position the front legs to accentuate the dragon’s stout appearance, firmly attaching them below the body’s midpoint.
Back Legs Make 2
R1: 6 sc in MR (6)
R2: inc ×6 (12)
R3: sc around (12)
R4: [1 sc, dec] ×4 (8)
R5: dec ×4 (4)
FO, leaving a tail for sewing.
The back legs will need to be securely sewn into the body to provide a balanced stance and support the dragon’s plush frame.
Wings Make 2
R1: 6 sc in MR (6)
R2: inc ×6 (12)
R3: [1 sc, inc] ×6 (18)
R4: [2 sc, inc] ×6 (24)
R5-6: sc around (24)
R7: [2 sc, dec] ×6 (18)
R8: [1 sc, dec] ×6 (12)
R9: dec ×6 (6)
FO, leaving a tail for sewing.
The wings should be attached high on the body to create a sense of lift, enhancing the whimsical look of the strawberry dragon.
Cheek Patches Make 2
R1: 6 sc in MR (6)
R2: inc ×6 (12)
sl st to close.
FO, leaving a tail for sewing.
The cheek patches should be positioned just below the eyes to add a cute, flushed feature to the face.
Tail Make 1
R1: 6 sc in MR (6)
R2: inc ×6 (12)
R3: [1 sc, inc] ×6 (18)
R4: [2 sc, inc] ×6 (24)
R5: sc around (24)
R6: [0 sc, dec] ×6 (18)
R7: dec ×6 (12)
FO, leaving a tail for sewing.
A well-defined tail should be balanced, giving the plush added stability and enhancing the overall silhouette.
Face Embroidery
When embroidering the face of your strawberry dragon, spacing the eyes approximately one eye-width apart helps achieve a balanced expression. For the nose, position it centrally just above the mouth line for an endearing look. Use the embroidery thread to create a small mouth curve, ensuring it’s placed above the cheek patches to highlight the dragon’s expressions adequately.
For securing the embroidery tails, hide them inside the plush by weaving them through the back to avoid any loose ends peeking out. Carefully check the placement to prevent a crooked look, and adjust accordingly before finishing.
Assembly
- Begin by securely attaching the head to the body, ensuring that it is centered and well-stitched for stability.
- Attach the wings to either side of the upper body, ensuring they are positioned high to maintain balance.
- Position the front legs beneath the body, making sure they are evenly placed to support the plush.
- Attach the back legs further down the body, again ensuring they are aligned symmetrically.
- Sew on the cheek patches, placing them just below the safety eyes to accentuate a cheerful expression.
- If your safety eyes were not added previously, add them at this point, ensuring they sit at the correct angle.
- Use embroidery thread to create the nose and mouth, keeping them symmetrical for a charming look.
- Secure the cheek patches in place, making sure they’re firmly attached.
- Take a moment to check the balance from all angles; adjust any features as necessary.
- Finally, weave in any visible ends and adjust the plush to ensure it keeps its intended shape.
The assembly of your strawberry dragon is now complete, and it should stand proudly as a consistent, well-formed plush toy.
7 Technical Tips
- Stitch marker drift: Keeping markers properly positioned is essential for maintaining round accuracy. If a marker slips, you risk falling behind on the count, leading to uneven surfaces or awkward shaping. Always double-check your marker placement after finishing each round to avoid drift.
- Stuffing firmness: Achieving a balance in stuffing is important for plush stability. If the dragon’s body is overstuffed, it may create strange tension in the yarn, distorting the intended shape. On the other hand, under-stuffing can lead to an overall limp structure that fails to balance well.
- Invisible decrease gaps: Ensuring that each decrease is seamless helps to maintain a smooth finish on your plush. If you miss a stitch or do not execute an invisible decrease correctly, gaps can form, making the plush look unfinished. Pay careful attention to your decreases to keep the shape looking tidy and secure.
- Eye placement timing: Positioning the safety eyes should be done before the head is completely closed to easily adjust as needed. If they are placed after, you may find it harder to hide loose threads behind the stitched surface. Correct eye placement enriches the expression of the dragon and significantly affects the final look.
- Plush yarn tension: Working with super bulky yarn can change how stitches hide and appear, necessitating attention to tension. Striking a balance in pressure while stitching keeps the fabric from becoming overly dense or uneven. Always monitor your tension as you work around the plush’s curved features.
- Pinning before sewing: Use pins generously to help visualize each part placement accurately before you commit to sewing. This lets you adjust elements quickly to achieve proper placement. Not utilizing pins may lead to skewed limbs and features, making the plush less appealing.
- Tail weaving: When weaving in the tail, make sure it goes deep into the plush, securing it effectively to prevent unraveling. Recklessness with tail weaving can lead to visible strands that spoil the plush’s overall appearance. Be meticulous about concealing all loose ends for a polished finish.
Related Patterns
- Cinnamon Roll Turtle — This design features a unique shell that incorporates pastry design elements, similar to our strawberry dragon’s mixed textures. [INTERNAL LINK NEEDED: topic]
- Galaxy Cat — Like the dragon, this pattern includes vibrant, colorful elements that inspire creativity, making it an appealing project for enthusiasts. [INTERNAL LINK NEEDED: topic]
- Plush Axolotl — Both patterns utilize soft yarn and rounded shapes to create charming plush toys, making them a cohesive collection for anyone fond of whimsical creations. [INTERNAL LINK NEEDED: topic]
- Pumpkin Bear — Sharing a cute aesthetic with our dragon, this pattern uses elements of nature in a delightful way. [INTERNAL LINK NEEDED: topic]
Conclusion
Crafting your strawberry dragon amigurumi pattern will result in a standout plush that showcases your crochet skills and creativity. The ample use of super bulky yarn allows for rapid creation while ensuring an inviting feel. Save this pattern to Pinterest for easy reference during your crafting sessions, and consider sharing your finished strawberry dragon on Instagram with the hashtag #StrawberryDragon. What colors will you choose to make your strawberry dragon uniquely yours?









