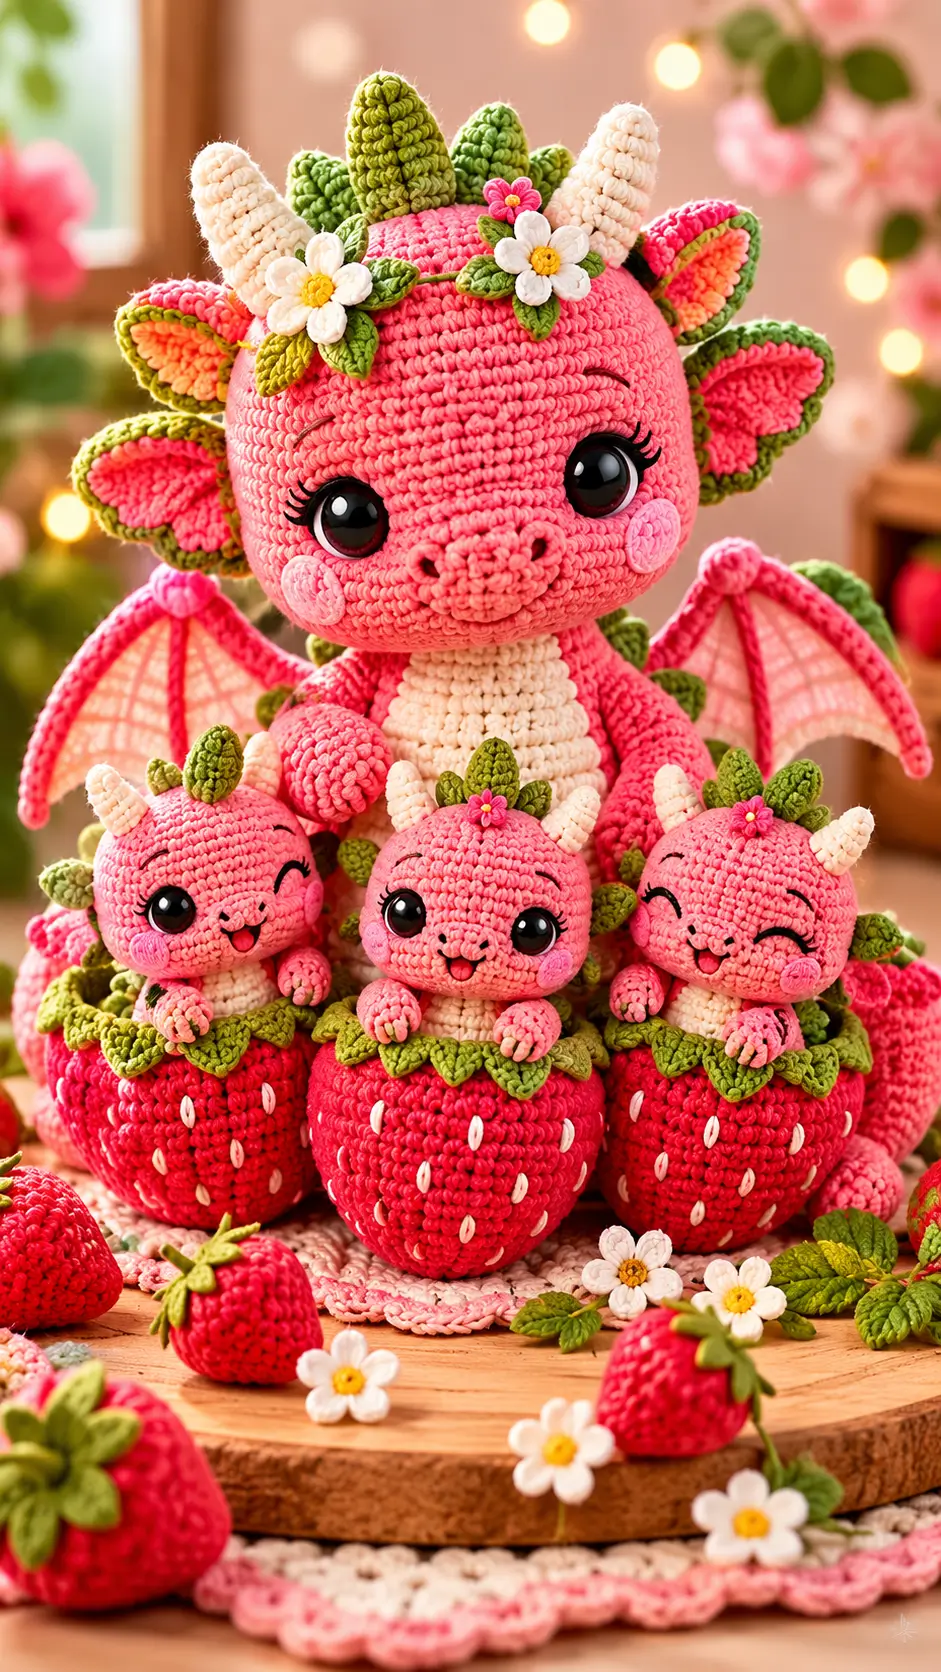
Strawberry dragons put fruit seeds where scales usually sit, so wing weight and leaf spikes matter before the face is even placed. This strawberry dragon amigurumi crochet pattern uses bulky pink yarn, a 4 mm hook, 16 mm safety eyes, and a medium 25 cm build for intermediate makers. The finished toy stands on its own for shelf styling, market display, or a themed nursery prop.
The Design: What Makes Strawberry Different
This pink dragon amigurumi needs a wide head, short limbs, and a heavy strawberry base so the character reads as dragon first and fruit second. The horns stay cream and clean because the leafy crown already adds visual weight across the forehead. Wings are made as folded circles rather than thin triangles; that choice reduces edge curling on chenille yarn and gives the membrane a rounded strawberry-petal outline. Leaf spikes are flattened cones, not loose appliqués, so they sit like scales along the back. A common error in a fruit dragon crochet pattern is making every accent large. When cheeks, flowers, horns, and leaves all compete, the snout disappears. This amigurumi dragon pattern keeps the snout raised and places the cheeks low.
Project Info at a Glance
| Skill Level | Time | Finished Size | Hook | Best For |
|---|---|---|---|---|
| Intermediate | 6–8 hours | 25 cm | 4.0 mm | Display toy, market table, themed gift set |
Materials and Tools
Yarn
- Strawberry pink — bulky/category 5 chenille — 90 g — Premier Basix Chenille or similar
- Cream — bulky/category 5 chenille — 18 g — belly and horns
- Olive green — bulky/category 5 chenille — 25 g — leaves, spikes, ear rims
- Red — bulky/category 5 chenille — 35 g — strawberry base
- Blush pink — bulky/category 5 chenille — 8 g — cheek patches and inner ears
- White — worsted cotton or chenille scraps — 6 g — daisy petals and strawberry seeds
- Yellow — worsted cotton scrap — 2 g — flower centers
Tools
- Hook 4.0 mm
- 16 mm plastic safety eyes
- Polyester fiberfill
- Yarn needle
- Locking stitch markers
- Embroidery needle
- Black embroidery thread
- Pins
- Scissors
Abbreviations
- MR = magic ring
- sc = single crochet
- inc = increase
- dec = decrease
- sl st = slip stitch
- ch = chain
- BLO = back loop only
- FO = fasten off
For invisible decrease, work through the front loops of the next two stitches before the final yarn-over, which reduces a seam ridge on the face.
Pattern — Step by Step
Work in a continuous spiral unless noted.
Head
Yarn: strawberry pink
R1: 6 sc in MR (6)
R2: inc ×6 (12)
R3: (sc, inc) ×6 (18)
R4: (2 sc, inc) ×6 (24)
R5: (3 sc, inc) ×6 (30)
R6: (4 sc, inc) ×6 (36)
R7–R13: sc around (36)
R14: (4 sc, dec) ×6 (30)
R15: (3 sc, dec) ×6 (24)
R16: (2 sc, dec) ×6 (18)
R17: (sc, dec) ×6 (12)
Insert safety eyes between R9 and R10, about 9 stitches apart. Stuff firmly before the final round.
R18: dec ×6 (6)
Fasten off. Leave 30 cm tail.
Body
Yarn: strawberry pink
R1: 6 sc in MR (6)
R2: inc ×6 (12)
R3: (sc, inc) ×6 (18)
R4: (2 sc, inc) ×6 (24)
R5: (3 sc, inc) ×6 (30)
R6: (4 sc, inc) ×6 (36)
R7–R11: sc around (36)
R12: (4 sc, dec) ×6 (30)
R13: (3 sc, dec) ×6 (24)
R14: (2 sc, dec) ×6 (18)
R15: (sc, dec) ×6 (12)
Stuff the lower half harder than the shoulder area so the head sits level.
R16: dec ×6 (6)
Fasten off. Leave 35 cm tail.
Belly Patch
Yarn: cream
Ch 7.
Rnd 1: sc in second ch from hook, 4 sc, 3 sc in last ch, work along opposite side, 4 sc, inc (14)
Rnd 2: inc, 4 sc, inc ×3, 4 sc, inc ×2 (20)
Rnd 3: (sc, inc), 4 sc, (sc, inc) ×3, 4 sc, (sc, inc) ×2 (26)
Sl st to finish.
Fasten off. Leave 25 cm tail.
Snout
Yarn: strawberry pink
R1: 6 sc in MR (6)
R2: inc ×6 (12)
R3: sc around (12)
Stuff lightly. Too much stuffing makes the nostrils tilt upward.
Fasten off. Leave 20 cm tail.
Horns
Yarn: cream
Make 2.
R1: 6 sc in MR (6)
R2: sc around (6)
R3: inc ×6 (12)
R4–R6: sc around (12)
Pin horns on R3–R6 of the head, outside the leaf spikes.
Fasten off. Leave 20 cm tail.
Leaf Ears
Yarn: olive green outer, blush pink insert
Make 2 outer pieces.
R1: 6 sc in MR (6)
R2: inc ×6 (12)
R3: (sc, inc) ×6 (18)
Fold flat and stitch the lower edge closed (18 edge stitches).
Make 2 pink inserts.
R1: 6 sc in MR (6)
R2: inc ×6 (12)
Sl st to finish (12).
Fasten off. Sew pink insert to the green ear before attaching.
Wings
Yarn: blush pink with strawberry pink edge
Make 2.
R1: 6 sc in MR (6)
R2: inc ×6 (12)
R3: (sc, inc) ×6 (18)
R4: (2 sc, inc) ×6 (24)
Fold the circle in half. Work through both layers with 12 sc across the top edge (12).
Border: ch 2, sl st in next st, sc in next st, hdc in next st, ch 2, sl st in next st; repeat along curved edge.
Fasten off. Leave 30 cm tail.
Arms / Front Legs
Yarn: strawberry pink
Make 2.
R1: 6 sc in MR (6)
R2: inc ×6 (12)
R3–R6: sc around (12)
Stuff only the paw end. Flatten the open edge before closing.
R7: dec ×6 (6)
Fasten off. Leave 22 cm tail.
Back Legs
Yarn: strawberry pink
Make 2.
R1: 6 sc in MR (6)
R2: inc ×6 (12)
R3: (sc, inc) ×6 (18)
R4–R5: sc around (18)
R6: (sc, dec) ×6 (12)
R7: dec ×6 (6)
Add three cream claw stitches across the front after sewing.
Fasten off. Leave 25 cm tail.
Tail
Yarn: strawberry pink
R1: 6 sc in MR (6)
R2: sc around (6)
R3: inc ×6 (12)
R4–R6: sc around (12)
R7: (sc, inc) ×6 (18)
R8: sc around (18)
R9: (2 sc, inc) ×6 (24)
R10–R11: sc around (24)
R12: (2 sc, dec) ×6 (18)
R13: (sc, dec) ×6 (12)
R14: dec ×6 (6)
Stuff as you go. Keep the tail base firm enough to balance the wings.
Fasten off. Leave 30 cm tail.
Back Leaf Spikes
Yarn: olive green
Make 7.
R1: 6 sc in MR (6)
R2: sc around (6)
R3: inc ×6 (12)
R4: sc around (12)
Flatten each spike and stitch the base closed (6 edge stitches).
Fasten off. Leave 15 cm tail per spike.
Cheek Patches
Yarn: blush pink
Make 2.
R1: 6 sc in MR (6)
R2: inc ×6 (12)
Sl st to finish (12).
Fasten off. Leave 18 cm tail.
Daisy Flowers
Yarn: yellow center, white petals
Make 2.
Center:
R1: 6 sc in MR (6)
Sl st to close (6).
Petals:
Join white yarn. In each stitch: ch 3, sl st in second ch from hook, sc in next ch, sl st into same center stitch. Repeat 6 petals.
Fasten off. Leave 18 cm tail.
Strawberry Base Accessory
Yarn: red, green leaves, white seed embroidery
R1: 6 sc in MR (6)
R2: inc ×6 (12)
R3: (sc, inc) ×6 (18)
R4: (2 sc, inc) ×6 (24)
R5: (3 sc, inc) ×6 (30)
R6: (4 sc, inc) ×6 (36)
R7–R10: sc around (36)
R11: (4 sc, dec) ×6 (30)
R12: (3 sc, dec) ×6 (24)
R13: (2 sc, dec) ×6 (18)
R14: (sc, dec) ×6 (12)
Stuff heavily so the dragon can sit on top without collapsing the berry.
R15: dec ×6 (6)
Fasten off. Weave end closed.
Green leaves: Make 6.
R1: 6 sc in MR (6)
R2: inc ×6 (12)
Flatten and stitch closed (6 edge stitches).
Sew leaves around the top of the strawberry. Add short white seed stitches across the red body.
Assembly
- Sew the head to the body with the head tilted slightly forward.
- Attach the cream belly patch centered on the front of the body.
- Sew the snout between the eyes, with its top edge touching R10 of the head.
- Add nostrils with two short black stitches, then embroider the mouth below the snout.
- Sew cheek patches low and wide, one under each eye.
- Attach arms on the upper body at R8–R10, angled toward the belly.
- Sew back legs at the base of the body so the dragon sits without tipping.
- Add horns, ears, wings, tail, and back leaf spikes in that order.
- Sew daisies near the horns and attach the strawberry base under the dragon.
- Weave all tails through the body for at least 4 cm before trimming.
The completed dragon measures about 25 cm when worked with bulky yarn and a 4 mm hook.
7 Technical Tips
- Stitch marker drift: When the marker shifts more than 2 stitches left by R10, the snout will sit off-center. Move the marker only at the end of a round, then write down the change.
- Stuffing firmness: A 25 cm bulky dragon needs a head that rebounds slowly when pressed 1 cm. Loose stuffing lets the horns pull the forehead flat.
- Invisible decrease gaps: Chenille yarn shows holes if a decrease is worked through both loops. Use front-loop invisible decreases on R14–R18 of the head and R12–R16 of the body.
- Eye placement timing: Place 16 mm eyes before closing R17 of the head. Waiting until R18 leaves too little room to adjust the 9-stitch eye gap.
- Velvet tension: Velvet-style yarn grows if pulled hard, especially on wings. Keep each wing round within 24 stitches and compare both pieces before edging.
- Pinning error: Wings sewn too high cover the ears and crowd the horns. Pin the top wing edge one round below the head-body seam before sewing.
- Tail weaving: Short tails can pull free from chenille after handling. Weave every sewing tail through at least 4 cm of fabric, reverse once, then trim.
Conclusion
This pattern solves the strawberry-dragon balance problem by keeping the head rounded, the snout visible, the wings light, and the leaf spikes narrow. The next practical step is to crochet the head first, then check eye spacing before any accessories are made. That single check controls the expression, snout position, and horn placement. Share the finished strawberry dragon on Pinterest as a process pin and on Instagram with a front, side, and berry-base photo. Use #StrawberryDragonAmigurumi for the finished post. Final note for this strawberry dragon amigurumi crochet pattern: will your leaf spikes run only down the back, or continue onto the tail?









