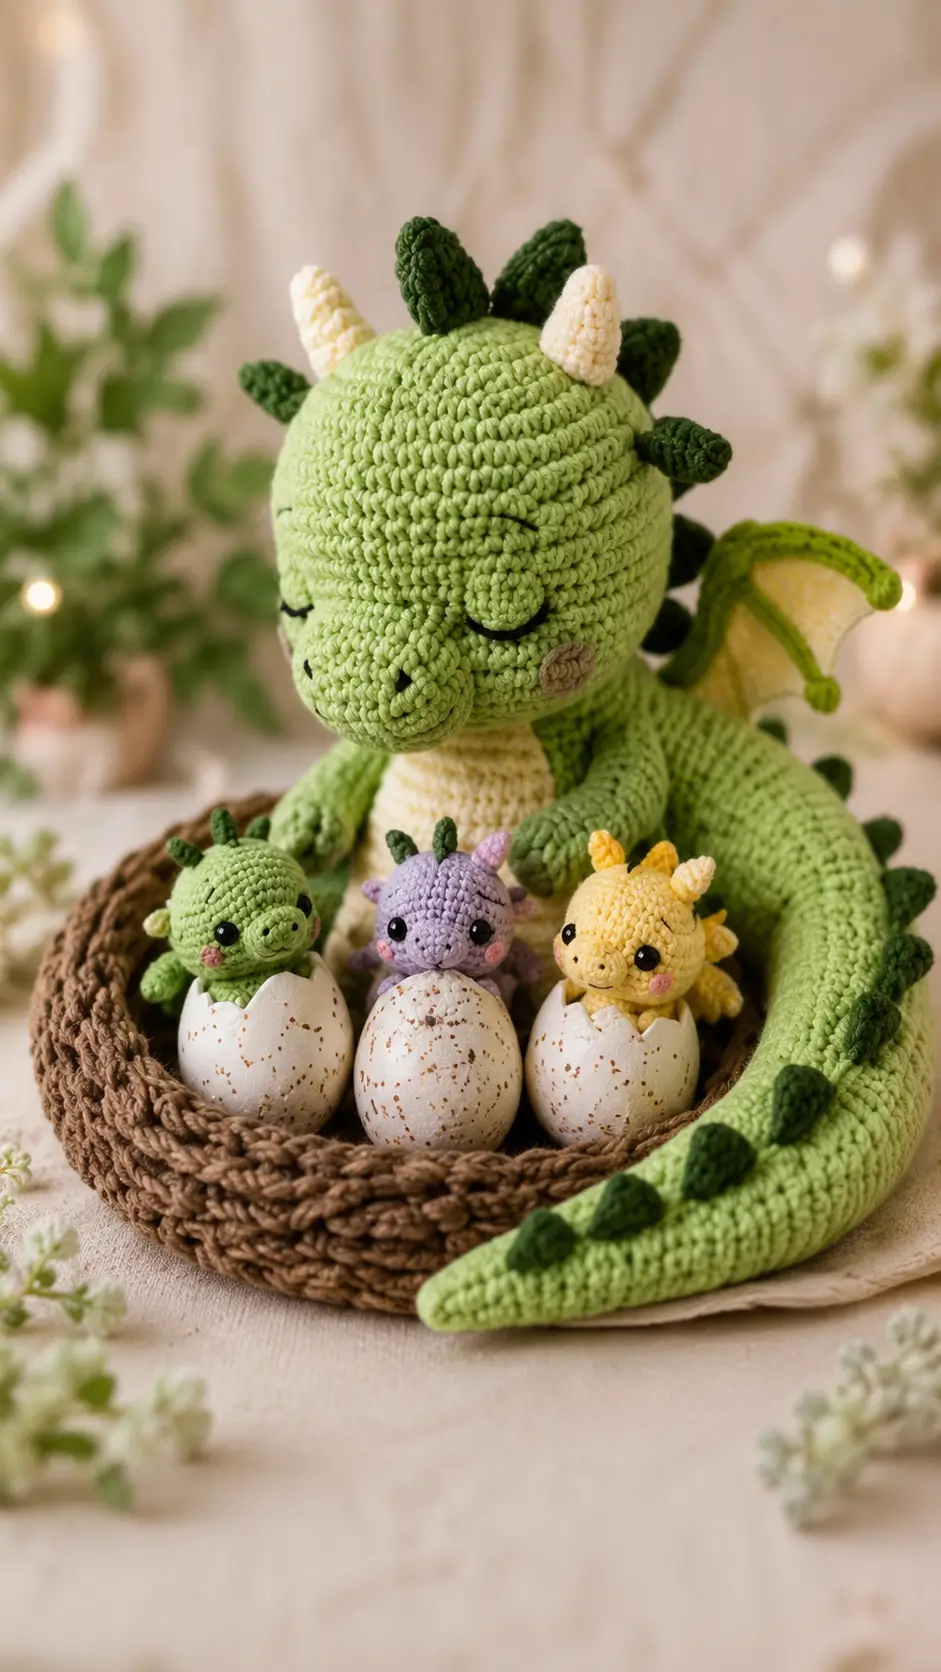
A sleeping dragon needs horns positioned before the brow line, not after it; this dragon amigurumi crochet pattern builds the adult first, then the babies, eggs, and nest. The materials use cotton yarn, a 2.5 mm hook, and embroidered adult eyes for a safe display finish. Finished height is 18 cm. Skill level is intermediate because wings, cones, and assembly drive the accuracy.
The Design: What Makes This Sleeping Dragon Different
The adult dragon is built as a curled guardian, so the tail is longer than a standard seated toy and stays open at the base for angled sewing. That choice gives the figure its nest-wrapping posture instead of a plain upright silhouette. The closed eyes are embroidered rather than set with plastic eyes because the main face reads as sleeping, while the hatchlings still use small 6 mm safety eyes for contrast. For a dragon amigurumi crochet pattern with eggs, scale matters: the baby heads must stay below the egg rim, or the scene turns crowded. The wing panel is flat, but the dark rib line gives it structure. A common mistake in a baby dragon crochet pattern is placing horns too far back; horns should frame the face before the spikes begin.
Project Info at a Glance
| Skill Level | Time | Finished Size | Hook | Best For |
|---|---|---|---|---|
| Intermediate | 8–10 hours | 18 cm adult height | 2.5 mm | Shelf display, nursery decor, fantasy markets |
Materials and Tools
Yarn
- Light green — cotton sport/DK — 50 g — Scheepjes Catona, Paintbox Cotton DK, or similar
- Cream/light yellow — cotton sport/DK — 25 g — horns, belly, wing panels
- Dark green — cotton sport/DK — 10 g — spikes, wing ribs
- White — cotton sport/DK — 30 g — egg cups
- Brown — cotton sport/DK held double, or worsted cotton — 60 g — nest
- Tan-pink — cotton scraps — 3 g — cheek patches
- Lavender and yellow — cotton scraps — 15 g total — alternate baby dragons
Tools
- Hook 2.5 mm
- 6 mm safety eyes for hatchlings only
- Black embroidery thread for adult closed eyes and nostrils
- Polyester stuffing
- Tapestry needle
- Stitch markers
- Pins
- Scissors
Abbreviations
MR = magic ring; sc = single crochet; inc = 2 sc in one stitch; dec = invisible decrease; sl st = slip stitch; ch = chain; BLO = back loop only; st = stitch; R = round or row. Invisible decrease works through front loops only, so the fabric pulls inward without a raised two-loop seam.
Pattern — Step by Step
Continuous spiral unless noted. The adult dragon uses a large 42-stitch plateau. The baby heads and eggs use smaller plateaus so the nest keeps scale.
Adult Head
Yarn: light green
R1: 6 sc in MR (6)
R2: inc ×6 (12)
R3: (sc, inc) ×6 (18)
R4: (2 sc, inc) ×6 (24)
R5: (3 sc, inc) ×6 (30)
R6: (4 sc, inc) ×6 (36)
R7: (5 sc, inc) ×6 (42)
R8–15: sc around (42)
R16: (5 sc, dec) ×6 (36)
R17: (4 sc, dec) ×6 (30)
R18: (3 sc, dec) ×6 (24)
Stuff firmly. Embroider closed eyes across R10–12, about 7 stitches wide, before the opening gets too small.
R19: (2 sc, dec) ×6 (18)
R20: (sc, dec) ×6 (12)
R21: dec ×6 (6)
Fasten off. Leave 20 cm tail.
Adult Body
Yarn: light green
R1: 6 sc in MR (6)
R2: inc ×6 (12)
R3: (sc, inc) ×6 (18)
R4: (2 sc, inc) ×6 (24)
R5: (3 sc, inc) ×6 (30)
R6: (4 sc, inc) ×6 (36)
R7: (5 sc, inc) ×6 (42)
R8–15: sc around (42)
R16: (5 sc, dec) ×6 (36)
R17–18: sc around (36)
R19: (4 sc, dec) ×6 (30)
R20: (3 sc, dec) ×6 (24)
R21: (2 sc, dec) ×6 (18)
Stuff the lower body firmly and the neck area harder than the belly.
R22: (sc, dec) ×6 (12)
R23: dec ×6 (6)
Fasten off. Leave 25 cm tail.
Snout
Yarn: light green
R1: 6 sc in MR (6)
R2: inc ×6 (12)
R3: (sc, inc) ×6 (18)
R4–5: sc around (18)
R6: (sc, dec) ×6 (12)
Fasten off. Leave 25 cm tail.
Stuff lightly. Embroider two short nostril marks over R3–4.
Horns
Yarn: cream
R1: 6 sc in MR (6)
R2: sc around (6)
R3: inc ×6 (12)
R4–5: sc around (12)
Fasten off. Leave 18 cm tail.
Do not overstuff; the base must flatten against the head.
Cheek Patches
Yarn: tan-pink
R1: 6 sc in MR (6)
R2: inc ×6 (12)
Sl st to first st.
Fasten off. Leave 15 cm tail.
Make 2. Sew under the eye curve, not beside the snout seam.
Front Legs / Arms
Yarn: light green
R1: 6 sc in MR (6)
R2: inc ×6 (12)
R3–8: sc around (12)
Stuff only the paw half so the shoulder can lie flat.
R9: dec ×6 (6)
Fasten off. Leave 20 cm tail. Make 2.
Back Legs
Yarn: light green
R1: 6 sc in MR (6)
R2: inc ×6 (12)
R3: (sc, inc) ×6 (18)
R4–5: sc around (18)
R6: (sc, dec) ×6 (12)
R7–8: sc around (12)
R9: dec ×6 (6)
Fasten off. Leave 20 cm tail. Make 2.
Belly Patch
Yarn: cream
Ch 7.
R1: sc in second ch from hook and across (6)
R2: inc, 4 sc, inc (8)
R3: inc, 6 sc, inc (10)
R4: sc across (10)
R5: inc, 8 sc, inc (12)
R6–10: sc across (12)
R11: dec, 8 sc, dec (10)
R12: dec, 6 sc, dec (8)
R13: dec, 4 sc, dec (6)
Fasten off. Leave 30 cm tail.
Block flat with pins before sewing.
Wings
Yarn: cream panel with dark green rib
Make 2 cream panels.
Ch 7.
R1: sc in second ch from hook and across (6)
R2: inc, 4 sc, inc (8)
R3: sc across (8)
R4: inc, 6 sc, inc (10)
R5: sc across (10)
R6: dec, 6 sc, dec (8)
R7: dec, 4 sc, dec (6)
Sl st around the outer edge. Fasten off.
Dark green rib: ch 10, sl st back across (9). Make 2 per wing. Sew one rib along the top edge and one diagonal rib from wing base to lower point.
Tail
Yarn: light green
R1: 6 sc in MR (6)
R2–3: sc around (6)
R4: inc ×6 (12)
R5–8: sc around (12)
R9: (sc, inc) ×6 (18)
R10–18: sc around (18)
R19: (2 sc, inc) ×6 (24)
R20–30: sc around (24)
R31: (2 sc, dec) ×6 (18)
R32–36: sc around (18)
R37: (sc, dec) ×6 (12)
Fasten off. Leave 35 cm tail.
Stuff as you go. Curve the tail around the nest before final sewing.
Back Spikes
Yarn: dark green
R1: 6 sc in MR (6)
R2: sc around (6)
R3: inc ×6 (12)
R4: sc around (12)
Fasten off. Leave 15 cm tail. Make 11: three for head, four for back, four for tail.
Stuff only the largest-looking spikes; flat spikes sew cleaner along the curve.
Baby Dragon Body-and-Head
Yarn: light green, lavender, or yellow
R1: 6 sc in MR (6)
R2: inc ×6 (12)
R3: (sc, inc) ×6 (18)
R4: (2 sc, inc) ×6 (24)
R5–8: sc around (24)
Insert 6 mm safety eyes between R5 and R6, 5 stitches apart.
R9: (2 sc, dec) ×6 (18)
R10: (sc, dec) ×6 (12)
R11: dec ×6 (6)
Fasten off. Leave 18 cm tail. Make 3.
Baby Snouts
Yarn: same as each baby
R1: 6 sc in MR (6)
R2: inc ×6 (12)
R3: sc around (12)
Fasten off. Leave 12 cm tail. Make 3.
Flatten slightly and sew below the eyes.
Baby Horns and Spikes
Yarn: cream or dark green
R1: 6 sc in MR (6)
R2: sc around (6)
Fasten off. Leave 10 cm tail. Make 6 horns and 9 tiny spikes.
Use horns on the forehead and spikes down the back edge of each baby head.
Egg Cups
Yarn: white
R1: 6 sc in MR (6)
R2: inc ×6 (12)
R3: (sc, inc) ×6 (18)
R4: (2 sc, inc) ×6 (24)
R5–8: sc around (24)
R9: BLO sc around (24)
Cracked rim: (sc, ch 2, sl st in second ch from hook, sc in next st) around, adjusting final repeat to fit.
Fasten off. Weave in. Make 3.
Nest
Yarn: brown, held double
R1: 6 sc in MR (6)
R2: inc ×6 (12)
R3: (sc, inc) ×6 (18)
R4: (2 sc, inc) ×6 (24)
R5: (3 sc, inc) ×6 (30)
R6: (4 sc, inc) ×6 (36)
R7: (5 sc, inc) ×6 (42)
R8: BLO sc around (42)
R9–10: sc around (42)
R11: (6 sc, inc) ×6 (48)
R12–13: sc around (48)
Sl st to finish.
Optional rim: ch 60, twist lightly, and sew around the upper edge for a braided nest line.
Assembly
- Sew the adult head to the body with the head tilted slightly downward.
- Attach the snout across R10–15 of the head and add nostril embroidery.
- Sew the horns between R5–8, keeping them forward of the first head spike.
- Place cheek patches below the closed eyes, 2 stitches away from the snout edge.
- Sew the belly patch down the body center, stopping before the lower curve.
- Attach front legs on each side of the belly patch and back legs near the base.
- Pin the wings to the back between the shoulder line and mid-body, then sew only the rib edge.
- Sew the tail around the nest curve, leaving the tip visible in front.
- Add head, back, and tail spikes in a single center line.
- Place babies in egg cups, set eggs into the nest, and tack the adult tail to the nest rim.
The finished piece is a sleeping adult dragon guarding three hatchlings in cracked eggs.
7 Technical Tips
- Stitch marker drift: If the marker shifts more than 3 stitches by R12, the eye embroidery will lean. Move the marker only at the back of the head after a full round check.
- Stuffing firmness: A soft neck collapses once the horns and snout are sewn on. Pack the final 3 cm of the body neck until it resists light finger pressure.
- Invisible decrease gaps: Standard decreases leave diagonal holes on the adult face. Work dec through front loops only on R16–21 of the head.
- Eye placement timing: Safety eyes on the babies must go in before R9. After R9, the 24-stitch opening tightens too much for washers.
- Wing curl: Flat wing panels twist when the edge tension is tighter than the center. Sew the dark green rib with loose whip stitches, about 5 mm apart.
- Spike alignment: A back spike row that shifts left by even 2 stitches makes the dragon look rolled over. Pin all 11 spikes before sewing the first one.
- Tail weaving: A short yarn tail can loosen where the tail meets the nest. Leave at least 35 cm at tail fasten-off and sew through the body twice.
Conclusion
This set works because the adult dragon, babies, eggs, and nest are scaled as one scene rather than four separate toys. Make the adult first, then test one baby inside one egg cup before repeating the other two. That single fit check prevents crowded shells and keeps the hatchlings below the broken rim. For posting, photograph the dragon from the front-left side so the sleeping face, horns, wing, and curled tail all read in one frame. Share the finished dragon amigurumi crochet pattern on Pinterest and Instagram with #SleepingDragonNest. Which hatchling color should sit in the center egg: green, lavender, or yellow?









