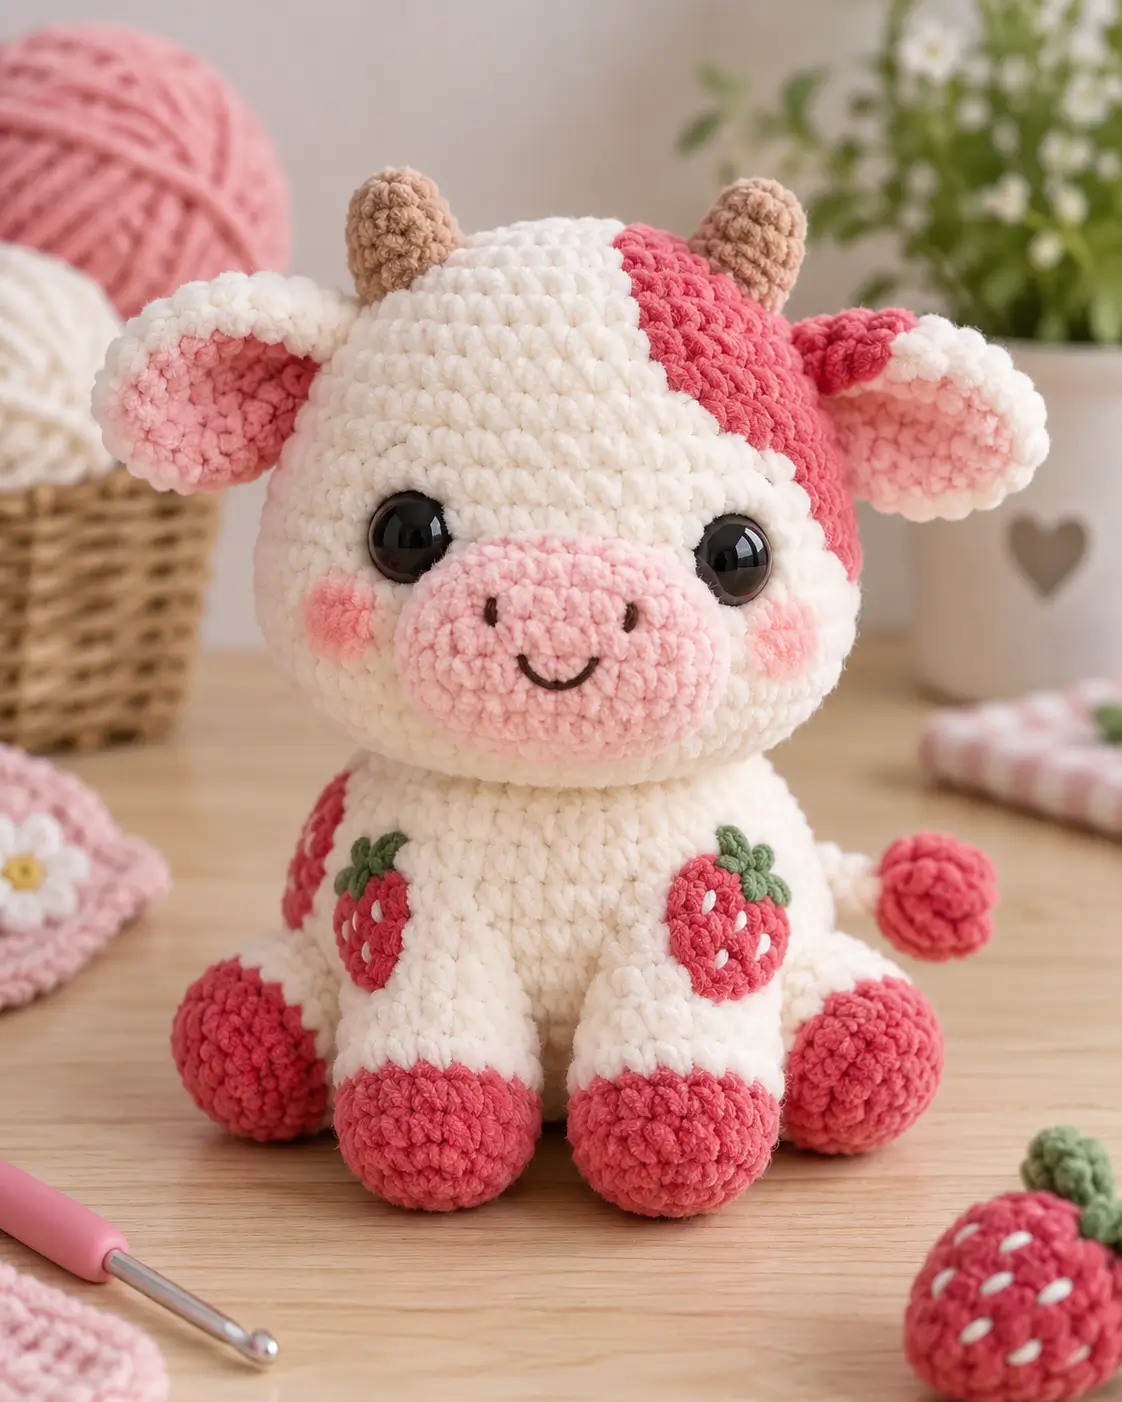
A strawberry cow needs its fruit markings to read as strawberries rather than ordinary pink cow spots. This strawberry cow amigurumi crochet pattern uses super-bulky plush yarn, a 4.5 mm hook and produces a finished cow approximately 30 cm tall. The construction is intermediate because it requires shaped pieces and controlled assembly. Its seated base also makes the finished cow practical for shelf display.
The Design: What Makes This Strawberry Cow Different
The head is deliberately wider than the torso because this character depends on a large face, horizontal muzzle and widely spaced ears. A 36-stitch head plateau provides enough circumference for 14 mm eyes without forcing the muzzle too low.
Next, the four legs are separate rather than crocheted directly into the body. That construction matters for the sitting posture: the back legs can project sideways while the front legs remain vertical. The crochet strawberry cow then rests on four broad pink hooves instead of tipping toward the muzzle.
The asymmetric pink crown patch is another structural detail. It breaks up the white head without hiding the tan horns. Two strawberry appliqués turn the torso into a recognizable strawberry cow plush rather than a standard pink-spotted cow.
A common mistake is sewing the back legs too low, which pushes the body forward instead of creating a stable seated triangle.
Project Info at a Glance
| Skill Level | Time | Finished Size | Hook | Best For |
|---|---|---|---|---|
| Intermediate | 4–6 hours | Approx. 30 cm | 4.5 mm | Sitting plush/display toy |
Materials and Tools
Yarn
- Ivory/white — super-bulky chenille — 100 g — Himalaya Dolphin Baby or comparable plush yarn
- Strawberry pink — super-bulky chenille — 50 g — matching plush yarn
- Pale pink — super-bulky chenille — 15–20 g — muzzle, ears and cheeks
- Tan/beige — super-bulky chenille — 10 g — horns
- Muted green — DK/worsted cotton or smooth acrylic — 5 g — strawberry leaves
- White — DK cotton scrap — strawberry seeds
- Black — DK cotton scrap — nostrils and mouth
Tools
- 4.5 mm crochet hook
- 14 mm safety eyes ×2
- Polyester stuffing
- Yarn needle
- Stitch markers
- Scissors
- Pins
Safety note: Safety eyes are not suitable for toys intended for children under three. Use securely embroidered eyes when making the cow for a young child.
Abbreviations
- MR — magic ring
- sc — single crochet
- inc — 2 sc in one stitch
- dec — decrease
- sl st — slip stitch
- ch — chain
- BLO — back loop only
- FO — fasten off
For an invisible decrease, insert the hook through the front loops of the next two stitches before completing one single crochet across both.
Strawberry Cow Amigurumi Pattern — Step by Step
Work in a continuous spiral unless a section states otherwise. Place a stitch marker in the first stitch of each round and move it upward as you work.
Head
Yarn: ivory/white.
R1: 6 sc in MR (6)
R2: inc ×6 (12)
R3: (1 sc, inc) ×6 (18)
R4: (2 sc, inc) ×6 (24)
R5: (3 sc, inc) ×6 (30)
R6: (4 sc, inc) ×6 (36)
R7–R13: 36 sc (36)
R14: (4 sc, dec) ×6 (30)
R15: (3 sc, dec) ×6 (24)
Insert the 14 mm safety eyes between R10 and R11, approximately 8 stitches apart. Begin stuffing the head firmly and evenly.
R16: (2 sc, dec) ×6 (18)
R17: (1 sc, dec) ×6 (12)
Finish stuffing before the opening becomes too small.
R18: dec ×6 (6)
Fasten off. Leave a 25 cm tail and close the opening.
Body
Yarn: ivory/white.
R1: 6 sc in MR (6)
R2: inc ×6 (12)
R3: (1 sc, inc) ×6 (18)
R4: (2 sc, inc) ×6 (24)
R5: (3 sc, inc) ×6 (30)
R6: (4 sc, inc) ×6 (36)
R7–R10: 36 sc (36)
R11: (4 sc, dec) ×6 (30)
R12–R13: 30 sc (30)
R14: (3 sc, dec) ×6 (24)
R15–R16: 24 sc (24)
R17: (2 sc, dec) ×6 (18)
R18: (1 sc, dec) ×6 (12)
R19: dec ×6 (6)
Stuff the lower half firmly. Use slightly less stuffing around the neck seam so the head can sit cleanly against the body.
Fasten off. Leave a 30 cm sewing tail.
Front Legs — Make 2
Start with strawberry pink yarn.
R1: 6 sc in MR (6)
R2: inc ×6 (12)
R3: (1 sc, inc) ×6 (18)
R4–R5: 18 sc (18)
Change to ivory/white yarn.
R6: (1 sc, dec) ×6 (12)
R7–R10: 12 sc (12)
Stuff the pink hoof firmly. Use lighter stuffing in the upper leg so the attachment seam remains flat.
R11: dec ×6 (6)
Fasten off. Leave a 25 cm tail.
Back Legs — Make 2
Start with strawberry pink yarn.
R1: 6 sc in MR (6)
R2: inc ×6 (12)
R3: (1 sc, inc) ×6 (18)
R4: (2 sc, inc) ×6 (24)
R5–R6: 24 sc (24)
Change to ivory/white yarn.
R7: (2 sc, dec) ×6 (18)
R8: 18 sc (18)
R9: (1 sc, dec) ×6 (12)
R10–R11: 12 sc (12)
R12: dec ×6 (6)
Stuff firmly at the pink foot and moderately through the white upper section.
Fasten off. Leave a 30 cm tail.
Muzzle
Yarn: pale pink.
R1: 6 sc in MR (6)
R2: inc ×6 (12)
R3: (1 sc, inc) ×6 (18)
R4: (2 sc, inc) ×6 (24)
R5–R6: 24 sc (24)
Add a thin layer of stuffing. Embroider two short vertical black nostrils approximately 5 stitches apart. Add a shallow curved mouth below the nostrils.
Fasten off. Leave a 30 cm sewing tail.
Ears — Make 2
Start with pale pink yarn.
R1: 6 sc in MR (6)
R2: inc ×6 (12)
R3: (1 sc, inc) ×6 (18)
Change to ivory/white yarn.
R4: (2 sc, inc) ×6 (24)
R5: 24 sc (24)
Do not stuff. Fold each piece slightly into a cupped ear shape and pinch the base before sewing.
Fasten off. Leave a 25 cm tail.
Horns — Make 2
Yarn: tan/beige.
R1: 6 sc in MR (6)
R2: inc ×6 (12)
R3–R5: 12 sc (12)
Add a small amount of stuffing. Keep the bottom of each horn relatively flat.
Fasten off. Leave a 20 cm tail.
Tail
Start with ivory/white yarn.
Ch 11.
Row 1: sl st into the second ch from the hook and each remaining ch (10).
Fasten off the ivory yarn.
For the tail tuft, join strawberry pink yarn.
R1: 6 sc in MR (6)
R2: inc ×6 (12)
R3: 12 sc (12)
R4: dec ×6 (6)
Stuff the tuft lightly, close it and sew it securely to the chain tail. Leave approximately 20 cm at the body end for attachment.
Cheek Patches — Make 2
Yarn: pale pink.
R1: 6 sc in MR (6)
R2: inc ×6 (12)
Sl st into the first stitch. Fasten off and leave a 15 cm sewing tail. Keep both circles flat.
Pink Head Patch
Yarn: strawberry pink.
R1: 6 sc in MR (6)
R2: inc ×6 (12)
R3: (1 sc, inc) ×6 (18)
R4: (2 sc, inc) ×6 (24)
Fasten off with a 30 cm tail. During assembly, stretch the circle gently into an irregular oval instead of sewing it as a symmetrical disk.
Strawberry Appliqués — Make 2
Start with strawberry pink yarn.
R1: 6 sc in MR (6)
R2: inc ×6 (12)
R3: (1 sc, inc) ×6 (18)
R4: 18 sc (18)
R5: (1 sc, dec) ×6 (12)
Flatten the piece instead of stuffing it. Pinch the lower edge slightly to form the strawberry point.
Fasten off and leave a 20 cm sewing tail.
Using muted green yarn, work the leafy top:
Row 1: 5 sc (5)
Row 2: Work (sl st, ch 3, sl st) across the upper edge to create three small leaf points.
Fasten off. With white yarn, embroider 5–7 short seed stitches across each strawberry.
Optional Small Body Spot
Yarn: strawberry pink.
R1: 6 sc in MR (6)
R2: inc ×6 (12)
R3: (1 sc, inc) ×6 (18)
Fasten off with a 20 cm tail. Position the patch partly behind one strawberry appliqué to reproduce the layered markings visible on the cow.
Assembly
- Pin the head centrally over the body opening. Sew through matching stitch columns so the muzzle line remains horizontal.
- Place the muzzle across the lower front of the head. Its upper edge should sit approximately two rounds below the bottom of the eyes.
- Sew the cheek patches beside the muzzle rather than underneath it. Keep both circles at approximately the same height.
- Attach the front legs to the lower-front body with the pink hooves facing forward. Leave a narrow gap between the two legs.
- Position the back legs on the lower sides. Pin both pieces before sewing and check that the cow sits level on all four hooves.
- Sew the ears high on the sides of the head. Angle the openings slightly forward and downward.
- Attach each horn between the ears, approximately 4–5 stitches from the center line of the head.
- Sew the pink head patch around the right horn area while keeping its lower edge clear of the safety eye. Attach the tail to the rear side of the body.
- Place one strawberry appliqué on each side of the front torso. Sew around the berry first, then tack the green leaves independently so their points remain visible.
- Weave every chenille tail through several internal stitches, trim concealed ends and test the seated base on a flat surface.
The completed cow should rest primarily on its back legs and front hooves without requiring the tail for support.
7 Technical Tips for a Cleaner Strawberry Cow
- Control marker drift. A missed round start can rotate the decreases and make the head lean. Place a locking marker in the first stitch of every round and move it before working the next round.
- Prevent an under-stuffed muzzle. Too little filling causes the 24-stitch muzzle to collapse around the embroidered mouth. Spread a thin layer of stuffing across the full oval instead of forming one central lump.
- Reduce visible decrease gaps. Standard decreases can produce obvious holes in chenille yarn. Work invisible decreases through the front loops and keep the working loop close to the hook shaft.
- Install the eyes before access closes. Adding the eyes after R15 leaves limited room for the washers. Fit the 14 mm eyes after the 36-stitch plateau and before the opening decreases below 24 stitches.
- Control chenille tension. Excessively tight stitches can strip the plush coating and reduce the intended finished size. The 4.5 mm hook should pass through each stitch without forcing the hook head.
- Pin both back legs before sewing. A difference of one round in leg placement can make the sitting cow tilt. Set both upper-leg seams at equal height and test the cow on a flat surface before making permanent stitches.
- Do not cut attachment tails too short. Chenille ends can work loose when only 2–3 cm is buried. Leave at least 15–20 cm on small decorative pieces and weave each tail through several internal stitch columns.
Finishing the Strawberry Cow
The finished construction combines a 36-stitch head, broad sitting body, four independently positioned legs and layered fruit details. That combination matters more than simply changing a standard cow from black to pink.
Before sewing every component permanently, pin the muzzle, ears, horns, legs and strawberries in position and photograph the cow directly from the front. Differences in eye spacing, ear height and leg placement are easier to detect in a flat image.
After assembly, check the bottom of the strawberry cow amigurumi crochet pattern on a level surface and adjust the back legs before securing the final yarn tails. Save the finished project to Pinterest or share it on Instagram with #StrawberryCowAmigurumi.
For another version, keep the body construction unchanged and alter one decorative feature at a time. Would you keep the asymmetric strawberry-pink head patch, or replace it with another strawberry appliqué?









