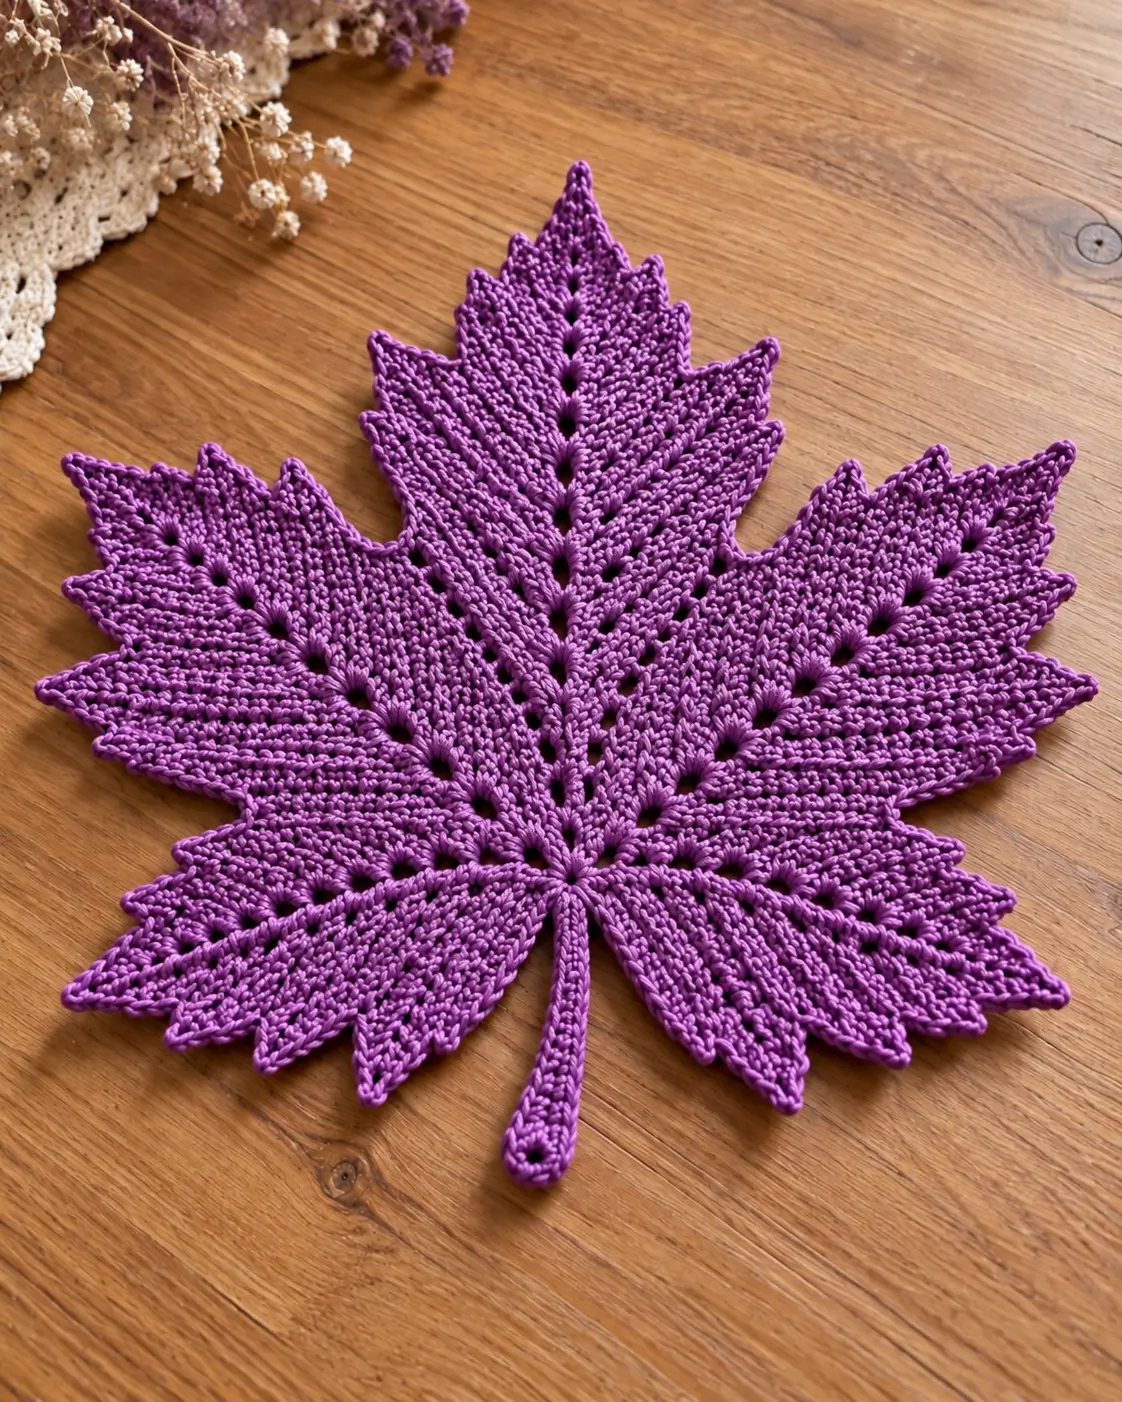
A maple leaf needs five dominant lobes and a strong central vein before the smaller points matter. This crochet maple leaf pattern recreates that structure with one continuous red motif, openwork vein spaces, pointed outer edges and a narrow stem. Use DK or medium-weight cotton with a 3.5–4 mm crochet hook. The finished leaf works as autumn table décor, a large appliqué, placemat or decorative centerpiece.
About the Crochet Maple Leaf Design
The defining feature of this design is its five-lobed outline. One tall central lobe establishes the vertical axis, two large side lobes create the width, and two lower lobes complete the characteristic maple silhouette.
The open spaces are structural as well as decorative. They form visible vein lines running outward from the center while separating the major lobes. Shorter pointed sections along each outer edge create the serrated appearance visible in the photographed leaf.
The stem is worked from the lower center and kept narrow so it does not compete with the leaf body.
Blocking matters on this project. Without firm blocking, the points can curl inward and the five main lobes become less distinct.
Project Information
| Skill Level | Estimated Time | Finished Size | Hook | Construction |
|---|---|---|---|---|
| Intermediate | 3–5 hours | Approx. 25–30 cm wide | 3.5–4 mm | Flat motif |
The finished measurement above is a target for this photo-inspired version rather than a direct measurement of the photographed object. Yarn thickness, hook size and blocking tension will change the final dimensions.
Materials and Tools
Yarn
- Red yarn: DK or light worsted cotton, approximately 50–70 g.
A smooth cotton yarn gives the points and openwork veins stronger definition. Acrylic can also be used, although the finished leaf may require more careful blocking.
Tools
- 3.5–4 mm crochet hook
- Tapestry needle
- Scissors
- Stitch markers
- Tape measure
- Blocking mat
- Rust-resistant blocking pins
Abbreviations
- ch = chain
- sc = single crochet
- hdc = half double crochet
- dc = double crochet
- tr = treble crochet
- dtr = double treble crochet
- sl st = slip stitch
- st/sts = stitch/stitches
- sp = space
- RS = right side
Crochet Maple Leaf Pattern
The leaf is built outward from a compact center. Five sections form the principal lobes. Chain spaces between them create the open vein structure visible in the finished piece.
Center Foundation
Round 1: Ch 6 and join with sl st to the first ch to form a ring.
Round 2: Ch 1, work 10 sc into the ring. Join with sl st to the first sc. (10)
Round 3: Ch 3, dc in same st, ch 2, skip next st, *2 dc in next st, ch 2, skip next st*. Repeat from * around. Join with sl st.
You should now have five paired-dc sections separated by five ch-2 spaces. These sections establish the five main divisions of the maple leaf.
Central Lobe
Join yarn to the upper ch-2 space.
Row 1: Ch 3, work 3 dc into the same space, ch 2, 4 dc into the same space. Turn.
Row 2: Ch 3, dc in next 3 sts, (2 dc, ch 2, 2 dc) in ch-2 space, dc in remaining 4 sts. Turn.
Row 3: Ch 3, dc across to ch-2 space, (2 dc, ch 3, 2 dc) in space, dc across. Turn.
Row 4: Ch 3, skip first st, dc across to center space, (dc, tr, ch 3, tr, dc) in center space, dc across to final 2 sts, skip one st, dc in final st. Turn.
Row 5: Ch 1, skip first st, sc in next 2 sts, hdc in next 2, dc in next 2, tr toward center point, work (tr, ch 3, sl st in first ch, tr) at the tip, then mirror the stitches down the opposite side.
Fasten off.
The central lobe should be the tallest section of the leaf. Do not shorten its final point during blocking.
Left Upper Lobe
Join yarn in the ch-2 space immediately to the left of the central lobe.
Row 1: Ch 3, 3 dc in space, ch 2, 4 dc in same space. Turn.
Row 2: Ch 3, dc across, working (2 dc, ch 2, 2 dc) into the center space. Turn.
Row 3: Ch 3, skip first st, dc toward center, (dc, tr, ch 3, tr, dc) in center space, dc across, skipping the penultimate st.
Row 4: Ch 1, sc, hdc, dc, tr toward the tip. Work ch 3 and sl st into the first ch to form the main point. Mirror the stitch heights down the second side.
Fasten off.
Right Upper Lobe
Work this lobe in the ch-2 space immediately to the right of the central lobe.
Repeat the instructions for the Left Upper Lobe.
Before fastening off, compare both upper side lobes. Their outer tips should finish at approximately the same horizontal level.
Left Lower Lobe
Join yarn in the next unused ch-2 space on the lower left side.
Row 1: Ch 3, 2 dc, ch 2, 3 dc in the same space. Turn.
Row 2: Ch 3, dc across to center space, (dc, tr, ch 2, tr, dc) into space, dc across. Turn.
Row 3: Ch 1, sc in first st, hdc in next, dc in next, tr toward the center. Work (tr, ch 3, sl st in first ch, tr) at the point, then mirror the stitches down the opposite side.
Fasten off.
Right Lower Lobe
Join yarn to the remaining lower-right ch-2 space.
Repeat the instructions for the Left Lower Lobe.
Do not weave in the working tail until the complete outline has been checked for symmetry.
Creating the Serrated Maple Leaf Edge
The photograph contains more than five simple points. Each principal lobe has several smaller teeth along its perimeter. These secondary points are added during an outline round.
Join red yarn at the lower center of the leaf.
Work sc evenly toward the first lower lobe.
At a location where a small tooth is required, work:
(sc, hdc, dc, ch 2, sl st in second ch from hook, dc, hdc, sc)
Continue in sc until the next tooth position.
For a larger secondary point, work:
(sc, hdc, dc, tr, ch 3, sl st in first ch, tr, dc, hdc, sc)
Use larger points close to the main lobe tips and smaller points closer to the valleys.
Continue around the entire leaf. Keep the valleys between the five major lobes comparatively narrow so the maple silhouette remains clear.
Adding the Openwork Veins
The photographed leaf uses open spaces to imitate the primary veins radiating from the center.
If the foundation spaces are not prominent enough after the lobes are completed, add surface crochet beside them.
Insert the hook near the center ring and pull up a loop of red yarn from the back.
Work loose surface slip stitches toward the tip of one lobe. Stop approximately 2–3 cm before the outer point.
Fasten off on the wrong side.
Repeat toward each of the five major lobes.
Keep these surface stitches loose. Tight surface crochet can pull the motif inward and create unwanted ridges.
Crochet Maple Leaf Stem
Join red yarn at the bottom center of the leaf.
Row 1: Ch 20.
Starting in the second ch from hook, work sl st in next 4 ch, sc in next 10 ch, hdc in next 4 ch, 5 hdc in final ch.
Continue along the opposite side of the foundation chain.
Hdc in next 4 ch, sc in next 10 ch and sl st in final 4 ch.
Sl st into the base of the leaf.
Fasten off.
The stem should remain substantially narrower than the lower lobes. If it twists after crocheting, straighten it during blocking instead of adding another round.
Assembly and Shaping
- Place the completed maple leaf on a flat blocking mat with the right side facing upward.
- Pin the central top point first, keeping it directly above the center ring.
- Pin the left and right upper lobe tips at equal distances from the center line.
- Position the two lower lobe tips symmetrically before pinning any smaller teeth.
- Pull the valleys between the main lobes inward slightly to increase separation between the five major sections.
- Pin every large secondary point individually rather than stretching the whole outer edge.
- Open the chain spaces along the five vein lines with the tip of a tapestry needle.
- Straighten the stem and pin it on the same vertical axis as the central lobe.
- Measure from the center to corresponding left and right points and correct differences greater than 5 mm.
- Allow the motif to dry completely before removing the pins and weaving in the remaining yarn ends.
The finished piece should show five dominant lobes, smaller serrated points, radiating openwork veins and one narrow central stem.
How to Make the Maple Points Sharper
Point definition comes from stitch-height changes rather than from pulling the fabric during blocking. A progression from sc to hdc, dc and tr creates an outward slope. A picot or short chain at the top creates the final sharp point.
If a point looks rounded, check the stitches immediately beside the tip. Too many tall stitches on either side make the end broad instead of triangular.
For the strongest tip, work the final chain loosely enough to accept the slip stitch but not so loosely that a visible loop remains after blocking.
How to Keep the Five Lobes Symmetrical
Do not judge symmetry from one lobe at a time. Complete all five major sections before making corrections.
Fold the unblocked leaf lightly along its central vertical axis. The upper-left and upper-right lobes should approximately correspond, as should the two lower lobes.
The center lobe remains longer than either side. That difference is intentional and is necessary for the maple-leaf silhouette.
During blocking, measure from the center ring to the corresponding tips. A difference of a few millimeters is generally less visible than a difference in the angle of the lobes.
7 Technical Tips for a Defined Crochet Maple Leaf
- Rounded main point: Too many double or treble crochet stitches around the final picot will produce a rounded lobe. Reduce the number of tall stitches immediately beside the tip.
Blocking the Crochet Maple Leaf
Blocking is particularly important for this design because the final silhouette contains many narrow points.
For cotton yarn, dampen the finished leaf evenly and remove excess water without twisting it. Place the piece on a blocking mat and establish the central vertical line first.
Pin the top point and stem on that axis. Next, pin the two large upper side lobes, followed by the two lower lobes.
Only after the five main points are positioned should you pin the smaller serrations.
Measure the overall width at the widest left and right points. Adjust the pins until both halves appear balanced.
Allow the crochet to dry completely. Removing pins while the fibers remain damp can allow the smaller points to contract.
Changing the Size
Changing yarn and hook size is the simplest way to resize this crochet maple leaf pattern without altering its proportions.
Use fingering or sport-weight yarn with a smaller hook for an appliqué. DK cotton produces a medium decorative motif, while worsted yarn with approximately a 4–4.5 mm hook can produce a larger leaf suitable for table décor.
Published maple-leaf patterns demonstrate the size range clearly. Similar motifs range from roughly 8.5 cm square in DK yarn to more than 20 cm across in medium-weight yarn.
Make a test leaf before producing a matching set. Record its blocked width and height because the unblocked measurement does not reliably predict the finished dimensions.
Using the Finished Maple Leaf
A large red leaf can function as a table centerpiece, placemat or decorative mat. Several smaller leaves can be connected into an autumn garland or arranged around a larger centerpiece.
For table use, cotton is practical because it blocks cleanly and provides good stitch definition. Keep the completed fabric away from direct contact with hot cookware unless the selected yarn is specifically appropriate for that application.
The same construction can also be worked in burnt orange, mustard, burgundy, brown or forest green. When making several leaves, retain the same yarn weight and hook size if consistent dimensions are required.
Conclusion
The five major lobes should be the first features checked after this leaf comes off the hook. Align the central point with the stem, match the two upper side lobes, then position the smaller lower lobes before pinning the serrated edge. Careful blocking will make the open vein spaces and secondary points substantially clearer. Record the final blocked measurements before making a second leaf so a matching set can be reproduced accurately. Save this crochet maple leaf pattern to Pinterest or share the finished version on Instagram with #RedCrochetMapleLeaf. For another version, which detail would you change first: the number of edge points or the length of the central lobe? “`1









