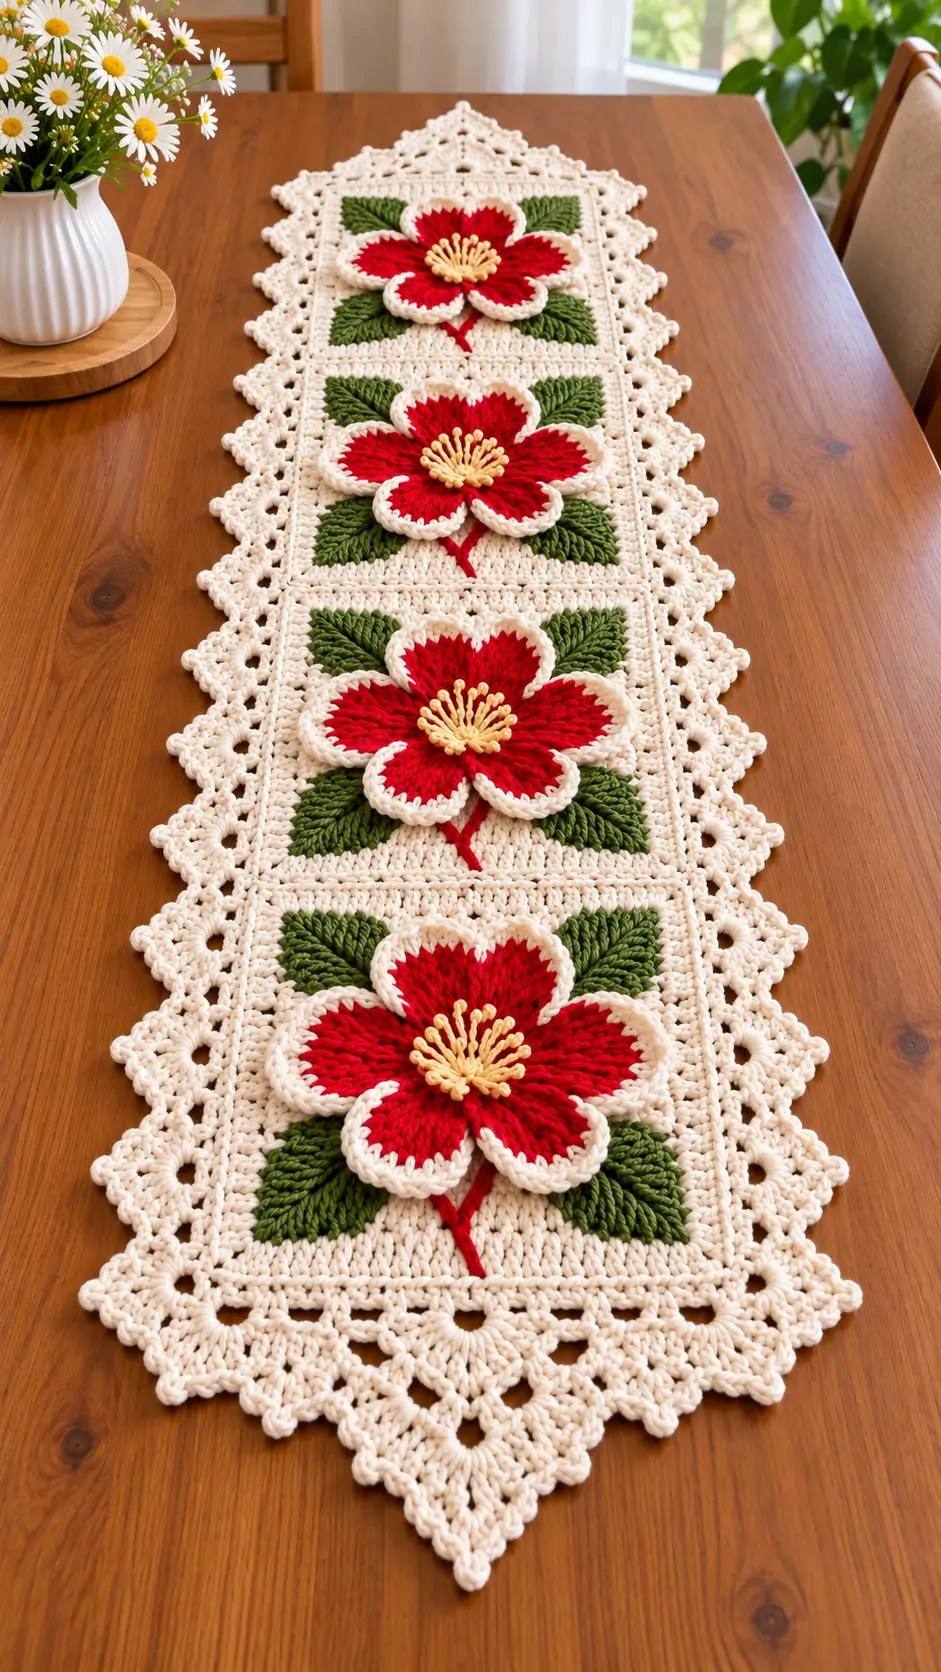
Poinsettia color comes from showy bracts surrounding much smaller flowers, and that layered structure determines how this runner should be built. This crochet poinsettia table runner pattern uses a cream modular base, raised red bracts, green leaves and stitched yellow centers. Use smooth DK cotton with a 3.5–4 mm hook for an intermediate-level project. Four repeating panels make the finished length easy to alter.
The Design: What Makes This Poinsettia Runner Different
The photographed runner depends on depth rather than colorwork alone. Each 3D crochet poinsettia sits above a cream rectangular panel so the red bracts remain visibly separate from the ground fabric. Cream edging around every bract creates another boundary and helps the five-point silhouette remain readable.
Green leaves are positioned behind the flower instead of beside it. That decision fills the corners of each panel without increasing the flower diameter. A narrow red stem then establishes a vertical axis.
Finally, the lace perimeter is substantially more open than the central fabric. It prevents a long crochet flower table runner from appearing visually heavy.
A common construction error is sewing the flower completely flat. Attach its center and inner bract bases while leaving the outer sections free.
Project Info at a Glance
| Skill Level | Time | Finished Size | Hook | Best For |
|---|---|---|---|---|
| Intermediate | 12–16 hours | Adjustable; four-panel sample approx. 110 × 32 cm | 3.5–4 mm | Dining table or sideboard |
The 110 × 32 cm measurement is the target for this photo-inspired version rather than a direct measurement taken from the photographed runner. Published poinsettia runners vary considerably in size depending on yarn, hook and construction method.
Materials and Tools
Yarn
Choose a smooth cotton or cotton-blend DK yarn with enough stitch definition to hold the leaf ribs and decorative lace points.
- Cream: DK, approximately 300–350 g. A firm cotton works well for the base and border.
- Red: DK, approximately 140–180 g. Use a saturated scarlet or poinsettia red.
- Forest green: DK, approximately 80–100 g. This is used for the dimensional leaves.
- Golden yellow: DK or fingering, approximately 15–20 g. Use this color for the flower centers.
Tools
- 3.5–4 mm crochet hook
- Tapestry needle
- Sharp scissors
- Locking stitch markers
- Rust-resistant blocking pins
- Blocking mats
- Tape measure
No stuffing or safety eyes are required for this project.
Abbreviations
- ch = chain
- sc = single crochet
- hdc = half double crochet
- dc = double crochet
- tr = treble crochet
- sl st = slip stitch
- st/sts = stitch/stitches
- sp = space
- BLO = back loop only
- RS = right side
An invisible decrease is not required because this project is constructed flat rather than as closed amigurumi forms.
Pattern – Step by Step
Work four base panels, four dimensional flowers, leaf sets and stems separately. Join the panels before adding the final perimeter border.
Cream Base Panel – Make 4
Yarn: cream.
Foundation: Ch 49.
Row 1: Dc in fourth ch from hook and in each remaining ch. (47 dc including turning chain)
Row 2: Ch 3, turn, dc across. (47)
Rows 3–23: Repeat Row 2. (47)
Do not cut the yarn after Row 23.
Panel Frame
Round 1: Ch 1. Work sc evenly around all four sides, placing 3 sc into each corner.
Round 2: Ch 3, dc in every st around, placing (dc, ch 2, dc) into each corner.
Fasten off with a 20 cm tail.
Block each panel to approximately the same dimensions before joining. Matching panel width matters more than matching the unblocked row height.
Red Poinsettia Bract – Make 20
Yarn: red with cream edging.
Foundation: Ch 13.
Row 1: Sc in second ch from hook, hdc in next 2, dc in next 3, tr in next 3, dc in next 2, 5 dc in final ch.
Continue down the opposite side of the foundation chain: dc in next 2, tr in next 3, dc in next 3, hdc in next 2, sc in final ch.
Edging: Change to cream. Ch 1 and sc evenly around the entire bract, placing 3 sc at the tip.
Fasten off. Leave approximately 20 cm of yarn for sewing.
The finished bracts should overlap slightly at their bases while retaining five clearly separated points.
Poinsettia Flower Assembly – Make 4
Arrange five red bracts radially, with approximately 72 degrees between their center lines. Overlap the bases by roughly 1–1.5 cm.
Using red yarn, stitch only the innermost 2–3 cm of each bract together. Leave the outer sections unattached so they retain their dimensional shape.
Set the assembled flowers aside while making the leaves.
Green Leaves – Make 16
Yarn: forest green.
Foundation: Ch 15.
Row 1: Sc in second ch, hdc in next 2, dc in next 3, tr in next 5, dc in next, hdc in next, 5 sc in final ch.
Continue along the opposite side of the foundation chain: hdc in next, dc in next, tr in next 5, dc in next 3, hdc in next 2, sc in final stitch.
Surface rib: With RS facing, sl st loosely along the foundation-chain ridge from the base of the leaf toward the tip.
Fasten off, leaving approximately 25 cm for sewing.
Make four leaves for each flower panel. Position them diagonally so green sections remain visible between neighboring red bracts.
Red Stems – Make 4
Yarn: red.
Ch 18.
Starting in the second ch from the hook, sl st in each ch. (17)
Fasten off with a 20 cm tail.
Pin one stem vertically beneath each flower. A slight curve is acceptable, but all four stems should follow the same general orientation.
Yellow Poinsettia Centers – Make 4
Yarn: golden yellow.
Ch 6 and sl st in the first ch to create a small ring.
Round 1: Work 12 sc into the ring. (12)
For each stitch around: ch 5, sl st in the second ch from hook and in the remaining 3 ch, then sl st into the next base stitch.
Repeat 12 times to create 12 narrow raised stamens.
Fasten off with a 20 cm tail.
For a denser center, add six short embroidered knots between the crocheted stamens after the flowers are attached.
Joining the Four Panels
Lay all four cream rectangles end to end with the right sides facing upward.
Using cream yarn and a tapestry needle, whipstitch corresponding stitches along each short edge. Keep the seam flat rather than pulling the yarn tightly enough to curl the fabric.
Repeat until all four panels form one continuous rectangle.
Measure both long edges. Correct a difference greater than 1 cm before adding the lace border because an uneven foundation will become more visible after the openwork rounds are added.
Foundation Border
Join cream yarn at one corner.
Round 1: Ch 1, sc evenly around the entire runner, placing 3 sc at each outer corner. Sl st to first sc.
Round 2: Ch 3, dc in each st around. Work (2 dc, ch 2, 2 dc) into each corner ch-space. Join.
Round 3: Ch 1, sc in each dc. Work 3 sc into each corner space. Join.
This dense frame provides a stable attachment line for the openwork lace.
Openwork Lace Border
Round 4: Ch 1, sc in first st, *ch 5, skip 3 sts, sc in next st*. Repeat around.
Adjust the final repeat on each side so that a ch-5 loop lands close to each corner.
At every corner work: sc, ch 7, sc into the same corner stitch.
Pointed Lace Edging
Round 5: Sl st into the first ch-5 space.
In each regular ch-5 space work:
(sc, hdc, 3 dc, hdc, sc)
In each corner ch-7 space work:
(sc, hdc, 3 dc, ch 3, sl st in first ch, 3 dc, hdc, sc)
Join with sl st.
Outer Picot Round
Round 6: Ch 1. Sc around the previous round. At the top of each shell, work ch 3 and sl st into the first chain to form one picot.
For a more pronounced pointed perimeter similar to the photographed runner, replace every fourth picot with ch 5 and sl st into the first ch.
Fasten off and weave the yarn tail through at least 4 cm of adjacent stitches.
Assembly
- Block the four joined cream panels before attaching the dimensional components. Square every seam to the runner’s center line.
- Position one red stem on each panel and sew through its chain ridge with matching red yarn.
- Pin four green leaves around the center of each panel, positioning their bases beneath the future flower.
- Sew each leaf primarily along its central foundation ridge instead of stitching around the complete perimeter.
- Center one five-bract poinsettia over each group of leaves. Check the spacing between all four flowers before sewing.
- Stitch each flower through its overlapped center and through approximately the inner 2 cm of every bract.
- Attach one yellow center over each flower junction to cover the red assembly stitches.
- Shape the cream bract edging and pin any twisted points before final blocking.
- Wet-block the complete runner to the target dimensions. Pin opposite sides symmetrically and open every major lace loop.
- Allow the runner to dry completely before removing the pins. Weave remaining tails into matching color sections on the back.
The completed runner contains four aligned dimensional poinsettias over a continuous cream base with a pointed openwork perimeter.
7 Technical Tips for a Cleaner Poinsettia Runner
- Panel mismatch: A 5 mm difference in individual panel width becomes a visible stepped seam once four panels are joined. Block all four rectangles against the same measurement template before assembly.
- Lost border stitches: Mark the first and last stitch of every border side rather than marking only the corners. Losing one stitch on each panel can shift the lace repeat noticeably by the opposite end.
- Flattened poinsettias: Do not sew around the entire edge of each red bract. Attach approximately the inner 2–3 cm and allow the outer section to remain free.
- Distorted flower spacing: Pin all four flower centers before sewing the first flower. Keep every center aligned with the longitudinal midpoint of the cream runner.
- Leaf distortion: Sewing completely around each green leaf can flatten its central rib. Attach along the center ridge and approximately the bottom 2 cm instead.
- Uneven lace: Measure both long edges before beginning Round 4. Correct any difference greater than 1 cm before adding the open chain spaces.
- Loose yarn tails: Weave structural tails through at least 4 cm of matching stitches, reverse direction, then weave another 2–3 cm. A single straight pass can pull free during washing or blocking.
Finishing and Blocking
Lay the completed runner on blocking mats with the wrong side facing down. Measure the full length first, then establish the width at the top, center and bottom.
Pin the four main corners before working along the sides. Add pins at matching points on opposite long edges so the central panels remain rectangular. Each decorative lace point should then be opened individually rather than stretched from a neighboring point.
Check the poinsettias after the base has been pinned. Arrange the five red bracts so their spacing remains consistent, position the green leaves between them and separate the yellow center strands with the tip of a tapestry needle.
Allow the runner to dry completely before removing any pins. Cotton can contract slightly after washing, so record the final dry measurement rather than the measurement taken while the piece is pinned.
Changing the Runner Length
The modular construction makes length adjustment practical. For a shorter table runner, make three cream panels, three flowers, twelve leaves and three stems. For a longer dining table, add complete panels rather than adding random rows to the ends.
Each additional panel should receive one complete poinsettia arrangement. This keeps the spacing between flowers consistent and preserves the repeated rectangular structure visible in the original design.
Before adding another panel, measure one finished and blocked repeat. Multiply that measurement by the required number of panels, then account for the outer border. This method provides a more reliable final-length estimate than calculating from the unblocked foundation chain.
How to Keep the 3D Poinsettias Defined
The dimensional effect depends primarily on attachment placement. Stitch the green leaves securely enough to prevent rotation, but leave their pointed outer sections free. Apply the same method to the red bracts.
Only the central section of each poinsettia needs firm attachment. The cream-edged tips should sit above the background rather than being sewn directly against it.
After washing, reshape each flower while the yarn is damp. Separate overlapping bracts, straighten the cream edging and reposition the leaves before the runner dries. Avoid pressing an iron directly onto the raised flowers because pressure can flatten the construction.
Conclusion
The final blocking stage determines whether the four panels read as one continuous runner rather than separate rectangles. Measure both long sides, square the joins and pin every major lace point before the fabric dries. After blocking, record the finished dimensions and yarn consumption so later versions can be shortened or extended by one complete flower panel. Save this crochet poinsettia table runner pattern to Pinterest and share the completed runner on Instagram with #PoinsettiaTableRunner. For the next version, decide on one structural change before selecting yarn: should the poinsettias retain five large red bracts, or should each flower receive a second smaller layer?









