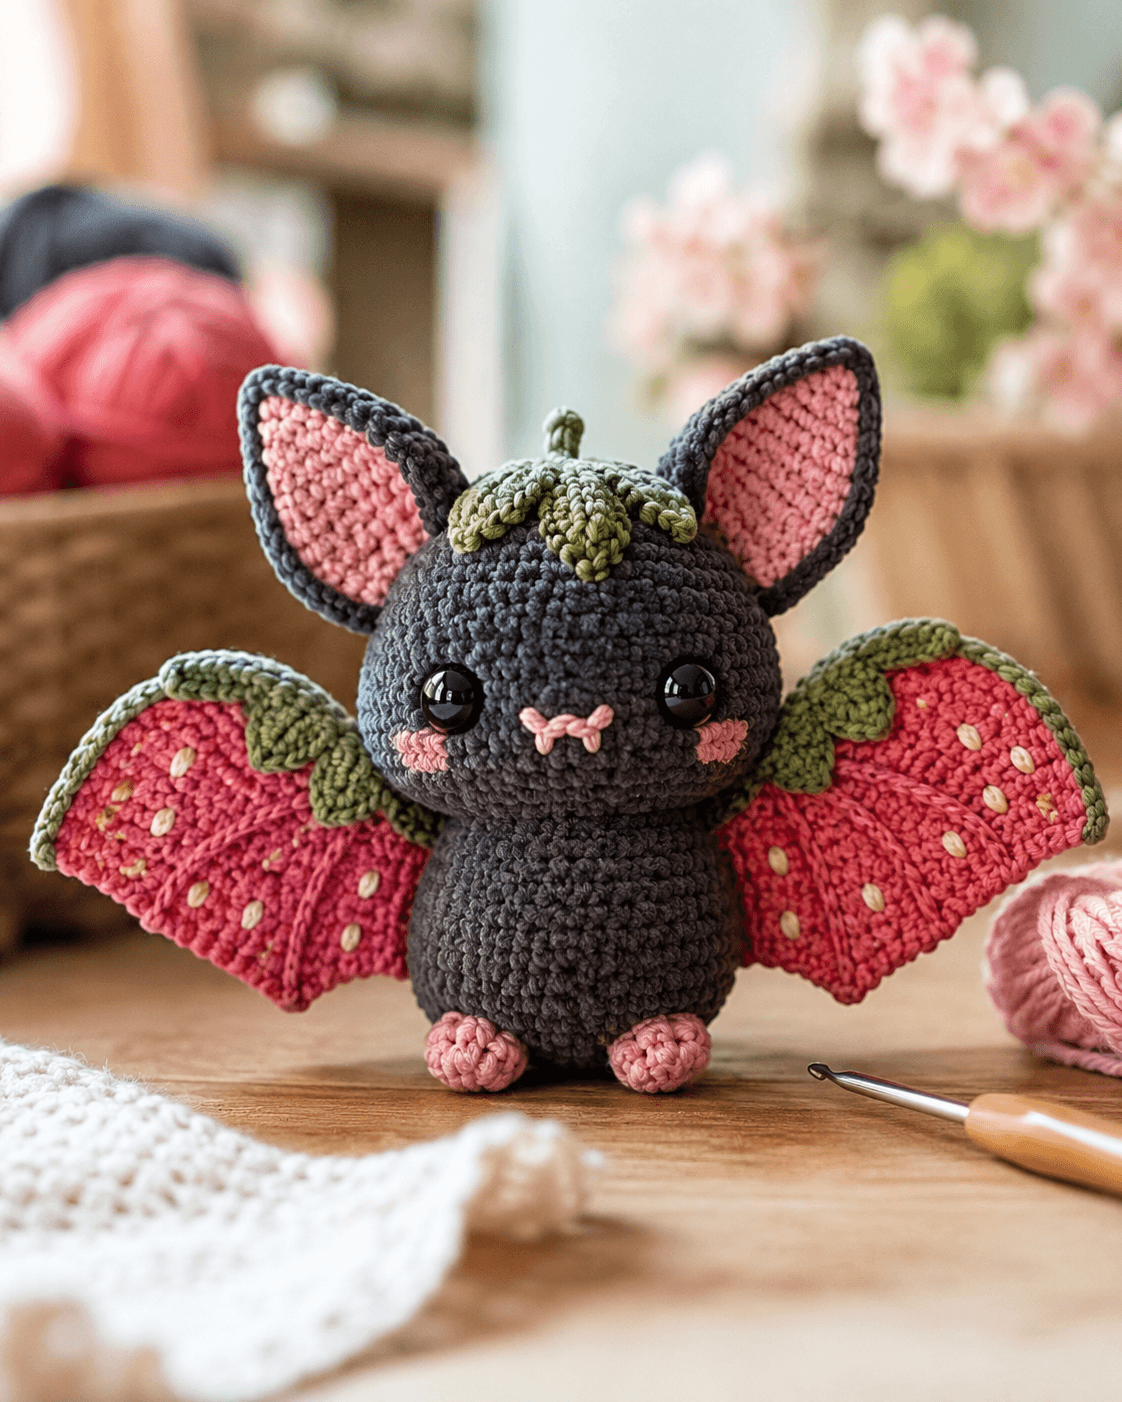
Materials
- Yarn — black or very dark charcoal for head, body, and outer ears
- Yarn — pink for inner ears, feet, cheeks, and nose detail
- Yarn — strawberry red for wings
- Yarn — olive or leaf green for wing tops, head leaves, and stem
- Yarn — cream or beige for strawberry seeds
- Embroidery yarn — pink or black for mouth detail
- Safety eyes 10–12 mm
- Polyester stuffing
- Crochet hook 2.5–3.5 mm
- Yarn needle
- Scissors
- Stitch marker
Abbreviations
- MR — magic ring
- sc — single crochet
- inc — increase
- dec — invisible decrease
- sl st — slip stitch
- ch — chain
- hdc — half double crochet
- dc — double crochet
- st — stitch
Notes
- Work in continuous rounds unless stated otherwise.
- The wings are made flat and sewn to the back after the body is assembled.
- Stuff the head firmly and the body moderately for an upright shape.
- Strawberry leaves are added to both the wings and the top of the head.
- Counts are shown in parentheses at the end of each round.
1. Head
R1: 6 sc in MR (6)
R2: inc around (12)
R3: (sc, inc) x 6 (18)
R4: (2 sc, inc) x 6 (24)
R5: (3 sc, inc) x 6 (30)
R6: (4 sc, inc) x 6 (36)
R7–12: sc around (36)
R13: (4 sc, dec) x 6 (30)
R14: (3 sc, dec) x 6 (24)
R15: (2 sc, dec) x 6 (18)
Insert safety eyes between R8–9, about 8 stitches apart. Stuff firmly. Fasten off with a long tail for sewing.
2. Body
With black or dark charcoal:
R1: 6 sc in MR (6)
R2: inc around (12)
R3: (sc, inc) x 6 (18)
R4: (2 sc, inc) x 6 (24)
R5: (3 sc, inc) x 6 (30)
R6–11: sc around (30)
R12: (3 sc, dec) x 6 (24)
R13: (2 sc, dec) x 6 (18)
Stuff moderately. Keep the lower body rounded so the bat sits evenly. Fasten off with a long tail.
3. Ears (Make 2)
Outer ears in black:
R1: 4 sc in MR (4)
R2: inc x 4 (8)
R3: (sc, inc) x 4 (12)
R4: (2 sc, inc) x 4 (16)
R5–6: sc around (16)
Fold slightly at the base to create the pointed ear shape. Fasten off with a long tail.
Inner ears in pink (Make 2):
R1: 4 sc in MR (4)
R2: inc x 4 (8)
R3: (sc, inc) x 4 (12)
R4: sc around (12)
Fasten off and sew one pink inner ear to each black outer ear.
4. Feet (Make 2)
With pink:
R1: 6 sc in MR (6)
R2: sc around (6)
R3: (sc, inc) x 3 (9)
Stuff lightly. Flatten the top slightly and fasten off with a long tail.
5. Wings (Make 2)
With strawberry red:
Ch 12.
Row 1: starting in 2nd ch from hook, sc 11, ch 1, turn (11)
Row 2: dec, sc 7, dec, ch 1, turn (9)
Row 3: sc across, ch 1, turn (9)
Row 4: dec, sc 5, dec, ch 1, turn (7)
Row 5: sc across, ch 1, turn (7)
Row 6: dec, sc 3, dec, ch 1, turn (5)
Row 7: sc across (5)
Fasten off. Lightly shape the lower edge into a gentle scallop while sewing.
6. Wing Veins
With pink or a slightly darker red:
Embroider 3–4 radiating lines on each wing from the lower inner corner toward the outer edges to create the segmented strawberry-wing look.
7. Wing Top Leaves (Make 4)
With olive green:
Ch 6.
Work back along chain: sl st, sc, hdc, sc, sl st.
Fasten off. Sew two leaves at the top of each wing where it joins the body.
8. Strawberry Seeds for Wings
With cream or beige:
Embroider small seed stitches across each red wing panel. Keep them evenly spaced but slightly varied for a natural strawberry look.
9. Head Leaves (Make 5)
With olive green:
Ch 5.
Work back along chain: sl st, sc, hdc, sc.
Fasten off. Sew the leaves in a crown arrangement on top of the head.
10. Stem
With olive green:
R1: 4 sc in MR (4)
R2–3: sc around (4)
Fasten off and sew upright at the center top of the leaf crown.
11. Cheek Patches (Make 2)
With pink:
R1: 6 sc in MR (6)
Fasten off and sew beneath the eyes.
12. Face Details
- Insert safety eyes before fully closing the head.
- Embroider a small pink nose centered low between the eyes.
- Add two short fang stitches below the nose using pink or cream yarn.
- Sew pink cheek patches evenly under the eyes.
13. Assembly
- Sew the head to the top of the body.
- Attach the ears to the upper sides of the head with the points angled outward.
- Sew the pink inner ear panels in place if not already attached.
- Attach the two pink feet to the lower front of the body so the bat stands upright.
- Sew the two wings to the back of the body, one on each side.
- Embroider the wing veins and cream strawberry seeds.
- Attach the green leaves to the top of each wing.
- Sew the head leaf cluster to the crown of the head.
- Attach the small green stem in the center of the head leaves.
- Check balance, adjust stuffing if needed, and weave in all ends.
© Image-based reconstructed copy for a strawberry bat amigurumi.









