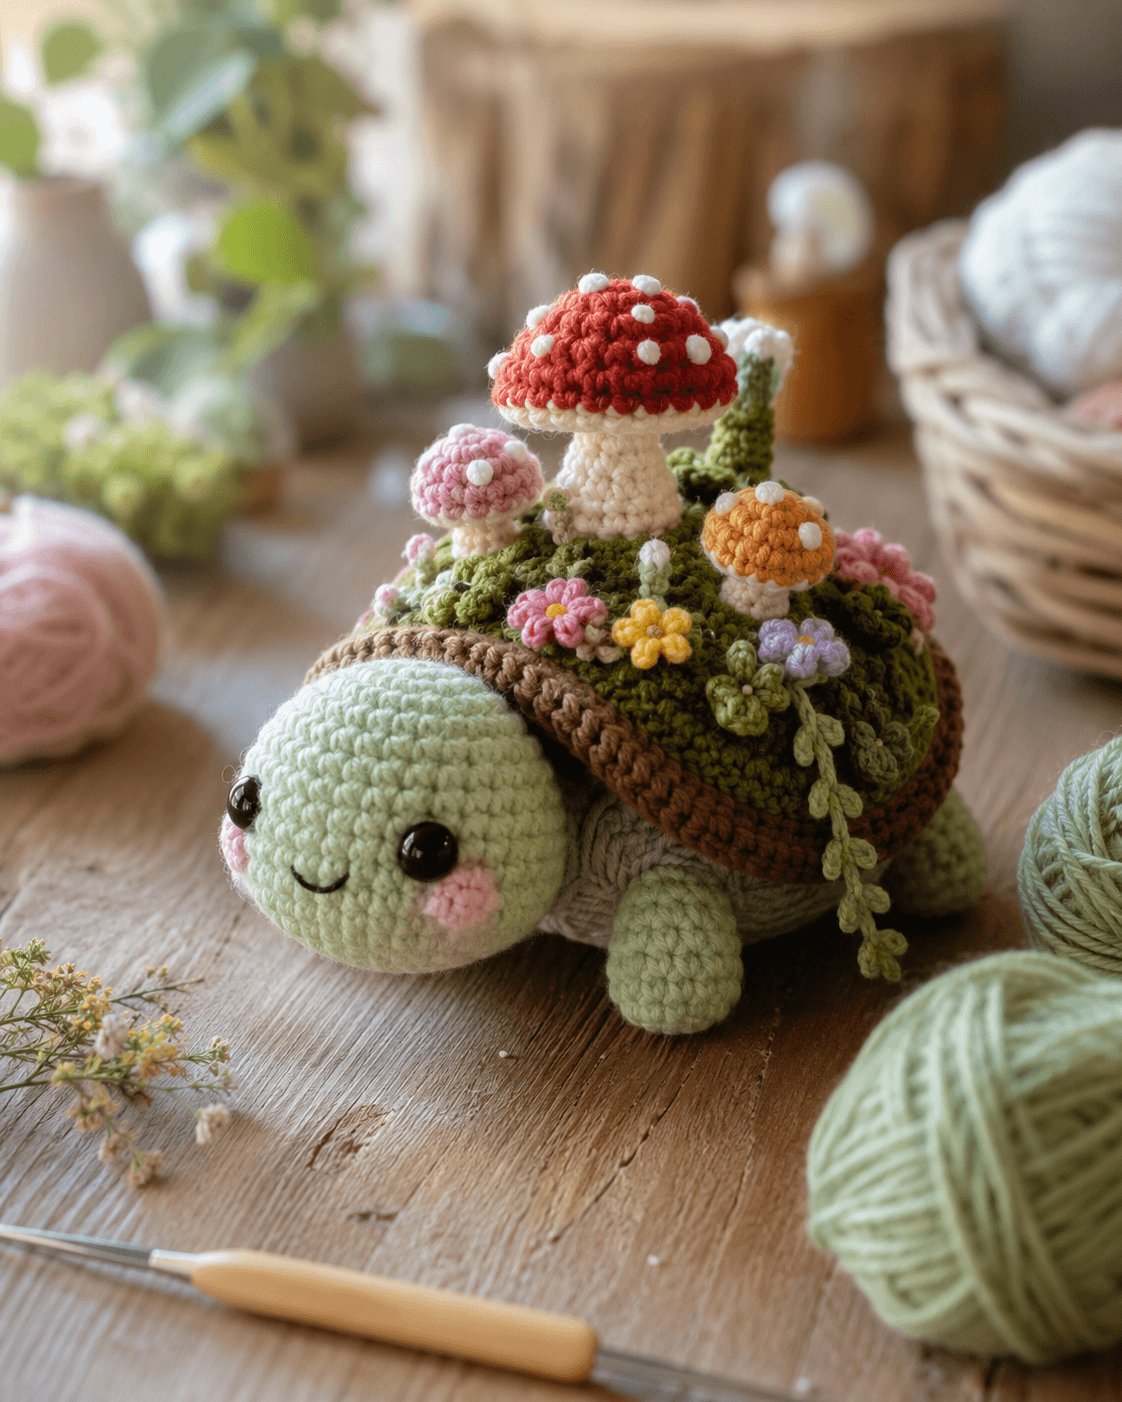
Materials
- Yarn — light mint green for head and legs
- Yarn — muted gray-beige for turtle body
- Yarn — dark olive and moss green for grassy shell cover
- Yarn — medium brown for shell rim
- Yarn — cream / white for mushroom stems and mushroom spots
- Yarn — red, pink, and orange for mushroom caps
- Yarn — pink, yellow, lavender, and pale green for flowers and vines
- Yarn — blush pink for cheeks
- Embroidery yarn — black for smile
- Safety eyes 10–12 mm
- Polyester stuffing
- Crochet hook 2.5–3.5 mm
- Yarn needle
- Scissors
- Stitch marker
Abbreviations
- MR — magic ring
- sc — single crochet
- inc — increase
- dec — invisible decrease
- sl st — slip stitch
- ch — chain
- hdc — half double crochet
- dc — double crochet
- st — stitch
Notes
- Work in continuous rounds unless stated otherwise.
- The turtle is built first, then the shell is decorated as a miniature garden scene.
- Stuff the head firmly and the body moderately so the turtle stays low and wide.
- Mushrooms, flowers, and trailing vines are sewn on after the shell cover is attached.
- Counts are shown in parentheses at the end of each round.
1. Head
R1: 6 sc in MR (6)
R2: inc around (12)
R3: (sc, inc) x 6 (18)
R4: (2 sc, inc) x 6 (24)
R5: (3 sc, inc) x 6 (30)
R6: (4 sc, inc) x 6 (36)
R7–11: sc around (36)
R12: (4 sc, dec) x 6 (30)
R13: (3 sc, dec) x 6 (24)
R14: (2 sc, dec) x 6 (18)
Insert safety eyes between R8–9, about 8 stitches apart. Embroider a small curved smile and add blush cheeks. Stuff firmly. Fasten off with a long tail.
2. Body
With muted gray-beige:
R1: 6 sc in MR (6)
R2: inc around (12)
R3: (sc, inc) x 6 (18)
R4: (2 sc, inc) x 6 (24)
R5: (3 sc, inc) x 6 (30)
R6: (4 sc, inc) x 6 (36)
R7–10: sc around (36)
R11: (4 sc, dec) x 6 (30)
R12: sc around (30)
Stuff moderately. Keep the shape low rather than round. Fasten off with a long tail for sewing the shell top if needed.
3. Legs (Make 4)
With light mint green:
R1: 6 sc in MR (6)
R2: inc around (12)
R3–6: sc around (12)
Stuff lightly to medium. Flatten the opening slightly and fasten off with a long tail.
4. Shell Dome
With dark olive or moss green:
R1: 6 sc in MR (6)
R2: inc around (12)
R3: (sc, inc) x 6 (18)
R4: (2 sc, inc) x 6 (24)
R5: (3 sc, inc) x 6 (30)
R6: (4 sc, inc) x 6 (36)
R7: (5 sc, inc) x 6 (42)
R8–12: sc around (42)
Stuff lightly or leave unstuffed if the shell will be supported by the body underneath. This piece forms the grassy top layer.
5. Shell Rim
With medium brown:
Join brown around the lower edge of the shell dome.
R1: sc around (42)
R2: (2 sc in next st, sc in next 2 sts) repeat around
Fasten off. This creates the raised brown border around the shell edge.
6. Large Mushroom (Make 1)
Mushroom Stem
With cream / white:
R1: 6 sc in MR (6)
R2: (sc, inc) x 3 (9)
R3–6: sc around (9)
R7: (sc, dec) x 3 (6)
Stuff lightly. Fasten off with a long tail.
Mushroom Cap
With red:
R1: 6 sc in MR (6)
R2: inc around (12)
R3: (sc, inc) x 6 (18)
R4: (2 sc, inc) x 6 (24)
R5–6: sc around (24)
Fasten off and sew to the stem. Add small white French knots or tiny circles for spots.
7. Small Mushrooms (Make 2–3)
Stem
With cream / white:
R1: 4 sc in MR (4)
R2–4: sc around (4)
Fasten off.
Caps
Make one pink and one orange.
R1: 6 sc in MR (6)
R2: inc around (12)
R3–4: sc around (12)
Fasten off and sew to the stems. Add white spots.
8. Tiny Mushroom Buds (Make 4–6)
With cream / white:
R1: 4 sc in MR (4)
Fasten off. Sew these directly into the grassy shell top as tiny mushroom buds.
9. Flowers (Make 5–7)
Use pink, yellow, lavender, and pale pink.
R1: 5 sc in MR (5)
Then in each stitch: ch 2, 2 dc, ch 2, sl st in same st
Fasten off. Add a French knot or small contrasting center if desired.
10. Leaves and Vines
Small Leaves
With pale green:
Ch 5, then work back: sl st, sc, hdc, sl st.
Make several and cluster them around the flowers.
Trailing Vine
With pale green:
Ch 18–24. Along the chain, at intervals, add tiny leaves with: ch 3, sl st in 2nd ch, sl st in next ch, sl st back to vine.
Fasten off and let the vine hang over one side of the shell.
11. Face Details
- Place safety eyes low on the head for the rounded, gentle expression.
- Embroider a small curved smile centered between the eyes.
- Add blush pink cheek patches slightly below and outside the eyes.
12. Assembly
- Sew the head to the front of the body.
- Attach the four legs evenly to the underside of the body.
- Sew the grassy shell dome to the top of the body.
- Attach the brown shell rim around the lower shell edge.
- Sew the large mushroom near the top center of the shell.
- Add the smaller mushrooms around it, spacing them to create a balanced garden layout.
- Sew the flowers and leaves across the shell surface.
- Attach the tiny mushroom buds between the larger decorations.
- Sew the trailing vine so it drapes over one side of the shell.
- Adjust all embellishments and weave in all ends securely.
© Image-based reconstructed copy for a garden turtle with mushroom shell amigurumi.









