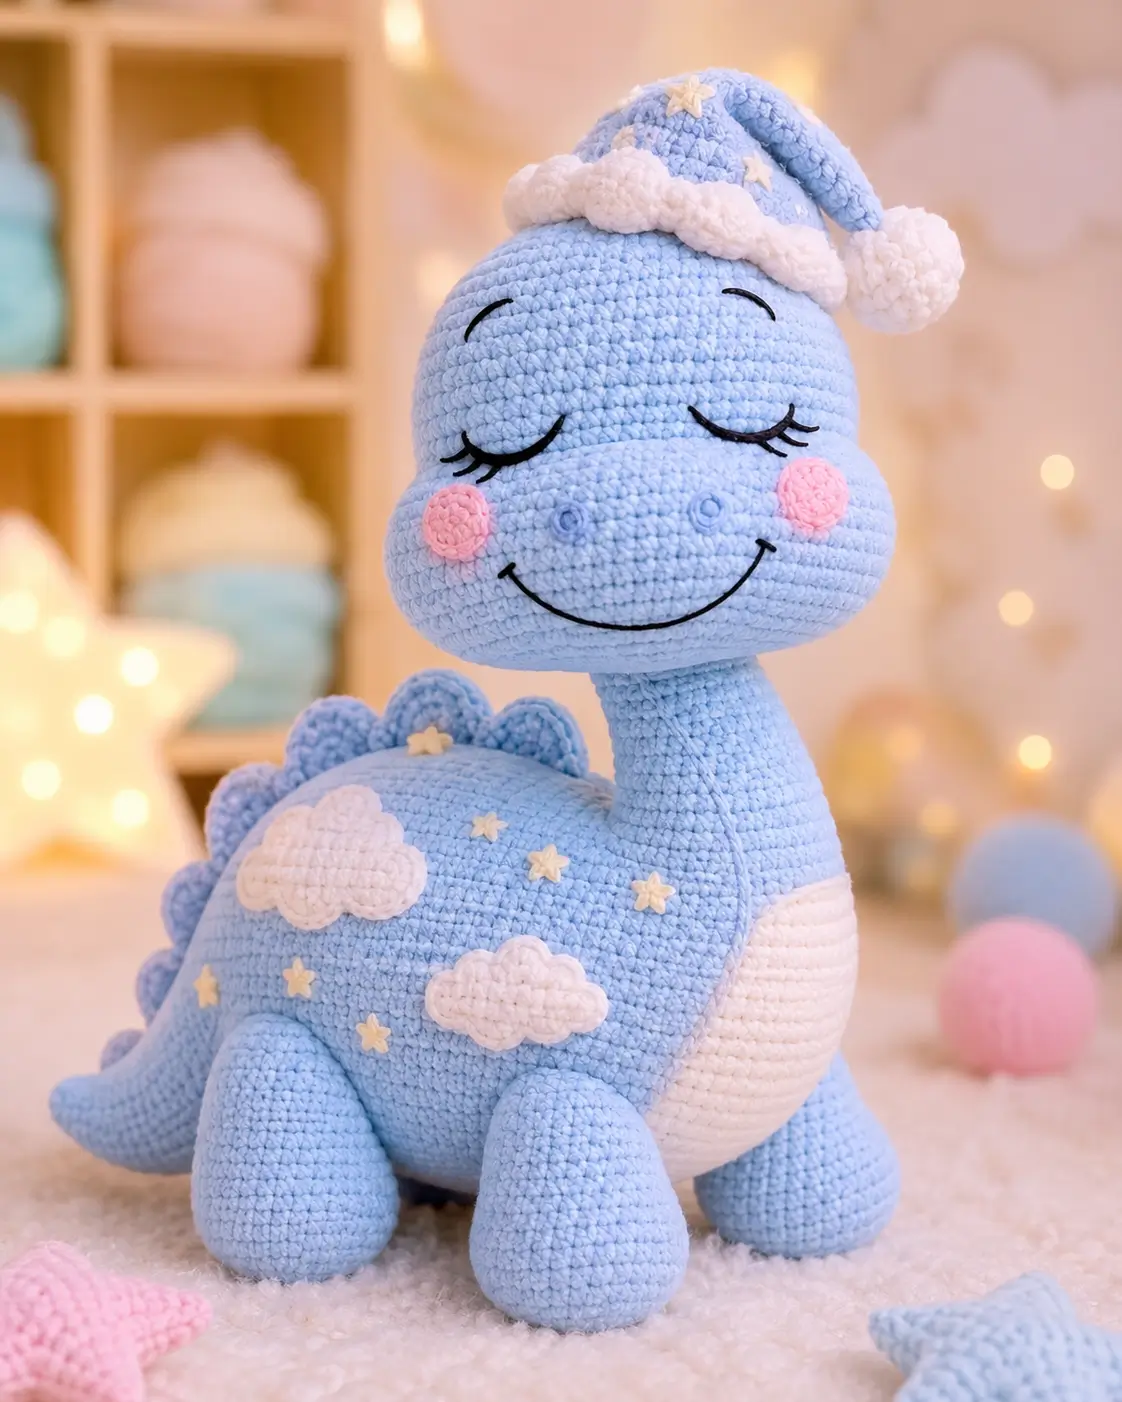
A brontosaurus wearing a nightcap has one engineering problem: the long neck must hold up a sleeping face without tipping the body forward. This brontosaurus amigurumi crochet pattern uses chunky blue chenille, embroidered features, and a 5.0 mm hook to make a 24 cm intermediate plush. You build it for nursery display or shelf styling when the maker needs a stable long-neck dinosaur with a soft bedtime theme.
The Design: What Makes Sleepy Sky Bronto Different
The design reads as a brontosaurus, not a generic dinosaur, because the head is wider than the neck and the body sits low with four stump legs. That wide head gives space for embroidered closed eyes and a smile; the narrow neck keeps the bedtime cap visible above the face. You work the belly patch separately so the white area stays clean instead of showing color-change jogs across the body. The back ridge uses small half-spheres rather than sharp spikes, matching the soft toy silhouette in the photo.
A common mistake in a long neck dinosaur amigurumi is leaving the neck lightly stuffed. The maker then gets a forward-drooping head after assembly. This crochet dinosaur plush pattern fixes that with a firm cylinder and a tail placed slightly low as a counterweight.
Project Info at a Glance
| Skill Level | Time | Finished Size | Hook | Best For |
|---|---|---|---|---|
| Intermediate | 1 day | 24 cm | 5.0 mm | Bedtime dinosaur decor, nursery shelf, plush display |
Materials and Tools
Yarn
- Pastel blue — #6 chunky chenille — 120 g — Premier Parfait Chunky or Bernat Baby Blanket
- White — #6 chunky chenille — 30 g — Premier Parfait Chunky
- Pink — #6 chunky chenille — 5 g — Premier Parfait Chunky
- Cream — DK or worsted cotton — 5 g — YarnArt Jeans, Paintbox Cotton DK, or similar
- Black — DK cotton embroidery yarn — 1 g — any smooth black cotton
Tools
- Hook 5.0 mm
- Safety eyes: none used; optional 12 mm only if changing the face
- Polyester stuffing
- Yarn needle
- Stitch markers
- Pins
- Scissors
Abbreviations
- MR = magic ring
- sc = single crochet
- inc = increase, 2 sc in one stitch
- dec = decrease
- sl st = slip stitch
- ch = chain
- BLO = back loop only
- FLO = front loop only
- bobble = 4 unfinished dc worked into one stitch, then pulled closed
An invisible decrease is worked through the front loops of the next two stitches before completing one sc, reducing holes on plush fabric.
Pattern — Step by Step
Continuous spiral unless noted.
Head
Yarn: pastel blue
R1: 6 sc in MR (6)
R2: inc ×6 (12)
R3: (sc 1, inc) ×6 (18)
R4: (sc 2, inc) ×6 (24)
R5: (sc 3, inc) ×6 (30)
R6: (sc 4, inc) ×6 (36)
R7: (sc 5, inc) ×6 (42)
R8–R13: sc around (42)
R14: (sc 5, dec) ×6 (36)
R15: sc around (36)
R16: (sc 4, dec) ×6 (30)
R17: (sc 3, dec) ×6 (24)
R18: (sc 2, dec) ×6 (18)
Stuff firmly. Embroider closed eyes over R9–R11, 10 stitches apart. Add the smile across R13–R15 before the head is fully closed.
R19: (sc 1, dec) ×6 (12)
R20: dec ×6 (6)
Fasten off. Leave a 20 cm tail and close the hole.
Body
Yarn: pastel blue
R1: 6 sc in MR (6)
R2: inc ×6 (12)
R3: (sc 1, inc) ×6 (18)
R4: (sc 2, inc) ×6 (24)
R5: (sc 3, inc) ×6 (30)
R6: (sc 4, inc) ×6 (36)
R7: (sc 5, inc) ×6 (42)
R8–R16: sc around (42)
R17: (sc 5, dec) ×6 (36)
R18: sc around (36)
R19: (sc 4, dec) ×6 (30)
R20: sc around (30)
R21: (sc 3, dec) ×6 (24)
Stuff the body firmly, especially the back half near the tail point.
R22: (sc 2, dec) ×6 (18)
R23: (sc 1, dec) ×6 (12)
R24: dec ×6 (6)
Fasten off. Leave a 25 cm tail and close the hole.
Neck
Yarn: pastel blue
R1: 6 sc in MR (6)
R2: inc ×6 (12)
R3: (sc 1, inc) ×6 (18)
R4: (sc 2, inc) ×6 (24)
R5–R17: sc around (24)
Stuff in small sections every 3 rounds. The neck should bend only slightly when held horizontal.
R18: (sc 2, dec) ×6 (18)
R19: sc around (18)
Fasten off. Leave a 35 cm tail for sewing to the body.
Front Legs
Make 2. Yarn: pastel blue
R1: 6 sc in MR (6)
R2: inc ×6 (12)
R3: (sc 1, inc) ×6 (18)
R4: (sc 2, inc) ×6 (24)
R5–R8: sc around (24)
R9: (sc 2, dec) ×6 (18)
R10–R11: sc around (18)
R12: (sc 1, dec) ×6 (12)
Stuff the bottom firmly and leave the top half lighter so the leg flattens against the body.
Fasten off. Leave a 30 cm tail.
Back Legs
Make 2. Yarn: pastel blue
R1: 6 sc in MR (6)
R2: inc ×6 (12)
R3: (sc 1, inc) ×6 (18)
R4: (sc 2, inc) ×6 (24)
R5–R9: sc around (24)
R10: (sc 2, dec) ×6 (18)
R11–R12: sc around (18)
R13: (sc 1, dec) ×6 (12)
Stuff more firmly than the front legs. These hold the rear body lift.
Fasten off. Leave a 30 cm tail.
Tail
Yarn: pastel blue
R1: 6 sc in MR (6)
R2: sc around (6)
R3: inc ×6 (12)
R4–R5: sc around (12)
R6: (sc 1, inc) ×6 (18)
R7–R9: sc around (18)
R10: (sc 2, inc) ×6 (24)
R11–R14: sc around (24)
Stuff the tail to the tip. Leave the open edge soft enough to curve downward on the body.
Fasten off. Leave a 35 cm tail.
Back Ridge Bumps
Make 7. Yarn: pastel blue
R1: 6 sc in MR (6)
R2: inc ×6 (12)
R3: sc around (12)
Do not stuff heavily. Each bump should sit like a rounded scallop, not a cone.
Fasten off. Leave a 20 cm tail.
White Belly Patch
Yarn: white
R1: 6 sc in MR (6)
R2: inc ×6 (12)
R3: (sc 1, inc) ×6 (18)
R4: (sc 2, inc) ×6 (24)
R5: (sc 3, inc) ×6 (30)
R6: (sc 4, inc) ×6 (36)
Block by hand into a vertical oval while sewing. Do not stuff.
Fasten off. Leave a 45 cm tail.
Cheek Patches
Make 2. Yarn: pink
R1: 6 sc in MR (6)
R2: inc ×6 (12)
sl st to first stitch (12)
Fasten off. Leave a 20 cm tail.
Nostril Bumps
Make 2. Yarn: pastel blue
R1: 6 sc in MR (6)
sl st to first stitch (6)
Fasten off. Leave a 15 cm tail.
Nightcap Cone
Yarn: pastel blue, then white
R1: 6 sc in MR (6)
R2: sc around (6)
R3: inc ×6 (12)
R4–R5: sc around (12)
R6: (sc 1, inc) ×6 (18)
R7–R8: sc around (18)
R9: (sc 2, inc) ×6 (24)
R10–R11: sc around (24)
R12: (sc 3, inc) ×6 (30)
R13–R14: sc around (30)
R15: (sc 4, inc) ×6 (36)
R16–R17: sc around (36)
Change to white.
R18: sc around in FLO (36)
R19: (sc 1, bobble) ×18 (36)
Fasten off. Leave a 35 cm tail.
Nightcap Pom-Pom
Yarn: white
R1: 6 sc in MR (6)
R2: inc ×6 (12)
R3–R4: sc around (12)
Stuff lightly.
R5: dec ×6 (6)
Fasten off. Leave a 20 cm tail.
Cloud Appliqués
Make 3. Yarn: white
For each cloud, make one large lobe and two small lobes.
Large lobe:
R1: 6 sc in MR (6)
R2: inc ×6 (12)
Fasten off.
Small lobe A:
R1: 6 sc in MR (6)
Fasten off.
Small lobe B:
R1: 6 sc in MR (6)
Fasten off.
Sew the two small lobes to the lower left and lower right of the large lobe. Leave one 25 cm tail on each cloud for attaching to the dinosaur.
Cream Stars
Make 8. Yarn: cream
R1: 6 sc in MR (6)
R2: (ch 3, sl st in 2nd ch from hook, sc in next ch, sl st in next stitch of R1) ×6
Fasten off. Leave a 15 cm tail.
Face Embroidery
Yarn: black and pastel blue
Use black yarn for closed eyes and the smile. Place each eye across 5 stitches on R9–R11 of the head, with the eyelash tips angled downward. Work the smile across R13–R15, starting and ending below the cheeks. Use pastel blue yarn to sew the nostril bumps 4 stitches apart at the center of the face.
Assembly
- Pin the neck to the top front of the body, tilted back by about 10 degrees. Sew around the 18-stitch neck opening twice.
- Pin the head to the closed top of the neck. Sew through the lower 24 stitches of the head so the join is hidden under the chin.
- Attach the white belly patch to the front body from R8 to R18. Stretch it into an oval while sewing.
- Sew the cheek patches onto the face at R12–R14, one on each side of the smile.
- Add the nostril bumps between the cheeks. Keep them centered and level.
- Pin the front legs under the chest, 4 stitches apart. Sew each leg through the top 12 stitches.
- Pin the back legs under the rear body, 5 stitches apart. Sew each leg through the top 12 stitches.
- Attach the tail low on the back body, centered between the rear legs. Sew around the 24-stitch opening twice.
- Sew the 7 back ridge bumps from the head base to the tail base. Place them 1 round apart.
- Fit the nightcap over the top right of the head, sew the brim in place, add the pom-pom, then sew clouds and stars across the body and hat.
The completed plush is a seated sleepy brontosaurus with a balanced neck, low tail, cloud appliqués, and embroidered bedtime face.
7 Technical Tips
- Marker drift failure mode: The head loses symmetry when the stitch marker creeps by more than 1 stitch per round. Recount at R7, R13, and R18 before closing.
- Stuffing firmness measurement: The neck should compress by less than 1 cm when pinched at the center. Under-stuffing creates a forward head drop after the cap is sewn on.
- Invisible decrease failure mode: Chenille gaps appear on R16–R20 of the head if standard decreases are pulled loose. Work the decrease through front loops only and tighten the following sc.
- Eye placement timing: Embroider the closed eyes before R19 of the head. After that point, the opening is too small for clean inside knots.
- Velvet tension issue: A 5.0 mm hook with #6 chenille can stretch if the working loop is taller than 5 mm. Keep each loop low so the stuffing does not show through the pale blue yarn.
- Pinning measurement: Pin the back legs 5 stitches apart and the front legs 4 stitches apart before sewing. A wider front stance makes the body look flat from the front.
- Tail weaving failure mode: The tail seam twists if the yarn tail is woven only through the outer loops. Weave through body stitches for 4 cm, reverse direction, then bury the end through the tail base.
Conclusion
The finished sleepy brontosaurus works because the head, neck, and tail are treated as a balance system, not separate decorative pieces. Pin the neck first, test the forward lean, then sew the tail low enough to act as visual and physical counterweight. For the next sample, change only the cap color and star count so gauge notes remain comparable. Share the finished brontosaurus amigurumi crochet pattern photo on Pinterest and Instagram with #SleepySkyBronto, then record yarn brand, hook size, and final height in centimeters. Which detail should stay most visible from the front view: the cloud on the body, the cheek circles, or the curved sleeping eyes?