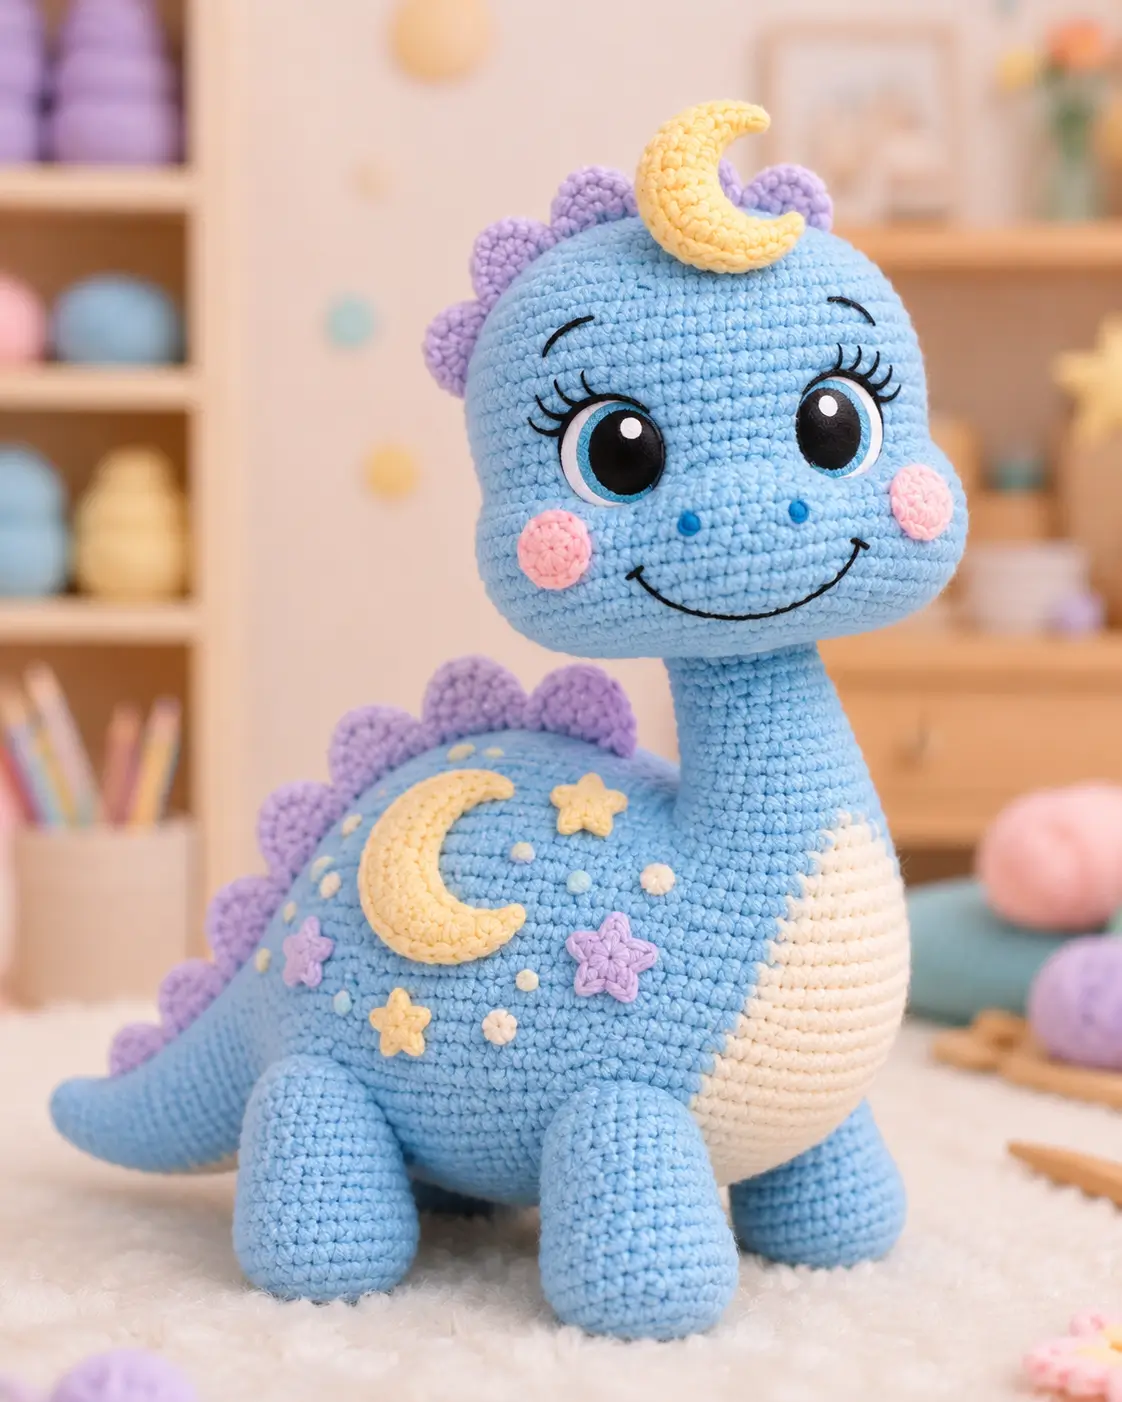
A brontosaurus fails if its long neck pulls the head past the front feet. This brontosaurus amigurumi crochet pattern uses a 4 mm hook, worsted yarn, 16 mm safety eyes, and a firm 20 cm sitting build. The skill level is intermediate because the neck support, face shaping, appliqués, and plate placement must be controlled. Make it when a dinosaur plush needs display value, not just a basic outline.
The Design: What Makes Moonbeam Different
The design is built around leverage. A long neck dinosaur crochet pattern needs a compact head, a firm neck tube, and rear mass from the tail; otherwise the finished toy tips forward. The separate head allows the maker to set the eyes and smile before final mounting, while the neck stays dense enough to hold the crescent. The rounded purple plates are small closed domes rather than flat triangles because the photo shows soft scallops along the spine. The moon dinosaur crochet pattern details use appliqué pieces so colorwork does not distort the blue body. A common mistake with a crochet brontosaurus pattern is placing all four legs too far out from the belly. The stance spreads, the body sags, and the neck looks longer than it should.
Project Info at a Glance
| Skill Level | Time | Finished Size | Hook | Best For |
|---|---|---|---|---|
| Intermediate | Multi-session work | 20 cm sitting height | 4.0 mm | Display plush or supervised play |
Materials and Tools
Yarn
- Sky blue — worsted #4 — 75 g — Paintbox Simply Aran, WeCrochet Brava Worsted, or similar
- Cream — worsted #4 — 20 g — belly patch
- Lavender — worsted #4 — 15 g — dorsal plates and stars
- Butter yellow — worsted #4 — 12 g — crescent moons and stars
- Pink — worsted #4 — 5 g — cheek patches
- Black embroidery yarn — small length — smile, lashes, brows
- Blue embroidery yarn — small length — nostrils
Tools
- Hook 4.0 mm
- Safety eyes 16 mm
- Polyester stuffing
- Yarn needle
- Stitch markers
- Straight pins
- Scissors
- Optional white felt or crochet eye whites
Abbreviations
MR = magic ring; sc = single crochet; inc = 2 sc in one stitch; dec = single crochet two stitches together; sl st = slip stitch; ch = chain; BLO = back loop only; FO = fasten off; FLO = front loop only.
For an invisible decrease, work through the front loops of the next two stitches, then finish one sc.
Pattern — Step by Step
Work in a continuous spiral unless noted. This is an original editor-drafted pattern using verified brontosaurus scale data and standard 6-stitch amigurumi increase math.
Head
Yarn: sky blue
R1: 6 sc in MR (6)
R2: inc ×6 (12)
R3: (sc, inc) ×6 (18)
R4: (2 sc, inc) ×6 (24)
R5: (3 sc, inc) ×6 (30)
R6: (4 sc, inc) ×6 (36)
R7: (5 sc, inc) ×6 (42)
R8–R14: sc around (42)
R15: (5 sc, dec) ×6 (36)
R16: (4 sc, dec) ×6 (30)
R17: (3 sc, dec) ×6 (24)
R18: (2 sc, dec) ×6 (18)
R19: (sc, dec) ×6 (12)
R20: dec ×6 (6)
Add safety eyes before R15 if you are not using separate eye whites. Place eye centers between R10 and R11, 8 stitches apart. Stuff firmly, especially below the eyes.
Fasten off. Leave a 35 cm tail.
Eye Whites
Yarn: white
Make 2.
R1: 6 sc in MR (6)
R2: inc ×6 (12)
R3: (sc, inc) ×6 (18)
Fasten off. Leave a 20 cm tail. Insert the safety eye through the center of each white circle before locking the washer behind the head fabric.
Neck
Yarn: sky blue
R1: 6 sc in MR (6)
R2: inc ×6 (12)
R3: (sc, inc) ×6 (18)
R4: (2 sc, inc) ×6 (24)
R5–R18: sc around (24)
R19: (2 sc, dec) ×6 (18)
Stuff in small sections. The tube should bend slightly but should not collapse when pressed.
Fasten off. Leave a 45 cm tail.
Body
Yarn: sky blue
R1: 6 sc in MR (6)
R2: inc ×6 (12)
R3: (sc, inc) ×6 (18)
R4: (2 sc, inc) ×6 (24)
R5: (3 sc, inc) ×6 (30)
R6: (4 sc, inc) ×6 (36)
R7: (5 sc, inc) ×6 (42)
R8–R21: sc around (42)
R22: (5 sc, dec) ×6 (36)
R23: (4 sc, dec) ×6 (30)
R24: (3 sc, dec) ×6 (24)
R25: (2 sc, dec) ×6 (18)
R26: (sc, dec) ×6 (12)
R27: dec ×6 (6)
Stuff the body heavily at the rear third. This counters the head and neck.
Fasten off. Leave a 30 cm tail and close the final opening.
Front Legs
Yarn: sky blue
Make 2.
R1: 6 sc in MR (6)
R2: inc ×6 (12)
R3: (sc, inc) ×6 (18)
R4–R8: sc around (18)
R9: (sc, dec) ×6 (12)
R10: dec ×6 (6)
Stuff only to medium firmness. A hard front leg can push the body upward.
Fasten off. Leave a 30 cm tail.
Back Legs
Yarn: sky blue
Make 2.
R1: 6 sc in MR (6)
R2: inc ×6 (12)
R3: (sc, inc) ×6 (18)
R4: (2 sc, inc) ×6 (24)
R5–R9: sc around (24)
R10: (2 sc, dec) ×6 (18)
R11: (sc, dec) ×6 (12)
R12: dec ×6 (6)
Back legs are wider than front legs to keep the tail-side mass grounded.
Fasten off. Leave a 35 cm tail.
Tail
Yarn: sky blue
R1: 6 sc in MR (6)
R2: sc around (6)
R3: inc ×6 (12)
R4: sc around (12)
R5: (sc, inc) ×6 (18)
R6–R14: sc around (18)
Stuff lightly. The tail should taper from the sewn base toward the closed point.
Fasten off. Leave a 45 cm tail for sewing.
Dorsal Plates
Yarn: lavender
Make 10.
R1: 6 sc in MR (6)
R2: inc ×6 (12)
R3–R4: sc around (12)
R5: dec ×6 (6)
Do not overstuff. These should sit as rounded scallops, not balls.
Fasten off. Leave a 20 cm tail on each plate.
Belly Patch
Yarn: cream
R1: 6 sc in MR (6)
R2: inc ×6 (12)
R3: (sc, inc) ×6 (18)
R4: (2 sc, inc) ×6 (24)
R5: (3 sc, inc) ×6 (30)
R6: (4 sc, inc) ×6 (36)
R7: (5 sc, inc) ×6 (42)
Block by hand into a vertical oval before pinning to the lower neck and front body.
Fasten off. Leave a 45 cm tail.
Cheek Patches
Yarn: pink
Make 2.
R1: 6 sc in MR (6)
R2: inc ×6 (12)
R3: (sc, inc) ×6 (18)
Fasten off. Leave a 20 cm tail.
Head Crescent Moon
Yarn: butter yellow
R1: 6 sc in MR (6)
R2: sc around (6)
R3: inc ×6 (12)
R4–R10: sc around (12)
R11: dec ×6 (6)
Stuff very lightly, curve into a crescent, and hold the curve with pins before sewing.
Fasten off. Leave a 35 cm tail.
Back Crescent Moon
Yarn: butter yellow
R1: 6 sc in MR (6)
R2: sc around (6)
R3: inc ×6 (12)
R4: (sc, inc) ×6 (18)
R5–R16: sc around (18)
R17: (sc, dec) ×6 (12)
R18: dec ×6 (6)
Stuff lightly through the center only. Keep both tips flatter so they curve cleanly against the body.
Fasten off. Leave a 45 cm tail.
Star Appliqués
Yarn: butter yellow and lavender
Make 4: two yellow, two lavender.
R1: 6 sc in MR (6)
R2: inc ×6 (12)
Point pass: (sl st, ch 3, sc in second ch from hook, hdc in next ch, sl st into next perimeter st) ×5.
The final point pass is decorative, not a counted increase round. Flatten each star before sewing.
Fasten off. Leave a 25 cm tail.
Small Star Dots
Yarn: cream and pale yellow
Make 8.
R1: 6 sc in MR (6)
Fasten off. Leave a 15 cm tail.
Assembly
- Pin the neck to the front top of the body, centered over the cream belly position, and sew around the full 24-stitch base.
- Sew the head to the top of the neck with the eyes facing forward and slightly downward.
- Attach the eye whites and safety eyes if they were made separately, then stitch the washer area tight from inside access points if needed.
- Embroider the smile with black yarn in a shallow U shape, then add three short lashes at the outer edge of each eye.
- Add two blue nostril knots between the eyes and smile, spaced 3 stitches apart.
- Sew the front legs under the chest, 6 stitches apart at the inner edges.
- Sew the back legs under the rear body, wider than the front legs by 2–3 stitches on each side.
- Attach the tail to the rear body, angled slightly down so it acts as a third balance point.
- Sew the lavender plates from the top of the head down the neck and along the spine, keeping 1 round between plates.
- Sew the belly patch, cheek patches, crescents, stars, and small dots in the same layout as the photo.
The finished dinosaur sits as a 20 cm celestial brontosaurus with a stabilized neck and balanced tail.
7 Technical Tips
- Stitch marker drift: If the round marker moves by more than 2 stitches during the head plateau, the eyes will sit on a diagonal. Reset the marker at R8 and again before R15.
- Stuffing firmness: The neck tube should resist a light press at the center. Under-stuffing causes the head to fold forward after the crescent is sewn on.
- Invisible decrease gaps: A visible hole larger than 2 mm at R18 or R26 means the decrease was worked too loosely. Work front-loop decreases and pull the working yarn down before the next sc.
- Eye placement timing: Place safety eye centers between R10 and R11 before the head closes past 24 stitches. Late placement forces the eyes too high and leaves no room for lashes.
- Worsted tension: With a 4 mm hook, the fabric should hide white stuffing under normal room light. If stuffing shows through the blue rounds, drop to a 3.5 mm hook.
- Pinning symmetry: Use at least 8 pins for the belly patch and 2 pins per leg before sewing. One unpinned back leg can rotate the body and make the dinosaur lean.
- Tail weaving: Leave a 45 cm sewing tail on the dinosaur tail. Weave through the body in three directions after sewing so the tail does not loosen under the rear weight.
Conclusion
Check the center of gravity before sewing the moons permanently. Set the dinosaur on a flat surface, press lightly on the top crescent, and watch whether the front feet lift. Shift the tail down or move the back legs outward before closing the last yarn tails. Save the stitch-count section for the head, body, and neck first; those three parts control the finished silhouette. Share the finished brontosaurus on Pinterest and Instagram with #MoonbeamBrontosaurus. For the next version of this brontosaurus amigurumi crochet pattern, should the back crescent sit closer to the neck plates or lower over the hip?









