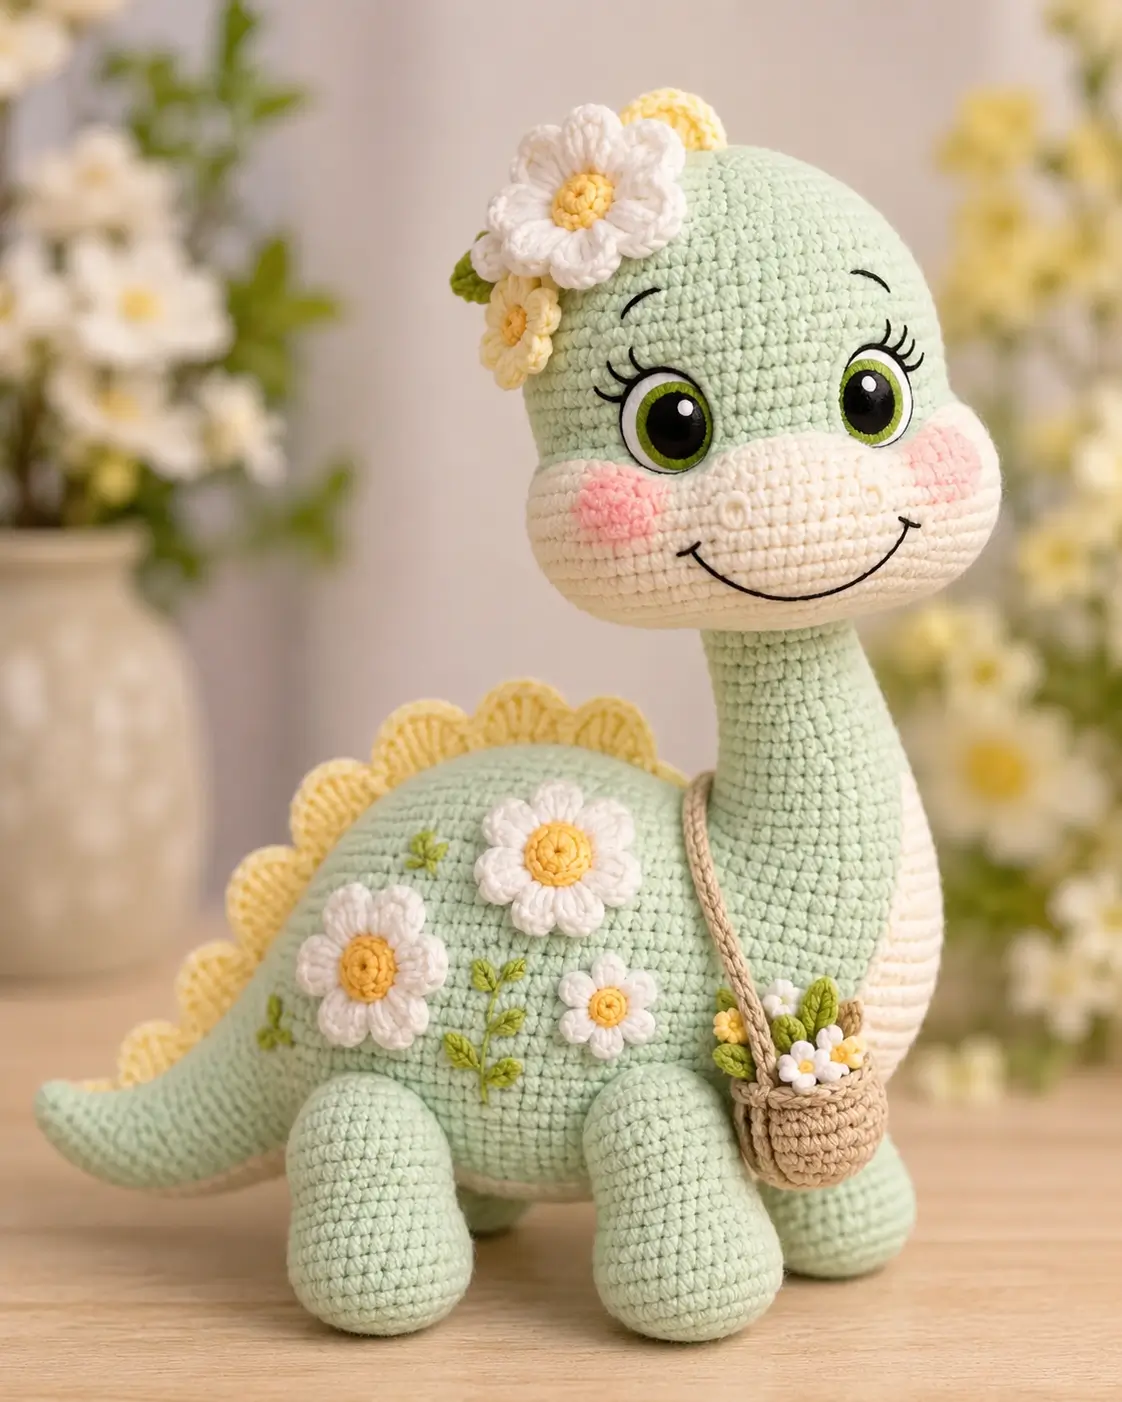
A brontosaurus can’t hide the engineering problem: a long neck must not tip the toy forward. This brontosaurus amigurumi crochet pattern uses worsted cotton, a 3.75–4.0 mm hook, 14 mm eyes, and a large 42-stitch plateau to finish near 24 cm tall. Work it at intermediate level for a stable shelf toy with removable garden-basket detail.
The Design: What Makes Blooming Bronto Different
Brontosaurus shape is not a round animal with a tail added later. The neck needs its own narrow cylinder so the head can sit above the forelegs instead of dragging the muzzle down. A closed 42-stitch head keeps the large eyes and cream snout from flattening the face. The body stays longer than it is tall, with back legs set slightly behind center so the tail becomes a counterweight. For this long neck dinosaur crochet pattern, the yellow scallops are decorative rather than anatomical; spacing them after assembly keeps the dorsal line visible above the daisies. The common mistake is sewing the neck directly on the front tip of the body. That pushes the center of gravity past the feet. A better dinosaur amigurumi pattern mounts the neck over the first third of the body and pins all four legs before stitching.
Project Info at a Glance
| Skill Level | Time | Finished Size | Hook | Best For |
|---|---|---|---|---|
| Intermediate | 6–8 hours | 24–26 cm | 3.75–4.0 mm | Decorative dinosaur toy with basket |
Materials and Tools
Yarn
- Mint green — worsted/medium cotton or DK-light worsted held tight — 75 g — Paintbox Cotton Aran, Yarn and Colors Epic, or similar.
- Cream — same yarn weight — 18 g — for snout and belly panel.
- Yellow — same yarn weight — 12 g — for flower centers and back scallops.
- White — same yarn weight — 10 g — for daisy petals.
- Tan — same yarn weight — 8 g — for the basket and strap.
- Olive green — scraps — for leaves and embroidered stems.
- Pink — scraps — for cheek patches.
- Black embroidery thread — small amount — for mouth, nostrils, lashes, and brows.
Tools
- Hook 3.75 mm for firm worsted stitches; use 4.0 mm if your fabric is too rigid.
- 14 mm safety eyes or embroidered eyes for child-safe use.
- Polyester stuffing, tapestry needle, stitch markers, pins, scissors, and row counter.
- Optional cardboard gauge strip, 10 cm wide, for checking neck height before sewing.
Abbreviations
MR = magic ring; sc = single crochet; inc = 2 sc in next stitch; dec = single crochet decrease; sl st = slip stitch; ch = chain; BLO = back loop only; FLO = front loop only; hdc = half double crochet; dc = double crochet.
For an invisible decrease, work through the front loops of the next two stitches before completing one sc decrease.
Pattern — Step by Step
Continuous spiral unless noted.
Head
Yarn: mint green.
R1: 6 sc in MR (6)
R2: inc ×6 (12)
R3: [sc, inc] ×6 (18)
R4: [2 sc, inc] ×6 (24)
R5: [3 sc, inc] ×6 (30)
R6: [4 sc, inc] ×6 (36)
R7: [5 sc, inc] ×6 (42)
R8–R14: sc around (42)
R15: [5 sc, dec] ×6 (36)
R16: [4 sc, dec] ×6 (30)
R17: [3 sc, dec] ×6 (24)
R18: [2 sc, dec] ×6 (18)
R19: [sc, dec] ×6 (12)
R20: dec ×6 (6)
Insert eyes between R10 and R11, 10 sts apart, before R16. Stuff firmly at the cheeks and lightly at the top dome.
Fasten off. Leave 25 cm tail.
Body
Yarn: mint green.
R1: 6 sc in MR (6)
R2: inc ×6 (12)
R3: [sc, inc] ×6 (18)
R4: [2 sc, inc] ×6 (24)
R5: [3 sc, inc] ×6 (30)
R6: [4 sc, inc] ×6 (36)
R7: [5 sc, inc] ×6 (42)
R8–R20: sc around (42)
R21: [5 sc, dec] ×6 (36)
R22: sc around (36)
R23: [4 sc, dec] ×6 (30)
R24: sc around (30)
R25: [3 sc, dec] ×6 (24)
R26: [2 sc, dec] ×6 (18)
R27: [sc, dec] ×6 (12)
R28: dec ×6 (6)
Stuff the middle harder than the tail end. A soft belly makes the legs splay.
Fasten off. Leave 35 cm tail.
Neck
Yarn: mint green.
R1: 6 sc in MR (6)
R2: inc ×6 (12)
R3: [sc, inc] ×6 (18)
R4: [2 sc, inc] ×6 (24)
R5–R24: sc around (24)
Stuff every 4 rounds. Keep the lower half firmer than the top.
Fasten off. Leave 45 cm tail for sewing to head and body.
Cream Snout
Yarn: cream.
Ch 10.
R1: Sc in 2nd ch from hook and next 7 ch, 3 sc in last ch, rotate, sc in next 7 bottom loops, inc in last bottom loop (20)
R2: inc, 7 sc, inc ×3, 7 sc, inc ×2 (26)
R3–R4: sc around (26)
Do not overstuff. The snout should sit flat against the lower head.
Fasten off. Leave 30 cm tail.
Belly and Chest Panel
Yarn: cream.
Ch 11.
Row 1: sc in 2nd ch from hook and across (10)
Row 2: inc, 8 sc, inc (12)
Row 3: inc, 10 sc, inc (14)
Rows 4–12: sc across (14)
Row 13: dec, 10 sc, dec (12)
Row 14: dec, 8 sc, dec (10)
Fasten off. Leave 35 cm tail.
Front Legs
Yarn: mint green. Make 2.
R1: 6 sc in MR (6)
R2: inc ×6 (12)
R3: [sc, inc] ×6 (18)
R4: BLO sc around (18)
R5–R9: sc around (18)
R10: [sc, dec] ×6 (12)
R11–R13: sc around (12)
Stuff the foot fully and leave the upper 2 rounds softer for sewing.
Fasten off. Leave 30 cm tail.
Back Legs
Yarn: mint green. Make 2.
R1: 6 sc in MR (6)
R2: inc ×6 (12)
R3: [sc, inc] ×6 (18)
R4: [2 sc, inc] ×6 (24)
R5: BLO sc around (24)
R6–R9: sc around (24)
R10: [2 sc, dec] ×6 (18)
R11–R13: sc around (18)
Stuff the base hard enough that the body rests level before pins are removed.
Fasten off. Leave 35 cm tail.
Tail
Yarn: mint green.
R1: 6 sc in MR (6)
R2: sc around (6)
R3: inc ×6 (12)
R4–R5: sc around (12)
R6: [sc, inc] ×6 (18)
R7–R9: sc around (18)
R10: [2 sc, inc] ×6 (24)
R11–R14: sc around (24)
Stuff the tip lightly and the base firmly.
Fasten off. Leave 40 cm tail.
Yellow Dorsal Scallops
Yarn: yellow. Make 7.
R1: 6 sc in MR (6)
R2: inc ×6 (12)
R3: [sc, inc] ×6 (18)
Fold the circle in half. Sc through both layers across the fold (9).
Fasten off. Leave 20 cm tail on each scallop.
Cheek Patches
Yarn: pink. Make 2.
R1: 6 sc in MR (6)
R2: inc ×6 (12)
Fasten off. Leave 15 cm tail. Sew or tack lightly so the patches sit under the outer corners of the eyes.
Daisy Flowers
Yarn: yellow centers and white petals. Make 2 large daisies and 3 small daisies.
Small center:
R1: 6 sc in MR, sl st to first sc (6)
Large center:
R1: 6 sc in MR (6)
R2: inc ×6, sl st to first sc (12)
Petal round for each flower: Join white yarn. [Ch 3, 2 dc in same stitch, ch 3, sl st in same stitch, sl st in next stitch] repeat around to make 6 petals (6 petals).
Fasten off. Leave 20 cm tail.
Leaves and Stems
Yarn: olive green.
Stems, make 4: ch 9, sl st in 2nd ch from hook and across (8)
Leaves, make 8: ch 5, sl st in 2nd ch, sc, hdc, 3 sc in last ch, rotate, hdc, sc, sl st (9)
Fasten off. Leave 12 cm tail per leaf.
Hanging Basket
Yarn: tan.
Basket body:
R1: 6 sc in MR (6)
R2: inc ×6 (12)
R3: [sc, inc] ×6 (18)
R4: BLO sc around (18)
R5–R9: sc around (18)
R10: sl st around loosely (18)
Strap: ch 64, sl st in 2nd ch from hook and across (63)
Handle: ch 24, sl st in 2nd ch from hook and across (23)
Fasten off. Leave 20 cm tails for attaching to the basket sides.
Face Embroidery
Yarn: black embroidery thread.
Embroider two nostrils on the cream snout, 3 sts apart. Add a smile as one 8 cm curve across the lower snout. Stitch three lashes at the outer edge of each eye, each about 1 cm long. Add one brow above each eye, 2 rounds above the eye top, spanning 4 stitches.
Assembly
- Sew the neck to the first third of the body, centered over R5–R10 of the body, with the neck leaning slightly back.
- Sew the head to the top of the neck with the snout facing forward and the eye line level.
- Pin the cream snout to the lower half of the head, then sew around the edge without pulling the oval tight.
- Place cheek patches under the outer corners of the eyes and tack them with matching pink yarn.
- Sew the belly panel down the front of the neck and onto the upper body.
- Pin the back legs slightly behind the body midpoint, then pin the front legs under the neck base before sewing any leg.
- Sew the tail to the rear body at a slight upward angle so it touches the table behind the toy.
- Attach the yellow scallops from the head-back join to the tail base, spacing each scallop 1 round apart.
- Sew daisies and leaves across the head and body, keeping one large daisy near the eye line and one on the back.
- Attach the basket strap around the neck, sew the basket to the lower strap point, and place small flowers inside.
The finished brontosaurus should sit level with the tail acting as a rear counterweight.
7 Technical Tips
- Stitch-marker drift: A one-stitch shift on the 42-st head moves the eyes off center. Reset the marker after R7 and again before placing eyes between R10 and R11.
- Stuffing firmness: A neck stuffed under 70% firmness bends forward after the head is sewn on. Pack the lower 12 neck rounds harder than the top 12 rounds.
- Invisible dec gaps: Standard decreases can leave six visible holes on R15–R20 of the head. Use front-loop invisible decreases on every decrease round that faces outward.
- Eye placement timing: Eyes added after R16 are difficult to lock because the opening has dropped to 30 stitches. Place 14 mm eyes before R16, then test the snout position before washers go on.
- Velvet tension: If switching to velvet yarn, tension looseness can add 3–5 cm to the height. Drop one hook size from the yarn label and make one test sphere to R7 before starting the full toy.
- Pinning failure: Sewing legs one at a time can leave one foot 1 cm higher than the others. Pin all four legs and the tail, then check the dinosaur on a flat surface before stitching.
- Tail weaving: A tail sewn only around the open edge can twist under the body weight. Weave the yarn tail 2 cm into the body after the first seam, then sew a second support line across the top of the tail base.
Conclusion
Block the basket strap before photographing the finished dinosaur because loose cotton straps twist across the neck and hide the flower cluster. The next concrete step is to pin the neck, four legs, and tail at the same time, then set the toy on a flat table before sewing. Save the finished brontosaurus amigurumi crochet pattern notes with your hook size and final height so the second version matches the first. Post the side view on Pinterest and the face close-up on Instagram with #BloomingBronto. Which detail changes the silhouette most on your version: the yellow dorsal scallops, the cream muzzle, or the hanging flower basket?










so cute!