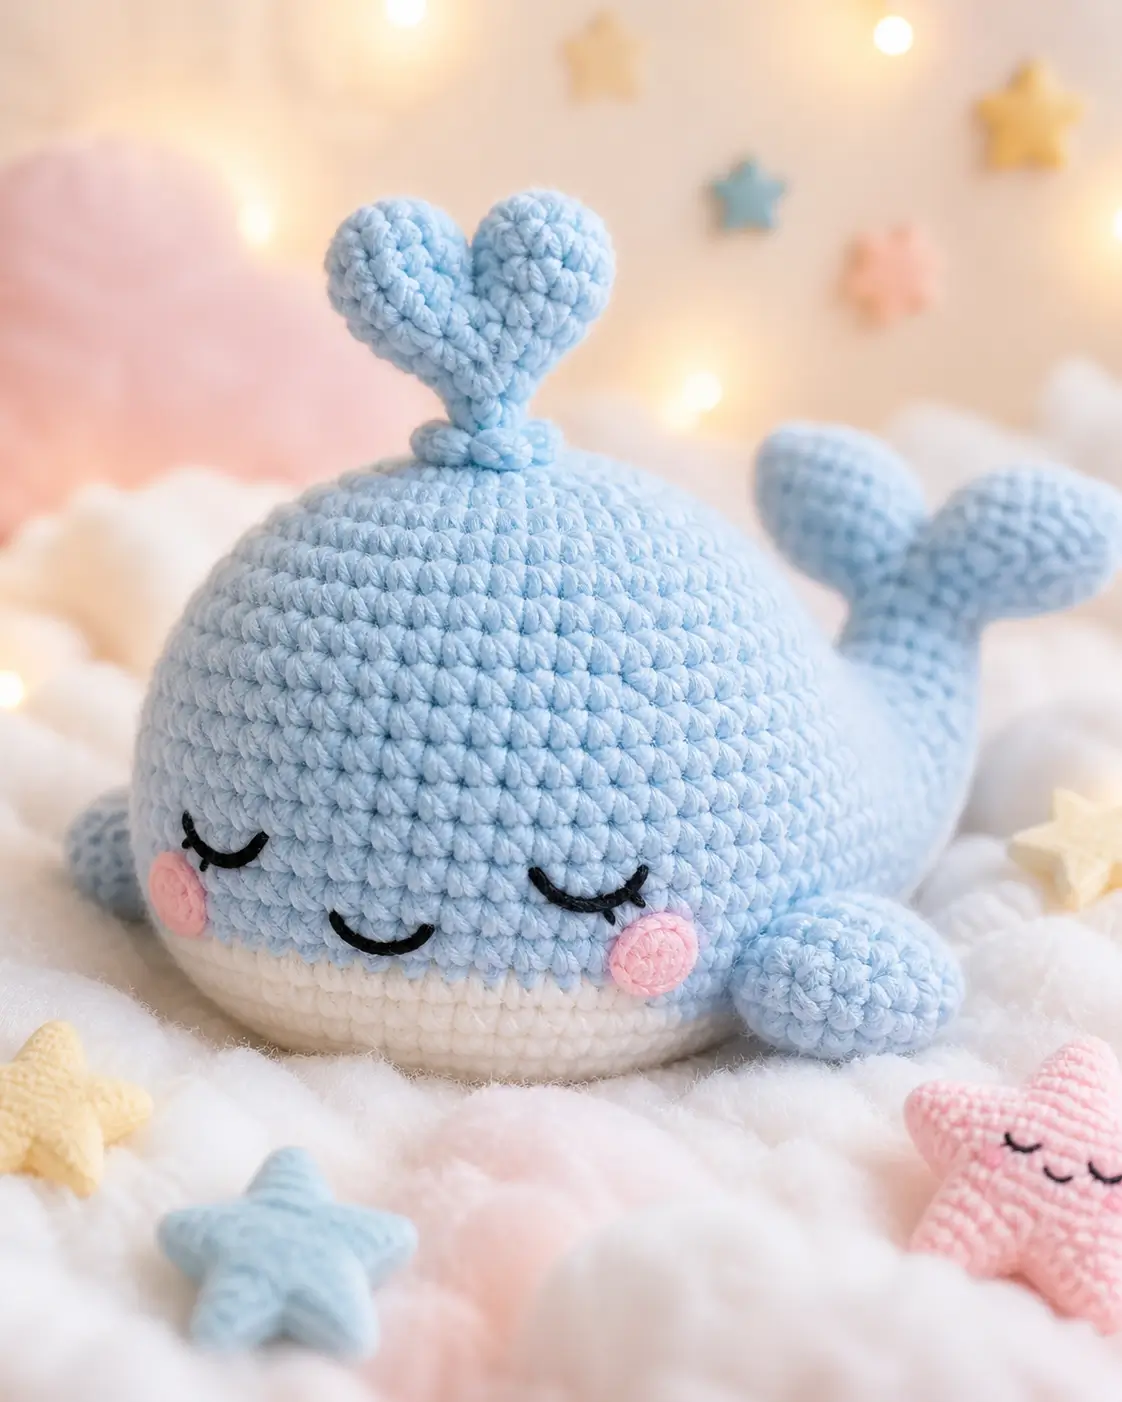
A whale breathes through a blowhole, so the water spout cannot sit like a flower. This whale amigurumi crochet pattern builds a sleepy blue whale with a rounded head, white belly, cheek patches, side fins, tail flukes, and a small star prop. Use worsted yarn, a 3.5–4 mm hook, and basic spiral shaping for an advanced-beginner toy about 15 cm long, sized for nursery shelf styling.
The Design: What Makes This Sleepy Whale Different
Three shapes control this whale. The head uses a 42-stitch dome, because a whale face needs width before height; otherwise the cheeks slip too low. The body uses a longer 42-stitch plateau to create the soft cylinder visible behind the face, while the white belly is sewn as a separate patch so the color line stays clean. A two-lobed spout replaces a flat dorsal fin. That choice matches the photo and gives the sleepy whale crochet pattern a vertical marker without making the toy top-heavy. The common mistake is placing tail flukes flat against the body. In a blue whale amigurumi free pattern, the flukes should lift slightly from a short stem so the silhouette reads as whale, not fish.
Project Info at a Glance
| Skill Level | Time | Finished Size | Hook | Best For |
|---|---|---|---|---|
| Advanced beginner | 3–4 hours | About 15 cm long × 10 cm high | 3.5–4 mm | Nursery shelf, baby photo prop, ocean set |
Materials and Tools
Yarn
- Pastel blue — worsted/Aran weight — 50 g — Caron Simply Soft, Paintbox Simply Aran, or similar acrylic blend.
- White — worsted/Aran weight — 18–20 g — use for belly panel and lower accents.
- Pink — worsted/Aran weight — 3–5 g — use for cheek patches and optional star.
- Black embroidery yarn — small scrap — use for closed sleepy eyes.
- Cream or yellow — worsted/Aran weight — 8–10 g — use for the star accessory.
Tools
- Hook 3.5–4 mm, matched to tight amigurumi tension.
- Safety eyes are not used for the photo-matched sample; use optional 10–12 mm eyes only for an open-eye version.
- Polyester fiberfill, yarn needle, removable stitch markers, pins, small scissors, and black embroidery needle.
Abbreviations
MR = magic ring; sc = single crochet; inc = increase; dec = decrease; sl st = slip stitch; ch = chain; BLO = back loop only; FLO = front loop only; hdc = half double crochet; dc = double crochet; st = stitch. Invisible decrease is worked through the front loops of two stitches to reduce bulk on the closing rounds.
Pattern — Step by Step
Work in a continuous spiral unless a row or embroidery step is stated. The whale amigurumi crochet pattern below uses a 42-stitch large plateau for the main pieces, then closes in six-stitch decrease steps.
Head (Make 1)
Yarn: pastel blue — Source: standard amigurumi math checked against published whale plateau counts.
R1: 6 sc in MR (6)
R2: inc ×6 (12)
R3: (sc, inc) ×6 (18)
R4: (2 sc, inc) ×6 (24)
R5: (3 sc, inc) ×6 (30)
R6: (4 sc, inc) ×6 (36)
R7: (5 sc, inc) ×6 (42)
R8–R14: sc around (42)
R15: (5 sc, dec) ×6 (36)
R16: (4 sc, dec) ×6 (30)
R17: (3 sc, dec) ×6 (24)
Stuff the head firmly. Keep the lower edge round, not flat.
R18: (2 sc, dec) ×6 (18)
R19: (sc, dec) ×6 (12)
R20: dec ×6 (6)
Fasten off. Leave a 25 cm tail for closing and sewing.
Body (Make 1)
Yarn: pastel blue — Source: standard amigurumi math; elongated shape based on 42-stitch whale body construction.
R1: 6 sc in MR (6)
R2: inc ×6 (12)
R3: (sc, inc) ×6 (18)
R4: (2 sc, inc) ×6 (24)
R5: (3 sc, inc) ×6 (30)
R6: (4 sc, inc) ×6 (36)
R7: (5 sc, inc) ×6 (42)
R8–R16: sc around (42)
R17: (5 sc, dec) ×6 (36)
R18: sc around (36)
R19: (4 sc, dec) ×6 (30)
R20: sc around (30)
R21: (3 sc, dec) ×6 (24)
Begin stuffing. Add more fiberfill to the top half than the lower half so the body sits without rolling.
R22: (2 sc, dec) ×6 (18)
R23: (sc, dec) ×6 (12)
R24: dec ×6 (6)
Fasten off. Leave a 30 cm tail for sewing to the head.
White Belly Panel (Make 1)
Yarn: white — Source: standard flat amigurumi circle math.
R1: 6 sc in MR (6)
R2: inc ×6 (12)
R3: (sc, inc) ×6 (18)
R4: (2 sc, inc) ×6 (24)
R5: (3 sc, inc) ×6 (30)
R6: (4 sc, inc) ×6 (36)
Do not stuff. Pin the circle into a low oval across the lower front before sewing.
Fasten off. Leave a 45 cm tail for appliqué stitching.
Front Flippers (Make 2)
Yarn: pastel blue — Source: standard amigurumi math.
R1: 6 sc in MR (6)
R2: inc ×6 (12)
R3–R5: sc around (12)
R6: dec ×6 (6)
Do not stuff. Flatten each flipper so the closing seam sits along the underside.
Fasten off. Leave a 25 cm tail on each flipper.
Tail Stem (Make 1)
Yarn: pastel blue — Source: standard amigurumi tube math.
R1: 6 sc in MR (6)
R2–R6: sc around (6)
Stuff with only a thin roll of fiberfill. The stem must bend upward slightly.
Fasten off. Leave a 25 cm tail.
Tail Flukes (Make 2)
Yarn: pastel blue — Source: standard amigurumi math checked against published whale tail-fin construction.
R1: 6 sc in MR (6)
R2: inc ×6 (12)
R3: (sc, inc) ×6 (18)
R4–R5: sc around (18)
R6: (sc, dec) ×6 (12)
R7: dec ×6 (6)
Do not stuff. Flatten each fluke, then curve the outer edge with your fingers before sewing.
Fasten off. Leave a 30 cm tail on each fluke.
Water Spout Stem (Make 1)
Yarn: pastel blue — Source: photo-specific shaping with standard amigurumi tube math.
R1: 6 sc in MR (6)
R2–R5: sc around (6)
Stuff lightly with one narrow strand of fiberfill or leave empty for a softer bend.
Fasten off. Leave a 20 cm tail for sewing to the head.
Water Spout Lobes (Make 2)
Yarn: pastel blue — Source: photo-specific two-lobed spout using standard ball math.
R1: 6 sc in MR (6)
R2: inc ×6 (12)
R3–R4: sc around (12)
R5: dec ×6 (6)
Stuff each lobe lightly. Sew both lobes side by side to form the heart-like top.
Fasten off. Leave a 20 cm tail on each lobe.
Cheek Patches (Make 2)
Yarn: pink — Source: standard flat amigurumi circle math.
R1: 6 sc in MR (6)
R2: inc ×6 (12)
Keep the patches flat. Block them with a fingertip before stitching to the face.
Fasten off. Leave a 20 cm tail on each cheek.
Sleepy Eyes (Embroider 2)
Yarn: black embroidery strand — Source: photo-specific embroidered face.
Cut a 35 cm strand. Insert the needle at the lower back of the head and exit at the first eye point.
Make one curved stitch across 4 stitches. Add three tiny lash stitches, each 1 stitch long, at the outer edge.
Repeat on the opposite side, keeping 10–12 stitches between the inner ends of the eyes. Knot inside the head if still open, or bury the knot under the belly-side seam.
Sleepy Star Accessory (Make 1)
Yarn: cream, yellow, blue, or pink — Source: photo accessory interpreted as a six-point nursery star to keep the 6-stitch math consistent.
R1: 6 sc in MR (6)
R2: inc ×6 (12)
R3: (sc, inc) ×6 (18)
Point 1: ch 4, sc in 2nd ch from hook, hdc in next ch, dc in next ch, skip 2 center sts, sl st in next st (3 sts on point)
Point 2: ch 4, sc in 2nd ch from hook, hdc in next ch, dc in next ch, skip 2 center sts, sl st in next st (3 sts on point)
Point 3: ch 4, sc in 2nd ch from hook, hdc in next ch, dc in next ch, skip 2 center sts, sl st in next st (3 sts on point)
Point 4: ch 4, sc in 2nd ch from hook, hdc in next ch, dc in next ch, skip 2 center sts, sl st in next st (3 sts on point)
Point 5: ch 4, sc in 2nd ch from hook, hdc in next ch, dc in next ch, skip 2 center sts, sl st in next st (3 sts on point)
Point 6: ch 4, sc in 2nd ch from hook, hdc in next ch, dc in next ch, skip 2 center sts, sl st in next st (3 sts on point)
Leave flat for a photo prop or make a second star and seam the edges for a stuffed version.
Fasten off. Leave a 25 cm tail if attaching to a mobile or garland.
Assembly
- Join the head to the widest end of the body with the head angled slightly downward.
- Pin the white belly panel across the lower front, covering the head-body join at the underside.
- Stitch the belly panel with small whipstitches, catching only the back loop of the panel edge.
- Place the cheek patches on the blue face area, 8–10 stitches apart and one round above the belly panel.
- Embroider the sleepy eyes above the cheeks, keeping each curve 4 stitches wide.
- Attach the front flippers on the side seams, one to two rounds behind the cheeks.
- Add the tail stem to the rear center of the body, then sew one fluke to each side of the stem.
- Fix the water spout stem on top of the head, centered over the face and two rounds behind the eye line.
- Tuck the two spout lobes against each other at the top of the stem and stitch them until they form a heart shape.
- Brush away loose fiberfill, weave all yarn tails through at least three stitch channels, and place the star prop beside the whale.
The finished whale has a rounded sleepy face, raised tail flukes, a white lower belly, and a two-lobed spout.
7 Technical Tips
- Stitch marker drift: Spiral rounds can rotate the belly line by 3–5 stitches if the marker is ignored. Move the marker at the end of every round and realign the head before sewing.
- Stuffing firmness: An underfilled head collapses under the water spout. Fill the head to about 85% firmness, then add small pieces around R15–R18 before closing.
- Invisible decrease holes: A standard decrease leaves visible gaps on pastel yarn. Use front-loop invisible decreases on all closing rounds from 36 stitches downward.
- Eye placement timing: Embroidered eyes placed after the cheeks often sit too high. Pin cheeks first, then stitch the eye curve 1 round above the top edge of each cheek.
- Velvet tension swap: Velvet yarn expands the whale by 20–30% and makes the spout lean. Drop at least 0.5 mm in hook size and stuff the stem less than the head.
- Pinning symmetry: Unpinned flippers twist forward and make the whale look like a seal. Pin both flippers 1–2 rounds behind the cheeks and check the front view before stitching.
- Tail weaving: Short tails can loosen after the flukes are handled. Leave 30 cm tails on both flukes and weave each tail through three separate stitch paths inside the body.
Conclusion
This sleepy whale is built from large, plain shapes, so accuracy depends on placement rather than difficult stitches. Check the 42-stitch plateau, pin the belly before the cheeks, and keep the water spout centered over the face. The next step is to make one test head in scrap yarn and mark the eye curve before cutting final yarn. Save this whale amigurumi crochet pattern to Pinterest, then share the finished whale on Instagram with the hashtag #SleepyWhaleAmigurumi. For a matching ocean set, repeat the star accessory in yellow, blue, and pink. Will your whale have a heart-shaped spout like the photo, or a taller fountain shape?









