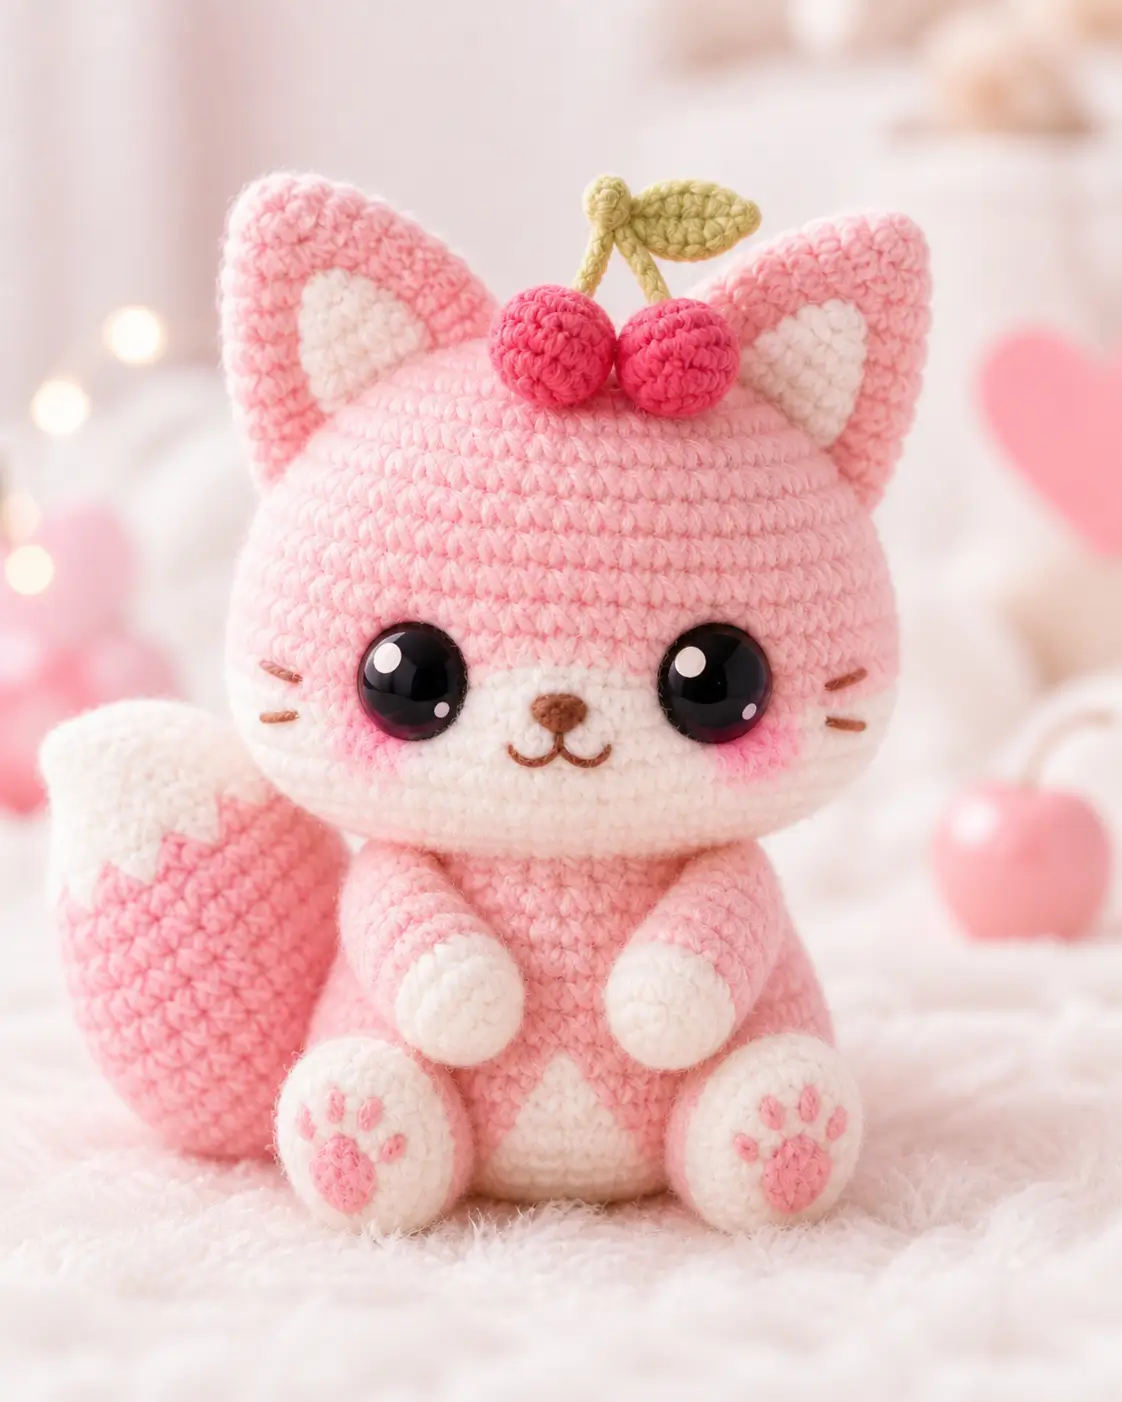
A pink cat with cherries has two centers of gravity: the round head and the fruit perched above it. This cat amigurumi crochet pattern builds a 17 cm sitting kitten with worsted yarn, a 3.5 mm hook, and 18 mm safety eyes. The skill level is advanced beginner because the face mask and cherry topper need careful placement. Make it when a plain cat needs a clear theme.
The Design: What Makes This Cherry Cat Different
This cat amigurumi crochet pattern depends on three shape choices. The head uses a 42-stitch plateau, larger than the 36-stitch body, because the photo reads as a chibi kitten rather than a realistic cat. The white face mask is a separate flat piece so the mask edge stays clean under the oversized black eyes. The ears are worked as shallow cones and flattened; a tall cone would pull the silhouette toward a fox. The tail starts with a white tip and bends by pairing one increase with one decrease in selected rounds. That keeps the stitch count stable while shifting the curve. A common mistake in a pink cat amigurumi is placing the cherry stems after the ears are sewn. Pin the fruit first, then set the ears around it. This cherry cat crochet pattern also needs cheek patches sized smaller than the eyes.
Project Info at a Glance
| Skill Level | Time | Finished Size | Hook | Best For |
|---|---|---|---|---|
| Advanced beginner | 5–6 hours | 17 cm sitting height | 3.5 mm | Kawaii cat amigurumi display, shelf toy, themed handmade gift |
Materials and Tools
Yarn
- Pastel pink — worsted or light worsted — 80 g — Paintbox Simply Aran, Stylecraft Special Aran, or similar smooth acrylic.
- Cream white — worsted or light worsted — 25 g — same yarn family as the main color for even stitch height.
- Cherry red or deep pink — worsted or light worsted — 8 g — smooth yarn for two round cherries and toe pads.
- Olive green — worsted or DK scrap — 3 g — stem and leaf.
- Brown embroidery yarn — cotton DK scrap — less than 1 g — nose, mouth, and whiskers.
- Blush pink — worsted scrap — 3 g — cheek patches and optional paw dots.
Tools
- Hook 3.5 mm
- 18 mm safety eyes
- Polyester stuffing
- Tapestry needle
- Stitch markers
- Straight pins
- Scissors
Abbreviations
MR = magic ring; sc = single crochet; inc = increase; dec = decrease; sl st = slip stitch; ch = chain; BLO = back loop only; st = stitch; R = round; FO = fasten off.
An invisible decrease is worked through the front loops of the next two stitches, then finished as one sc to reduce bulk at the closed rounds.
Pattern — Step by Step
Work in a continuous spiral unless a section says to work in rows. Move the stitch marker at the end of every round. Counts appear in brackets after every round.
Head
Yarn: pastel pink — Source: standard amigurumi math scaled to the photo.
R1: 6 sc in MR (6)
R2: inc ×6 (12)
R3: (1 sc, inc) ×6 (18)
R4: (2 sc, inc) ×6 (24)
R5: (3 sc, inc) ×6 (30)
R6: (4 sc, inc) ×6 (36)
R7: (5 sc, inc) ×6 (42)
R8–R16: sc around (42)
Pause after R13 if you want the safety eye posts to pass through the face mask and the head at the same time. Pin the face mask first, then test the eye spacing.
R17: (5 sc, dec) ×6 (36)
R18: (4 sc, dec) ×6 (30)
R19: (3 sc, dec) ×6 (24)
R20: (2 sc, dec) ×6 (18)
Stuff the head firmly around the cheeks and crown. Add smaller pieces of stuffing near the lower face so the mask area does not collapse.
R21: (1 sc, dec) ×6 (12)
R22: dec ×6 (6)
Fasten off. Leave a 20 cm tail and close the opening through the front loops.
White Face Mask
Yarn: cream white — Source: standard amigurumi math.
R1: 6 sc in MR (6)
R2: inc ×6 (12)
R3: (1 sc, inc) ×6 (18)
R4: (2 sc, inc) ×6 (24)
R5: (3 sc, inc) ×6 (30)
R6: sc around (30)
Fasten off. Leave a 45 cm tail. Pin the piece as a wide oval across the lower front of the head, with the top edge sitting just under the eye line.
Body
Yarn: pastel pink — Source: standard amigurumi math scaled to the photo.
R1: 6 sc in MR (6)
R2: inc ×6 (12)
R3: (1 sc, inc) ×6 (18)
R4: (2 sc, inc) ×6 (24)
R5: (3 sc, inc) ×6 (30)
R6: (4 sc, inc) ×6 (36)
R7–R12: sc around (36)
R13: (4 sc, dec) ×6 (30)
R14: sc around (30)
R15: (3 sc, dec) ×6 (24)
R16: (2 sc, dec) ×6 (18)
Stuff the body with a flat base and a rounded chest. The body must support the oversized head without tilting backward.
R17: (1 sc, dec) ×6 (12)
R18: dec ×6 (6)
Fasten off. Leave a 30 cm tail for sewing the head to the body.
Belly Patch
Yarn: cream white — Source: standard amigurumi math.
R1: 6 sc in MR (6)
R2: inc ×6 (12)
R3: (1 sc, inc) ×6 (18)
R4: (2 sc, inc) ×6 (24)
R5: sc around (24)
Fasten off. Leave a 35 cm tail. Pin vertically on the front of the body from R6 to R12, then sew with small outer-loop stitches.
Arms / Front Legs
Make 2. Yarn: cream white for paw, pastel pink for arm — Source: standard amigurumi math.
R1: with cream white, 6 sc in MR (6)
R2: inc ×6 (12)
R3–R4: sc around (12)
R5: dec ×6 (6)
R6: change to pastel pink, sc around (6)
R7–R11: sc around (6)
Stuff the paw only. Leave the upper arm flat so it sits cleanly against the body.
Fasten off. Leave a 25 cm tail on each arm.
Back Legs
Make 2. Yarn: cream white for foot, pastel pink for upper leg — Source: standard amigurumi math.
R1: with cream white, 6 sc in MR (6)
R2: inc ×6 (12)
R3: (1 sc, inc) ×6 (18)
R4–R5: sc around (18)
R6: (1 sc, dec) ×6 (12)
R7: change to pastel pink, sc around (12)
R8–R9: sc around (12)
R10: dec ×6 (6)
Stuff the white foot firmly and the pink upper leg lightly. The flat side faces the body.
Fasten off. Leave a 30 cm tail on each leg.
Back Paw Pads
Make 2. Yarn: blush pink — Source: standard amigurumi math.
R1: 6 sc in MR (6)
R2: inc ×6 (12)
Fasten off. Leave a 20 cm tail. Sew one pad to the center of each cream foot. Add three small toe stitches above each pad with blush pink yarn.
Ears
Make 2. Yarn: pastel pink with cream white inner stitching — Source: standard amigurumi math.
R1: 6 sc in MR (6)
R2: sc around (6)
R3: inc ×6 (12)
R4: sc around (12)
R5: (1 sc, inc) ×6 (18)
R6–R7: sc around (18)
Fasten off. Leave a 35 cm tail. Flatten each ear into a triangle. With cream white yarn, surface stitch a smaller triangle inside each ear, keeping the inner triangle 2 rounds away from the outer edge.
Curled Tail
Yarn: cream white for tip, pastel pink for tail — Source: standard amigurumi math with shaping rounds.
R1: with cream white, 6 sc in MR (6)
R2: inc ×6 (12)
R3–R5: sc around (12)
R6: change to pastel pink, sc around (12)
R7–R8: sc around (12)
R9: 2 sc, inc, 4 sc, dec, 3 sc (12)
R10–R11: sc around (12)
R12: 2 sc, inc, 4 sc, dec, 3 sc (12)
R13–R14: sc around (12)
R15: 2 sc, inc, 4 sc, dec, 3 sc (12)
R16–R18: sc around (12)
Stuff lightly. Bend the increase side outward and the decrease side inward to set the curl.
Fasten off. Leave a 40 cm tail for sewing.
Cherry Topper
Make 2 cherries. Yarn: cherry red or deep pink — Source: standard amigurumi math.
R1: 6 sc in MR (6)
R2: inc ×6 (12)
R3–R4: sc around (12)
Stuff each cherry with a small, firm ball of fiberfill.
R5: dec ×6 (6)
Fasten off. Leave a 25 cm tail. Close each cherry and keep the tail for attaching to the head.
Cherry Stems and Leaf
Yarn: olive green — Source: chain-and-row shaping.
Stem 1: ch 9, sl st in 2nd ch from hook and across (8)
Stem 2: ch 9, sl st in 2nd ch from hook and across (8)
Leaf: ch 7. Starting in 2nd ch from hook: sc, hdc, dc, dc, hdc, sc; turn to the unused loops and work sc, hdc, dc, dc, hdc, sc (12)
Fasten off. Leave 20 cm tails on all green pieces. Sew both stems between the cherries and place the leaf above the stem join.
Cheek Patches
Make 2. Yarn: blush pink — Source: standard amigurumi math.
R1: 6 sc in MR (6)
R2: inc ×6 (12)
Fasten off. Leave a 20 cm tail. Sew one patch under each eye, offset slightly toward the outer edge of the face mask.
Nose, Mouth, and Whiskers
Yarn: brown embroidery yarn — Source: photo-based embroidery placement.
Work a small satin-stitch triangle for the nose at the center of the face mask, 2 rounds below the eye line. Add two short curved mouth stitches under the nose. Stitch two whisker lines on each side of the face; each whisker should measure about 1.5 cm and angle slightly upward.
Assembly
- Pin the head to the closed top of the body with the face centered over the belly patch.
- Sew the head to the body through one full ring of stitches, then repeat the seam once for neck strength.
- Pin the white face mask on the lower head before locking the safety eye washers, then sew the mask edge flat.
- Attach the 18 mm safety eyes between R11 and R12 of the head, about 9 stitches apart, passing through both mask and head when possible.
- Sew the nose, mouth, cheek patches, and whiskers after the eyes are fixed so the expression stays balanced.
- Place the arms on the front body between R7 and R11, angled inward toward the belly patch.
- Sew the back legs to the lower front body between R3 and R7 so the paw pads face forward.
- Pin the ears between R5 and R11 of the head, leaving space at the crown for the cherry stems.
- Sew the curled tail to the back-left side of the body, with the white tip curving upward beside the head.
- Attach the two cherries, stems, and leaf to the crown, stitching through the head fabric at least four times per cherry.
The finished piece is a sitting cherry pink cat with a stable body, centered face mask, and raised fruit topper.
7 Technical Tips
- Stitch marker drift: If the marker shifts by one stitch during the 42-stitch head plateau, the face mask will sit off-center. Count R8, R12, and R16 before adding the eyes.
- Stuffing firmness: A soft head will flatten under the cherry topper and make the ears lean outward. Fill the crown to about 85 percent firmness before closing R20.
- Invisible decrease ridges: Standard decreases can leave visible bars across R17–R22 of the head. Work each decrease through front loops only, then pull the working yarn tight after the next sc.
- Eye placement timing: Locking the washers before testing the face mask can trap the white patch too low. Pin the mask first and test both 18 mm eyes through the fabric before pressing washers on.
- Velvet yarn substitution: Chenille or velvet yarn can enlarge this toy by 30 to 50 percent and make the cherries heavy. Move up to 20 mm eyes and add extra head stuffing if using plush yarn.
- Ear pinning failure: Ears sewn without four pins often rotate backward after stuffing settles. Pin the ear tip, both lower corners, and the inner edge before stitching from R5 to R11.
- Tail weaving weakness: A tail sewn through only the outer loops can loosen when the toy sits against a surface. Anchor the tail through the body fabric in a square path measuring about 2 cm wide.
Conclusion
Check the silhouette before trimming any tails: the cherries should sit between the ears, the tail should curl upward, and the white face mask should frame both eyes without covering the nose. The next practical step is to make a second face mask in cream and compare it against bright white; the warmer shade usually matches pastel pink better. Share the finished cat on Pinterest and Instagram with the front view and one side view so the tail shape is visible. Use the hashtag #CherryPinkCat. For this cat amigurumi crochet pattern, would you keep both cherries centered or angle them toward one ear?









