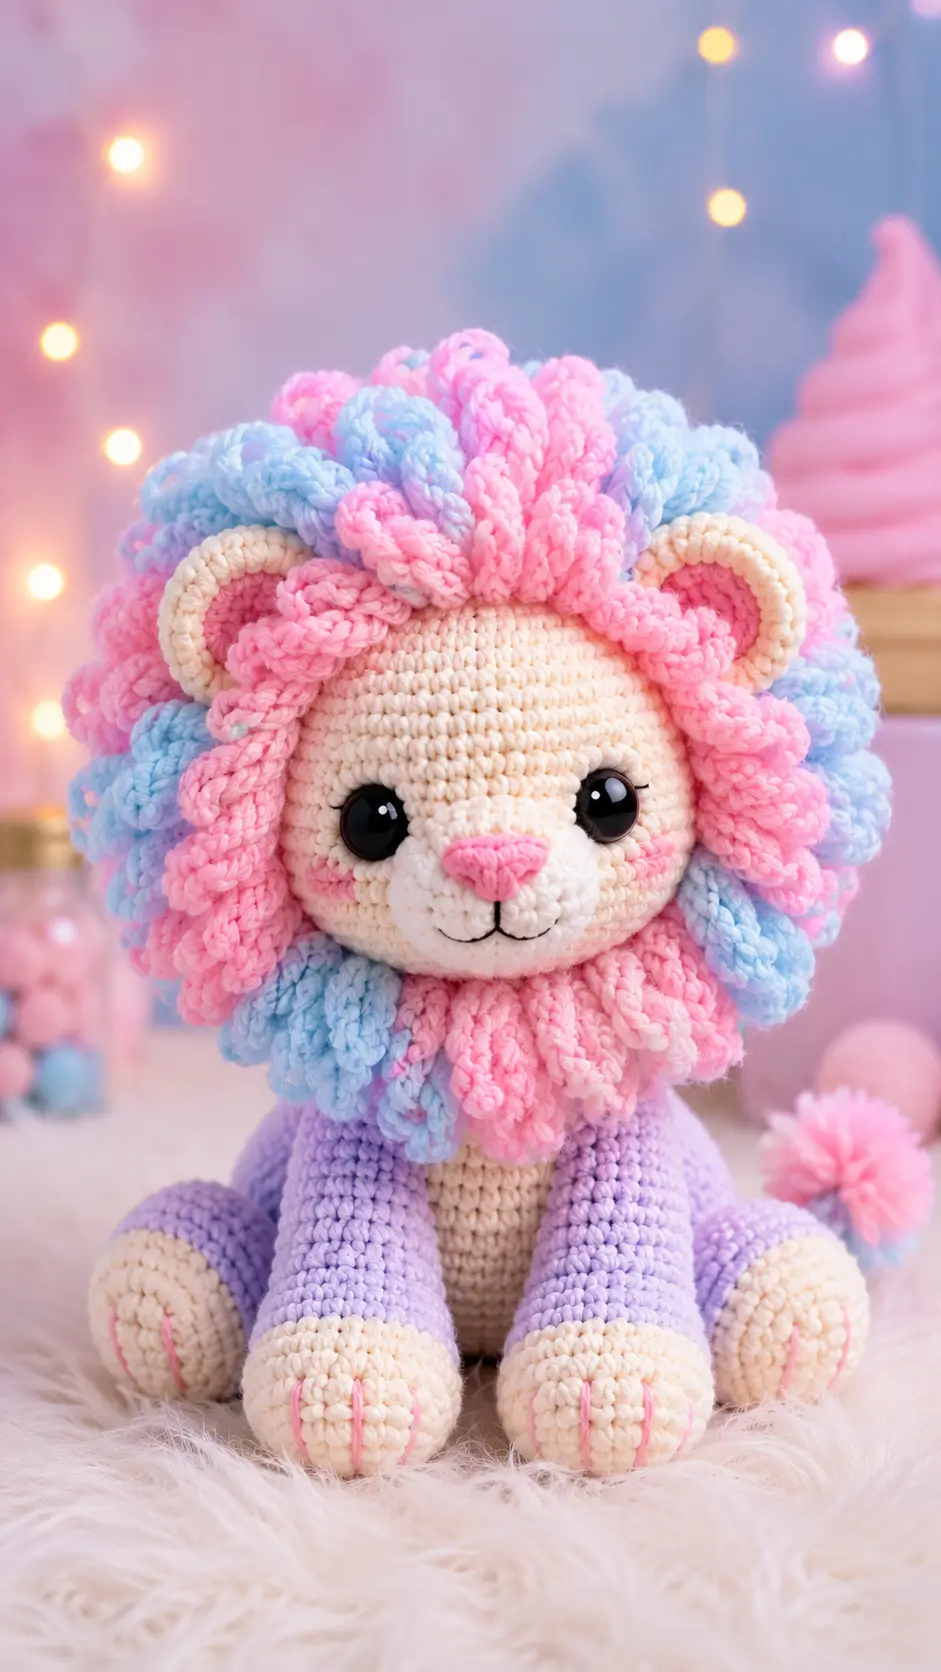
A lion’s mane must frame the face without burying the ears. This lion amigurumi crochet pattern builds a seated pastel cub with a cream head, lavender body, curled two-color mane, 3.5 mm hook, worsted yarn, and an estimated 22 cm seated height. The skill level is intermediate because the mane is placed after shaping. Make it when you need a shelf sample with readable facial proportions.
The Design: What Makes This Pastel Lion Different
Two structural choices control this pastel lion. First, the head is larger than the body, because the mane adds visual weight before any stuffing shifts the center of gravity. Second, the ears are worked as shallow cups and sewn partly under the curls, so the cream rim stays visible after the pink and blue spirals are pinned. You need the face finished before any mane curl is attached. A maker who adds the mane first will guess eye width through bulk, and the finished amigurumi lion toy can look cross-eyed. Third, the muzzle is separate rather than stitched flat onto the head; that raised oval keeps the pink nose from sinking into cream stitches. Many free lion crochet pattern sources use cut yarn fringe. This version uses spiral curls to match the photo.
Project Info at a Glance
| Skill Level | Time | Finished Size | Hook | Best For |
|---|---|---|---|---|
| Intermediate | 6–10 hours for comparable lion projects | 22 cm seated target | 3.5 mm with worsted yarn | Shelf display, pattern photography, nursery decor out of child reach |
Comparable sources list 22 cm seated height, 3.5 mm worsted-hook use, and 6–10 hour lion timing. Safety eyes are not suitable for toys handled by children under 3; embroider eyes for that use. Source: Cuddly Stitches Craft
Materials and Tools
Yarn
- Cream — worsted / medium 4 — 45 g — Lion Brand Vanna’s Choice, WeCrochet Brava, or Paintbox Simply Aran
- Lavender — worsted / medium 4 — 35 g — same yarn line as cream
- Blush pink — worsted / medium 4 — 25 g — mane curls, nose, inner ears, toe lines
- Sky blue — worsted / medium 4 — 25 g — mane curls and tail tuft
- Black embroidery thread — small amount — mouth details
- Optional pale pink — worsted / medium 4 — 8 g — cheek patches
The yarn amounts are scaled for the photographed color layout and checked against published lion yarn ranges that list 100 g main yarn and 75 g mane yarn for a larger worsted lion. Source: Jess Huff
Tools
- Hook 3.5 mm
- Safety eyes 15 mm, or embroidered eyes for children under 3
- Polyester stuffing
- Yarn needle
- Stitch markers
- Straight pins
- Scissors
- Measuring tape
Abbreviations
MR = magic ring; sc = single crochet; inc = increase; dec = decrease; sl st = slip stitch; ch = chain; BLO = back loop only; st = stitch; R = round or row. Invisible decrease: insert the hook through the front loops of the next two stitches, draw up a loop, yarn over, and finish one sc.
Pattern — Step by Step
Continuous spiral unless noted. Counts appear in brackets at the end of each round.
Head Make 1
Yarn: cream — Source: Standard amigurumi math; 42-stitch gauge checked against a lion pattern source. Source: Cuddly Stitches Craft
R1: 6 sc in MR (6)
R2: inc ×6 (12)
R3: (sc, inc) ×6 (18)
R4: (2 sc, inc) ×6 (24)
R5: (3 sc, inc) ×6 (30)
R6: (4 sc, inc) ×6 (36)
R7: (5 sc, inc) ×6 (42)
R8–R14: sc around (42)
R15: (5 sc, dec) ×6 (36)
R16: (4 sc, dec) ×6 (30)
R17: (3 sc, dec) ×6 (24)
R18: (2 sc, dec) ×6 (18)
R19: (sc, dec) ×6 (12)
R20: dec ×6 (6)
Insert 15 mm eyes between R10 and R11, 8 stitches apart, before closing. Stuff firmly after R17, then top up before R20.
Fasten off. Close the final 6 stitches and leave a 40 cm tail for sewing.
Muzzle Make 1
Yarn: cream — Source: Standard amigurumi math.
R1: 6 sc in MR (6)
R2: inc ×6 (12)
R3: (sc, inc) ×6 (18)
R4: (2 sc, inc) ×6 (24)
R5–R6: sc around (24)
Stuff lightly. Flatten the lower edge with your thumb before pinning so the muzzle becomes oval, not round.
Fasten off. Leave a 30 cm tail.
Cheek Patches Make 2
Yarn: pale blush pink — Source: Standard amigurumi math.
R1: 6 sc in MR (6)
R2: inc ×6 (12)
R3: (sc, inc) ×6 (18)
sl st to finish (18)
Do not stuff. These patches sit flat under the outer edges of the muzzle.
Fasten off. Leave a 20 cm tail on each patch.
Ears Make 2
Yarn: cream outer ears, blush pink inner ears — Source: Standard amigurumi math.
Outer ear:
R1: 6 sc in MR (6)
R2: inc ×6 (12)
R3: (sc, inc) ×6 (18)
R4: (2 sc, inc) ×6 (24)
R5: sc around (24)
Inner ear:
R1: 6 sc in MR (6)
R2: inc ×6 (12)
R3: (sc, inc) ×6 (18)
Do not stuff. Sew one inner ear to one outer ear, then fold the finished ear slightly at the base.
Fasten off. Leave a 25 cm tail on each outer ear.
Body Make 1
Yarn: lavender — Source: Standard amigurumi math.
R1: 6 sc in MR (6)
R2: inc ×6 (12)
R3: (sc, inc) ×6 (18)
R4: (2 sc, inc) ×6 (24)
R5: (3 sc, inc) ×6 (30)
R6: (4 sc, inc) ×6 (36)
R7–R12: sc around (36)
R13: (4 sc, dec) ×6 (30)
R14–R15: sc around (30)
R16: (3 sc, dec) ×6 (24)
R17: (2 sc, dec) ×6 (18)
R18: (sc, dec) ×6 (12)
R19: dec ×6 (6)
Stuff from R10 onward. Pack the base more firmly than the neck so the lion sits without tipping forward.
Fasten off. Close the base and leave a 35 cm tail.
Belly Patch Make 1
Yarn: cream — Source: Standard amigurumi math.
R1: 6 sc in MR (6)
R2: inc ×6 (12)
R3: (sc, inc) ×6 (18)
R4: (2 sc, inc) ×6 (24)
R5: (3 sc, inc) ×6 (30)
Block flat by hand. The patch should cover the center front of the lavender body without reaching the side seams.
Fasten off. Leave a 30 cm tail.
Front Legs / Arms Make 2
Yarn: cream paw, lavender leg — Source: Standard amigurumi math.
R1: 6 sc in MR with cream (6)
R2: inc ×6 (12)
R3: (sc, inc) ×6 (18)
R4–R5: sc around (18)
R6: (sc, dec) ×6 (12)
R7: change to lavender, sc around (12)
R8–R13: sc around (12)
Stuff the cream paw firmly and the lavender upper leg lightly. Flatten the top opening before sewing.
Fasten off. Leave a 25 cm tail on each leg.
Back Legs Make 2
Yarn: cream paw, lavender leg — Source: Standard amigurumi math.
R1: 6 sc in MR with cream (6)
R2: inc ×6 (12)
R3: (sc, inc) ×6 (18)
R4: (2 sc, inc) ×6 (24)
R5–R6: sc around (24)
R7: (2 sc, dec) ×6 (18)
R8: (sc, dec) ×6 (12)
R9: change to lavender, sc around (12)
R10–R12: sc around (12)
Stuff the cream foot firmly and leave the top lavender section softer so the leg sits at an angle.
Fasten off. Leave a 30 cm tail on each leg.
Pastel Mane Curls Make 36
Yarn: blush pink and sky blue — Source: Original spiral-curl method; lion mane placement checked against mane references. Source: Stella’s Yarn Universe
Make 18 curls in blush pink and 18 curls in sky blue.
Row 1: ch 16
Row 2: starting in the 2nd ch from hook, 3 sc in each ch across (45)
The strip will twist into a curl as the stitches crowd the chain. Leave both tails long enough for sewing.
Fasten off each curl with a 15 cm tail.
Placement plan: pin 20 curls around the outer mane ring, 12 curls around the inner cheek ring, and 4 curls at the crown. Keep the ear openings visible.
Tail and Tail Tuft Make 1 Tail, 5 Tuft Curls
Yarn: lavender tail, blush pink and sky blue tuft — Source: Standard amigurumi math plus original curl method.
Tail tube:
R1: 6 sc in MR with lavender (6)
R2: inc ×6 (12)
R3–R9: sc around (12)
Stuff very lightly. A firm tail will push the lion away from the surface when seated.
Fasten off. Leave a 25 cm tail.
Tuft curls:
Row 1: ch 10
Row 2: starting in the 2nd ch from hook, 3 sc in each ch across (27)
Make 3 pink curls and 2 blue curls. Sew them to the closed end of the tail.
Face and Paw Embroidery
Yarn: blush pink and black embroidery thread — Source: Standard finishing method.
Nose: stitch a pink triangle across the upper center of the muzzle, about 5 stitches wide and 3 rounds tall. Add a black vertical line 2 rounds long below the nose, then curve two short mouth stitches outward.
Paws: add three pink vertical toe lines on each cream paw. Each toe line should measure about 1.5 cm on the back paws and 1 cm on the front paws.
Assembly
- Sew the head to the top of the body, keeping the face centered over the cream belly area.
- Sew the cream belly patch to the front of the lavender body from R7 to R16.
- Pin the muzzle between the eyes, with its top edge one round below the eye line, then sew around the edge.
- Sew the cheek patches under the outer lower edges of the muzzle.
- Attach the ears between R5 and R9 of the head, partly tucked under the future mane ring.
- Sew the front legs to the body sides just below the head join.
- Sew the back legs to the lower body with cream paws facing forward.
- Attach the tail to the back of the body at R11, then sew the tuft curls to the tail tip.
- Pin all mane curls before sewing; place pink curls near the face and mix blue curls around the outer ring.
- Weave every tail through at least 3 cm of stitches, trim, and press the toy into a sitting position.
The pastel lion is complete when the body sits level and the mane frames both eyes without covering the ears.
7 Technical Tips
- Stitch marker drift: if the marker shifts more than 2 stitches left by Head R12, add one plain sc before the next decrease round and move the marker. Uncorrected drift places the muzzle seam under one eye.
- Stuffing firmness: the head should resist a 1 cm finger press without stretching visible holes. Under-stuffing makes the mane pull the forehead backward.
- Invisible decrease gaps: use front-loop invisible decreases on Head R15–R20 and Body R13–R19. Standard decreases can leave six visible diagonal gaps around the face.
- Eye placement timing: lock the 15 mm eyes after Head R14 and before R18. Placing them after the opening narrows to 18 stitches can crack the washer or distort the face.
- Curl length control: keep each mane chain at 16 chains for the main ring. Longer curls cover the ears; shorter curls leave the cream head exposed above the cheeks.
- Pinning order: pin the ears before the mane, then pin the outer mane ring before the inner ring. Skipping that order causes the curls to crowd the ear rims.
- Tail weaving: weave each curl tail through at least 3 cm of nearby stitches. A shorter weave can work loose when the mane is handled during photography.
Conclusion
Use the final shaping check before posting the project: the mane should circle the head without covering the cream ear rims, and the body should sit level with the back paws angled forward. Record your hook, yarn brand, and eye size in the project notes, because small changes alter the face quickly on this lion amigurumi crochet pattern. Next, pin the finished sample beside a ruler and photograph the front, side, and tail view for your WordPress post. Share the finished cub on Pinterest and Instagram with #PastelLionAmigurumi. Which mane layout worked better for this lion: alternating pink and blue curls, or a pink front ring with blue curls behind?









