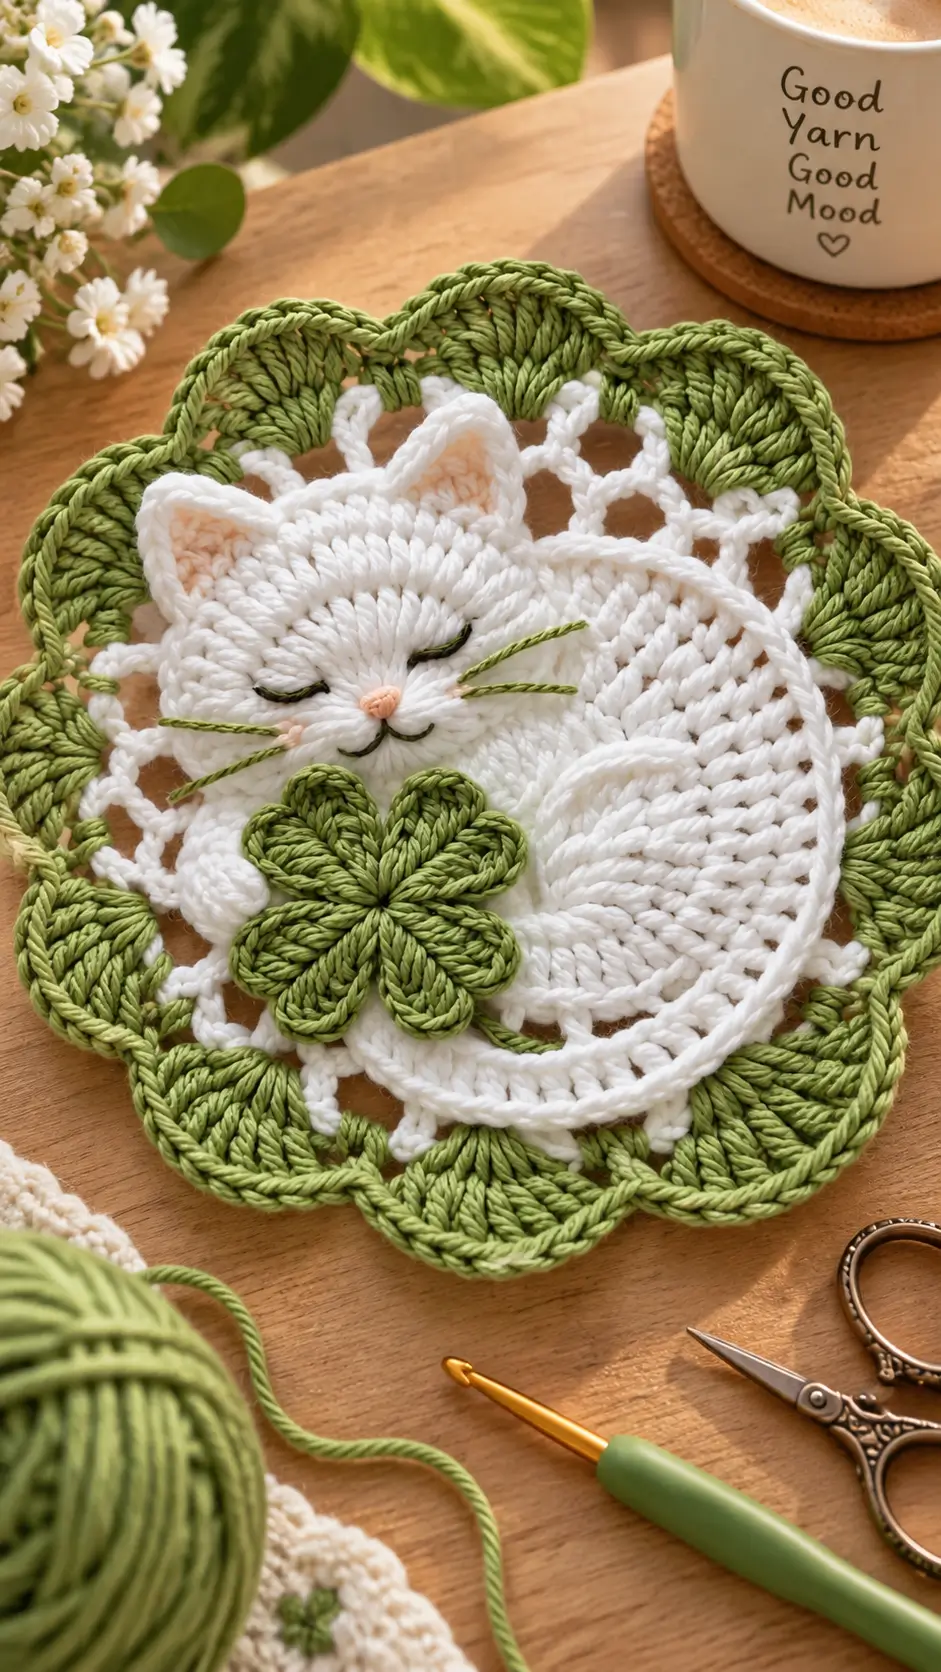
A sleeping cat hides its paws under the chest and wraps its tail around the body, so those overlaps define this motif. This sleeping cat crochet pattern uses DK cotton, a 3.5 mm hook and embroidered features to build an approximately 24 cm decorative piece. The project suits intermediate crochet skills. Its flat construction works particularly well as table décor, framed fiber art or a large sewn appliqué.
The Design: What Makes the Sleeping Cat Different
The cat is built around a 36-stitch circular body because a broad disc creates the curled sleeping posture without stuffing. A separate head overlaps the upper-left section, while two small paws interrupt the lower outline so the animal does not read as a plain circle. The tail needs its own raised curve: placing it over the body produces the characteristic tucked-cat silhouette seen in a sleeping cat appliqué.
The botanical surround uses open chain spaces between the animal and outer leaves. That negative space keeps the crochet cat doily from becoming a solid mat.
A frequent construction mistake is centering the head directly above the body. Sleeping cats generally read more clearly when the head is offset and the tail closes the opposite side of the composition.
Project Info at a Glance
| Skill Level | Time | Finished Size | Hook | Best For |
|---|---|---|---|---|
| Intermediate | 4–6 hours | Approx. 24 cm diameter | 3.5 mm | Table décor, wall art, large appliqué |
The 24 cm measurement is the target size for this photo-inspired version. Actual finished dimensions depend on yarn, hook size and individual tension.
Materials and Tools
Yarn
- White — DK cotton — approximately 35 g
- Olive green — DK cotton — approximately 20 g
- Peach — DK cotton or embroidery thread — less than 1 g
- Dark olive or black — embroidery thread — less than 1 g
Tools
- 3.5 mm crochet hook
- Tapestry needle
- Scissors
- Stitch markers
- Rust-resistant blocking pins
- Blocking mat
No safety eyes are required. The closed eyes are embroidered, which matches the sleeping expression shown in the design.
Abbreviations
- MR — magic ring
- sc — single crochet
- inc — 2 sc in one stitch
- dec — single crochet decrease
- sl st — slip stitch
- ch — chain
- hdc — half double crochet
- dc — double crochet
- tr — treble crochet
- BLO — back loop only
- st/sts — stitch/stitches
For an invisible decrease, insert the hook through the front loops of the next two stitches, yarn over, pull through both front loops, then complete the single crochet.
Sleeping Cat Crochet Pattern — Step by Step
Work the circular sections in a continuous spiral unless a joined round is specifically indicated. Place a stitch marker in the first stitch of each round.
Cat Body
Yarn: white
R1: 6 sc in MR (6)
R2: inc ×6 (12)
R3: (1 sc, inc) ×6 (18)
R4: (2 sc, inc) ×6 (24)
R5: (3 sc, inc) ×6 (30)
R6: (4 sc, inc) ×6 (36)
R7: 36 sc (36)
R8: 36 sc (36)
Slip stitch into the next stitch. The two plateau rounds add visual mass without sharply increasing the diameter.
Fasten off. Leave approximately 25 cm of yarn for assembly.
Head
Yarn: white
R1: 6 sc in MR (6)
R2: inc ×6 (12)
R3: (1 sc, inc) ×6 (18)
R4: (2 sc, inc) ×6 (24)
R5: 24 sc (24)
Do not stuff. Flatten the circle slightly into an oval during assembly.
Fasten off. Leave a 30 cm sewing tail.
Front Paws — Make 2
Yarn: white
R1: 6 sc in MR (6)
R2: inc ×6 (12)
R3: 12 sc (12)
Flatten each paw rather than stuffing it. Sew only the lower section to the body so the upper rounded edge remains visible.
Fasten off. Leave a 15 cm sewing tail on each paw.
Back Legs
No separate back legs are required. The circular body represents the cat’s tucked hindquarters. Adding independent back legs would alter the curled sleeping silhouette.
Ears — Make 2
Yarn: white
Ch 5.
Row 1: sc in second ch from hook and next 3 ch (4)
Row 2: ch 1, turn, dec, 2 sc (3)
Row 3: ch 1, turn, dec, 1 sc (2)
Row 4: ch 1, turn, dec (1)
Fasten off. Leave a 15 cm sewing tail.
Place both ears behind the head so approximately two-thirds of each triangle remains visible.
Curled Tail
Yarn: white
Ch 38.
Row 1: Starting in second ch from hook, 37 sc (37)
Row 2: ch 1, turn, 8 sc, 8 hdc, 13 dc, 8 hdc (37)
Row 3: ch 1, turn, 10 sc, 17 hdc, 10 sc (37)
Fasten off. Leave approximately 35 cm for sewing.
Curve the strip around the lower and right edge of the cat. Pin the tail before sewing. Its upper end should taper visually toward the right side of the body while the lower curve passes beneath the paws.
Cheek Patches — Make 2
Yarn: pale peach
R1: 6 sc in MR (6)
Slip stitch to the first stitch and fasten off, leaving a 10 cm tail.
Keep the circles small and flat. For a subtler result, replace the crocheted circles with two short peach embroidery stitches.
Nose
Yarn: peach embroidery thread
Create a small triangular satin-stitch nose approximately 5–6 mm wide. Bring the working thread downward from the center of the triangle to form a short vertical line.
Closed Eyes and Mouth
Use dark olive or black embroidery thread. Each closed eye should span approximately 15–18 mm.
Position the inner ends of the eyes roughly 10–12 mm from the center of the nose. Work the mouth as two shallow curved stitches directly beneath the nose.
Add three whiskers on each side. Each whisker should measure approximately 25–35 mm.
Six-Petal Flower
Yarn: olive green
R1: 6 sc in MR (6)
For the first petal, ch 8. Starting in the second chain from the hook, work 1 sc, 1 hdc, 3 dc, 1 hdc, 1 sc. Sl st into the same base stitch.
Repeat this petal sequence in each of the remaining five stitches to create 6 petals total.
Fasten off. Leave approximately 25 cm for sewing.
Position the flower across the lower-left intersection of the cat’s body and tail. Sew through the central ring and inner sections of the petals while leaving the outer tips free.
Openwork Foundation Ring
Yarn: white
Join the white yarn behind the assembled cat body.
R1: Work approximately 48 evenly distributed sc around the outside of the composition (48).
R2: (ch 5, skip 2 sts, sl st in next 2 sts) ×12.
Keep the chain loops outside the cat silhouette rather than allowing them to cover the ears, head, paws or tail.
Botanical Outer Border
Yarn: olive green
Join the olive green yarn in one white ch-5 loop.
R1: Work 5 sc into each ch-5 space around (60).
For each outer leaf or scallop, work across five base stitches:
R2: ch 3, 2 dc in first st, 3 tr in second st, 4 tr in third st, 3 tr in fourth st, 2 dc in fifth st, ch 3, sl st at base.
Repeat the sequence around the complete border.
For stronger leaf definition, surface crochet a line of slip stitches from the base toward the center of each green scallop.
Fasten off. Weave the green yarn end through several dense stitches on the reverse.
Assembly
- Block the white body into a flat circle measuring approximately 10–11 cm before attaching the smaller components.
- Position the head over the upper-left quadrant of the body. Overlap the two sections by approximately 20–25 mm and sew around the concealed edge.
- Place both ears behind the head with approximately 25–30 mm between their inner bases. Sew securely from the reverse.
- Embroider the closed eyes, peach nose, mouth and whiskers before attaching the botanical frame.
- Attach both front paws to the lower-left portion of the body. Slightly overlap their inner edges.
- Curve the tail from the lower body clockwise around the right side. Pin it at intervals of approximately 20–25 mm before sewing.
- Sew the six-petal green flower over the lower-left area where the paws, body and tail visually meet.
- Add the white openwork loops around the completed cat. Keep their spacing consistent around the ears and tail.
- Crochet the olive botanical border into the openwork foundation. Block each scallop separately to establish the outer shape.
- Weave every yarn tail through at least 3 cm of dense crochet on the reverse. Trim the ends and complete the final blocking.
The completed piece forms a flat sleeping cat surrounded by a contrasting botanical crochet frame.
7 Technical Tips for a Cleaner Sleeping Cat
- Prevent an uneven body circle: place a stitch marker in the first stitch of every round. Missing one increase between R2 and R6 shifts the increase points and can distort the 36-stitch body.
- Correct body cupping: the body should lie flat at 36 stitches. If it forms a shallow bowl after blocking, change from a 3.5 mm hook to a hook approximately 0.5 mm larger.
- Avoid visible decrease bars: work decreases through the front loops when modifying shaped components. A conventional decrease can leave a noticeable horizontal bar on the visible surface.
- Place the face before the border: embroider the eyes after pinning the head but before constructing the botanical frame. Keep the inner eye endpoints approximately 10–12 mm from the nose centerline.
- Control loose cotton stitches: open spaces around the head and paws indicate that the hook is too large for the selected DK cotton. Move from 3.5 mm to 3.0 mm rather than pulling the yarn excessively tight.
- Stop the tail from distorting: pin the curved tail at approximately 20–25 mm intervals. Sewing continuously without pinning can shorten its inner edge and pull the circular body out of shape.
- Keep woven ends invisible: weave each yarn tail through at least 3 cm of dense crochet. Avoid hiding ends inside the open chain sections because trimmed yarn can remain visible through the gaps.
Finishing and Blocking
Lay the finished crochet piece on a blocking mat with the reverse facing downward. Begin by pinning the cat body so the central section remains flat, then position the head and tail without stretching their edges.
Pin each green outer scallop individually. Measure from the center of the cat to several points around the border so one side does not become wider than the other.
For cotton yarn, lightly dampen the finished piece and allow it to dry completely while pinned. Do not remove the pins while any section remains damp because the openwork border can contract.
The target finished diameter is approximately 24 cm, although yarn thickness, hook size and personal tension can change the measurement.
How to Adjust the Finished Size
For a smaller motif, use a lighter cotton yarn with a correspondingly smaller hook while retaining the same stitch counts. This preserves the proportions between the head, body, paws and botanical frame.
For a larger decorative piece, changing yarn weight is preferable to adding uncontrolled increases to individual components. Enlarging only the body can make the head appear undersized, while enlarging the outer border without changing the cat creates excessive negative space.
If you change the yarn weight, crochet the body first and use its finished diameter as the reference measurement for every remaining component.
Conclusion
The final construction depends on three measurements: a flat 36-stitch body, an offset head and a tail pinned closely around the outer curve. Block those elements before adding the openwork and green scallops because correcting distortion becomes harder once the botanical frame is attached. Your next step is to crochet the white body through R8 and measure it before making the remaining components. Save the finished sleeping cat crochet pattern to Pinterest and share your completed version on Instagram with #SleepingCatFloralDoily. When you compare the finished motif with the reference design, does the curled white tail remain clearly distinguishable from the cat’s circular body?









