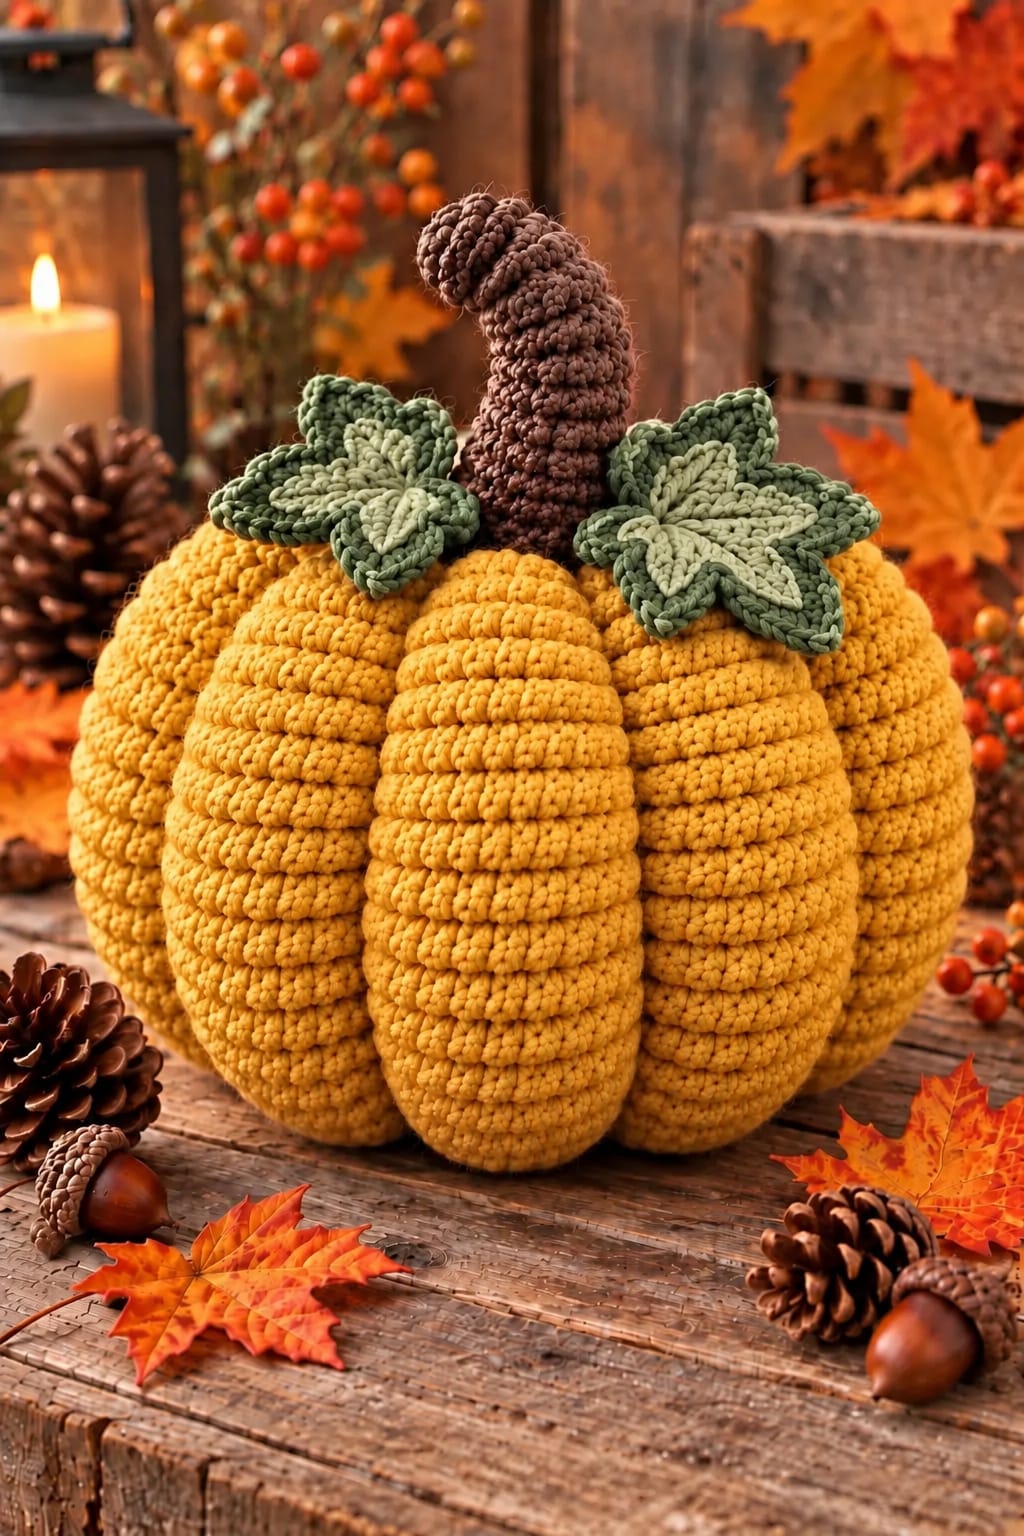
A pumpkin needs deep vertical furrows before its round shape starts reading like a harvested gourd rather than a stuffed ball. This large crochet pumpkin pattern builds those ribs directly into eight separate golden sections, then finishes the top with a curved brown stem and two layered green leaves. Use chunky yarn with a 5 mm hook for an approximately 25–30 cm decorative pumpkin. The construction suits intermediate crochet skills and produces substantial autumn table décor.
The Design: What Makes This Crochet Pumpkin Different
The photograph shows unusually pronounced vertical ribs. Instead of relying only on surface sculpting, this version builds eight raised pumpkin sections individually. Each segment has horizontal ridges, while the joined edges create the deep channels running from top to bottom.
A tall curved stem changes the proportions significantly. It needs a firm stuffed base but a bendable upper section so it can lean without pulling the pumpkin out of shape.
Two large leaves cover part of the upper join. Their two-tone construction creates the strong veins visible in the reference design.
The main failure point is overstuffing. Too much fiberfill pushes the sections apart and erases the deep grooves that define a ribbed crochet pumpkin.
Project Information
| Skill Level | Time | Finished Size | Hook | Construction |
|---|---|---|---|---|
| Intermediate | 6–9 hours | Approx. 25–30 cm wide | 5 mm | 8 joined ribbed sections |
The finished size is a target for this photo-inspired version. Exact dimensions depend on yarn thickness, tension and stuffing density.
Materials and Tools
Yarn
- Golden mustard — chunky/#5 yarn — approximately 250–300 g
- Dark sage green — chunky/#5 yarn — approximately 40 g
- Light sage green — chunky/#5 yarn — approximately 25 g
- Dark brown — chunky/#5 yarn — approximately 40–50 g
The quantities above are working estimates for this oversized photo-inspired pumpkin. A smaller published DK pumpkin measuring approximately 11.4 cm wide uses about 50 g for the pumpkin body, so substantially more yarn is required for this large version.
Tools
- 5 mm crochet hook
- Approximately 300–400 g polyester fiberfill
- Long tapestry or doll needle
- Stitch markers
- Scissors
- Blocking pins for leaves
- Optional flexible craft wire for the stem
No safety eyes are required. The photographed pumpkin is a decorative botanical design without a face.
Abbreviations
- MR — magic ring
- ch — chain
- sc — single crochet
- hdc — half double crochet
- dc — double crochet
- tr — treble crochet
- inc — 2 stitches in one stitch
- dec — decrease
- sl st — slip stitch
- BLO — back loop only
- FLO — front loop only
- st/sts — stitch/stitches
For an invisible decrease, insert the hook through the front loops of the next two stitches, yarn over and pull through both front loops before completing the single crochet.
Large Crochet Pumpkin Pattern — Step by Step
The pumpkin is assembled from eight matching ribbed panels. Make all eight before joining them so their dimensions can be compared.
Pumpkin Rib Panels — Make 8
Yarn: golden mustard.
Ch 31.
Row 1: Starting in second ch from hook, 30 hdc (30)
Row 2: Ch 1, turn, 30 hdc BLO (30)
Row 3: Ch 1, turn, 30 hdc BLO (30)
Row 4: Ch 1, turn, 30 hdc BLO (30)
Row 5: Ch 1, turn, 30 hdc BLO (30)
Row 6: Ch 1, turn, 30 hdc BLO (30)
Row 7: Ch 1, turn, 30 hdc BLO (30)
Row 8: Ch 1, turn, 30 hdc BLO (30)
Row 9: Ch 1, turn, 30 hdc BLO (30)
Row 10: Ch 1, turn, 30 hdc BLO (30)
Fasten off with a 40 cm sewing tail.
The BLO rows form the horizontal ridges visible across each pumpkin section. All eight panels should have matching row counts and nearly identical dimensions before assembly.
Shaping Each Pumpkin Panel
Thread the long sewing tail through the short edge at one end of a panel. Pass the needle through approximately every second row end.
Pull firmly to gather the edge. Do not close it completely yet.
Repeat at the opposite end using a separate length of matching yarn.
The panel should now narrow at both ends while remaining broad through the center.
Repeat this preparation for all eight sections.
Joining the Pumpkin Sections
Place two panels together with their long edges aligned.
Whip stitch through the outer loops from top to bottom. Pull the seam firmly enough to create a recessed channel but not so tightly that the panels buckle.
Add the third panel in the same manner.
Continue until all eight sections form a circular pumpkin shell.
Leave the final long seam partially open for stuffing.
Stuffing the Pumpkin
Add polyester fiberfill in small amounts.
Push stuffing into the lower and upper curves first, then fill the center. The pumpkin should remain compressible enough for the seams to stay recessed.
Check the eight grooves after every few handfuls of fiberfill.
If the channels begin disappearing, remove some stuffing rather than tightening the seams excessively.
Once the shape is even, close the remaining long seam.
Closing the Bottom
Thread a long strand of golden yarn through the gathered lower edges of all eight panels.
Pull gradually, moving around the opening several times rather than tightening one section completely.
When the opening measures approximately 2–3 cm, add any final stuffing required at the base.
Pull the opening closed.
Secure with several stitches across opposite sides of the hole.
Fasten off and weave the tail deeply into the pumpkin.
Closing the Top
Repeat the gathering process around the upper opening.
Leave an opening approximately 3 cm wide for the stem.
Do not close this hole completely. The stem base will sit inside it and conceal the opening.
Optional Deep Sculpting
For stronger grooves, cut eight lengths of matching golden yarn approximately three times the pumpkin circumference.
Thread one length through a long doll needle.
Insert the needle through the bottom center and bring it out through the top center.
Run the yarn down one existing seam and return through the center of the pumpkin.
Pull until the groove deepens slightly.
Secure the yarn at the bottom.
Repeat only where necessary. The panel seams already create substantial segmentation, so excessive sculpting can compress the pumpkin vertically.
Brown Stem
Yarn: dark brown.
R1: 6 sc in MR (6)
R2: inc ×6 (12)
R3: (1 sc, inc) ×6 (18)
R4: 18 sc BLO (18)
R5: 18 sc (18)
R6: (4 sc, dec) ×3 (15)
R7: 15 sc (15)
R8: 15 sc (15)
R9: (3 sc, dec) ×3 (12)
R10: 12 sc (12)
R11: 12 sc (12)
R12: 12 sc (12)
R13: 12 sc (12)
R14: 12 sc (12)
R15: 12 sc (12)
R16: 12 sc (12)
R17: 12 sc (12)
R18: 12 sc (12)
Stuff the lower half firmly. Add progressively less stuffing toward the top so the stem can curve.
For a permanently bent stem, insert a protected length of flexible craft wire through the center before completing the stuffing. Fold both wire ends back on themselves so no sharp point touches the crochet fabric.
R19: (2 sc, dec) ×3 (9)
R20: 9 sc (9)
R21: (1 sc, dec) ×3 (6)
Fasten off. Close the final six stitches with a tapestry needle.
Bend the upper third gently to one side.
Large Two-Tone Pumpkin Leaves — Make 2
Yarn: light sage center with dark sage border.
Begin with light sage.
Ch 15.
Starting in the second chain from the hook:
1 sc, 1 hdc, 2 dc, 4 tr, 2 dc, 2 hdc, 2 sc.
Work 3 sc into the final chain.
Continue along the opposite side of the foundation chain:
2 sc, 2 hdc, 2 dc, 4 tr, 2 dc, 1 hdc, 1 sc.
Sl st to the first stitch.
Change to dark sage.
Dark Green Leaf Border
Ch 1.
Work 1 sc in the next 2 sts.
In the next stitch work (1 hdc, ch 2, 1 hdc) to form a point.
Work 1 sc in each of the next 3 sts.
Repeat the pointed sequence around the outer edge, spacing the points so each leaf develops approximately five pronounced lobes.
At the main leaf tip work (1 sc, ch 3, 1 sc).
Continue around the opposite side.
Sl st at the base.
Fasten off with a 30 cm sewing tail.
Raised Leaf Veins
Join dark sage at the base of one leaf.
Surface crochet slip stitches along the original foundation chain toward the point.
For each major lobe, work a short surface-crochet branch from the central vein toward the outer point.
Keep these stitches loose. Tight surface stitches will cause the leaf to fold inward.
Fasten off at the tip and weave the yarn along the reverse.
Optional Small Leaf
Yarn: sage green.
Ch 10.
Starting in the second chain:
1 sc, 1 hdc, 2 dc, 2 tr, 1 dc, 1 hdc, 1 sc.
Work 3 sc into the final chain.
Repeat the stitch sequence down the opposite side.
Sl st at the base.
Add a contrasting surface-slip-stitch vein if required.
Fasten off with a 20 cm sewing tail.
Assembly
- Arrange all eight golden panels and confirm that their length and width match before joining the pumpkin shell.
- Sew the panel edges together firmly, leaving the seams slightly recessed to establish the vertical pumpkin grooves.
- Stuff the pumpkin gradually and rotate it after every few handfuls of fiberfill to check that all eight sections remain balanced.
- Gather and close the bottom opening, then press the base against a flat surface to check stability.
- Gather the upper opening to approximately 3 cm while keeping enough space for the brown stem base.
- Add optional sculpting yarn through any groove that lacks sufficient definition, working from the bottom center to the top center.
- Insert the brown stem approximately 2–3 cm into the upper opening and sew around its base with brown yarn.
- Position the first large leaf so it overlaps the pumpkin top and partly covers the stem attachment seam.
- Place the second leaf on the opposite side at a slightly different angle, then stitch both leaves through their bases and central veins.
- Shape the curved stem, redistribute the stuffing if required and trim all woven yarn ends.
The completed pumpkin should stand independently with eight visible golden sections, a tall curved brown stem and two broad green leaves.
How to Create Deep Pumpkin Ribs
The ribs are the main structural feature of this design. A plain stuffed sphere with yarn wrapped around it can produce pumpkin grooves, but the photograph shows considerably more surface texture.
Here, the separate panels provide the first level of definition. BLO half double crochet creates smaller horizontal ridges across each panel, while the joining seams create the large vertical channels.
Stuffing controls the final depth. Firm stuffing is required around the lower third so the pumpkin can support itself, but the center should retain enough compression for the grooves to remain visible.
If one section projects farther than the others, massage the fiberfill away from that area before adding sculpting yarn. Uneven stuffing is usually easier to correct than an excessively tight seam.
How to Adjust the Pumpkin Size
For a smaller pumpkin, reduce the starting chain of every panel while keeping all eight sections identical. A shorter chain reduces the vertical dimension.
To change the circumference, adjust the number of BLO rows in each panel. Fewer rows make each segment narrower; additional rows increase the width.
Do not change only one or two panels. Even small discrepancies become obvious after the eighth section is attached.
For a significantly smaller pumpkin, switching to DK or worsted yarn is more predictable than heavily rewriting the panel dimensions.
7 Technical Tips for a Better Ribbed Pumpkin
- Weak vertical grooves: reduce the stuffing immediately beside each seam. Keeping approximately 1–2 cm around the channels slightly softer makes the eight sections remain visible.
- Uneven panel sizes: count exactly 30 stitches on every row and 10 rows on every panel. A single extra row repeated across one section creates a visibly wider pumpkin rib.
- Flat horizontal texture: insert the hook through the back loop only on Rows 2–10. Accidentally working through both loops interrupts the raised lines across the pumpkin surface.
- Bottom wobble: distribute stuffing around the lower perimeter before closing the center. Press the pumpkin onto a flat surface while the final opening is still accessible.
- Stem falling sideways: stuff the lowest 5–7 cm more firmly than the upper portion. The base needs enough resistance to support the curved section above it.
- Leaves curling inward: keep the surface-crochet veins loose. A central vein that is even 5–10 mm shorter than the leaf fabric can force the entire motif to cup.
- Sculpting yarn cutting into the fabric: tighten each groove gradually rather than pulling it to full depth in one movement. Stop when the seam is clearly recessed but before individual crochet stitches begin stretching apart.
Positioning the Stem and Leaves
The stem should not rise vertically from the exact visual center. Angle its upper section slightly so the silhouette resembles the curved stem in the reference design.
Position the leaves only after the stem is sewn securely. One leaf can sit slightly forward and left, while the second extends toward the opposite side.
Allow the leaves to overlap the golden body. Their purpose is partly decorative and partly structural: they conceal the gathered top and soften the transition between the broad pumpkin and narrow stem.
Sew each leaf at several points near its base. Leave the outer lobes unattached so they remain dimensional rather than lying completely flat against the pumpkin.
Choosing Yarn for a Large Crochet Pumpkin
Chunky yarn produces the scale and pronounced stitch texture seen in this version. A 5 mm hook should create a dense fabric that holds fiberfill without obvious gaps.
If stuffing shows between stitches, reduce the hook size by approximately 0.5 mm. Do not compensate by pulling every stitch excessively tight because that can make eight matching panels difficult to produce.
DK yarn creates a considerably smaller pumpkin using the same construction. Published pumpkin patterns demonstrate that DK yarn is well suited to decorative pumpkins, while worsted yarn is also widely used for larger versions.
Whichever yarn is selected, crochet one complete panel before making the remaining seven. Measure it and check the texture first. The other sections can then be matched to that sample.
Stuffing and Final Shaping
Fiberfill should be added in thin layers rather than large clumps. Separate each handful before inserting it so dense lumps do not develop behind individual panels.
Rotate the pumpkin frequently. View it from the top to compare the eight sections, then place it on a flat surface to check the lower profile.
The top can remain slightly depressed around the stem. That indentation strengthens the pumpkin silhouette and gives the leaves a natural attachment area.
Once the final seam has been closed, massage the stuffing through the crochet fabric. Move excess filling away from narrow ribs and into sections that appear flat.
Finishing the Crochet Pumpkin
Inspect every joining seam before trimming the final yarn tails. Each vertical channel should run continuously from the upper gathering point toward the base.
Weave golden tails through dense internal seams rather than across the exposed ridges. Brown yarn ends can be hidden inside the stuffed stem, while green tails should travel along the back of the leaf veins.
If the pumpkin is intended purely as indoor autumn décor, no additional stiffening is required. The stuffed body supplies the structure, while the leaf shape comes from stitch construction and careful positioning.
Conclusion
The defining feature of this large crochet pumpkin pattern is the combination of eight raised sections and deep recessed channels. Keep every golden panel identical, control the stuffing around the seams and secure the tall stem before positioning the leaves. Crochet one rib panel first and measure it before producing the remaining seven; that single check prevents most proportion problems later in the project. When the pumpkin is complete, save the finished version to Pinterest or share it on Instagram with #LargeRibbedCrochetPumpkin. For your version, will you keep the photographed golden mustard color or change the eight pumpkin ribs to a deeper burnt orange?









